Visual Classifier
Learn how to create and train a visual classifier model
Input: Images and videos
Output: Concepts
Visual classifier is a type of deep fine-tuned model that allows you to classify images and video frames into a set of concepts. It helps you answer the question "What" or "Who" is in your data.
The visual classifier model type also comes with various templates that give you the control to choose the specific architecture used by your neural network, as well as define a set of hyperparameters you can use to fine-tune the way your model learns.
Visual classifiers are commonly used for various computer vision tasks, such as:
- Image classification: Categorizing images into different concepts, such as "cat", "dog", "car", or "person".
- Object detection: Finding and identifying objects in images, such as faces, cars, or traffic signs.
- Scene recognition: Identifying the scene in an image, such as a beach, a forest, or a city.
- Video analysis: Tracking objects and events in videos.
You may choose a visual classifier model type in cases where:
- Accuracy and the ability to carefully target solutions take priority over speed and ease of use.
- You need a classification model to learn new features not recognized by the existing Clarifai models. In that case, you may need to "deep fine-tune" your custom model and integrate it directly within your workflows.
- You have a custom-tailored dataset, accurate labels, and the expertise and time to fine-tune models.
Example Use Case
A large retailer is looking to find and remove listings for illegal objects and substances across thousands of listings that include user-generated data. A classification model allows the retailer to quickly find listings that violate their community rules, and remove them from the site.
Via the UI
Let's demonstrate how to create and train a visual classifier model using the UI. We intend to create a model that can distinguish between images of cats and dogs.
Step 1: Prepare Training Data
Preparing data for fine-tuning ensures that the custom model learns effectively from the new task or domain, generalizes well to unseen data, and produces reliable predictions.
Ensure that you collect high-quality, well-prepared data that will help achieve optimized performance in your model.
You can prepare your data using your preferred spreadsheet software. Click here to download a CSV template you can use to prepare your data.
To illustrate how fine-tuning works, we'll prepare the following simple dataset consisting of images of dogs and cats. Note that for your model to perform well, you need to provide it with enough diverse data to learn meaningful patterns. Click here to learn how you can get images to enrich your dataset.
Sample Dataset
https://samples.clarifai.com/dog1.jpeg
https://samples.clarifai.com/dog2.jpeg
https://samples.clarifai.com/dog3.jpeg
https://samples.clarifai.com/dog2_tiny.jpeg
https://samples.clarifai.com/dog.tiff
https://samples.clarifai.com/cat1.jpeg
https://samples.clarifai.com/cat2.jpeg
https://samples.clarifai.com/cat3.jpeg
https://samples.clarifai.com/featured-models/blip-flying-cat.jpg
https://samples.clarifai.com/featured-models/social-media-cat-laying-down.jpg
Step 2: Create an App
Click here to learn how to create an application on the Clarifai portal.
When creating the application, go with the default Image/Video option as the primary input type. And in the collapsible Advanced Settings field, also go with the default Universal as the base workflow.
Step 3: Add and Annotate Inputs
Select the Inputs option on your app’s collapsible left sidebar. Next, use the inputs uploader pop-up window to upload the images of dogs you prepared to a dataset within your application.
Also, label the images with the "dog" concept.
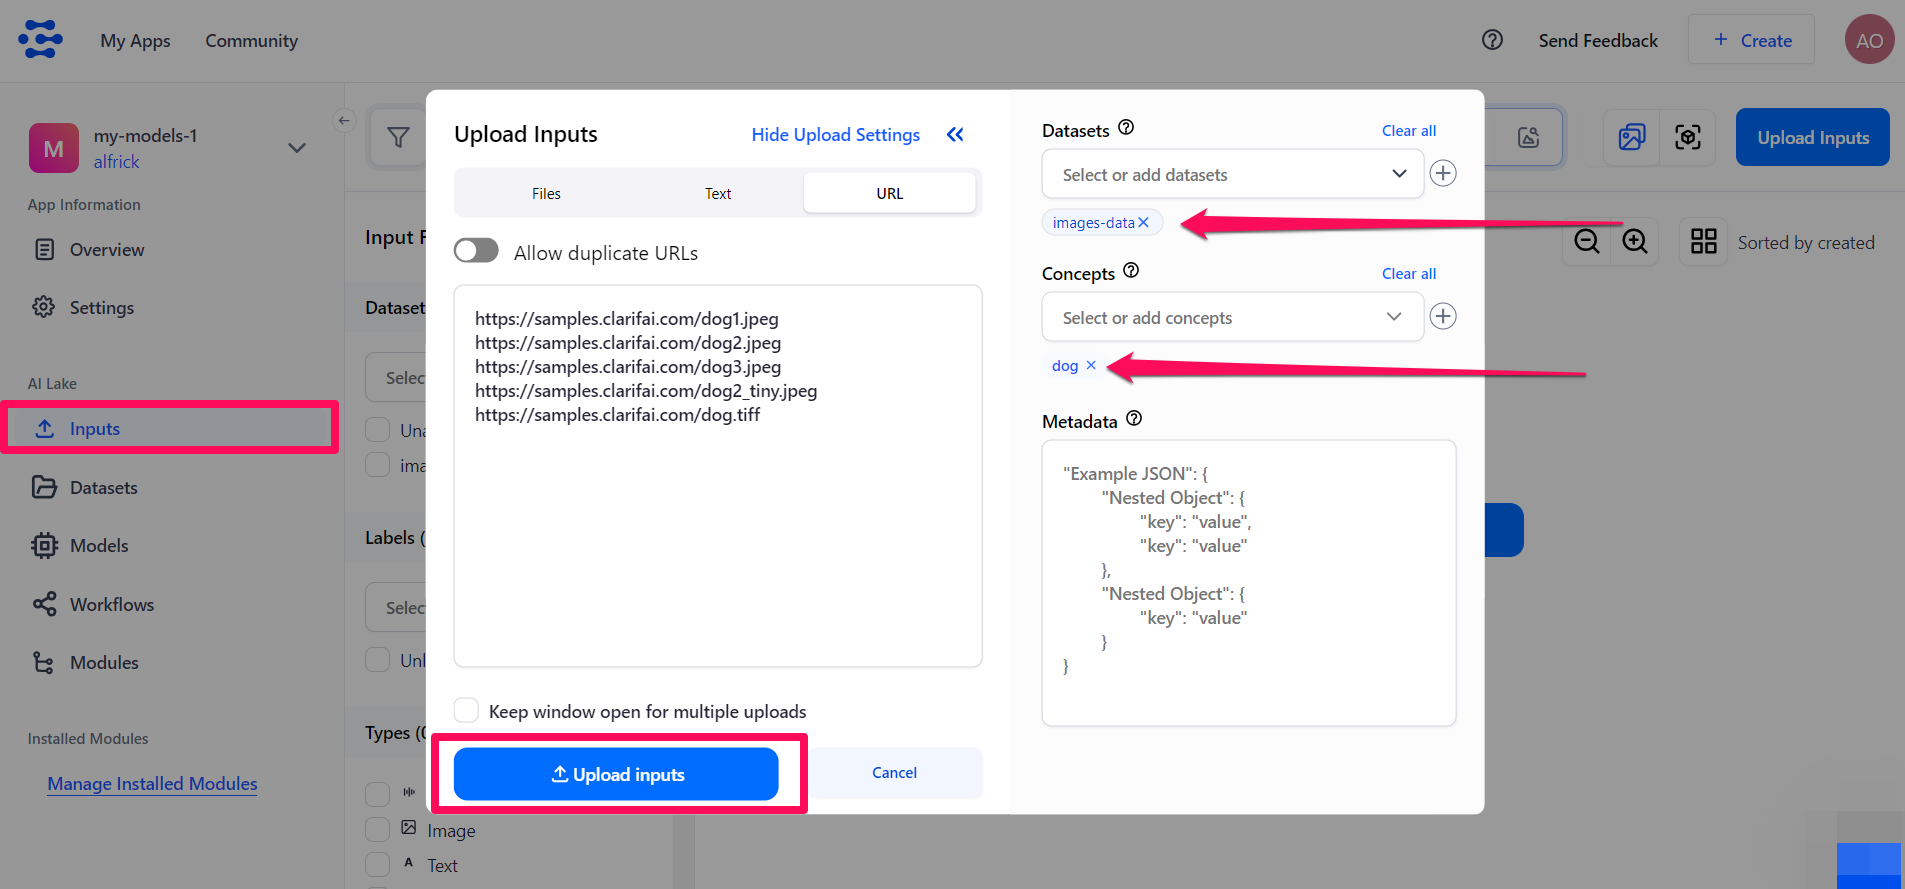
Click the Upload inputs button to add the annotated images of dogs to your app.
Similarly, use the inputs uploader pop-up window to upload the images of cats you prepared to the same dataset.
Also, label the images with the "cat" concept.

Click the Upload inputs button to add the annotated images of cats to your app.
Step 4: Choose a Model Type
Select the Models option on your app’s collapsible left sidebar.
Click the Add Model button on the upper-right corner of the page. On the window that pops up, select the Build a Custom Model option and click the Continue button.
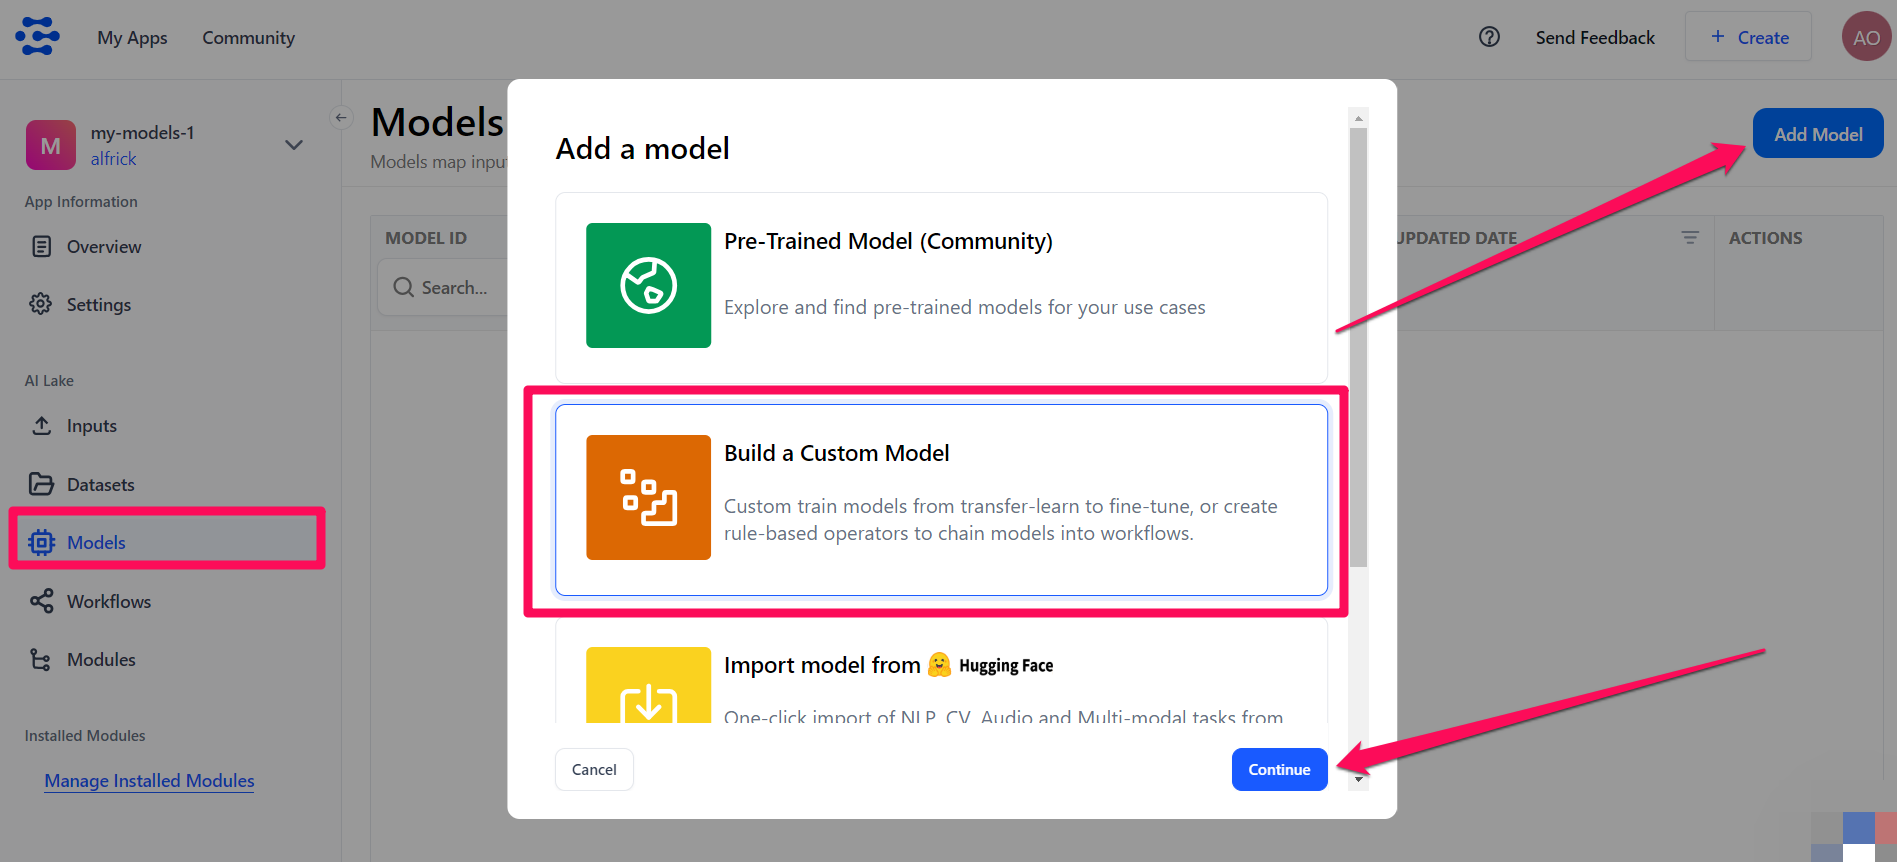
You’ll be redirected to a page where you can choose the type of model you want to create and fine-tune.
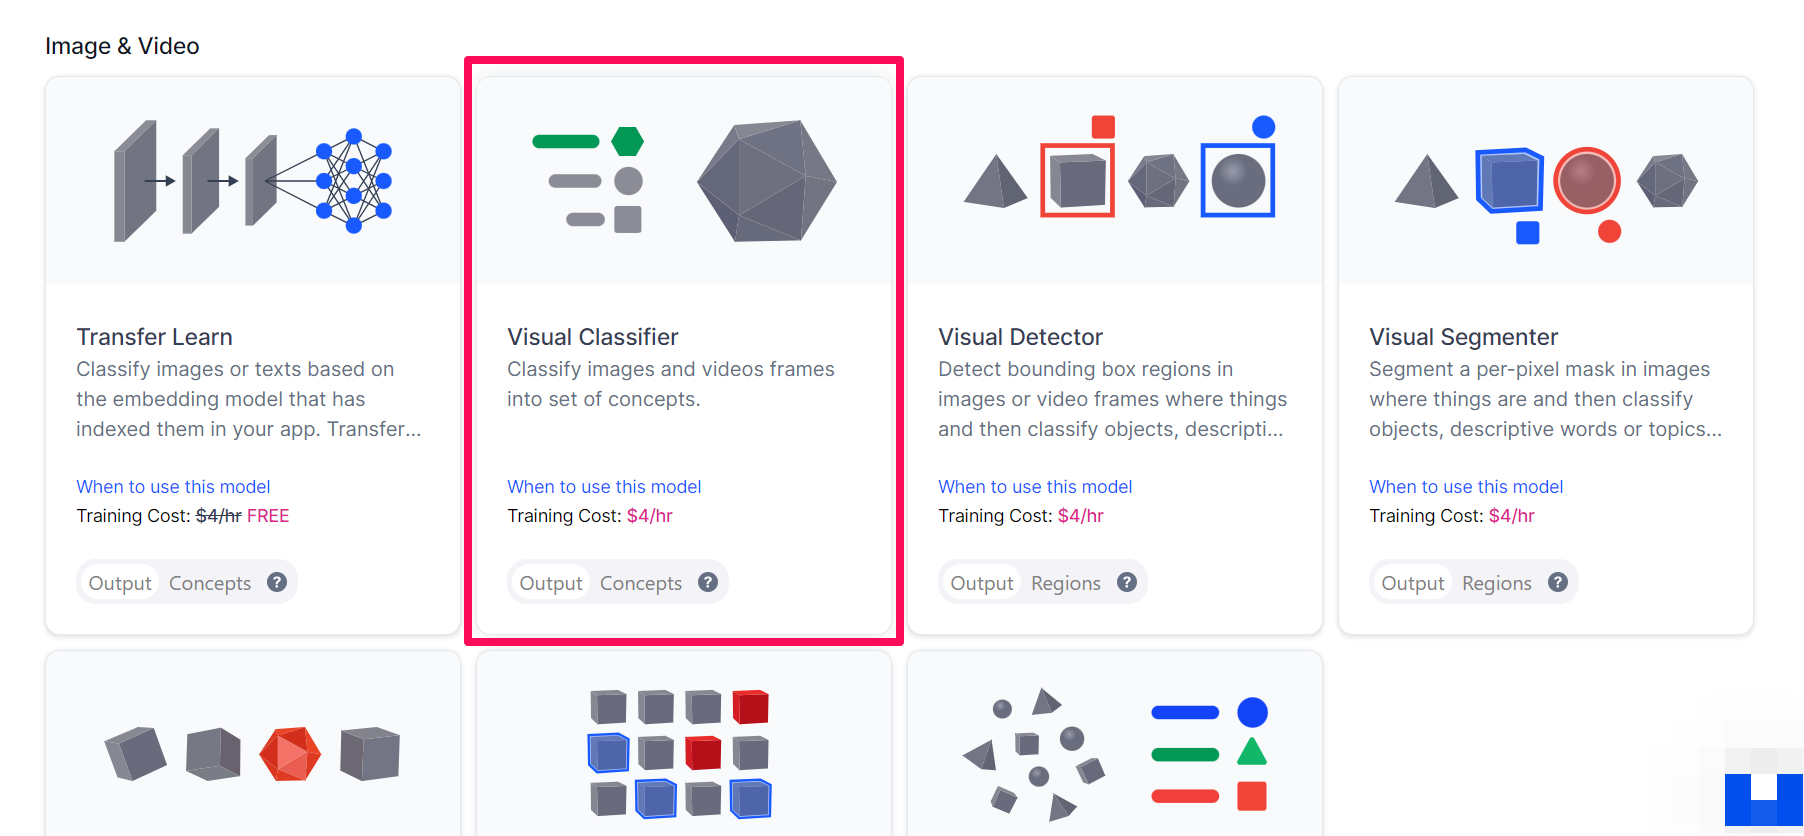
Select the Visual Classifier option.
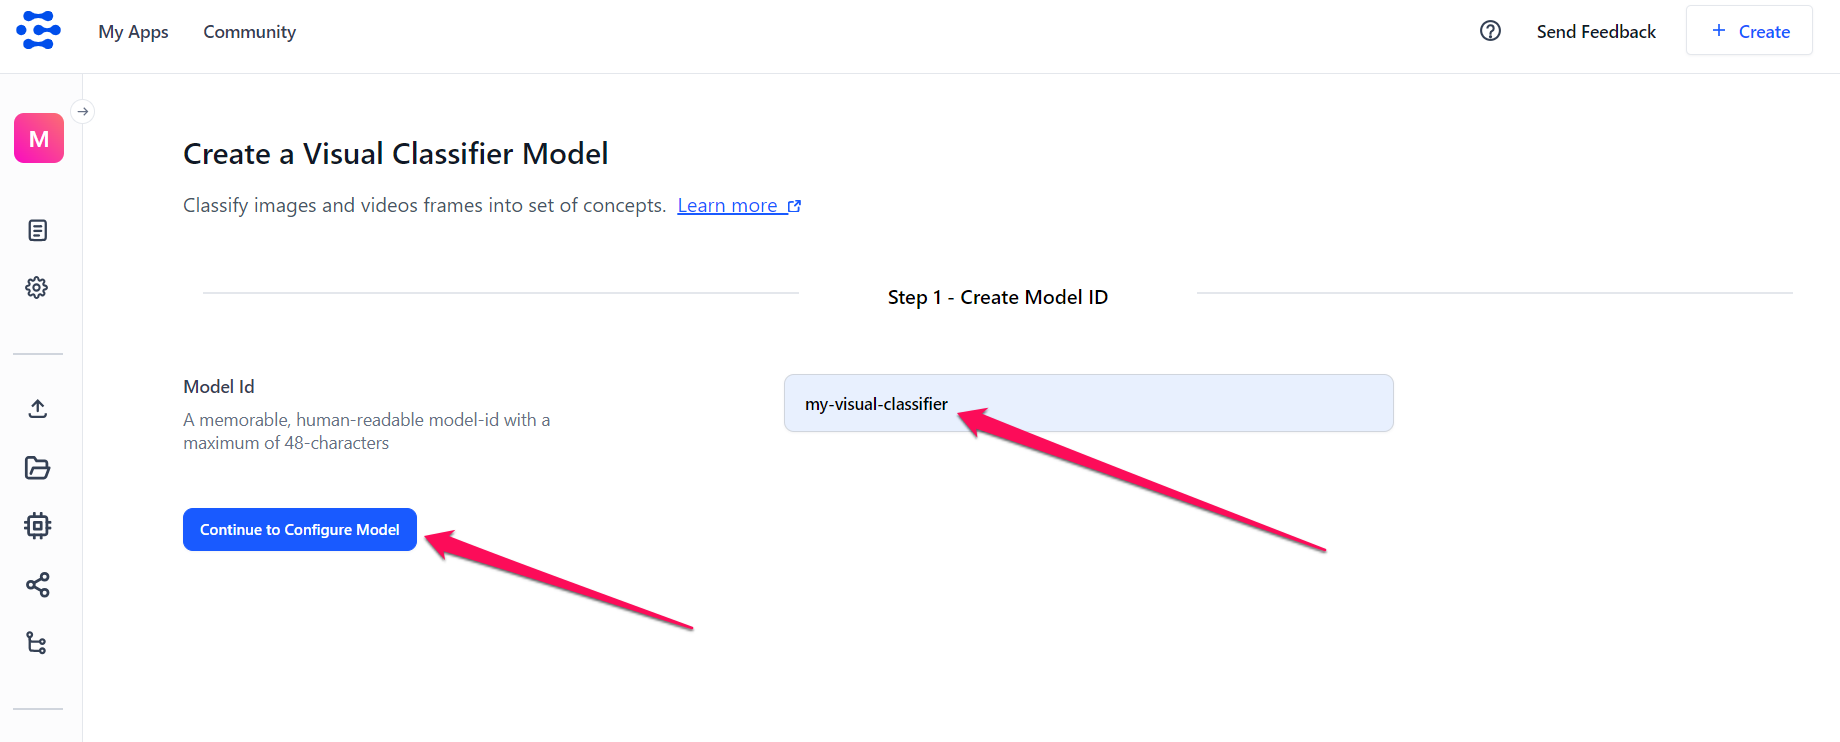
Step 5: Create the Model
The ensuing page allows you to create and fine-tune a visual classifier model that categorizes images into a set of predefined concepts.
Provide a unique ID and click the Continue to Configure model button to create your model.
After creating the model, set it up for training.
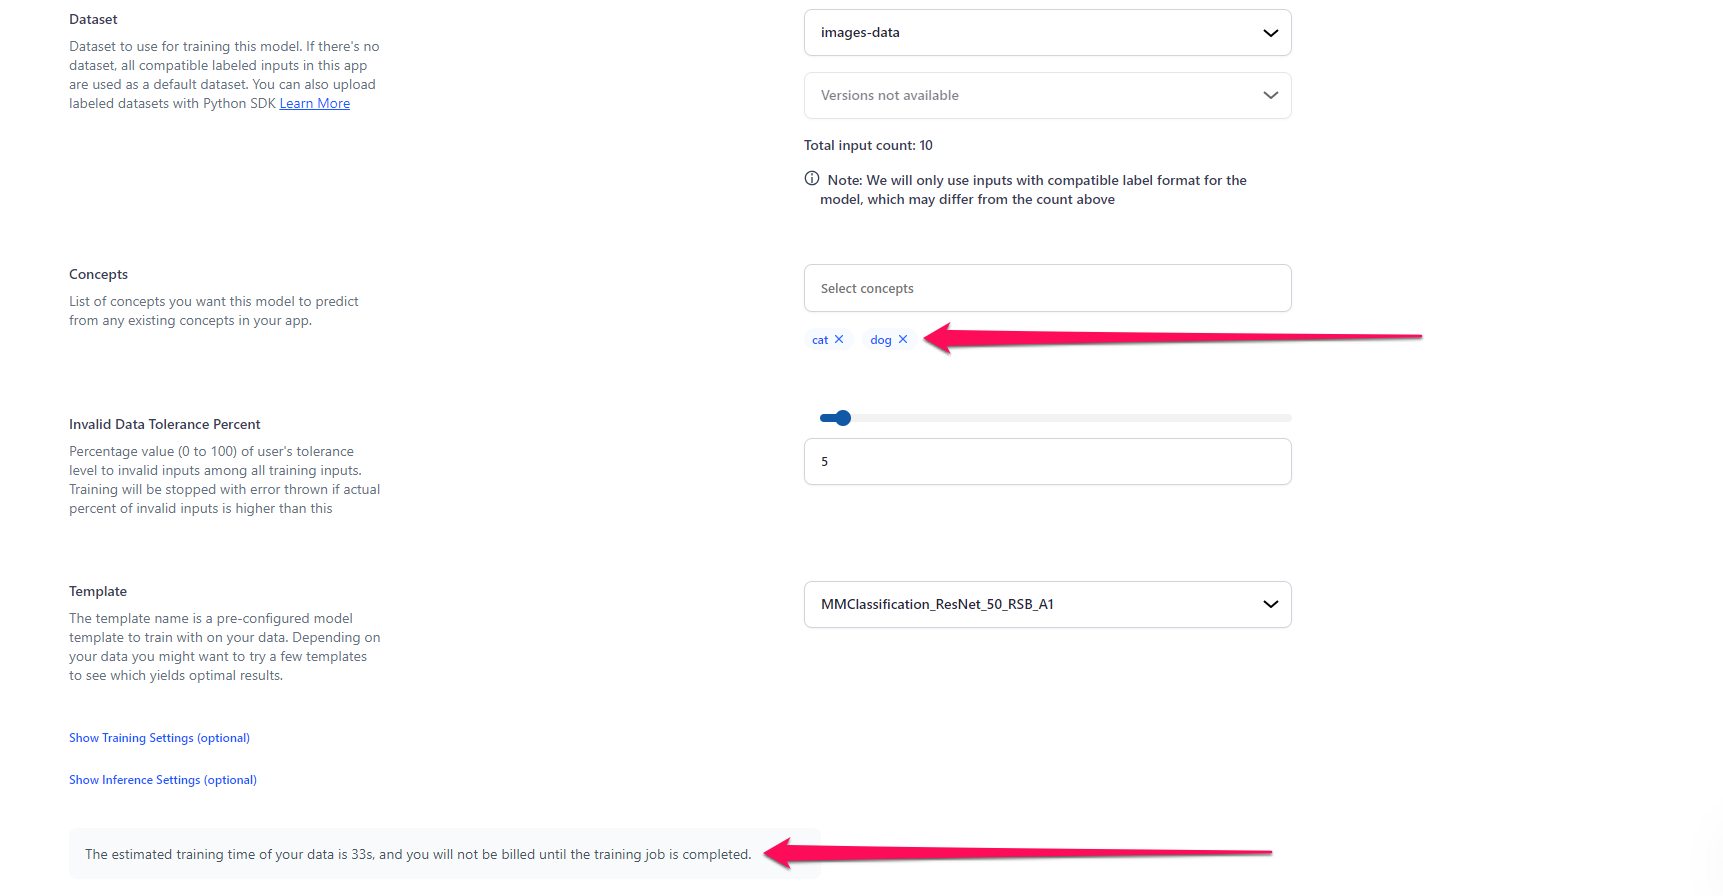
- Dataset — Select the dataset you previously created that has the images of the dogs and cats. You can also select a specific version for it.
- Concepts — Select the list of concepts you want the model to predict from the existing concepts in your app. For this example, let's select "cat" and "dog."
- Invalid Data Tolerance Percent — Optionally, you can set a tolerance threshold (0 to 100) for the percentage of invalid inputs during training, and if this threshold is exceeded, training is stopped with an error.
- Template — Select a pre-configured model template you want to use to fine-tune your model. When you choose a deep training template, you will see the hyperparameters that are available within that template populated with default values. You can adjust these values as desired. For this example, we’ll go with the recommended template:
MMClassification_ResNet_50_RSB_A1. Click here to learn more about the visual classification templates.
Notice that the estimated duration for the training process is displayed for you. This Training Time Estimator feature offers transparency in expected training costs.
Step 6: Train the Model
After configuring the training settings, click the Train Model button to initiate training your model.
You'll be redirected to the individual page of your model.
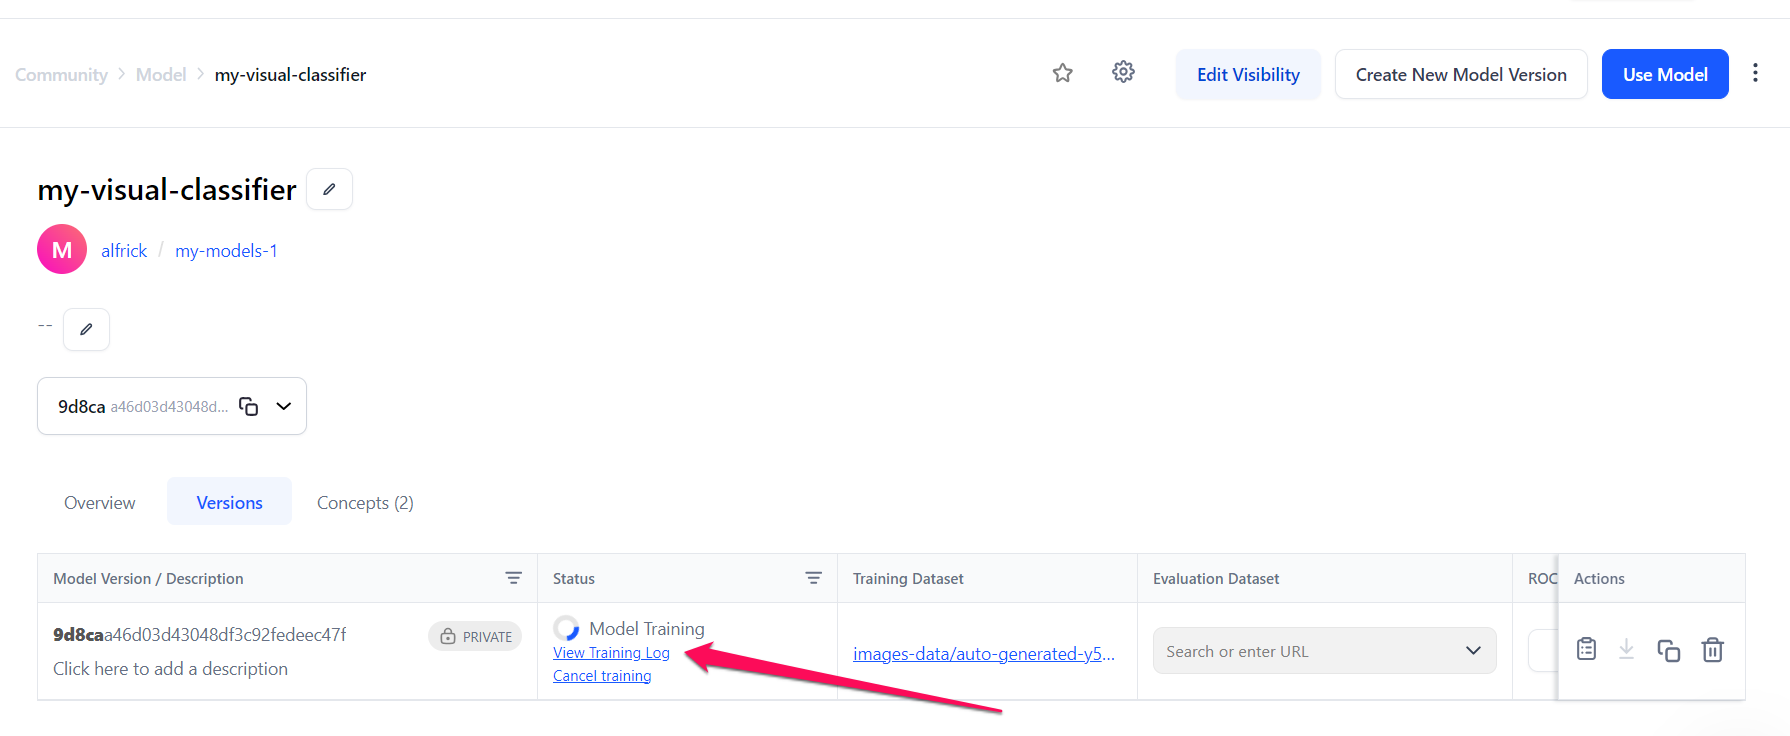
If you check the model's versions table, you’ll notice that the model is still being trained.
Many hours may be required to deep train models with large numbers of inputs and complex taxonomies. You can cancel a deep fine-tuning job at any time by clicking the Cancel training button.
Deep fine-tuning is billed at an hourly rate, and for canceled jobs, you will be charged for the time you've used to train your model. You can learn more about deep fine-tuning pricing here.
You can check the training progress by clicking the View Training Log button. If you click the button, a small sidebar will appear with details of the training exercise. You can also download the training log data by clicking the download button.

Step 7: Use the Model
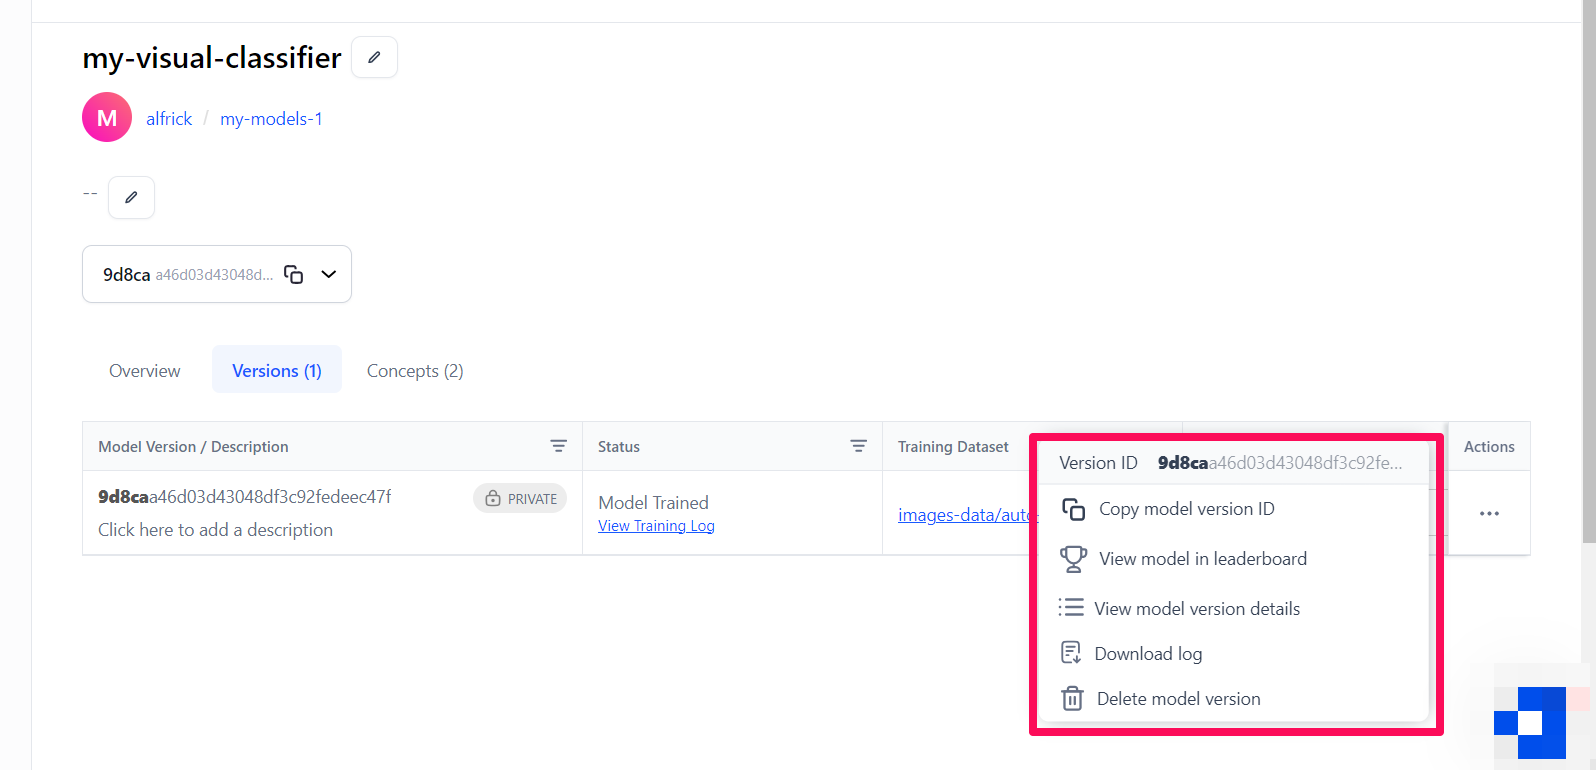
After the model has been trained, the status will change to Model Trained.
In the Actions column, you can carry out the following:
- Copy the model version ID
- View the model in the leaderboard
- View the model version details
- Download the training log data
- Delete the model version
Once you've created and trained your new model, you can put it to work. It will be ready to be evaluated, combined with other models and agent operators in a workflow, or used to serve inference requests as it is.
That's it!
Via the API
Let's demonstrate how to create and train a visual classifier model using our API.
Before using the Python SDK, Node.js SDK, or any of our gRPC clients, ensure they are properly installed on your machine. Refer to their respective installation guides for instructions on how to install and initialize them.
Step 1: App Creation
Let's start by creating an app.
- Python SDK
from clarifai.client.user import User
#replace your "user_id"
client = User(user_id="user_id")
app = client.create_app(app_id="demo_train", base_workflow="Universal")
Step 2: Dataset Upload
Next, let’s upload the dataset that will be used to train the model to the app.
You can find the dataset we used here.
- Python SDK
#importing load_module_dataloader for calling the dataloader object in dataset.py in the local data folder
from clarifai.datasets.upload.utils import load_module_dataloader


# Construct the path to the dataset folder
module_path = os.path.join(os.getcwd().split('/models/model_train')[0], 'datasets/upload/image_classification/food-101')

# Load the dataloader module using the provided function from your module
food101_dataloader = load_module_dataloader(module_path)

# Create a Clarifai dataset with the specified dataset_id ("image_dataset")
dataset = app.create_dataset(dataset_id="image_dataset")

# Upload the dataset using the provided dataloader and get the upload status
dataset.upload_dataset(dataloader=food101_dataloader, get_upload_status=True)
Step 3: Model Creation
Let's list all the available trainable model types in the Clarifai platform.
- Python SDK
print(app.list_trainable_model_types())
Output
['visual-classifier',
 'visual-detector',
 'visual-segmenter',
 'visual-anomaly-heatmap',
 'visual-embedder',
 'clusterer',
 'text-classifier',
 'embedding-classifier',
 'text-to-text']
Next, let's select the visual-classifier model type and use it to create a model.
- Python SDK
- Python (gRPC)
- JavaScript (REST)
- Node.js (gRPC)
- Java (gRPC)
- PHP (gRPC)
- cURL
MODEL_ID = "model_classifier"
MODEL_TYPE_ID = "visual-classifier"
# Create a model by passing the model name and model type as parameter
model = app.create_model(model_id=MODEL_ID, model_type_id=MODEL_TYPE_ID)
##########################################################################################
# In this section, we set the user authentication, app ID, model ID, and model type ID.
# Change these strings to run your own example.
#########################################################################################

USER_ID = 'YOUR_USER_ID_HERE'
# Your PAT (Personal Access Token) can be found in the Account's Security section
PAT = 'YOUR_PAT_HERE'
APP_ID = 'YOUR_APP_ID_HERE'
# Change these to create your own model
MODEL_ID = 'petsID'
MODEL_TYPE_ID = 'visual-classifier'

##########################################################################
# YOU DO NOT NEED TO CHANGE ANYTHING BELOW THIS LINE TO RUN THIS EXAMPLE
##########################################################################

from clarifai_grpc.channel.clarifai_channel import ClarifaiChannel
from clarifai_grpc.grpc.api import resources_pb2, service_pb2, service_pb2_grpc
from clarifai_grpc.grpc.api.status import status_code_pb2

channel = ClarifaiChannel.get_grpc_channel()
stub = service_pb2_grpc.V2Stub(channel)

metadata = (('authorization', 'Key ' + PAT),)

userDataObject = resources_pb2.UserAppIDSet(user_id=USER_ID, app_id=APP_ID)

post_models_response = stub.PostModels(
    service_pb2.PostModelsRequest(
        user_app_id=userDataObject,
        models=[
            resources_pb2.Model(
                id=MODEL_ID,
                model_type_id=MODEL_TYPE_ID
            )
        ]
    ),
    metadata=metadata
)

if post_models_response.status.code != status_code_pb2.SUCCESS:
    print(post_models_response.status)
    raise Exception("Post models failed, status: " + post_models_response.status.description)
<!--index.html file-->

<script>
    ///////////////////////////////////////////////////////////////////////////////////////////
    // In this section, we set the user authentication, app ID, model ID, and model type ID.
    // Change these strings to run your own example.
    //////////////////////////////////////////////////////////////////////////////////////////

    const USER_ID = 'YOUR_USER_ID_HERE';
    // Your PAT (Personal Access Token) can be found in the Account's Security section
    const PAT = 'YOUR_PAT_HERE';
    const APP_ID = 'YOUR_APP_ID_HERE';
    // Change these to create your own model
    const MODEL_ID = 'petsID';
    const MODEL_TYPE_ID = 'visual-classifier';

    ///////////////////////////////////////////////////////////////////////////////////
    // YOU DO NOT NEED TO CHANGE ANYTHING BELOW THIS LINE TO RUN THIS EXAMPLE
    ///////////////////////////////////////////////////////////////////////////////////

    const raw = JSON.stringify({
        "user_app_id": {
            "user_id": USER_ID,
            "app_id": APP_ID
        },
        "model": {
            "id": MODEL_ID,
            "model_type_id": MODEL_TYPE_ID
        }
    });

    const requestOptions = {
        method: 'POST',
        headers: {
            'Accept': 'application/json',
            'Authorization': 'Key ' + PAT
        },
        body: raw
    };

    fetch("https://api.clarifai.com/v2/models", requestOptions)
        .then(response => response.text())
        .then(result => console.log(result))
        .catch(error => console.log('error', error));

</script>
//index.js file

////////////////////////////////////////////////////////////////////////////////////////////
// In this section, we set the user authentication, app ID, model ID, and model type ID.
// Change these strings to run your own example.
///////////////////////////////////////////////////////////////////////////////////////////

const USER_ID = 'YOUR_USER_ID_HERE';
// Your PAT (Personal Access Token) can be found in the Account's Security section
const PAT = 'YOUR_PAT_HERE';
const APP_ID = 'YOUR_APP_ID_HERE';
// Change these to create your own model
const MODEL_ID = 'petsID';
const MODEL_TYPE_ID = 'visual-classifier';

/////////////////////////////////////////////////////////////////////////////
// YOU DO NOT NEED TO CHANGE ANYTHING BELOW THIS LINE TO RUN THIS EXAMPLE
/////////////////////////////////////////////////////////////////////////////

const { ClarifaiStub, grpc } = require("clarifai-nodejs-grpc");

const stub = ClarifaiStub.grpc();

// This will be used by every Clarifai endpoint call
const metadata = new grpc.Metadata();
metadata.set("authorization", "Key " + PAT);

stub.PostModels(
    {
        user_app_id: {
            "user_id": USER_ID,
            "app_id": APP_ID
        },
        models: [
            {
                id: MODEL_ID,
                model_type_id: MODEL_TYPE_ID
            }
        ]
    },
    metadata,
    (err, response) => {
        if (err) {
            throw new Error(err);
        }

        if (response.status.code !== 10000) {
            throw new Error("Post models failed, status: " + response.status.description);
        }
    }
);
package com.clarifai.example;

import com.clarifai.grpc.api.*;
import com.clarifai.channel.ClarifaiChannel;
import com.clarifai.credentials.ClarifaiCallCredentials;
import com.clarifai.grpc.api.status.StatusCode;

public class ClarifaiExample {

    ////////////////////////////////////////////////////////////////////////////////////////////
    // In this section, we set the user authentication, app ID, model ID, and model type ID.
    // Change these strings to run your own example.
    ///////////////////////////////////////////////////////////////////////////////////////////

    static final String USER_ID = "YOUR_USER_ID_HERE";
    //Your PAT (Personal Access Token) can be found in the portal under Authentication
    static final String PAT = "YOUR_PAT_HERE";
    static final String APP_ID = "YOUR_APP_ID_HERE";
    // Change these to create your own model
    static final String MODEL_ID = "petsID";
    static final String MODEL_TYPE_ID = "visual-classifier";

    ///////////////////////////////////////////////////////////////////////////////////
    // YOU DO NOT NEED TO CHANGE ANYTHING BELOW THIS LINE TO RUN THIS EXAMPLE
    ///////////////////////////////////////////////////////////////////////////////////

    public static void main(String[] args) {

        V2Grpc.V2BlockingStub stub = V2Grpc.newBlockingStub(ClarifaiChannel.INSTANCE.getGrpcChannel())
            .withCallCredentials(new ClarifaiCallCredentials(PAT));

        SingleModelResponse postModelsResponse = stub.postModels(
            PostModelsRequest.newBuilder()
            .setUserAppId(UserAppIDSet.newBuilder().setUserId(USER_ID).setAppId(APP_ID))
            .addModels(
                Model.newBuilder()
                .setId(MODEL_ID)
                .setModelTypeId(MODEL_TYPE_ID)
            ).build()
        );

        if (postModelsResponse.getStatus().getCode() != StatusCode.SUCCESS) {
            throw new RuntimeException("Post models failed, status: " + postModelsResponse.getStatus());
        }

    }

}
<?php

require __DIR__ . "/vendor/autoload.php";

/////////////////////////////////////////////////////////////////////////////////////////////////
// In this section, we set the user authentication, app ID, model ID, and model type ID.
// Change these strings to run your own example.
/////////////////////////////////////////////////////////////////////////////////////////////////

$USER_ID = "YOUR_USER_ID_HERE";
// Your PAT (Personal Access Token) can be found in the Account's Security section
$PAT = "YOUR_PAT_HERE";
$APP_ID = "YOUR_APP_ID_HERE";
// Change these to create your own model
$MODEL_ID = "petsID";
$MODEL_TYPE_ID = "visual-classifier";

///////////////////////////////////////////////////////////////////////////////////
// YOU DO NOT NEED TO CHANGE ANYTHING BELOW THIS LINE TO RUN THIS EXAMPLE
///////////////////////////////////////////////////////////////////////////////////

use Clarifai\ClarifaiClient;
use Clarifai\Api\Model;
use Clarifai\Api\PostModelsRequest;
use Clarifai\Api\Status\StatusCode;
use Clarifai\Api\UserAppIDSet;

$client = ClarifaiClient::grpc();

$metadata = ["Authorization" => ["Key " . $PAT]];

$userDataObject = new UserAppIDSet([
    "user_id" => $USER_ID,
    "app_id" => $APP_ID,
]);

// Let's make a RPC call to the Clarifai platform. It uses the opened gRPC client channel to communicate a
// request and then wait for the response
[$response, $status] = $client->PostModels(
        // The request object carries the request along with the request status and other metadata related to the request itself
        new PostModelsRequest([
            "user_app_id" => $userDataObject,
            "models" => [
                new Model([
                    "id" => $MODEL_ID,
                    "model_type_id" => $MODEL_TYPE_ID,
                ]),
            ],
        ]),
        $metadata
    )->wait();

// A response is returned and the first thing we do is check the status of it
// A successful response will have a status code of 0; otherwise, there is some error
if ($status->code !== 0) {
    throw new Exception("Error: {$status->details}");
}
// In addition to the RPC response status, there is a Clarifai API status that reports if the operation was a success or failure
// (not just that the communication was successful)
if ($response->getStatus()->getCode() != StatusCode::SUCCESS) {
    throw new Exception("Failure response: " . $response->getStatus()->getDescription() . " " . $response->getStatus()->getDetails());
}

?>
curl -X POST "https://api.clarifai.com/v2/users/YOUR_USER_ID_HERE/apps/YOUR_APP_ID_HERE/models" \
  -H "Authorization: Key YOUR_PAT_HERE" \
  -H "Content-Type: application/json" \
  -d '{
    "model": {
      "id": "petsID",
      "model_type_id": "visual-classifier"
    }
  }'
Step 4: Template Selection
Let's list all the available training templates in the Clarifai platform.
- Python
print(model.list_training_templates())
Output
['classification_inception_general_v1_3_transfer_embednorm',
 'classification_basemodel_v1',
 'classification_cifar10_v1',
 'Clarifai_InceptionTransferEmbedNorm',
 'Clarifai_ResNext',
 'Clarifai_InceptionV2',
 'Clarifai_InceptionBatchNorm',
 'MMClassification',
 'MMClassification_EfficientNet',
 'MMClassification_ResNet_50_RSB_A1',
 'MMClassification_ResNet_50']
Next, let's choose the 'MMClassification_EfficientNet' template to use for training our model, as demonstrated below.
Step 5: Set Up Model Parameters
You can save the model parameters in a YAML file, which can then be passed to the model when initiating training.
- Python
import yaml
YAML_FILE = 'mmclassification_efficientnet.yaml'
model_params = model.get_params(template='MMClassification_EfficientNet', save_to=YAML_FILE)
# Preview YAML content
file = open(YAML_FILE)
data = yaml.safe_load(file)
print(data)
Output
{'dataset_id': '',
 'dataset_version_id': '',
 'concepts': [],
 'train_params': {'invalid_data_tolerance_percent': 5.0,
  'template': 'MMClassification_EfficientNet',
  'seed': -1.0,
  'num_gpus': 1.0,
  'image_size': 336.0,
  'batch_size': 4.0,
  'num_epochs': 30.0,
  'per_item_lrate': 0.000390625,
  'weight_decay': 0.0001,
  'momentum': 0.9,
  'pretrained_weights': 'ImageNet-1k',
  'flip_probability': 0.5,
  'flip_direction': 'horizontal',
  'concepts_mutually_exclusive': False},
 'inference_params': {'select_concepts': []}}
You can customize the YAML file according to your requirements and then reload it for model training.
Below is an example of the modifications made to the YAML file:
- Python
file = open('models/model_train/saved_mmclassification_efficientnet.yaml')
data = yaml.safe_load(file)
print(data)
Output
{'dataset_id': 'image_dataset',
 'dataset_version_id': '',
 'concepts': ['id-ramen', 'id-prime_rib', 'id-hamburger', 'id-beignets'],
 'train_params': {'invalid_data_tolerance_percent': 5.0,
  'template': 'MMClassification_EfficientNet',
  'seed': -1.0,
  'num_gpus': 1.0,
  'image_size': 336.0,
  'batch_size': 4.0,
  'num_epochs': 10.0,
  'per_item_lrate': 0.000390625,
  'weight_decay': 0.0001,
  'momentum': 0.9,
  'pretrained_weights': 'ImageNet-1k',
  'flip_probability': 0.5,
  'flip_direction': 'horizontal',
  'concepts_mutually_exclusive': False},
 'inference_params': {'select_concepts': []}}
Step 6: Initiate Model Training
You can initiate model training by passing the YAML configuration file as a parameter to model.train(). The Clarifai API also provides features for monitoring training status and saving training logs to a local file.
If the status code is MODEL-TRAINED, it indicates that the model has been successfully trained and is ready for use.
- Python
- Python (gRPC)
- JavaScript (REST)
- Java (gRPC)
- cURL
#Starting the training
model_version_id = model.train(yaml_file='models/model_train/saved_mmclassification_efficientnet.yaml')
#Checking the status of training
#To store training logs in a file, fix training_logs param as True
status = model.training_status(version_id=model_version_id,training_logs=False)
########################################################################################
# In this section, we set the user authentication, app ID, model ID, and concept IDs.
# Change these strings to run your own example.
########################################################################################

USER_ID = "YOUR_USER_ID_HERE"
# Your PAT (Personal Access Token) can be found in the Account's Security section
PAT = "YOUR_PAT_HERE"
APP_ID = "YOUR_APP_ID_HERE"
# Change these to train your own model
MODEL_ID = "petsID"
CONCEPT_ID_1 = "ferrari23"
CONCEPT_ID_2 = "outdoors23"

##########################################################################
# YOU DO NOT NEED TO CHANGE ANYTHING BELOW THIS LINE TO RUN THIS EXAMPLE
##########################################################################

from clarifai_grpc.channel.clarifai_channel import ClarifaiChannel
from clarifai_grpc.grpc.api import resources_pb2, service_pb2, service_pb2_grpc
from clarifai_grpc.grpc.api.status import status_code_pb2
from google.protobuf.struct_pb2 import Struct

channel = ClarifaiChannel.get_grpc_channel()
stub = service_pb2_grpc.V2Stub(channel)

params = Struct()
params.update(
    {
        "template": "MMClassification_ResNet_50_RSB_A1",
        "num_epochs": 2
    }
    )

metadata = (("authorization", "Key " + PAT),)

userDataObject = resources_pb2.UserAppIDSet(user_id=USER_ID, app_id=APP_ID)

post_model_versions = stub.PostModelVersions(
    service_pb2.PostModelVersionsRequest(
        user_app_id=userDataObject,
        model_id=MODEL_ID,
        model_versions=[
            resources_pb2.ModelVersion(
                train_info=resources_pb2.TrainInfo(
                    params=params,
                ),
                output_info=resources_pb2.OutputInfo(
                    data=resources_pb2.Data(
                        concepts=[
                            resources_pb2.Concept(id=CONCEPT_ID_1),
                            resources_pb2.Concept(id=CONCEPT_ID_2)
                            ]
                    ),
                ),
            )
        ],
    ),
    metadata=metadata,
)

if post_model_versions.status.code != status_code_pb2.SUCCESS:
    print(post_model_versions.status)
    raise Exception("Post models versions failed, status: " + post_model_versions.status.description)
<!--index.html file-->

<script>
    //////////////////////////////////////////////////////////////////////////////////////////
    // In this section, we set the user authentication, app ID, model ID, and concept IDs.
    // Change these strings to run your own example.
    /////////////////////////////////////////////////////////////////////////////////////////

    const USER_ID = "YOUR_USER_ID_HERE";
    // Your PAT (Personal Access Token) can be found in the Account's Security section
    const PAT = "YOUR_PAT_HERE";
    const APP_ID = "YOUR_APP_ID_HERE";
    // Change these to train your own model
    const MODEL_ID = "petsID";
    const CONCEPT_ID_1 = "ferrari23";
    const CONCEPT_ID_2 = "outdoors23";

    ///////////////////////////////////////////////////////////////////////////////////
    // YOU DO NOT NEED TO CHANGE ANYTHING BELOW THIS LINE TO RUN THIS EXAMPLE
    ///////////////////////////////////////////////////////////////////////////////////

    const raw = JSON.stringify({
        "user_app_id": {
            "user_id": USER_ID,
            "app_id": APP_ID
        },
        "model_versions": [{
            "train_info": {
                "params": {
                    "template": "MMClassification_ResNet_50_RSB_A1",
                    "num_epochs": 2
                }
            },
            "output_info": {
                "data": {
                    "concepts": [
                        {
                            "id": CONCEPT_ID_1
                        },
                        {
                            "id": CONCEPT_ID_2
                        }
                    ]
                }
            }
        }]

    });

    const requestOptions = {
        method: "POST",
        headers: {
            "Content-Type": "application/json",
            "Authorization": "Key " + PAT
        },
        body: raw
    };

    fetch(`https://api.clarifai.com/v2/models/${MODEL_ID}/versions`, requestOptions)
        .then(response => response.text())
        .then(result => console.log(result))
        .catch(error => console.log("error", error));

</script>
package com.clarifai.example;

import com.clarifai.grpc.api.*;
import com.clarifai.channel.ClarifaiChannel;
import com.clarifai.credentials.ClarifaiCallCredentials;
import com.clarifai.grpc.api.status.StatusCode;
import com.google.protobuf.Struct;
import com.google.protobuf.Value;

public class ClarifaiExample {

    //////////////////////////////////////////////////////////////////////////////////////////
    // In this section, we set the user authentication, app ID, model ID, and concept IDs.
    // Change these strings to run your own example.
    //////////////////////////////////////////////////////////////////////////////////////////

    static final String USER_ID = "YOUR_USER_ID_HERE";
    // Your PAT (Personal Access Token) can be found in the portal under Authentication
    static final String PAT = "YOUR_PAT_HERE";
    static final String APP_ID = "YOUR_APP_ID_HERE";
    // Change these to train your own model
    static final String MODEL_ID = "petsID";
    static final String CONCEPT_ID_1 = "ferrari23";
    static final String CONCEPT_ID_2 = "outdoors23";

    ///////////////////////////////////////////////////////////////////////////////////
    // YOU DO NOT NEED TO CHANGE ANYTHING BELOW THIS LINE TO RUN THIS EXAMPLE
    ///////////////////////////////////////////////////////////////////////////////////

    public static void main(String[] args) {

        V2Grpc.V2BlockingStub stub = V2Grpc.newBlockingStub(ClarifaiChannel.INSTANCE.getGrpcChannel())
                .withCallCredentials(new ClarifaiCallCredentials(PAT));

        Struct.Builder params = Struct.newBuilder()
                .putFields("template", Value.newBuilder().setStringValue("MMClassification_ResNet_50_RSB_A1").build())
                .putFields("num_epochs", Value.newBuilder().setNumberValue(2).build());

        SingleModelResponse postModelVersionsResponse = stub.postModelVersions(
                PostModelVersionsRequest.newBuilder()
                        .setUserAppId(UserAppIDSet.newBuilder().setUserId(USER_ID).setAppId(APP_ID))
                        .setModelId(MODEL_ID)
                        .addModelVersions(ModelVersion.newBuilder()
                                .setTrainInfo(TrainInfo.newBuilder()
                                        .setParams(params)
                                )
                                .setOutputInfo(OutputInfo.newBuilder()
                                        .setData(Data.newBuilder()
                                                .addConcepts(Concept.newBuilder()
                                                        .setId(CONCEPT_ID_1)
                                                )
                                                .addConcepts(Concept.newBuilder()
                                                        .setId(CONCEPT_ID_2)
                                                )
                                        )
                                )
                        )
                        .build()
        );

        if (postModelVersionsResponse.getStatus().getCode() != StatusCode.SUCCESS) {
            throw new RuntimeException("Post model outputs failed, status: " + postModelVersionsResponse.getStatus());
        }

    }
}
curl -X POST "https://api.clarifai.com/v2/users/YOUR_USER_ID_HERE/apps/YOUR_APP_ID_HERE/models/YOUR_MODEL_ID_HERE/versions" \
  -H "Authorization: Key YOUR_PAT_HERE" \
  -H "Content-Type: application/json" \
  -d '{
        "model_versions": [{
            "train_info": {
                "params": {
                    "template": "MMClassification_ResNet_50_RSB_A1",
                    "num_epochs": 2
                }
            },
            "output_info": {
                "data": {
                    "concepts": [
                        {
                            "id": "ferrari23"
                        },
                        {
                            "id": "outdoors23"
                        }
                    ]
                }
            }
        }]
  }'
Output
code: MODEL_TRAINED
description: "Model is trained and ready"
Step 7: Model Prediction
After the model is trained and ready to use, you can run some predictions with it.
- Python
import cv2
import matplotlib.pyplot as plt

IMAGE_PATH = os.path.join(os.getcwd().split('/models')[0],'datasets/upload/image_classification/food-101/images/hamburger/139558.jpg')
model_prediction = model.predict_by_filepath(IMAGE_PATH, input_type="image")

#Display the model predictions
img = plt.imread(IMAGE_PATH)
plt.axis('off')
plt.imshow(img)
for concept in model_prediction.outputs[0].data.concepts:
    print(concept.id,':',round(concept.value,2))
Output
id-hamburger : 0.64

id-ramen : 0.45

id-prime_rib : 0.44

id-beignets : 0.42
Step 8: Model Evaluation
Let’s evaluate the model using both the training and test datasets. We’ll start by reviewing the evaluation metrics for the training dataset.
- Python
# Evaluate the model using the specified dataset ID and evaluation ID.
model.evaluate(dataset_id='image_dataset', eval_id='one')


# Retrieve the evaluation results using the specified evaluation ID and store it in the variable 'result'.
result = model.get_eval_by_id(eval_id="one")

# Print a summary of the evaluation results stored in the variable 'result'.
print(result.summary)
Output
macro_avg_roc_auc: 0.9200000166893005
macro_std_roc_auc: 0.03399345278739929
macro_avg_f1_score: 0.6682435274124146
macro_std_f1_score: 0.08137183636426926
macro_avg_precision: 0.53125
macro_avg_recall: 0.949999988079071
Before evaluating the model on the test dataset, ensure it is uploaded using the data loader. Once uploaded, proceed with the evaluation.
- Python
# Load the dataloader module using the provided function from your module
PATH=os.path.join(os.getcwd().split('/models/model_train')[0],'datasets/upload/data/images_test')
food101_dataloader = load_module_dataloader(PATH)

# Create a Clarifai dataset with the specified dataset_id ("image_dataset")
test_dataset = app.create_dataset(dataset_id="image_dataset2")

# Upload the dataset using the provided dataloader and get the upload status
test_dataset.upload_dataset(dataloader=food101_dataloader, get_upload_status=True)

# Evaluate the model using the specified dataset ID and evaluation ID.
model.evaluate(dataset_id='image_dataset2',eval_id='two')


# Retrieve the evaluation results using the specified evaluation ID and store it in the variable 'result'.
result=model.get_eval_by_id("two")

print(result.summary)
Output
macro_avg_roc_auc: 1.0
macro_avg_f1_score: 0.7916666865348816
macro_std_f1_score: 0.21650634706020355
macro_avg_precision: 0.7083333134651184
macro_avg_recall: 1.0
Finally, to gain deeper insights into the model’s performance, use the EvalResultCompare method to compare results across multiple datasets.
- Python
from clarifai.utils.evaluation import EvalResultCompare

# Initializing an object of the EvalResultCompare class
# with specified models and datasets
eval_result = EvalResultCompare(models=[model], datasets=[dataset, test_dataset])

print(eval_result.detailed_summary())
Output
INFO:clarifai.utils.evaluation.helpers:Model visual_classifier_eval2/model_classifier/48ed4: retrieving {'binary_metrics': True} metrics of dataset: image_dataset2
(        Concept  Accuracy (ROC AUC)  Total Labeled  Total Predicted  \
 0      id-ramen               0.933              5               12
 0  id-prime_rib               0.960              5                5
 0  id-hamburger               0.920              5                8
 0   id-beignets               0.867              5               12
 0      id-ramen               1.000              1                3
 0  id-prime_rib               1.000              1                1
 0  id-hamburger               1.000              1                1
 0   id-beignets               1.000              1                1

    True Positives  False Negatives  False Positives  Recall  Precision  \
 0               5                0                7     1.0     0.4167
 0               4                1                1     0.8     0.6667
 0               5                0                3     1.0     0.6250
 0               5                0                7     1.0     0.4167
 0               1                0                2     1.0     0.3333
 0               1                0                0     1.0     1.0000
 0               1                0                0     1.0     1.0000
 0               1                0                0     1.0     0.5000

          F1         Dataset
 0  0.588269  image_dataset3
 0  0.727293  image_dataset3
 0  0.769231  image_dataset3
 0  0.588269  image_dataset3
 0  0.499962  image_dataset2
 0  1.000000  image_dataset2
 0  1.000000  image_dataset2
 0  0.666667  image_dataset2  ,
             Total Concept  Accuracy (ROC AUC)  Total Labeled  Total Predicted  \
 0  Dataset:image_dataset3                0.92             20               37
 0  Dataset:image_dataset2                1.00              4                6

    True Positives  False Negatives  False Positives  Recall  Precision  \
 0              19                1               18    0.95   0.531275
 0               4                0                2    1.00   0.708325

          F1
 0  0.681455
 0  0.829263  )