Visual Segmenter
Learn about our visual segmenter model type
Input: Images and videos
Output: Regions
Visual segmenter, also known as semantic segmentation, is a type of deep fine-tuned model used in image analysis and understanding tasks.
It aims to achieve a fine-grained understanding of the content within an image by associating each pixel with a particular class label. This is more detailed than traditional object detection, which typically identifies bounding boxes around objects.
The primary task of a visual segmenter model is twofold:
- Semantic segmentation: The model segments an input image into per-pixel masks, where each mask corresponds to a particular object or region of interest. Each pixel in the image is assigned a label that indicates the class of the object it belongs to. This process effectively divides the image into segments based on the objects or regions present in it.
- Object classification or labeling: Once the semantic segmentation is done, the model can then classify the segmented objects or regions into specific categories, descriptive words, or topics. This classification step involves assigning labels or tags to the segmented areas, indicating what each segment represents.
The visual segmenter model type also comes with various templates that give you the control to choose the specific architecture used by your neural network, as well as define a set of hyperparameters you can use to fine-tune the way your model learns.
Visual Segmenter models are used in a wide variety of applications, including:
- Self-driving cars: Visual Segmenter models can be used to identify objects in the road and surroundings, such as other cars, pedestrians, and traffic signs. This information can be used to help self-driving cars navigate safely.
- Robotics: Visual Segmenter models can be used to help robots interact with the physical world. For example, a robot could use a Visual Segmenter model to identify objects in its environment and then plan a path to avoid those objects.
- Image editing: Visual segmenter models can assist in automatic background removal, object manipulation, and other image editing tasks.
- Augmented reality: In AR applications, semantic segmentation helps in understanding the scene and integrating virtual objects more realistically.
You may choose a visual segmenter model type in cases where:
- Your application requires high accuracy, and you're willing to sacrifice speed and ease of use. These models tend to be computationally intensive due to their per-pixel processing.
- You need a segmentation model to learn new features not recognized by the existing Clarifai models, especially if your application requires a detailed understanding of the content within an image at a per-pixel level. In that case, you may need to "deep fine-tune" your custom segmenter model and integrate it directly within your workflows.
- You have a custom-tailored dataset, accurate labels, and the expertise and time to fine-tune models.
Example Use Case
Given an image of a street scene, a visual segmenter model could segment the image into per-pixel masks representing cars, pedestrians, buildings, roads, and other objects. Then, for each segmented area, the model could classify the objects into categories like "sedan," "person," "skyscraper," and "asphalt road.”
Create and Train a Visual Segmenter
Let's demonstrate how to create and train a visual segmenter model using our API.
Before using the Python SDK, Node.js SDK, or any of our gRPC clients, ensure they are properly installed on your machine. Refer to their respective installation guides for instructions on how to install and initialize them.
Step 1: App Creation
Let's start by creating an app.
- Python SDK
from clarifai.client.user import User
#replace your "user_id"
client = User(user_id="user_id")
app = client.create_app(app_id="demo_train", base_workflow="Universal")
Step 2: Dataset Upload
Next, let’s upload the dataset that will be used to train the model to the app.
You can find the dataset we used here.
- Python SDK
#importing load_module_dataloader for calling the dataloader object in dataset.py in the local data folder
from clarifai.datasets.upload.utils import load_module_dataloader


# Construct the path to the dataset folder
module_path = os.path.join(os.getcwd().split('/models/model_train')[0],'datasets/upload/image_segmentation/coco')


# Load the dataloader module using the provided function from your module
coco_dataloader = load_module_dataloader(module_path)

# Create a Clarifai dataset with the specified dataset_id ("image_dataset")
dataset = app.create_dataset(dataset_id="segmentation_dataset")

# Upload the dataset using the provided dataloader and get the upload status
dataset.upload_dataset(dataloader=coco_dataloader)
Step 3: Model Creation
Let's list all the available trainable model types in the Clarifai platform.
- Python SDK
print(app.list_trainable_model_types())
Output
['visual-classifier',
 'visual-detector',
 'visual-segmenter',
 'visual-embedder',
 'clusterer',
 'text-classifier',
 'embedding-classifier',
 'text-to-text']
Next, let's select the visual-segmenter model type and use it to create a model.
- Python SDK
MODEL_ID = "segmenter"
MODEL_TYPE_ID = "visual-segmenter"

# Create a model by passing the model name and model type as parameter
model = app.create_model(model_id=MODEL_ID, model_type_id=MODEL_TYPE_ID)
Step 4: Template Selection
Let's list all the available training templates in the Clarifai platform.
- Python SDK
print(model.list_training_templates())
Output
['MMSegmentation', 'MMSegmentation_SegFormer']
Next, let's choose the 'MMSegmentation_SegFormer' template to use for training our model, as demonstrated below.
Step 5: Set Up Model Parameters
You can save the model parameters in a YAML file, which can then be passed to the model when initiating training.
- Python SDK
import yaml
YAML_FILE = 'model_params.yaml'
model_params = model.get_params(template='MMSegmentation_SegFormer',save_to=YAML_FILE)
# Preview YAML content
file = open(YAML_FILE)
data = yaml.safe_load(file)
print(data)
Output
{'dataset_id': '',
 'dataset_version_id': '',
 'concepts': [],
 'train_params': {'invalid_data_tolerance_percent': 5.0,
  'template': 'MMSegmentation_SegFormer',
  'image_size': [520.0],
  'batch_size': 2.0,
  'num_epochs': 1.0,
  'per_item_lrate': 7.5e-06,
  'pretrained_weights': 'ade20k'}}
You can modify the YAML file to suit your specific needs and reload it for model training.
Before making changes, let’s first list the available concepts in the app. After that, we’ll show an example of the edited YAML configuration.
- Python SDK
# List the concept
concepts = [concept.id for concept in app.list_concepts()]
print(concepts)
Output
['id-chair',
 'id-cup',
 'id-couch',
 'id-baseballbat',
 'id-kite',
 'id-person',
 'id-elephant',
 'id-cellphone',
 'id-handbag',
 'id-cat',
 'id-toilet',
 'id-laptop',
 'id-diningtable',
 'id-keyboard',
 'id-mouse',
 'id-oven',
 'id-pizza',
 'id-clock']
Next, we’ll create a dataset version and then use the model.update_params() method to update the model parameters accordingly.
- Python SDK
#creating dataset version
dataset_version = dataset.create_version()
dataset_version_id = dataset_version.version.id

#update params
model.update_params(dataset_id = 'segmentation_dataset', dataset_version_id=dataset_version_id,concepts = concepts, num_epochs = 5)
Output
{'dataset_id': 'segmentation_dataset',
 'dataset_version_id': '43cdc090797c41f19bb420ab6e4baf0c',
 'concepts': ['id-chair',
  'id-cup',
  'id-couch',
  'id-baseballbat',
  'id-kite',
  'id-person',
  'id-elephant',
  'id-cellphone',
  'id-handbag',
  'id-cat',
  'id-toilet',
  'id-laptop',
  'id-diningtable',
  'id-keyboard',
  'id-mouse',
  'id-oven',
  'id-pizza',
  'id-clock'],
 'train_params': {'invalid_data_tolerance_percent': 5.0,
  'template': 'MMSegmentation_SegFormer',
  'image_size': [520.0],
  'batch_size': 2.0,
  'num_epochs': 5,
  'per_item_lrate': 7.5e-06,
  'pretrained_weights': 'ade20k'}}
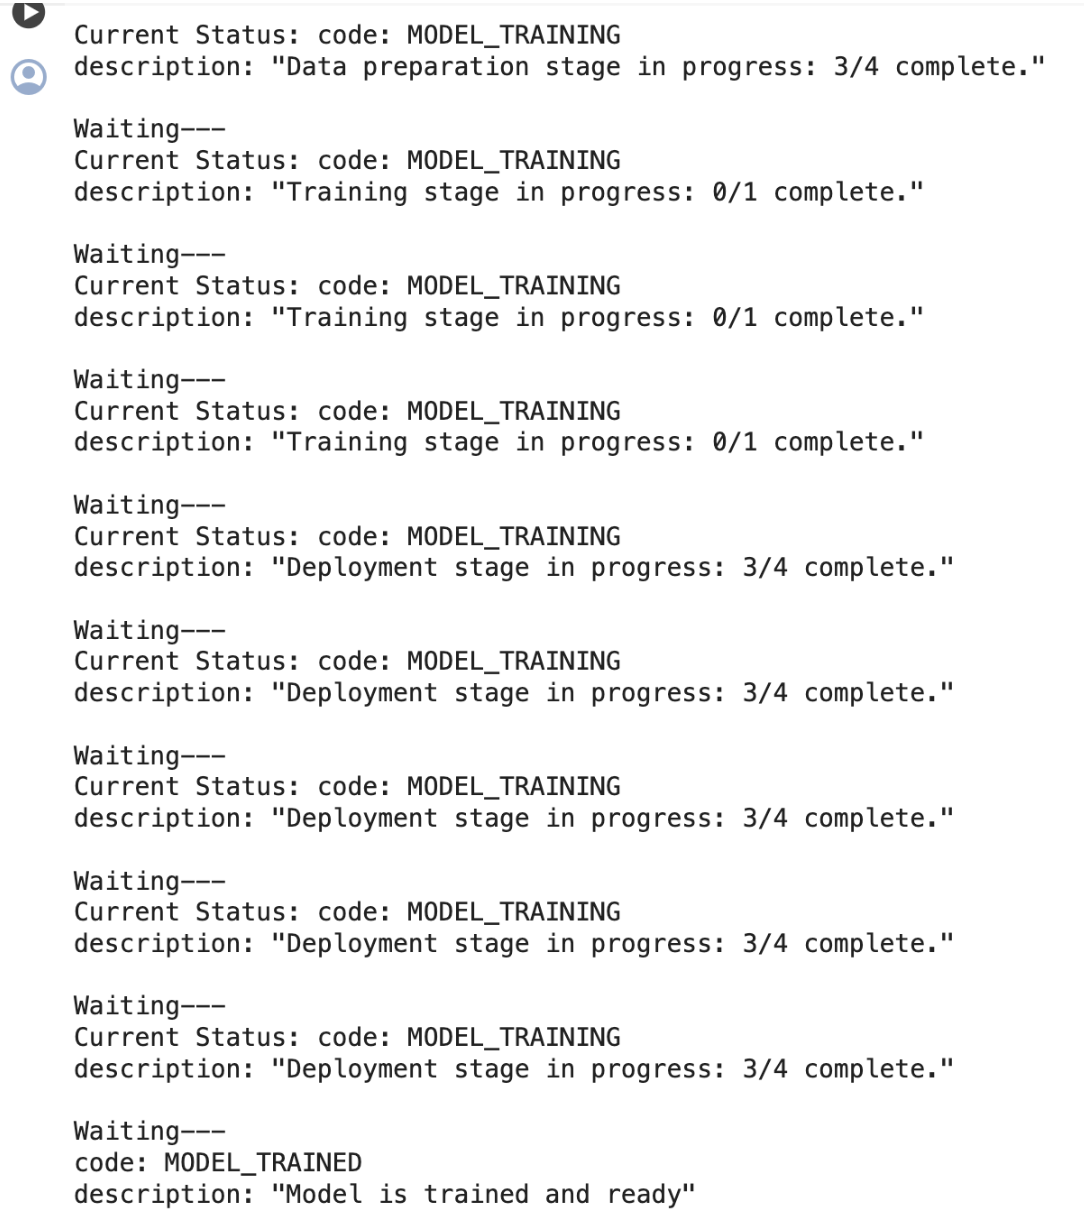
Step 6: Initiate Model Training
To initiate the model training process, call the model.train() method. The Clarifai API also provides features for monitoring training status and saving training logs to a local file.
If the status code is MODEL-TRAINED, it indicates that the model has been successfully trained and is ready for use.
- Python SDK
import time
#Starting the training
model_version_id = model.train()

#Checking the status of training
while True:
    status = model.training_status(version_id=model_version_id,training_logs=False)
    if status.code == 21106: #MODEL_TRAINING_FAILED
        print(status)
        break
    elif status.code == 21100: #MODEL_TRAINED
        print(status)
        break
    else:
        print("Current Status:",status)
        print("Waiting---")
        time.sleep(120)
Output
Step 7: Model Prediction
After the model is trained and ready to use, you can run some predictions with it.
- Python SDK
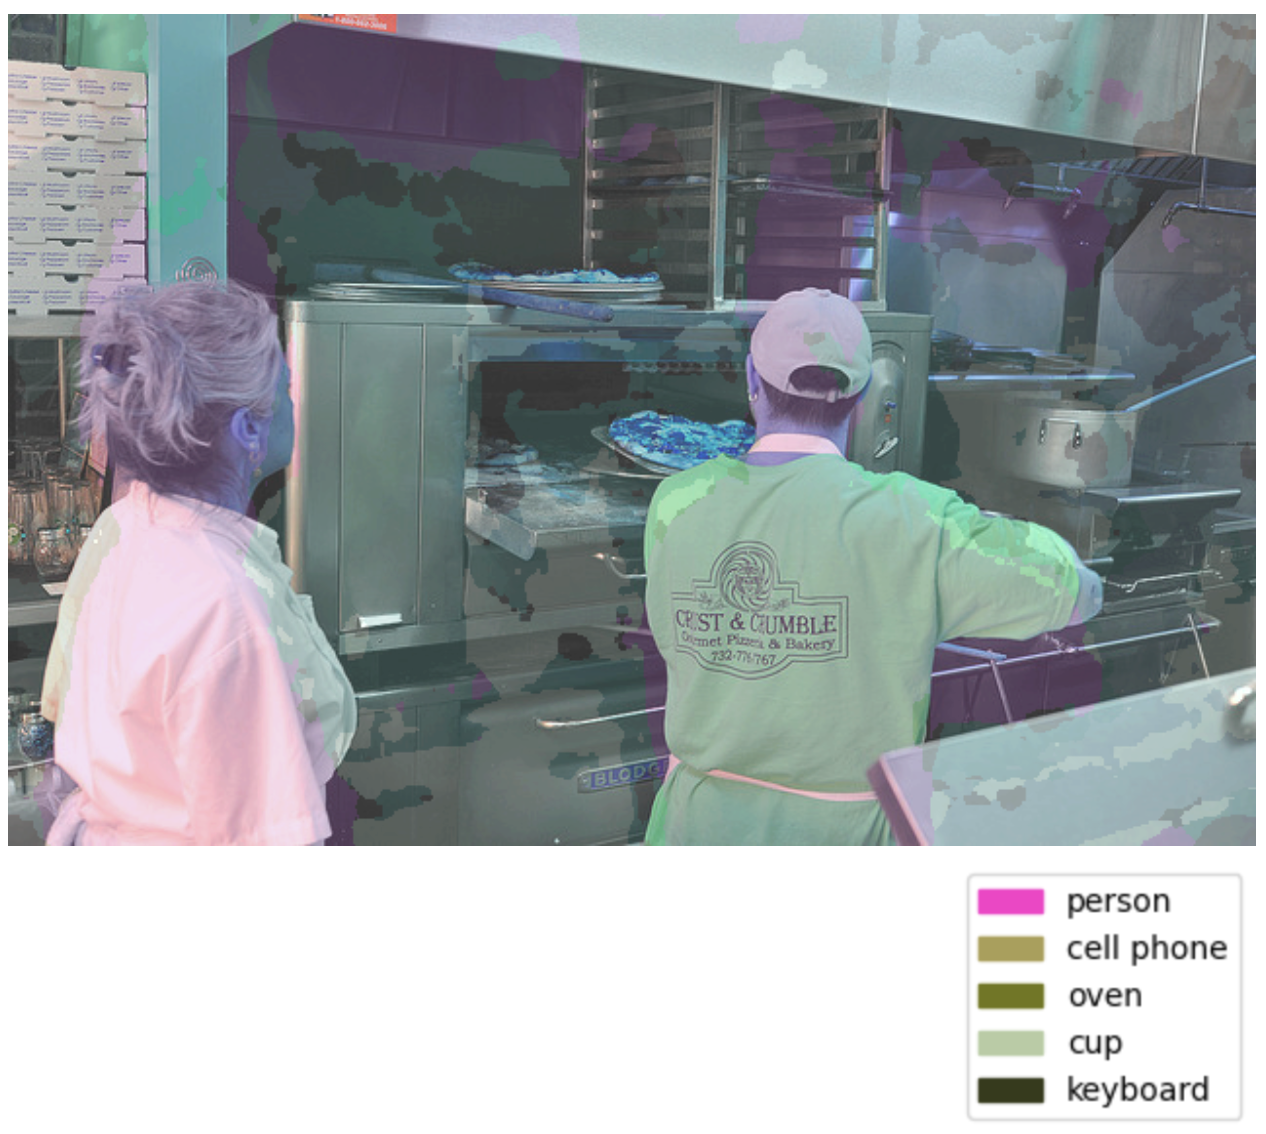
# Display the predicted masks
import cv2
from urllib.request import urlopen
import numpy as np
from PIL import Image as PILImage
from io import BytesIO
import random
import matplotlib.pyplot as plt
import matplotlib.patches as mpatches
from google.colab.patches import cv2_imshow

IMAGE_PATH = os.path.join(os.getcwd().split('/models')[0],'datasets/upload/image_segmentation/coco/images/000000424349.jpg')

prediction_response = model.predict_by_filepath(IMAGE_PATH, input_type="image")

# Get the output
regions = prediction_response.outputs[0].data.regions

img = cv2.imread(IMAGE_PATH)
img=cv2.cvtColor(img,cv2.COLOR_BGR2RGB)
masks = []
concepts = []
for region in regions:
    if region.data.concepts[0].value > 0.05:
        masks.append(np.array(PILImage.open(BytesIO(region.region_info.mask.image.base64))))
        concepts.append(region.data.concepts[0].name)


# Generate random colors
colors = []
for i in range(len(masks)):
    r = random.randint(0,255)
    g = random.randint(0,255)
    b = random.randint(0,255)
    colors.append((b,g,r))

# Map masks to overlays
overlays = []
for i in range(len(masks)):
    mask = masks[i]
    color = colors[i]

    overlay = np.zeros_like(img)
    overlay[mask > 0] = color
    overlays.append(overlay)

# Overlay masks on original image
overlayed = np.copy(img)

for overlay in overlays:
  # Apply alpha blending
  cv2.addWeighted(overlay, 0.15, overlayed, 0.85, 0, overlayed)

overlayed = cv2.convertScaleAbs(overlayed, alpha=1.5, beta=50)


# Display overlayed image
img = overlayed
# for displaying in google colab or else use cv2.imshow()
cv2_imshow(img)

# Create legend with colors and concepts
legend_items = []
for i in range(len(overlays)):
    color = [c/255 for c in colors[i]]
    concept = concepts[i]
    legend_items.append(mpatches.Patch(color=color, label=concept))

plt.legend(handles=legend_items, loc='lower left', bbox_to_anchor=(1.05, 0))
plt.axis('off')
plt.show()
The model’s performance can be further improved by increasing the number of training epochs.
Image Output