Visual Classifier
Learn how to use transfer learning to create custom visual classifier models
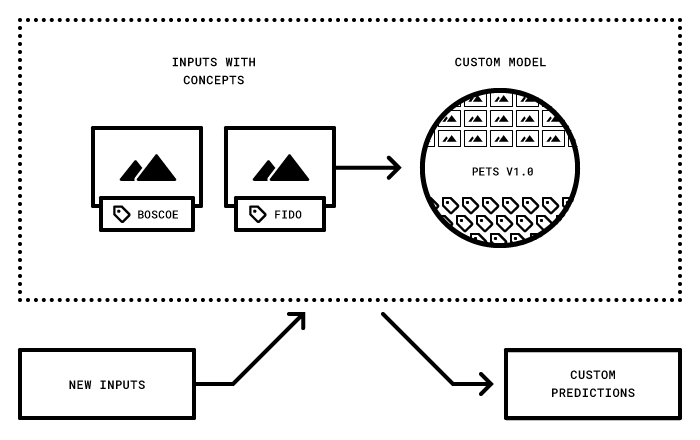
A visual classifier model is a type of machine learning model that is trained to recognize and categorize images or visual inputs into predefined classes or labels. It "classifies" visual data based on patterns it has learned from training examples.
Let's demonstrate how you can create a custom visual classifier model using the transfer learning technique.
Via the UI
Let’s walk through how to create a model using the UI that can distinguish between pants and shorts.
Step 1: Create an App
Click here to learn how to create an application on the Clarifai platform.
When creating the application, go with the default Image/Video option as the primary input type.
Step 2: Create a Dataset
Click here to learn how to create a dataset that will store the inputs.
Step 3: Add and Annotate Inputs
Next, you need to upload data to the app you've created. The input data, labeled with concepts, is what will be used for training your model. Training helps your model to “learn” from the annotated concepts on your inputs so that it can be able to recognize them.
To get started with transfer learning, you don't need a large number of images. We recommend beginning with just 10 and adding more as needed.
In this example, we'll use 5 images of pants and 5 images of shorts sourced from this clothing dataset. You can clone the repository and follow along with this documentation.
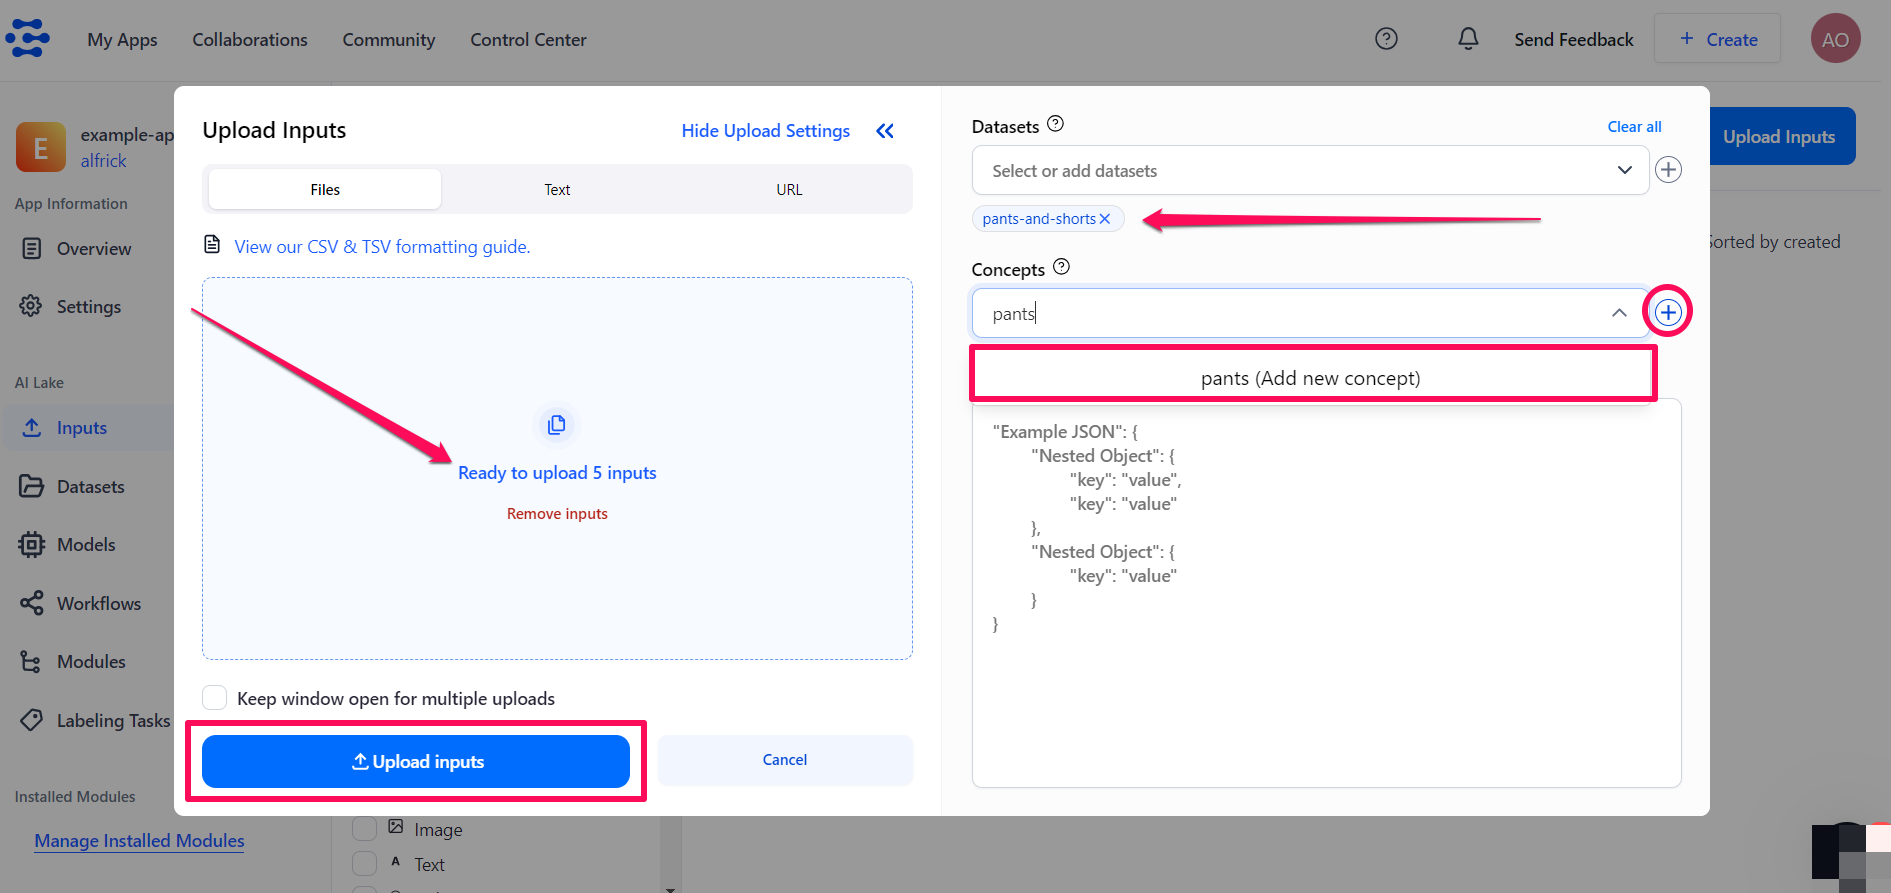
To upload inputs, select the Inputs option in the collapsible left sidebar. Next, click the Upload inputs button.

The small window that pops up allows you to upload your inputs — either by providing publicly accessible URLs or by uploading them directly from your local device. For this illustration, we'll upload the images of pants and shorts from a local device.
-
Use the Select or add datasets search box to select the dataset you previously created for storing the uploaded inputs.
-
To label the inputs with the
pantsconcept, click the plus (+) icon next to the Select or add concepts search box. Then, type the new concept name in the search box. The new name you've typed will appear underneath the search box. Click the Add new concept button to create the concept. Once created, the concept will be listed underneath the search box. -
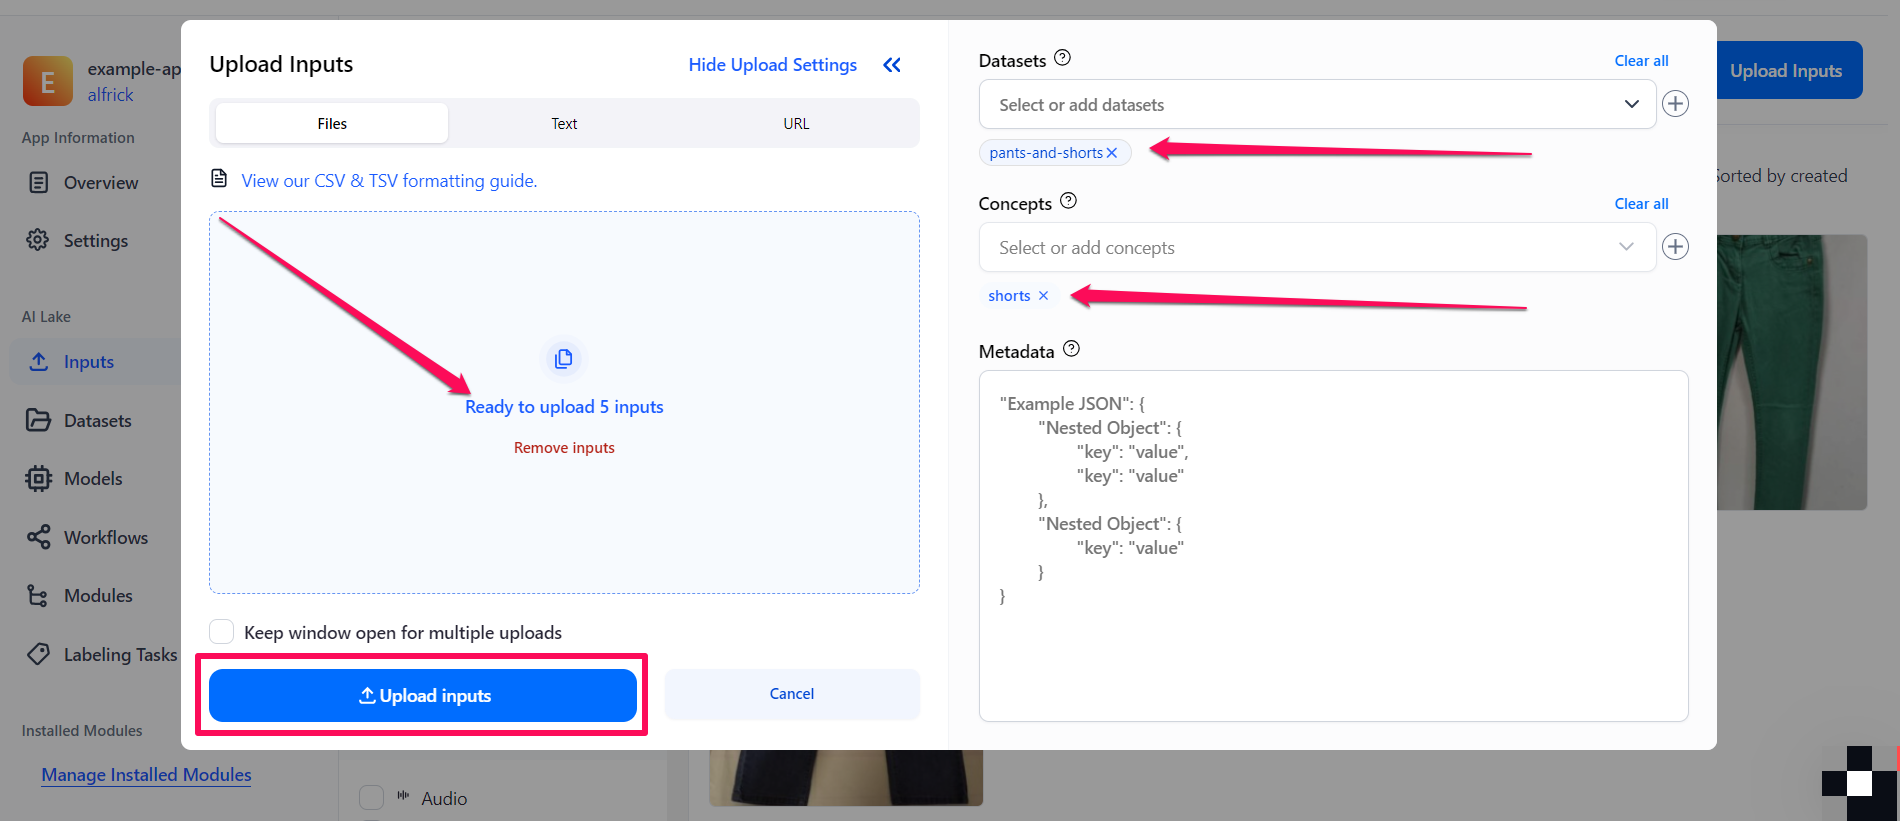
Click the Upload inputs button at the bottom of the pop-up window to finalize uploading your annotated inputs to the dataset.
-
Similarly, upload the images of shorts to the dataset you previously created, and label them with the
shortsconcept.
Click here to learn more about labeling inputs.
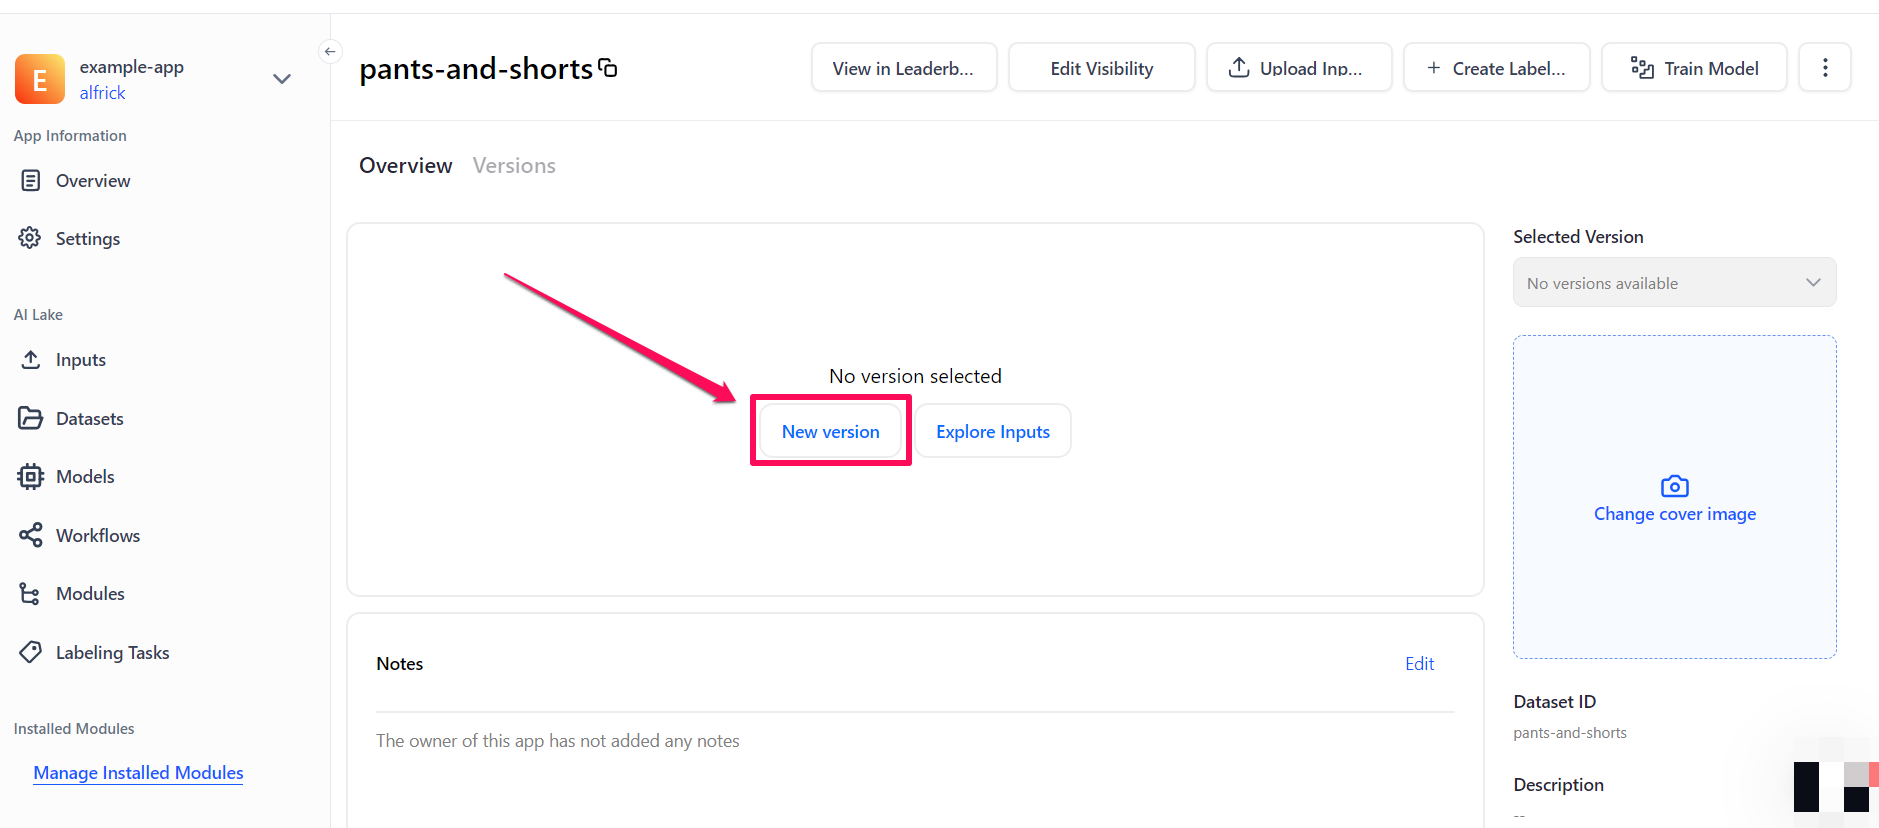
Step 4: Update Dataset
Next, go to the individual page of your dataset and create a version for it by clicking the New version button. This bookmarks the state of your data so that you can apply a specific version for training your custom model.
Step 5: Choose a Model Type
Once you've added images that contain the concepts you want to train for, you can now proceed to create your custom model.
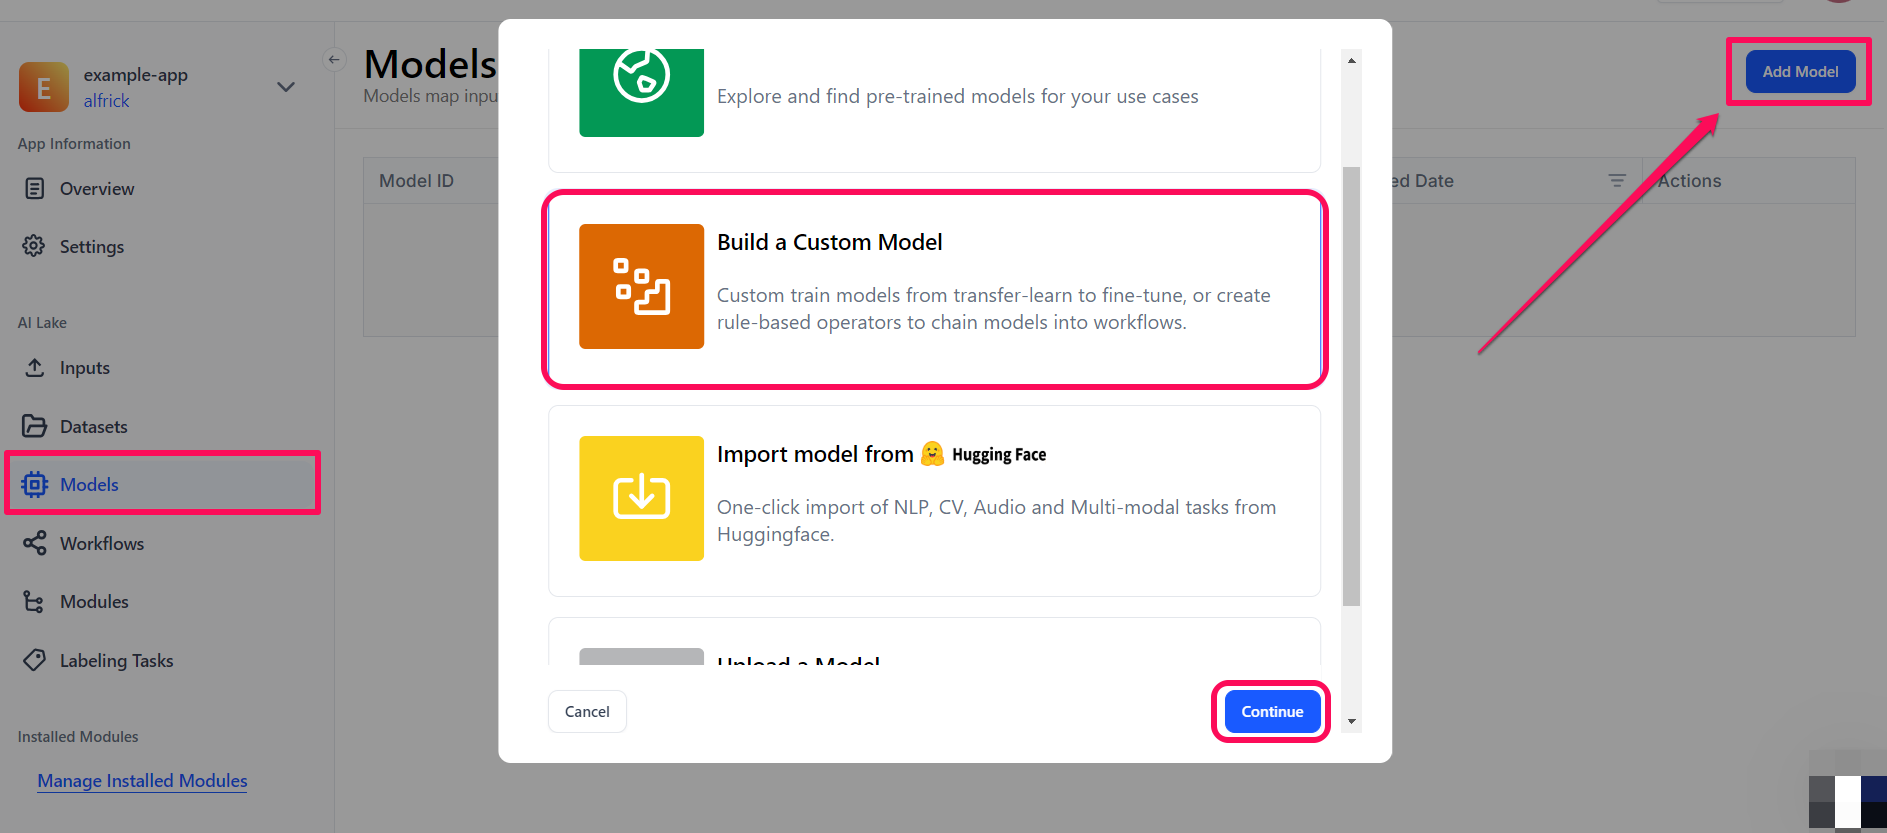
To begin, select the Models option in the collapsible left sidebar. On the ensuing page, click the Add Model button in the upper-right corner.
In the pop-up window, choose the Build a Custom Model option, then click Continue to proceed.
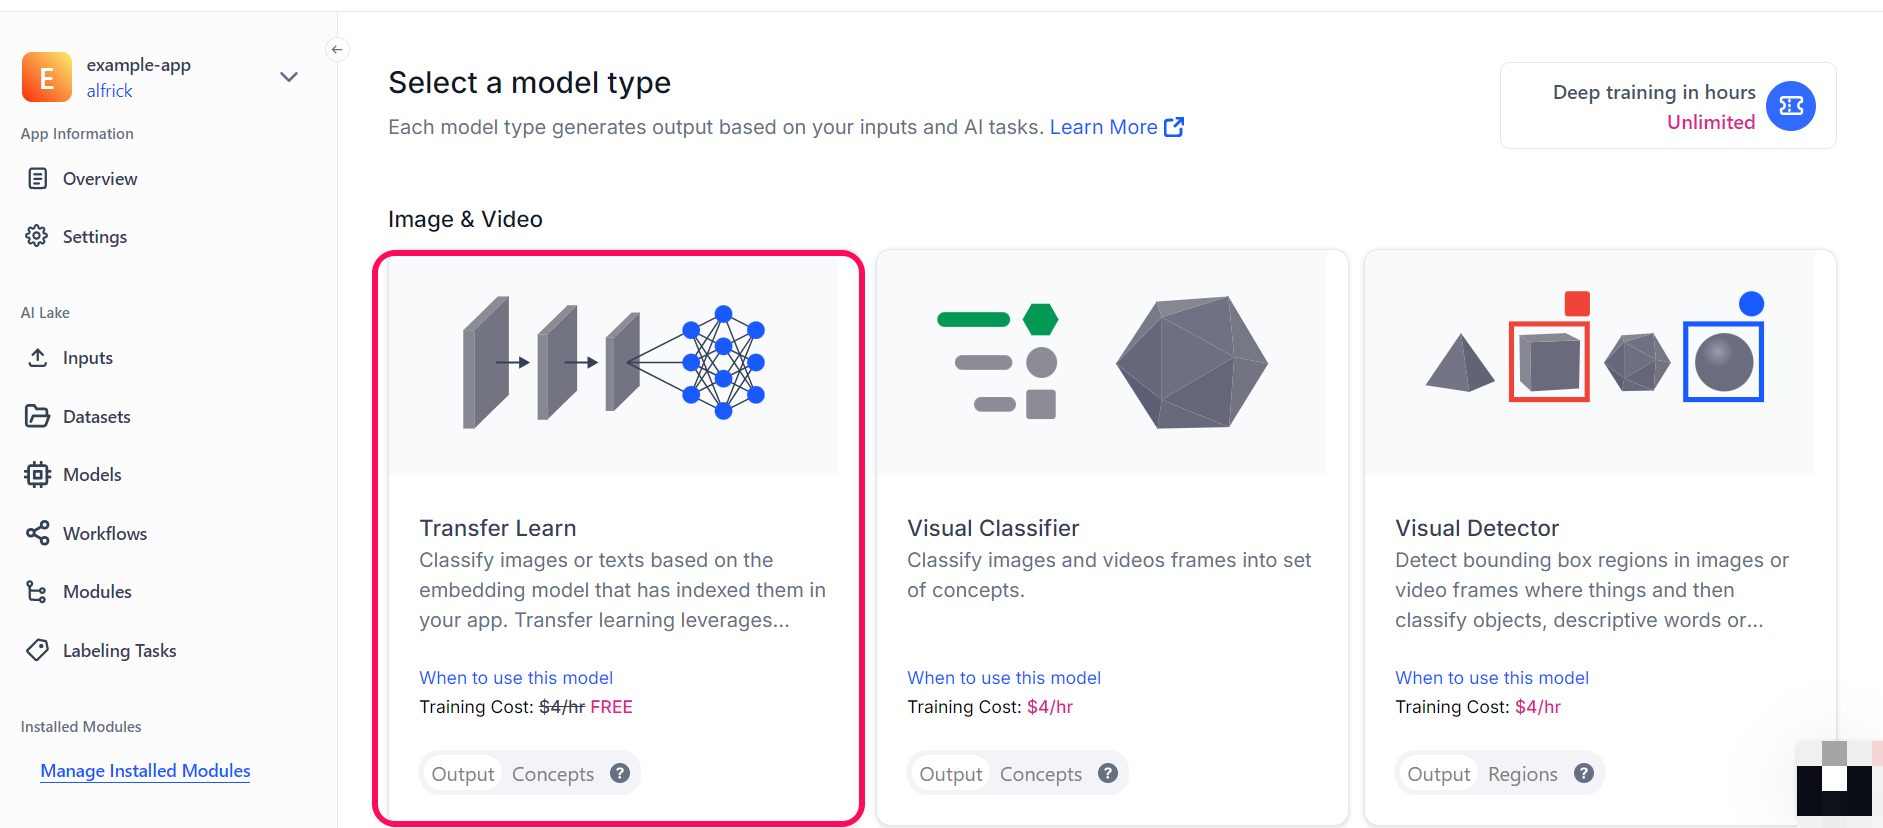
You’ll be redirected to a page where you can choose the type of model you want to create
Let’s choose the Transfer Learn model type.
Step 6: Create a Model
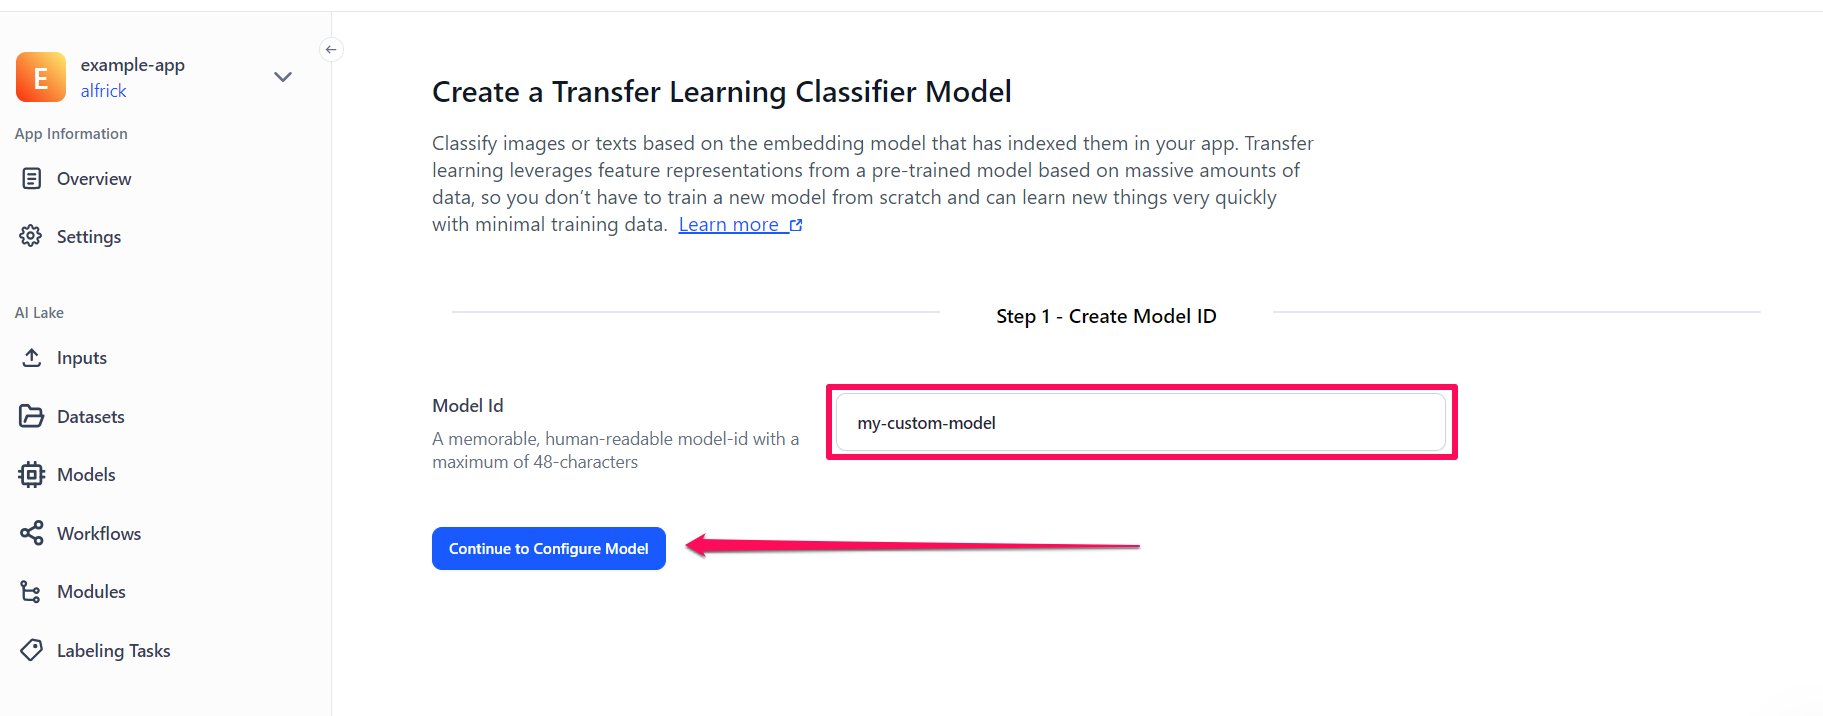
On the ensuing page, provide a unique ID and click the Continue to Configure Model button to create your model.
Step 7: Set Up the Model
Next, you need to set up the model for training by providing the required details.
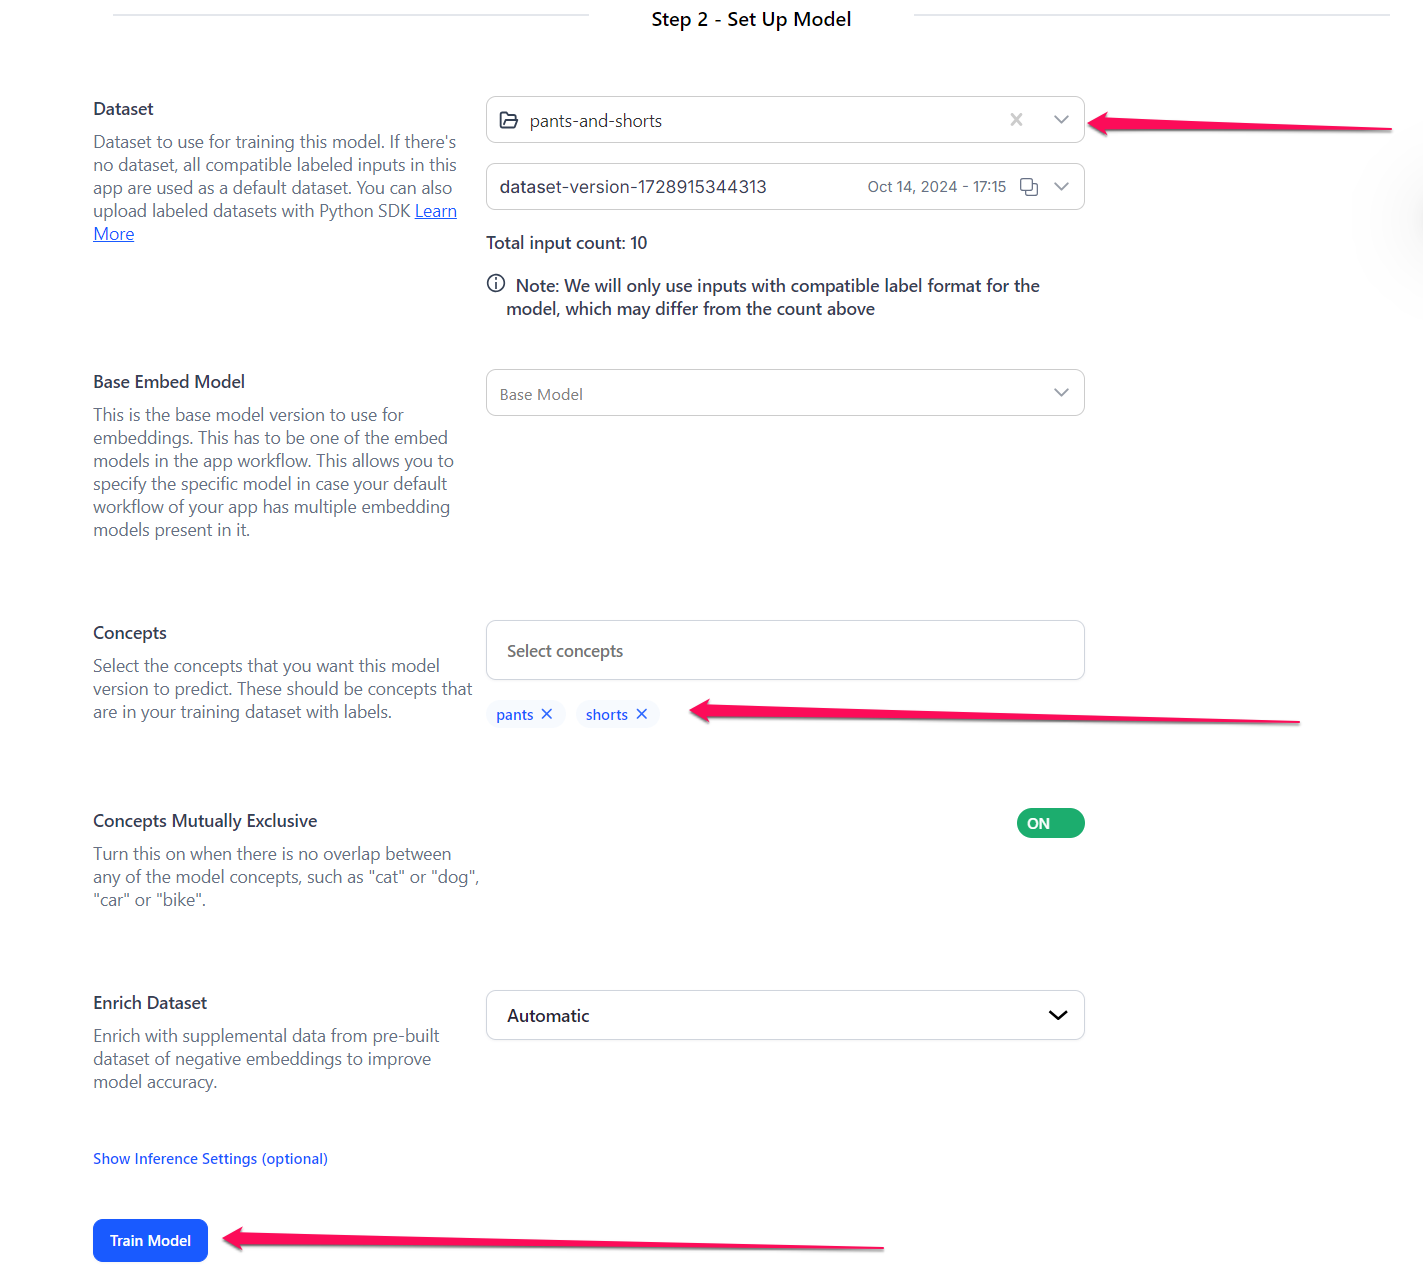
- Dataset — Select a dataset to use to train the model. For this example, let's select the dataset we previously created — alongside its version.
- Base Embed Model — You can select the base model version to use for embeddings, which has to be one of the embed models in the app workflow. This allows you to specify the specific model in case the default workflow of your app has multiple embedding models present in it. For this example, let's go with the default option.
- Concepts — Select the concepts that you want the model to predict. For this example, let's choose the
pantsandshortsconcepts. - Concepts Mutually Exclusive — Let's turn the button on to indicate no overlap between any of the model concepts.
- Enrich Dataset — If enabled and set to
Automatic, this option enhances your model by incorporating supplemental data from pre-built datasets of negative embeddings, helping to improve accuracy. Alternatively, setting it toDisabledwill exclude the use of negative embeddings, regardless of their availability. For this example, we'll proceed with the defaultAutomaticoption. - Inference Settings (optional) — Optionally, you can configure the provided inference settings for your model.
After configuring the settings, click the Train Model button to begin training your custom model.
Step 8: Use Your Custom Model
You'll be redirected to the created model's page. Once the visual classifier model is trained, which normally takes a few seconds, you can put it to work.
For example, to use it for making a prediction, click the blue (+) Try your own images or videos button. A small window will pop up that allows you to upload an input and see its prediction probabilities on the right side of the page.

That's it!
Via the API
Let’s walk through how to create a visual classifier model using the API.
Before using the Python SDK, Node.js SDK, or any of our gRPC clients, ensure they are properly installed on your machine. Refer to their respective installation guides for instructions on how to install and initialize them.
Step 1: Create an App
Before you create and train your first model, you need to create an application and select Image/Video as the primary input type.
Step 2: Add Images With Concepts
This walkthrough example assumes that you've selected a Classification Base Workflow. If you choose a Detection Base Workflow, then this Add Images With Concepts example could throw an error message, such as Adding/patching inputs with pre-tagged concepts is not allowed for apps with a detection model in their base workflow. Please use Post or Patch Annotations instead. If you get such an error, you should first upload the inputs without any concepts attached and then use the Annotations endpoint to label the inputs.
To get started training your own model, you need to first add images that already contain the concepts you want your model to see.
- Python (gRPC)
- JavaScript (REST)
- Node.js (gRPC)
- Java (gRPC)
- PHP (gRPC)
- cURL
##############################################################################
# In this section, we set the user authentication, app ID, and the images and
# concepts we want to add. Change these strings to run your own example.
##############################################################################

USER_ID = 'YOUR_USER_ID_HERE'
# Your PAT (Personal Access Token) can be found in the Account's Security section
PAT = 'YOUR_PAT_HERE'
APP_ID = 'YOUR_APP_ID_HERE'
# Change these to add your own images with concepts
IMAGE_URL_1 = 'https://samples.clarifai.com/puppy.jpeg'
IMAGE_URL_2 = 'https://samples.clarifai.com/wedding.jpg'
CONCEPT_ID_1 = 'charlie'
CONCEPT_ID_2 = 'our_wedding'
CONCEPT_ID_3 = 'our_wedding'
CONCEPT_ID_4 = 'charlie'
CONCEPT_ID_5 = 'cat'

##########################################################################
# YOU DO NOT NEED TO CHANGE ANYTHING BELOW THIS LINE TO RUN THIS EXAMPLE
##########################################################################

from clarifai_grpc.channel.clarifai_channel import ClarifaiChannel
from clarifai_grpc.grpc.api import resources_pb2, service_pb2, service_pb2_grpc
from clarifai_grpc.grpc.api.status import status_code_pb2

channel = ClarifaiChannel.get_grpc_channel()
stub = service_pb2_grpc.V2Stub(channel)

metadata = (('authorization', 'Key ' + PAT),)

userDataObject = resources_pb2.UserAppIDSet(user_id=USER_ID, app_id=APP_ID)

post_inputs_response = stub.PostInputs(
    service_pb2.PostInputsRequest(
        user_app_id=userDataObject,
        inputs=[
            resources_pb2.Input(
                data=resources_pb2.Data(
                    image=resources_pb2.Image(
                        url=IMAGE_URL_1,
                        allow_duplicate_url=True
                    ),
                    concepts=[
                        resources_pb2.Concept(id=CONCEPT_ID_1, value=1),
                        resources_pb2.Concept(id=CONCEPT_ID_2, value=0),
                    ]
                )
            ),
            resources_pb2.Input(
                data=resources_pb2.Data(
                    image=resources_pb2.Image(
                        url=IMAGE_URL_2,
                        allow_duplicate_url=True
                    ),
                    concepts=[
                        resources_pb2.Concept(id=CONCEPT_ID_3, value=1),
                        resources_pb2.Concept(id=CONCEPT_ID_4, value=0),
                        resources_pb2.Concept(id=CONCEPT_ID_5, value=0),
                    ]
                )
            ),
        ]
    ),
    metadata=metadata
)

if post_inputs_response.status.code != status_code_pb2.SUCCESS:
    print("There was an error with your request!")
    for input_object in post_inputs_response.inputs:
        print("Input " + input_object.id + " status:")
        print(input_object.status)

    print(post_inputs_response.status)
    raise Exception("Post inputs failed, status: " + post_inputs_response.status.description)

print(post_inputs_response)
<!--index.html file-->

<script>
    //////////////////////////////////////////////////////////////////////////////////
    // In this section, we set the user authentication, app ID, and the images and
    // concepts we want to add. Change these strings to run your own example.
    /////////////////////////////////////////////////////////////////////////////////

    const USER_ID = 'YOUR_USER_ID_HERE';
    // Your PAT (Personal Access Token) can be found in the Account's Security section
    const PAT = 'YOUR_PAT_HERE';
    const APP_ID = 'YOUR_APP_ID_HERE';
    // Change these to add your own images with concepts
    const IMAGE_URL_1 = 'https://samples.clarifai.com/puppy.jpeg';
    const IMAGE_URL_2 = 'https://samples.clarifai.com/wedding.jpg';
    const CONCEPT_ID_1 = 'charlie';
    const CONCEPT_ID_2 = 'our_wedding';
    const CONCEPT_ID_3 = 'our_wedding';
    const CONCEPT_ID_4 = 'charlie';
    const CONCEPT_ID_5 = 'cat';

    ///////////////////////////////////////////////////////////////////////////////////
    // YOU DO NOT NEED TO CHANGE ANYTHING BELOW THIS LINE TO RUN THIS EXAMPLE
    ///////////////////////////////////////////////////////////////////////////////////

    const raw = JSON.stringify({
        "user_app_id": {
            "user_id": USER_ID,
            "app_id": APP_ID
        },
        "inputs": [
            {
                "data": {
                    "image": {
                        "url": IMAGE_URL_1,
                        "allow_duplicate_url": true
                    },
                    "concepts": [
                        {
                            "id": CONCEPT_ID_1,
                            "value": 1
                        },
                        {
                            "id": CONCEPT_ID_2,
                            "value": 0
                        }
                    ]
                }
            },
            {
                "data": {
                    "image": {
                        "url": IMAGE_URL_2,
                        "allow_duplicate_url": true
                    },
                    "concepts": [
                        {
                            "id": CONCEPT_ID_3,
                            "value": 1
                        },
                        {
                            "id": CONCEPT_ID_4,
                            "value": 0
                        },
                        {
                            "id": CONCEPT_ID_5,
                            "value": 0
                        }
                    ]
                }
            }
        ]
    });

    const requestOptions = {
        method: 'POST',
        headers: {
            'Accept': 'application/json',
            'Authorization': 'Key ' + PAT
        },
        body: raw
    };

    fetch("https://api.clarifai.com/v2/inputs", requestOptions)
        .then(response => response.text())
        .then(result => console.log(result))
        .catch(error => console.log('error', error));

</script>
//index.js file

//////////////////////////////////////////////////////////////////////////////////
// In this section, we set the user authentication, app ID, and the images and
// concepts we want to add. Change these strings to run your own example.
/////////////////////////////////////////////////////////////////////////////////

const USER_ID = 'YOUR_USER_ID_HERE';
// Your PAT (Personal Access Token) can be found in the Account's Security section
const PAT = 'YOUR_PAT_HERE';
const APP_ID = 'YOUR_APP_ID_HERE';
// Change these to add your own images with concepts
const IMAGE_URL_1 = 'https://samples.clarifai.com/puppy.jpeg';
const IMAGE_URL_2 = 'https://samples.clarifai.com/wedding.jpg';
const CONCEPT_ID_1 = 'charlie';
const CONCEPT_ID_2 = 'our_wedding';
const CONCEPT_ID_3 = 'our_wedding';
const CONCEPT_ID_4 = 'charlie';
const CONCEPT_ID_5 = 'cat';

/////////////////////////////////////////////////////////////////////////////
// YOU DO NOT NEED TO CHANGE ANYTHING BELOW THIS LINE TO RUN THIS EXAMPLE
/////////////////////////////////////////////////////////////////////////////

const { ClarifaiStub, grpc } = require("clarifai-nodejs-grpc");

const stub = ClarifaiStub.grpc();

// This will be used by every Clarifai endpoint call
const metadata = new grpc.Metadata();
metadata.set("authorization", "Key " + PAT);

stub.PostInputs(
    {
        user_app_id: {
            "user_id": USER_ID,
            "app_id": APP_ID
        },
        inputs: [
            {
                data: {
                    image: { url: IMAGE_URL_1, allow_duplicate_url: true },
                    concepts: [{ id: CONCEPT_ID_1, value: 1 }, { id: CONCEPT_ID_2, value: 0 }]
                }
            },
            {
                data: {
                    image: { url: IMAGE_URL_2, allow_duplicate_url: true },
                    concepts: [{ id: CONCEPT_ID_3, value: 1 }, { id: CONCEPT_ID_4, value: 0 }, { id: CONCEPT_ID_5, value: 0 }]
                }
            },
        ]
    },
    metadata,
    (err, response) => {
        if (err) {
            throw new Error(err);
        }

        if (response.status.code !== 10000) {
            for (const input of response.inputs) {
                console.log("Input " + input.id + " status: ");
                console.log(JSON.stringify(input.status, null, 2) + "\n");
            }

            throw new Error("Post inputs failed, status: " + response.status.description);
        }
    }
);
package com.clarifai.example;

import com.clarifai.grpc.api.*;
import com.clarifai.channel.ClarifaiChannel;
import com.clarifai.credentials.ClarifaiCallCredentials;
import com.clarifai.grpc.api.status.StatusCode;

public class ClarifaiExample {

    //////////////////////////////////////////////////////////////////////////////////
    // In this section, we set the user authentication, app ID, and the images and
    // concepts we want to add. Change these strings to run your own example.
    /////////////////////////////////////////////////////////////////////////////////

    static final String USER_ID = "YOUR_USER_ID_HERE";
    //Your PAT (Personal Access Token) can be found in the portal under Authentication
    static final String PAT = "YOUR_PAT_HERE";
    static final String APP_ID = "YOUR_APP_ID_HERE";
    // Change these to add your own images with concepts
    static final String IMAGE_URL_1 = "https://samples.clarifai.com/puppy.jpeg";
    static final String IMAGE_URL_2 = "https://samples.clarifai.com/wedding.jpg";
    static final String CONCEPT_ID_1 = "charlie";
    static final String CONCEPT_ID_2 = "our_wedding";
    static final String CONCEPT_ID_3 = "our_wedding";
    static final String CONCEPT_ID_4 = "charlie";
    static final String CONCEPT_ID_5 = "cat";

    ///////////////////////////////////////////////////////////////////////////////////
    // YOU DO NOT NEED TO CHANGE ANYTHING BELOW THIS LINE TO RUN THIS EXAMPLE
    ///////////////////////////////////////////////////////////////////////////////////

    public static void main(String[] args) {

        V2Grpc.V2BlockingStub stub = V2Grpc.newBlockingStub(ClarifaiChannel.INSTANCE.getGrpcChannel())
            .withCallCredentials(new ClarifaiCallCredentials(PAT));

        MultiInputResponse postInputsResponse = stub.postInputs(
            PostInputsRequest.newBuilder()
            .setUserAppId(UserAppIDSet.newBuilder().setUserId(USER_ID).setAppId(APP_ID))
            .addInputs(
                Input.newBuilder()
                .setData(
                    Data.newBuilder()
                    .setImage(
                        Image.newBuilder()
                        .setUrl(IMAGE_URL_1)
                        .setAllowDuplicateUrl(true)
                    )
                    .addConcepts(Concept.newBuilder().setId(CONCEPT_ID_1).setValue(1))
                    .addConcepts(Concept.newBuilder().setId(CONCEPT_ID_2).setValue(0))
                )
            )
            .addInputs(
                Input.newBuilder()
                .setData(
                    Data.newBuilder()
                    .setImage(
                        Image.newBuilder()
                        .setUrl(IMAGE_URL_2)
                        .setAllowDuplicateUrl(true)
                    )
                    .addConcepts(Concept.newBuilder().setId(CONCEPT_ID_3).setValue(1))
                    .addConcepts(Concept.newBuilder().setId(CONCEPT_ID_4).setValue(0))
                    .addConcepts(Concept.newBuilder().setId(CONCEPT_ID_5).setValue(0))
                )
            )
            .build()
        );

        if (postInputsResponse.getStatus().getCode() != StatusCode.SUCCESS) {
            for (Input input: postInputsResponse.getInputsList()) {
                System.out.println("Input " + input.getId() + " status: ");
                System.out.println(input.getStatus() + "\n");
            }

            throw new RuntimeException("Post inputs failed, status: " + postInputsResponse.getStatus());
        }

    }

}
<?php

require __DIR__ . "/vendor/autoload.php";

////////////////////////////////////////////////////////////////////////////////////
// In this section, we set the user authentication, app ID, and the images and
// concepts we want to add. Change these strings to run your own example.
////////////////////////////////////////////////////////////////////////////////////

$USER_ID = "YOUR_USER_ID_HERE";
// Your PAT (Personal Access Token) can be found in the Account's Security section
$PAT = "YOUR_PAT_HERE";
$APP_ID = "YOUR_APP_ID_HERE";
// Change these to add your own images with concepts
$IMAGE_URL_1 = "https://samples.clarifai.com/puppy.jpeg";
$IMAGE_URL_2 = "https://samples.clarifai.com/wedding.jpg";
$CONCEPT_ID_1 = "charlie";
$CONCEPT_ID_2 = "our_wedding";
$CONCEPT_ID_3 = "our_wedding";
$CONCEPT_ID_4 = "charlie";
$CONCEPT_ID_5 = "cat";

///////////////////////////////////////////////////////////////////////////////////
// YOU DO NOT NEED TO CHANGE ANYTHING BELOW THIS LINE TO RUN THIS EXAMPLE
///////////////////////////////////////////////////////////////////////////////////

use Clarifai\Api\Concept;
use Clarifai\ClarifaiClient;
use Clarifai\Api\Data;
use Clarifai\Api\Image;
use Clarifai\Api\Input;
use Clarifai\Api\PostInputsRequest;
use Clarifai\Api\Status\StatusCode;
use Clarifai\Api\UserAppIDSet;

$client = ClarifaiClient::grpc();

$metadata = ["Authorization" => ["Key " . $PAT]];

$userDataObject = new UserAppIDSet([
    "user_id" => $USER_ID,
    "app_id" => $APP_ID
]);

// Let's make a RPC call to the Clarifai platform. It uses the opened gRPC client channel to communicate a
// request and then wait for the response
[$response, $status] = $client->PostInputs(
    // The request object carries the request along with the request status and other metadata related to the request itself
    new PostInputsRequest([
        "user_app_id" => $userDataObject,
        "inputs" => [
            new Input([
                // The Input object wraps the Data object in order to meet the API specification
                "data" => new Data([
                    // The Data object is constructed around the Image object. It offers a container that has additional image independent
                    // metadata. In this particular use case, no other metadata is needed to be specified
                    "image" => new Image([
                        // In the Clarifai platform, an image is defined by a special Image object
                        "url" => $IMAGE_URL_1,
                        "allow_duplicate_url" => true
                    ]),
                    "concepts" => [
                        new Concept([
                            "id" => $CONCEPT_ID_1,
                            "value" => 1
                        ]),
                        new Concept([
                            "id" => $CONCEPT_ID_2,
                            "value" => 0
                        ])
                    ]
                ])
            ]),
            new Input([
                "data" => new Data([
                    "image" => new Image([
                        "url" => $IMAGE_URL_2,
                        "allow_duplicate_url" => true
                    ]),
                    "concepts" => [
                        new Concept([
                            "id" => $CONCEPT_ID_3,
                            "value" => 1
                        ]),
                        new Concept([
                            "id" => $CONCEPT_ID_4,
                            "value" => 0
                        ]),
                        new Concept([
                            "id" => $CONCEPT_ID_5,
                            "value" => 0
                        ])
                    ]
                ])
            ])
        ]
    ]),
    $metadata
)->wait();

// A response is returned and the first thing we do is check the status of it
// A successful response will have a status code of 0; otherwise, there is some error
if ($status->code !== 0) {
    throw new Exception("Error: {$status->details}");
}
// In addition to the RPC response status, there is a Clarifai API status that reports if the operation was a success or failure
// (not just that the communication was successful)
if ($response->getStatus()->getCode() != StatusCode::SUCCESS) {
    print $response->getStatus()->getDetails();
    throw new Exception("Failure response: " . $response->getStatus()->getDescription());
}

echo $response->serializeToJsonString();
curl -X POST "https://api.clarifai.com/v2/users/YOUR_USER_ID_HERE/apps/YOUR_APP_ID_HERE/inputs" \
  -H "Authorization: Key YOUR_PAT_HERE" \
  -H "Content-Type: application/json" \
  -d '{
    "inputs": [
      {
        "data": {
          "image": {
            "url": "https://samples.clarifai.com/puppy.jpeg",
            "allow_duplicate_url": true
          },
          "concepts":[
            {
              "id": "charlie",
              "value": 1
            },
            {
              "id": "our_wedding",
              "value": 0
            }
          ]
        }
      },
      {
        "data": {
          "image": {
            "url": "https://samples.clarifai.com/wedding.jpg",
            "allow_duplicate_url": true
          },
          "concepts":[
            {
              "id": "our_wedding",
              "value": 1
            },
            {
              "id": "charlie",
              "value": 0
            },
            {
              "id": "cat",
              "value": 0
            }
          ]
        }
      }
    ]
  }'
Raw Output Example
status {
  code: SUCCESS
  description: "Ok"
  req_id: "7ff42b88ef477bb9b9ecab0b61d051ca"
}
inputs {
  id: "7b708ee204284ed0a914dc37a7def8be"
  data {
    image {
      url: "https://samples.clarifai.com/puppy.jpeg"
      image_info {
        format: "UnknownImageFormat"
        color_mode: "UnknownColorMode"
      }
    }
    concepts {
      id: "charlie"
      name: "charlie"
      value: 1.0
      app_id: "test-app"
    }
    concepts {
      id: "our_wedding"
      name: "our_wedding"
      app_id: "test-app"
    }
  }
  created_at {
    seconds: 1646288847
    nanos: 89138802
  }
  modified_at {
    seconds: 1646288847
    nanos: 89138802
  }
  status {
    code: INPUT_DOWNLOAD_PENDING
    description: "Download pending"
  }
}
inputs {
  id: "5571376e9d42447dafb76711669f6731"
  data {
    image {
      url: "https://samples.clarifai.com/wedding.jpg"
      image_info {
        format: "UnknownImageFormat"
        color_mode: "UnknownColorMode"
      }
    }
    concepts {
      id: "our_wedding"
      name: "our_wedding"
      value: 1.0
      app_id: "test-app"
    }
    concepts {
      id: "charlie"
      name: "charlie"
      app_id: "test-app"
    }
    concepts {
      id: "cat"
      name: "cat"
      app_id: "test-app"
    }
  }
  created_at {
    seconds: 1646288847
    nanos: 89138802
  }
  modified_at {
    seconds: 1646288847
    nanos: 89138802
  }
  status {
    code: INPUT_DOWNLOAD_PENDING
    description: "Download pending"
  }
}
Step 3: Create a Model
After adding images with concepts, you are now ready to create a custom transfer learning model (also called an "embedding-classifier"). You need to provide an ID for the model.
If you want to create another type of model you could use the model_type_id parameter to specify it. Otherwise, the "embedding-classifier" model type will be created by default.
PostModels will create new models but not create new model versions. This means trainable models that have not yet been trained will require the additional step of calling the PostModelVersions endpoint, while providing the *_info fields in the model version—to affect training.
Take note of the model id, as we'll need that for the next steps.
- Python (gRPC)
- JavaScript (REST)
- Node.js (gRPC)
- Java (gRPC)
- PHP (gRPC)
- cURL
##############################################################################
# In this section, we set the user authentication, app ID, and model ID.
# Change these strings to run your own example.
##############################################################################

USER_ID = 'YOUR_USER_ID_HERE'
# Your PAT (Personal Access Token) can be found in the Account's Security section
PAT = 'YOUR_PAT_HERE'
APP_ID = 'YOUR_APP_ID_HERE'
# Change this to create your own model
MODEL_ID = 'my-pets'

##########################################################################
# YOU DO NOT NEED TO CHANGE ANYTHING BELOW THIS LINE TO RUN THIS EXAMPLE
##########################################################################

from clarifai_grpc.channel.clarifai_channel import ClarifaiChannel
from clarifai_grpc.grpc.api import resources_pb2, service_pb2, service_pb2_grpc
from clarifai_grpc.grpc.api.status import status_code_pb2

channel = ClarifaiChannel.get_grpc_channel()
stub = service_pb2_grpc.V2Stub(channel)

metadata = (('authorization', 'Key ' + PAT),)

userDataObject = resources_pb2.UserAppIDSet(user_id=USER_ID, app_id=APP_ID)

post_models_response = stub.PostModels(
    service_pb2.PostModelsRequest(
        user_app_id=userDataObject,
        models=[
            resources_pb2.Model(
                id=MODEL_ID
            )
        ]
    ),
    metadata=metadata
)

if post_models_response.status.code != status_code_pb2.SUCCESS:
    print(post_models_response.status)
    raise Exception("Post models failed, status: " + post_models_response.status.description)
<!--index.html file-->

<script>
    //////////////////////////////////////////////////////////////////////////////
    // In this section, we set the user authentication, app ID, and model ID.
    // Change these strings to run your own example.
    //////////////////////////////////////////////////////////////////////////////

    const USER_ID = 'YOUR_USER_ID_HERE';
    // Your PAT (Personal Access Token) can be found in the Account's Security section
    const PAT = 'YOUR_PAT_HERE';
    const APP_ID = 'YOUR_APP_ID_HERE';
    // Change this to create your own model
    const MODEL_ID = 'my-pets';

    ///////////////////////////////////////////////////////////////////////////////////
    // YOU DO NOT NEED TO CHANGE ANYTHING BELOW THIS LINE TO RUN THIS EXAMPLE
    ///////////////////////////////////////////////////////////////////////////////////

    const raw = JSON.stringify({
        "user_app_id": {
            "user_id": USER_ID,
            "app_id": APP_ID
        },
        "model": {
            "id": MODEL_ID
        }
    });

    const requestOptions = {
        method: 'POST',
        headers: {
            'Accept': 'application/json',
            'Authorization': 'Key ' + PAT
        },
        body: raw
    };

    fetch("https://api.clarifai.com/v2/models", requestOptions)
        .then(response => response.text())
        .then(result => console.log(result))
        .catch(error => console.log('error', error));

</script>
//index.js file

///////////////////////////////////////////////////////////////////////////////
// In this section, we set the user authentication, app ID, and model ID.
// Change these strings to run your own example.
///////////////////////////////////////////////////////////////////////////////

const USER_ID = 'YOUR_USER_ID_HERE';
// Your PAT (Personal Access Token) can be found in the Account's Security section
const PAT = 'YOUR_PAT_HERE';
const APP_ID = 'YOUR_APP_ID_HERE';
// Change this to create your own model
const MODEL_ID = 'my-pets';

/////////////////////////////////////////////////////////////////////////////
// YOU DO NOT NEED TO CHANGE ANYTHING BELOW THIS LINE TO RUN THIS EXAMPLE
/////////////////////////////////////////////////////////////////////////////

const { ClarifaiStub, grpc } = require("clarifai-nodejs-grpc");

const stub = ClarifaiStub.grpc();

// This will be used by every Clarifai endpoint call
const metadata = new grpc.Metadata();
metadata.set("authorization", "Key " + PAT);

stub.PostModels(
    {
        user_app_id: {
            "user_id": USER_ID,
            "app_id": APP_ID
        },
        models: [
            {
                id: MODEL_ID
            }
        ]
    },
    metadata,
    (err, response) => {
        if (err) {
            throw new Error(err);
        }

        if (response.status.code !== 10000) {
            throw new Error("Post models failed, status: " + response.status.description);
        }
    }
);
package com.clarifai.example;

import com.clarifai.grpc.api.*;
import com.clarifai.channel.ClarifaiChannel;
import com.clarifai.credentials.ClarifaiCallCredentials;
import com.clarifai.grpc.api.status.StatusCode;

public class ClarifaiExample {

    ////////////////////////////////////////////////////////////////////////////////////////////
    // In this section, we set the user authentication, app ID, model ID, and model type ID.
    // Change these strings to run your own example.
    ///////////////////////////////////////////////////////////////////////////////////////////

    static final String USER_ID = "YOUR_USER_ID_HERE";
    //Your PAT (Personal Access Token) can be found in the portal under Authentication
    static final String PAT = "YOUR_PAT_HERE";
    static final String APP_ID = "YOUR_APP_ID_HERE";
    // Change this to create your own model
    static final String MODEL_ID = "my-pets";

    ///////////////////////////////////////////////////////////////////////////////////
    // YOU DO NOT NEED TO CHANGE ANYTHING BELOW THIS LINE TO RUN THIS EXAMPLE
    ///////////////////////////////////////////////////////////////////////////////////

    public static void main(String[] args) {

        V2Grpc.V2BlockingStub stub = V2Grpc.newBlockingStub(ClarifaiChannel.INSTANCE.getGrpcChannel())
            .withCallCredentials(new ClarifaiCallCredentials(PAT));

        SingleModelResponse postModelsResponse = stub.postModels(
            PostModelsRequest.newBuilder()
            .setUserAppId(UserAppIDSet.newBuilder().setUserId(USER_ID).setAppId(APP_ID))
            .addModels(
                Model.newBuilder()
                .setId(MODEL_ID)
            ).build()
        );

        if (postModelsResponse.getStatus().getCode() != StatusCode.SUCCESS) {
            throw new RuntimeException("Post models failed, status: " + postModelsResponse.getStatus());
        }

    }

}
<?php

require __DIR__ . "/vendor/autoload.php";

/////////////////////////////////////////////////////////////////////////////////////////////////
// In this section, we set the user authentication, app ID, and model ID.
// Change these strings to run your own example.
/////////////////////////////////////////////////////////////////////////////////////////////////

$USER_ID = "YOUR_USER_ID_HERE";
// Your PAT (Personal Access Token) can be found in the Account's Security section
$PAT = "YOUR_PAT_HERE";
$APP_ID = "YOUR_APP_ID_HERE";
// Change these to create your own model
$MODEL_ID = "my-pets";

///////////////////////////////////////////////////////////////////////////////////
// YOU DO NOT NEED TO CHANGE ANYTHING BELOW THIS LINE TO RUN THIS EXAMPLE
///////////////////////////////////////////////////////////////////////////////////

use Clarifai\ClarifaiClient;
use Clarifai\Api\Model;
use Clarifai\Api\PostModelsRequest;
use Clarifai\Api\Status\StatusCode;
use Clarifai\Api\UserAppIDSet;

$client = ClarifaiClient::grpc();

$metadata = ["Authorization" => ["Key " . $PAT]];

$userDataObject = new UserAppIDSet([
    "user_id" => $USER_ID,
    "app_id" => $APP_ID,
]);

// Let's make a RPC call to the Clarifai platform. It uses the opened gRPC client channel to communicate a
// request and then wait for the response
[$response, $status] = $client->PostModels(
        // The request object carries the request along with the request status and other metadata related to the request itself
        new PostModelsRequest([
            "user_app_id" => $userDataObject,
            "models" => [
                new Model([
                    "id" => $MODEL_ID
                ]),
            ],
        ]),
        $metadata
    )->wait();

// A response is returned and the first thing we do is check the status of it
// A successful response will have a status code of 0; otherwise, there is some error
if ($status->code !== 0) {
    throw new Exception("Error: {$status->details}");
}
// In addition to the RPC response status, there is a Clarifai API status that reports if the operation was a success or failure
// (not just that the communication was successful)
if ($response->getStatus()->getCode() != StatusCode::SUCCESS) {
    throw new Exception("Failure response: " . $response->getStatus()->getDescription() . " " . $response->getStatus()->getDetails());
}

?>
curl -X POST "https://api.clarifai.com/v2/users/YOUR_USER_ID_HERE/apps/YOUR_APP_ID_HERE/models" \
  -H "Authorization: Key YOUR_PAT_HERE" \
  -H "Content-Type: application/json" \
  -d '{
    "model": {
      "id": "my-pets"
    }
  }'
Raw Output Example
status {
  code: SUCCESS
  description: "Ok"
  req_id: "c179a31bea659b27214213ee137215f8"
}
model {
  id: "my-pets"
  name: "my-pets"
  created_at {
    seconds: 1693506608
    nanos: 652910264
  }
  app_id: "items-app"
  user_id: "my-user-id"
  model_type_id: "embedding-classifier"
  visibility {
    gettable: PRIVATE
  }
  metadata {
  }
  modified_at {
    seconds: 1693506608
    nanos: 652910264
  }
  presets {
  }
  workflow_recommended {
  }
}
Step 4: Train the Model
Now that you've added images with concepts, then created a model, the next step is to train the model. When you train a model, you are telling the system to look at all the images with concepts you've provided and learn from them.
This train operation is asynchronous. It may take a few seconds for your model to be fully trained and ready.
Take note of the model_version id in the response. We'll need that for the next section when we predict with the model.
-
The PostModelVersions endpoint kicks off training and creates a new model version. You can also add concepts to a model when creating the model version—and only if the model type supports it as defined in the model type parameters.
-
You can use the PostModelVersions endpoint to give information specific to a model version. All the
*_infofields—such asoutput_info,input_info,train_info, andimport_info—are available on this endpoint. -
You cannot remove the training concepts from a model version. However, you can edit the additional
OutputInfo.Paramsconcept options if they are defined in the model type. -
When training an embedding-classifier, you could specify the
enrich_datasetvariable insidemodelVersion.TrainInfo.Paramsof the PostModelVersions endpoint. It lets you enrich the model with supplemental data from pre-built datasets of negative embeddings, which improves the model's accuracy. It has two options:Automatic(default) means that if there are negative embeddings for a base model, we will use them—and we won’t use them if they’re not available.Disabledmeans that we should not use the negative embeddings whether they are available or not.
- Python (gRPC)
- JavaScript (REST)
- Node.js (gRPC)
- Java (gRPC)
- PHP (gRPC)
- cURL
########################################################################################
# In this section, we set the user authentication, app ID, model ID, and concept IDs.
# Change these strings to run your own example.
########################################################################################

USER_ID = 'YOUR_USER_ID_HERE'
# Your PAT (Personal Access Token) can be found in the Account's Security section
PAT = 'YOUR_PAT_HERE'
APP_ID = 'YOUR_APP_ID_HERE'
# Change these to train your own model
MODEL_ID = 'my-pets'
CONCEPT_ID_1 = 'charlie'
CONCEPT_ID_2 = 'our_wedding'

##########################################################################
# YOU DO NOT NEED TO CHANGE ANYTHING BELOW THIS LINE TO RUN THIS EXAMPLE
##########################################################################

from clarifai_grpc.channel.clarifai_channel import ClarifaiChannel
from clarifai_grpc.grpc.api import resources_pb2, service_pb2, service_pb2_grpc
from clarifai_grpc.grpc.api.status import status_code_pb2

channel = ClarifaiChannel.get_grpc_channel()
stub = service_pb2_grpc.V2Stub(channel)

metadata = (('authorization', 'Key ' + PAT),)

userDataObject = resources_pb2.UserAppIDSet(user_id=USER_ID, app_id=APP_ID)

post_model_versions = stub.PostModelVersions(
    service_pb2.PostModelVersionsRequest(
        user_app_id=userDataObject,
        model_id=MODEL_ID,
        model_versions=[
            resources_pb2.ModelVersion(
                output_info=resources_pb2.OutputInfo(
                    data=resources_pb2.Data(
                        concepts=[
                            resources_pb2.Concept(id=CONCEPT_ID_1, value=1), # 1 means true, this concept is present
                            resources_pb2.Concept(id=CONCEPT_ID_2, value=1)
                            ]
                        ),
                )
            )]
    ),
    metadata=metadata
)

if post_model_versions.status.code != status_code_pb2.SUCCESS:
    print(post_model_versions.status)
    raise Exception("Post models versions failed, status: " + post_model_versions.status.description)
<!--index.html file-->

<script>
  ////////////////////////////////////////////////////////////////////////////////////////
  // In this section, we set the user authentication, app ID, model ID, and concept IDs.
  // Change these strings to run your own example.
  ///////////////////////////////////////////////////////////////////////////////////////

  const USER_ID = 'YOUR_USER_ID_HERE';
  // Your PAT (Personal Access Token) can be found in the Account's Security section
  const PAT = 'YOUR_PAT_HERE';
  const APP_ID = 'YOUR_APP_ID_HERE';
  // Change these to train your own model
  const MODEL_ID = 'my-pets';
  const CONCEPT_ID_1 = 'charlie';
  const CONCEPT_ID_2 = 'our_wedding';

  ///////////////////////////////////////////////////////////////////////////////////
  // YOU DO NOT NEED TO CHANGE ANYTHING BELOW THIS LINE TO RUN THIS EXAMPLE
  ///////////////////////////////////////////////////////////////////////////////////

  const raw = JSON.stringify({
      "user_app_id": {
          "user_id": USER_ID,
          "app_id": APP_ID
      },
      "model_versions":[{
          "output_info": {
              "data":{
                  "concepts":[
                          {
                              "id": CONCEPT_ID_1,
                              "value": 1
                          },
                          {
                              "id": CONCEPT_ID_2,
                              "value": 1
                          },
                      ]
                  }
              }
          }]

  });

  const requestOptions = {
      method: 'POST',
      headers: {
          'Content-Type': 'application/json',
          'Authorization': 'Key ' + PAT
      },
      body: raw
  };

  fetch(`https://api.clarifai.com/v2/models/${MODEL_ID}/versions`, requestOptions)
      .then(response => response.text())
      .then(result => console.log(result))
      .catch(error => console.log('error', error));

</script>
//index.js file

////////////////////////////////////////////////////////////////////////////////////////
// In this section, we set the user authentication, app ID, model ID, and concept IDs.
// Change these strings to run your own example.
//////////////////////////////////////////////////////////////////////////////////////

const USER_ID = 'YOUR_USER_ID_HERE';
// Your PAT (Personal Access Token) can be found in the Account's Security section
const PAT = 'YOUR_PAT_HERE';
const APP_ID = 'YOUR_APP_ID_HERE';
// Change these to train your own model
const MODEL_ID = 'my-pets';
const CONCEPT_ID_1 = 'charlie';
const CONCEPT_ID_2 = 'our_wedding';

/////////////////////////////////////////////////////////////////////////////
// YOU DO NOT NEED TO CHANGE ANYTHING BELOW THIS LINE TO RUN THIS EXAMPLE
/////////////////////////////////////////////////////////////////////////////

const { ClarifaiStub, grpc } = require("clarifai-nodejs-grpc");

const stub = ClarifaiStub.grpc();

// This will be used by every Clarifai endpoint call
const metadata = new grpc.Metadata();
metadata.set("authorization", "Key " + PAT);

stub.PostModelVersions(
    {
        user_app_id: {
            "user_id": USER_ID,
            "app_id": APP_ID
        },
        model_id: MODEL_ID,
        model_versions: [{
            output_info: {
                data: { concepts: [{ id: CONCEPT_ID_1, value: 1 }, { id: CONCEPT_ID_2, value: 1 }] },
            }
        }
        ]
    },
    metadata,
    (err, response) => {
        if (err) {
            throw new Error(err);
        }

        if (response.status.code !== 10000) {
            throw new Error("Post models failed, status: " + response.status.description);
        }
    }
);
package com.clarifai.example;

import com.clarifai.grpc.api.*;
import com.clarifai.channel.ClarifaiChannel;
import com.clarifai.credentials.ClarifaiCallCredentials;
import com.clarifai.grpc.api.status.StatusCode;

public class ClarifaiExample {

    /////////////////////////////////////////////////////////////////////////////////////////////
    // In this section, we set the user authentication, app ID, model ID, and concept IDs.
    // Change these strings to run your own example.
    /////////////////////////////////////////////////////////////////////////////////////////////

    static final String USER_ID = "YOUR_USER_ID_HERE";
    // Your PAT (Personal Access Token) can be found in the portal under Authentication
    static final String PAT = "YOUR_PAT_HERE";
    static final String APP_ID = "YOUR_APP_ID_HERE";
    // Change these to train your own model
    static final String MODEL_ID = "my-pets";
    static final String CONCEPT_ID_1 = "charlie";
    static final String CONCEPT_ID_2 = "our_wedding";

    ///////////////////////////////////////////////////////////////////////////////////
    // YOU DO NOT NEED TO CHANGE ANYTHING BELOW THIS LINE TO RUN THIS EXAMPLE
    ///////////////////////////////////////////////////////////////////////////////////

    public static void main(String[] args) {

        V2Grpc.V2BlockingStub stub = V2Grpc.newBlockingStub(ClarifaiChannel.INSTANCE.getGrpcChannel())
                .withCallCredentials(new ClarifaiCallCredentials(PAT));

        SingleModelResponse postModelVersionsResponse = stub.postModelVersions(
                PostModelVersionsRequest.newBuilder()
                        .setUserAppId(UserAppIDSet.newBuilder().setUserId(USER_ID).setAppId(APP_ID))
                        .setModelId(MODEL_ID)
                        .addModelVersions(ModelVersion.newBuilder()
                                .setOutputInfo(OutputInfo.newBuilder()
                                        .setData(Data.newBuilder()
                                                .addConcepts(Concept.newBuilder()
                                                        .setId(CONCEPT_ID_1)
                                                        .setValue(1)
                                                )
                                                .addConcepts(Concept.newBuilder()
                                                        .setId(CONCEPT_ID_2)
                                                        .setValue(1)
                                                )
                                        )
                                )
                        )
                        .build()
        );

        if (postModelVersionsResponse.getStatus().getCode() != StatusCode.SUCCESS) {
            throw new RuntimeException("Post model outputs failed, status: " + postModelVersionsResponse.getStatus());
        }

    }
}
<?php

require __DIR__ . "/vendor/autoload.php";

/////////////////////////////////////////////////////////////////////////////////////////////////
// In this section, we set the user authentication, app ID, model ID, and concept ID.
// Change these strings to run your own example.
/////////////////////////////////////////////////////////////////////////////////////////////////

$USER_ID = "YOUR_USER_ID_HERE";
// Your PAT (Personal Access Token) can be found in the Account's Security section
$PAT = "YOUR_PAT_HERE";
$APP_ID = "YOUR_APP_ID_HERE";
// Change these to create your own model
$MODEL_ID = "my-pets";
$CONCEPT_ID_1 = "charlie";
$CONCEPT_ID_2 = "our_wedding";

///////////////////////////////////////////////////////////////////////////////////
// YOU DO NOT NEED TO CHANGE ANYTHING BELOW THIS LINE TO RUN THIS EXAMPLE
///////////////////////////////////////////////////////////////////////////////////

use Clarifai\ClarifaiClient;
use Clarifai\Api\PostModelVersionsRequest;
use Clarifai\Api\Status\StatusCode;
use Clarifai\Api\UserAppIDSet;
use Clarifai\Api\ModelVersion;
use Clarifai\Api\OutputInfo;
use Clarifai\Api\Data;
use Clarifai\Api\Concept;

$client = ClarifaiClient::grpc();

$metadata = ["Authorization" => ["Key " . $PAT]];

$userDataObject = new UserAppIDSet([
    "user_id" => $USER_ID,
    "app_id" => $APP_ID,
]);

// Let's make a RPC call to the Clarifai platform. It uses the opened gRPC client channel to communicate a
// request and then wait for the response
[$response, $status] = $client->PostModelVersions(
    // The request object carries the request along with the request status and other metadata related to the request itself
    new PostModelVersionsRequest([
        "user_app_id" => $userDataObject,
        "model_id" => $MODEL_ID,
        "model_versions" => [
            new ModelVersion([
                "output_info" => new OutputInfo([
                    "data" => new Data([
                        "concepts" => [
                            new Concept([
                                "id" => $CONCEPT_ID_1,
                                "value" => 1,
                            ]),
                            new Concept([
                                "id" => $CONCEPT_ID_2,
                                "value" => 1,
                            ]),
                        ],
                    ]),
                ]),
            ]),
        ],
    ]),
    $metadata
)->wait();

// A response is returned and the first thing we do is check the status of it
// A successful response will have a status code of 0; otherwise, there is some error
if ($status->code !== 0) {
    throw new Exception("Error: {$status->details}");
}
// In addition to the RPC response status, there is a Clarifai API status that reports if the operation was a success or failure
// (not just that the communication was successful)
if ($response->getStatus()->getCode() != StatusCode::SUCCESS) {
    throw new Exception("Failure response: " . $response->getStatus()->getDescription() . " " . $response->getStatus()->getDetails());
}
curl -X POST "https://api.clarifai.com/v2/users/YOUR_USER_ID_HERE/apps/YOUR_APP_ID_HERE/models/YOUR_MODEL_ID_HERE/versions" \
  -H "Authorization: Key YOUR_PAT_HERE" \
  -H "Content-Type: application/json" \
  -d '{
    "model_versions":[{
        "output_info": {
            "data":{
                "concepts":[
                        {
                          "id": "charlie",
                          "value": 1
                        },
                        {
                          "id": "our_wedding",
                          "value": 1
                        }
                    ]
                }
            }
        }]
  }'
Raw Output Example
status {
  code: SUCCESS
  description: "Ok"
  req_id: "c2b73a383ff73d57ce10eb92d4ceeca3"
}
model {
  id: "my-pets"
  name: "my-pets"
  created_at {
    seconds: 1693501169
    nanos: 811818000
  }
  app_id: "items-app"
  model_version {
    id: "adbd648acc8146f788520dad0376411e"
    created_at {
      seconds: 1693558909
      nanos: 61554817
    }
    status {
      code: MODEL_QUEUED_FOR_TRAINING
      description: "Model is currently in queue for training."
    }
    active_concept_count: 2
    visibility {
      gettable: PRIVATE
    }
    app_id: "items-app"
    user_id: "alfrick"
    metadata {
    }
    output_info {
      output_config {
      }
      message: "Show output_info with: GET /models/{model_id}/output_info"
      params {
        fields {
          key: "max_concepts"
          value {
            number_value: 20.0
          }
        }
        fields {
          key: "min_value"
          value {
            number_value: 0.0
          }
        }
        fields {
          key: "select_concepts"
          value {
            list_value {
            }
          }
        }
      }
    }
    input_info {
      params {
      }
      base_embed_model {
        id: "general-image-embedding"
        app_id: "main"
        model_version {
          id: "bb186755eda04f9cbb6fe32e816be104"
        }
        user_id: "clarifai"
        model_type_id: "visual-embedder"
      }
    }
    train_info {
      params {
        fields {
          key: "dataset_id"
          value {
            string_value: ""
          }
        }
        fields {
          key: "dataset_version_id"
          value {
            string_value: ""
          }
        }
        fields {
          key: "enrich_dataset"
          value {
            string_value: "Automatic"
          }
        }
      }
    }
    import_info {
    }
  }
  user_id: "alfrick"
  model_type_id: "embedding-classifier"
  visibility {
    gettable: PRIVATE
  }
  metadata {
  }
  modified_at {
    seconds: 1693501169
    nanos: 811818000
  }
  presets {
  }
  workflow_recommended {
  }
}
Step 5: Predict With the Model
Now that we have trained the model, we can start making predictions with it. In our predict call, we specify three items: the model id, model version id (optional, defaults to the latest trained version if omitted), and the input we want a prediction for.
You can repeat the above steps as often as you like. By adding more images with concepts and training, you can get the model to predict exactly how you want it to.
- Python (gRPC)
- JavaScript (REST)
- Node.js (gRPC)
- Java (gRPC)
- PHP (gRPC)
- cURL
####################################################################################
# In this section, we set the user authentication, app ID, model ID, model version,
# and image URL. Change these strings to run your own example.
####################################################################################

USER_ID = 'YOUR_USER_ID_HERE'
# Your PAT (Personal Access Token) can be found in the Account's Security section
PAT = 'YOUR_PAT_HERE'
APP_ID = 'YOUR_APP_ID_HERE'
# Change these to make your own predictions
MODEL_ID = 'my-pets'
MODEL_VERSION = '8eb21f63ba9d40c7b84ecfd664ac603d'
IMAGE_URL = 'https://samples.clarifai.com/puppy.jpeg'

##########################################################################
# YOU DO NOT NEED TO CHANGE ANYTHING BELOW THIS LINE TO RUN THIS EXAMPLE
##########################################################################

from clarifai_grpc.channel.clarifai_channel import ClarifaiChannel
from clarifai_grpc.grpc.api import resources_pb2, service_pb2, service_pb2_grpc
from clarifai_grpc.grpc.api.status import status_code_pb2

channel = ClarifaiChannel.get_grpc_channel()
stub = service_pb2_grpc.V2Stub(channel)

metadata = (('authorization', 'Key ' + PAT),)

userDataObject = resources_pb2.UserAppIDSet(user_id=USER_ID, app_id=APP_ID)

post_model_outputs_response = stub.PostModelOutputs(
    service_pb2.PostModelOutputsRequest(
        user_app_id=userDataObject,
        model_id=MODEL_ID,
        version_id=MODEL_VERSION,  # This is optional. Defaults to the latest model version.
        inputs=[
            resources_pb2.Input(
                data=resources_pb2.Data(
                    image=resources_pb2.Image(
                        url=IMAGE_URL
                    )
                )
            )
        ]
    ),
    metadata=metadata
)

if post_model_outputs_response.status.code != status_code_pb2.SUCCESS:
    print(post_model_outputs_response.status)
    raise Exception("Post model outputs failed, status: " + post_model_outputs_response.status.description)

# Since we have one input, one output will exist here.
output = post_model_outputs_response.outputs[0]

print("Predicted concepts:")
for concept in output.data.concepts:
    print("%s %.2f" % (concept.name, concept.value))

# Uncomment this line to print the raw output
#print(post_model_outputs_response)
<!--index.html file-->

<script>
    //////////////////////////////////////////////////////////////////////////////////////
    // In this section, we set the user authentication, app ID, model ID, model version,
    // and image URL. Change these strings to run your own example.
    //////////////////////////////////////////////////////////////////////////////////////

    const USER_ID = 'YOUR_USER_ID_HERE';
    // Your PAT (Personal Access Token) can be found in the Account's Security section
    const PAT = 'YOUR_PAT_HERE';
    const APP_ID = 'YOUR_APP_ID_HERE';
    // Change these to make your own predictions
    const MODEL_ID = 'my-pets';
    const MODEL_VERSION = '6f2c3e043b3e49bdafd38851fb5675d5';
    const IMAGE_URL = 'https://samples.clarifai.com/metro-north.jpg';

    ///////////////////////////////////////////////////////////////////////////////////
    // YOU DO NOT NEED TO CHANGE ANYTHING BELOW THIS LINE TO RUN THIS EXAMPLE
    ///////////////////////////////////////////////////////////////////////////////////

    const raw = JSON.stringify({
        "user_app_id": {
            "user_id": USER_ID,
            "app_id": APP_ID
        },
        "inputs": [
            {
                "data": {
                    "image": {
                        "url": IMAGE_URL
                    }
                }
            }
        ]
    });

    const requestOptions = {
        method: 'POST',
        headers: {
            'Accept': 'application/json',
            'Authorization': 'Key ' + PAT
        },
        body: raw
    };

    // NOTE: MODEL_VERSION_ID is optional, you can also call prediction with the MODEL_ID only
    // https://api.clarifai.com/v2/models/{YOUR_MODEL_ID}/outputs
    // this will default to the latest version_id

    fetch(`https://api.clarifai.com/v2/models/${MODEL_ID}/versions/${MODEL_VERSION}/outputs`, requestOptions)
        .then(response => response.text())
        .then(result => console.log(result))
        .catch(error => console.log('error', error));

</script>
//index.js file

//////////////////////////////////////////////////////////////////////////////////////
// In this section, we set the user authentication, app ID, model ID, model version,
// and image URL. Change these strings to run your own example.
//////////////////////////////////////////////////////////////////////////////////////

const USER_ID = 'YOUR_USER_ID_HERE';
// Your PAT (Personal Access Token) can be found in the Account's Security section
const PAT = 'YOUR_PAT_HERE';
const APP_ID = 'YOUR_APP_ID_HERE';
// Change these to make your own predictions
const MODEL_ID = 'my-pets';
const MODEL_VERSION = '6f2c3e043b3e49bdafd38851fb5675d5';
const IMAGE_URL = 'https://samples.clarifai.com/metro-north.jpg';

/////////////////////////////////////////////////////////////////////////////
// YOU DO NOT NEED TO CHANGE ANYTHING BELOW THIS LINE TO RUN THIS EXAMPLE
/////////////////////////////////////////////////////////////////////////////

const { ClarifaiStub, grpc } = require("clarifai-nodejs-grpc");

const stub = ClarifaiStub.grpc();

// This will be used by every Clarifai endpoint call
const metadata = new grpc.Metadata();
metadata.set("authorization", "Key " + PAT);

stub.PostModelOutputs(
    {
        user_app_id: {
            "user_id": USER_ID,
            "app_id": APP_ID
        },
        model_id: MODEL_ID,
        version_id: MODEL_VERSION,  // This is optional. Defaults to the latest model version
        inputs: [
            { data: { image: { url: IMAGE_URL } } }
        ]
    },
    metadata,
    (err, response) => {
        if (err) {
            throw new Error(err);
        }

        if (response.status.code !== 10000) {
            throw new Error("Post model outputs failed, status: " + response.status.description);
        }

        // Since we have one input, one output will exist here.
        const output = response.outputs[0];

        console.log("Predicted concepts:");
        for (const concept of output.data.concepts) {
            console.log(concept.name + " " + concept.value);
        }
    }
);
package com.clarifai.example;

import com.clarifai.grpc.api.*;
import com.clarifai.channel.ClarifaiChannel;
import com.clarifai.credentials.ClarifaiCallCredentials;
import com.clarifai.grpc.api.status.StatusCode;

public class ClarifaiExample {

    //////////////////////////////////////////////////////////////////////////////////////
    // In this section, we set the user authentication, app ID, model ID, model version,
    // and image URL. Change these strings to run your own example
    /////////////////////////////////////////////////////////////////////////////////////

    static final String USER_ID = "YOUR_USER_ID_HERE";
    //Your PAT (Personal Access Token) can be found in the portal under Authentication
    static final String PAT = "YOUR_PAT_HERE";
    static final String APP_ID = "YOUR_APP_ID_HERE";
    // Change these to make your own predictions
    static final String MODEL_ID = "my-pets";
    static final String MODEL_VERSION = "6f2c3e043b3e49bdafd38851fb5675d5";
    static final String IMAGE_URL = "https://samples.clarifai.com/metro-north.jpg";

    ///////////////////////////////////////////////////////////////////////////////////
    // YOU DO NOT NEED TO CHANGE ANYTHING BELOW THIS LINE TO RUN THIS EXAMPLE
    ///////////////////////////////////////////////////////////////////////////////////

    public static void main(String[] args) {

        V2Grpc.V2BlockingStub stub = V2Grpc.newBlockingStub(ClarifaiChannel.INSTANCE.getGrpcChannel())
            .withCallCredentials(new ClarifaiCallCredentials(PAT));

        MultiOutputResponse postModelOutputsResponse = stub.postModelOutputs(
            PostModelOutputsRequest.newBuilder()
            .setUserAppId(UserAppIDSet.newBuilder().setUserId(USER_ID).setAppId(APP_ID))
            .setModelId(MODEL_ID)
            .setVersionId(MODEL_VERSION) // This is optional. Defaults to the latest model version
            .addInputs(
                Input.newBuilder().setData(
                    Data.newBuilder().setImage(
                        Image.newBuilder().setUrl(IMAGE_URL)
                    )
                )
            )
            .build()
        );

        if (postModelOutputsResponse.getStatus().getCode() != StatusCode.SUCCESS) {
            throw new RuntimeException("Post model outputs failed, status: " + postModelOutputsResponse.getStatus());
        }

        // Since we have one input, one output will exist here.
        Output output = postModelOutputsResponse.getOutputs(0);

        System.out.println("Predicted concepts:");
        for (Concept concept: output.getData().getConceptsList()) {
            System.out.printf("%s %.2f%n", concept.getName(), concept.getValue());
        }

    }

}
<?php

require __DIR__ . "/vendor/autoload.php";

//////////////////////////////////////////////////////////////////////////////////////////////////
// In this section, we set the user authentication, app ID, model ID, model version,
// and image URL. Change these strings to run your own example.
//////////////////////////////////////////////////////////////////////////////////////////////////

$USER_ID = "YOUR_USER_ID_HERE";
// Your PAT (Personal Access Token) can be found in the Account's Security section
$PAT = "YOUR_PAT_HERE";
$APP_ID = "YOUR_APP_ID_HERE";
// Change these to whatever model and image URL you want to use
$MODEL_ID = "my-pets";
$MODEL_VERSION_ID = "8eb21f63ba9d40c7b84ecfd664ac603d";
$IMAGE_URL = "https://samples.clarifai.com/puppy.jpeg";

///////////////////////////////////////////////////////////////////////////////////
// YOU DO NOT NEED TO CHANGE ANYTHING BELOW THIS LINE TO RUN THIS EXAMPLE
///////////////////////////////////////////////////////////////////////////////////

use Clarifai\ClarifaiClient;
use Clarifai\Api\Data;
use Clarifai\Api\Image;
use Clarifai\Api\Input;
use Clarifai\Api\PostModelOutputsRequest;
use Clarifai\Api\Status\StatusCode;
use Clarifai\Api\UserAppIDSet;

$client = ClarifaiClient::grpc();

$metadata = ["Authorization" => ["Key " . $PAT]];

$userDataObject = new UserAppIDSet([
    "user_id" => $USER_ID,
    "app_id" => $APP_ID,
]);

// Let's make a RPC call to the Clarifai platform. It uses the opened gRPC client channel to communicate a
// request and then wait for the response
[$response, $status] = $client->PostModelOutputs(
        // The request object carries the request along with the request status and other metadata related to the request itself
        new PostModelOutputsRequest([
            "user_app_id" => $userDataObject,
            "model_id" => $MODEL_ID,
            "version_id" => $MODEL_VERSION_ID, // This is optional. Defaults to the latest model version
            "inputs" => [
                new Input([
                    // The Input object wraps the Data object in order to meet the API specification
                    "data" => new Data([
                        // The Data object is constructed around the Image object. It offers a container that has additional image independent
                        // metadata. In this particular use case, no other metadata is needed to be specified
                        "image" => new Image([
                            // In the Clarifai platform, an image is defined by a special Image object
                            "url" => $IMAGE_URL,
                        ]),
                    ]),
                ]),
            ],
        ]),
        $metadata
    )
    ->wait();

// A response is returned and the first thing we do is check the status of it
// A successful response will have a status code of 0; otherwise, there is some error
if ($status->code !== 0) {
    throw new Exception("Error: {$status->details}");
}
// In addition to the RPC response status, there is a Clarifai API status that reports if the operation was a success or failure
// (not just that the communication was successful)
if ($response->getStatus()->getCode() != StatusCode::SUCCESS) {
    throw new Exception("Failure response: " . $response->getStatus()->getDescription() . " " . $response->getStatus()->getDetails());
}

// The output of a successful call can be used in many ways. In this example, we loop through all of the predicted concepts
// and print them out along with their numerical prediction value (confidence)
echo "Predicted concepts: </br>";
foreach ($response->getOutputs()[0]->getData()->getConcepts() as $concept) {
    echo $concept->getName() . ": " . number_format($concept->getValue(), 2) . "</br>";
}

?>
curl -X POST "https://api.clarifai.com/v2/users/YOUR_USER_ID_HERE/apps/YOUR_APP_ID_HERE/models/YOUR_MODEL_ID_HERE/versions/YOUR_MODEL_VERSION_ID_HERE/outputs" \
  -H "Authorization: Key YOUR_PAT_HERE" \
  -H "Content-Type: application/json" \
  -d '{
    "inputs": [
      {
        "data": {
          "image": {
            "url": "https://samples.clarifai.com/metro-north.jpg"
          }
        }
      }
    ]
  }'
Text Output Example
Predicted concepts:
charlie 1.00
Raw Output Example
status {
    code: SUCCESS
    description: "Ok"
    req_id: "db4cf89c13303aa9889a89f2ae0a91f4"
  }
  outputs {
    id: "20ed3f59dc5b4b1e9082a7e91ff29f48"
    status {
      code: SUCCESS
      description: "Ok"
    }
    created_at {
      seconds: 1646333543
      nanos: 352417324
    }
    model {
      id: "my-pets"
      name: "my-pets"
      created_at {
        seconds: 1646291711
        nanos: 640607000
      }
      app_id: "test-app"
      output_info {
        output_config {
        }
        message: "Show output_info with: GET /models/{model_id}/output_info"
        params {
          fields {
            key: "max_concepts"
            value {
              number_value: 20.0
            }
          }
          fields {
            key: "min_value"
            value {
              number_value: 0.0
            }
          }
          fields {
            key: "select_concepts"
            value {
              list_value {
              }
            }
          }
        }
      }
      model_version {
        id: "8eb21f63ba9d40c7b84ecfd664ac603d"
        created_at {
          seconds: 1646330065
          nanos: 537080000
        }
        status {
          code: MODEL_TRAINED
          description: "Model is trained and ready"
        }
        total_input_count: 14
        completed_at {
          seconds: 1646330068
          nanos: 100250000
        }
        visibility {
          gettable: PRIVATE
        }
        app_id: "test-app"
        user_id: "ei2leoz3s3iy"
        metadata {
        }
      }
      user_id: "ei2leoz3s3iy"
      input_info {
      }
      train_info {
      }
      model_type_id: "embedding-classifier"
      visibility {
        gettable: PRIVATE
      }
      modified_at {
        seconds: 1646291711
        nanos: 640607000
      }
      import_info {
      }
    }
    input {
      id: "f1ce5584c5e54653b722ac3ef163a077"
      data {
        image {
          url: "https://samples.clarifai.com/puppy.jpeg"
        }
      }
    }
    data {
      concepts {
        id: "charlie"
        name: "charlie"
        value: 0.9998574256896973
        app_id: "test-app"
      }
    }
  }