Create a Labeling Task
Label a batch of data manually or with AI assistance
Tasks enable you to label the inputs in your dataset easily, fast, and conveniently. You can create new labeling tasks, distribute these tasks to your workforce, and review their work in one convenient tool.
Let's demonstrate how you can label a batch of data manually or with AI assistance.
Click here to learn how to label inputs automatically using the auto-annotation technique.
Prerequisites
- An application
- A dataset containing the inputs you want to label. For this example, we’ll create a dataset containing a few images of pants, shirts, shoes, shorts, and skirts sourced from this clothing dataset.
- Concepts that you want to use for the labeling task. For this example, we'll add the following concepts to our app:
pants,shirt,shoe,short, andskirt.
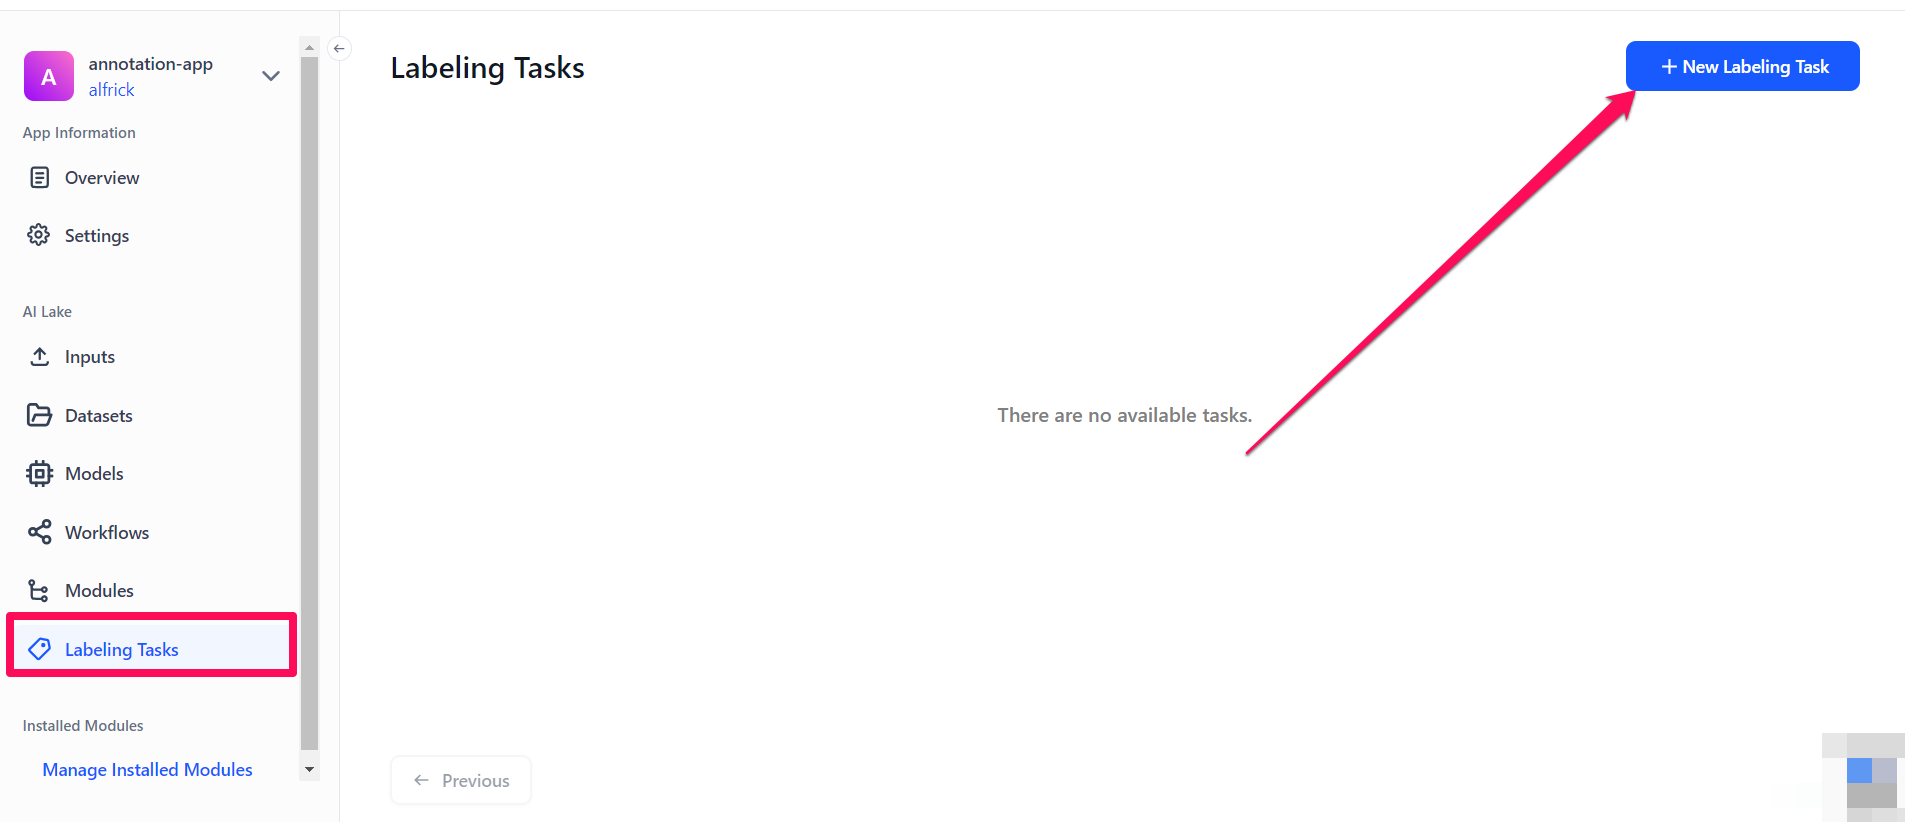
Step 1: Start the Labeling Task
To create a task, select Labeling Tasks from the collapsible left sidebar, then click the New Labeling Task button located in the upper-right corner of the Labeling Tasks page.
Step 2: Select Dataset
You'll be redirected to the New Labeling Task page, where you can provide the details for creating a new task.
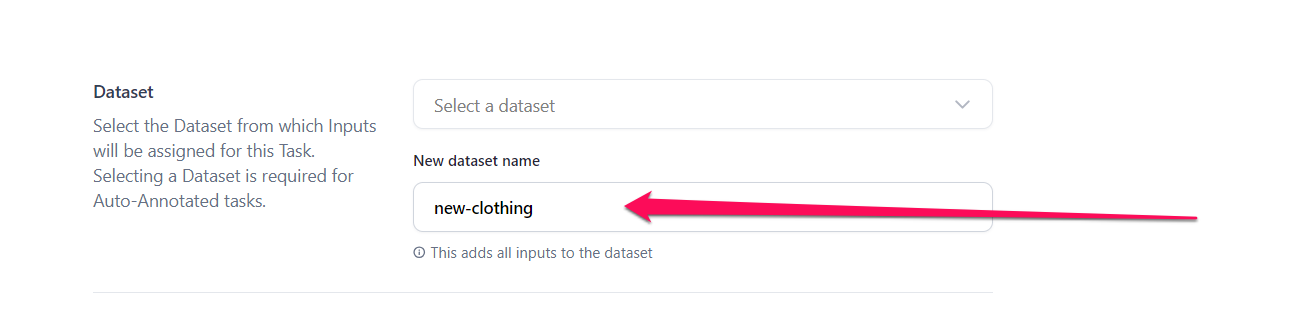
Start by selecting a dataset from which inputs will be assigned for the labeling task. To do so, click the Select a dataset search box and choose the dataset you want to use from the list that drops down.
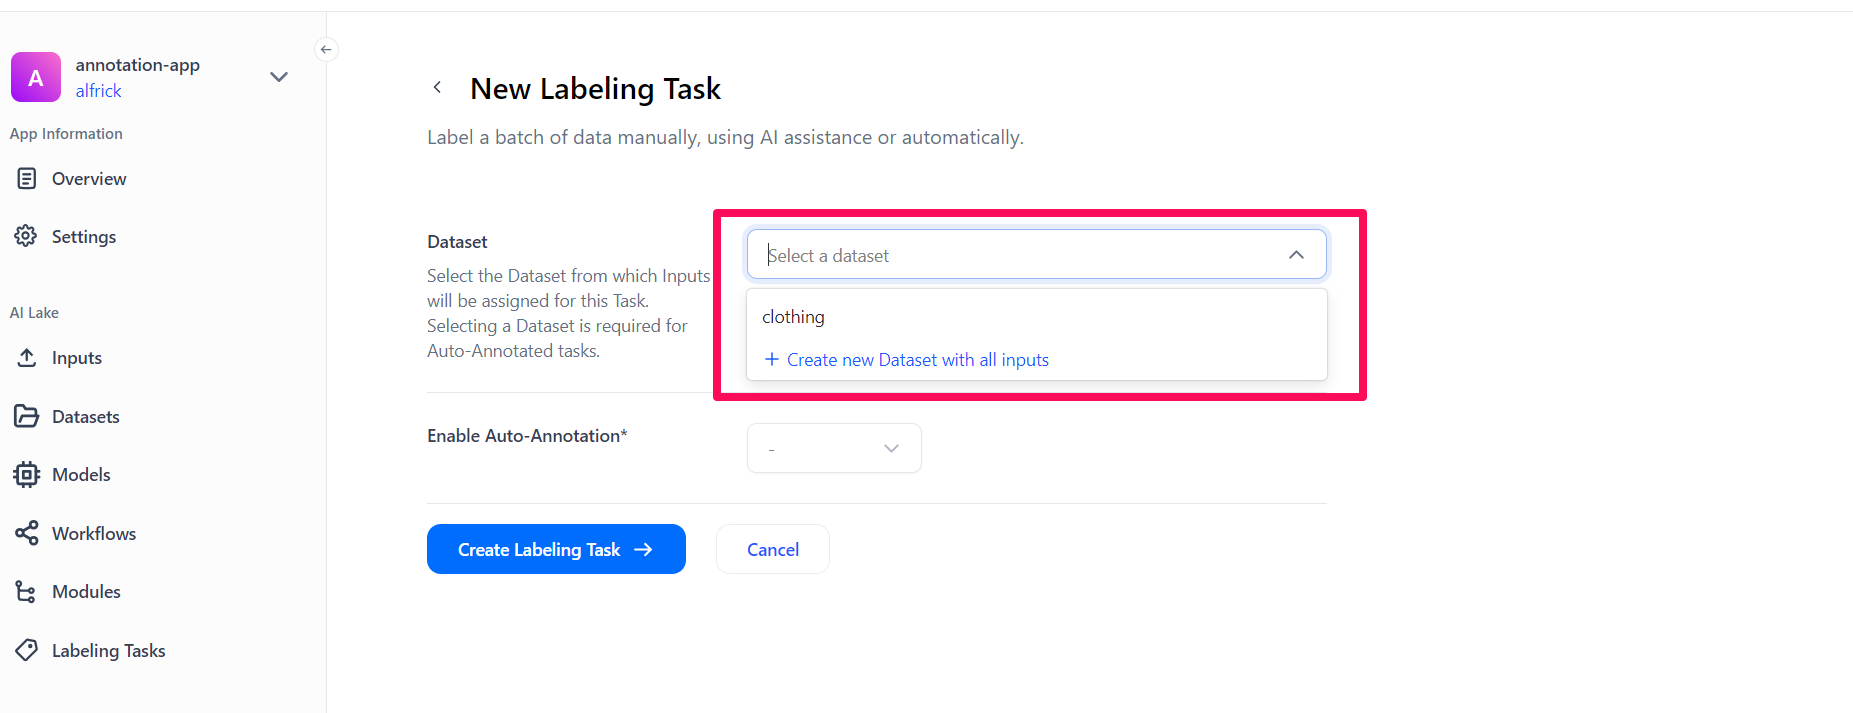
If you don't already have a dataset, click the Create new Dataset with all inputs button. Then, provide the name for the new dataset in the drop-down that appears. All the inputs in your app will be added to this new dataset.
Step 3: Turn Off Auto-Annotation
To label the inputs manually or with AI assistance, select the No button. This will turn off the auto-annotation process.

Step 4: Select Task Type
Choose the objective you want to achieve with your labeling task. You can choose among the following label types:
- Classification — categorizes images, videos, and texts into categories;
- Detection — detects where an object of interest is and draws a bounding box around it;
- Segmentation (polygons for segmentation) — outlines the exact shape or contour of an object.
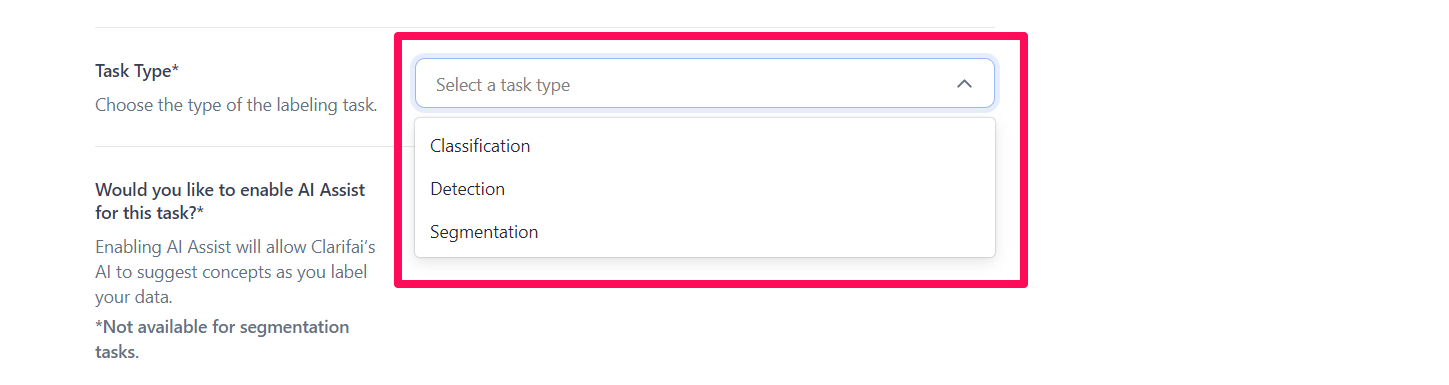
For this example, let's select the detection label type.
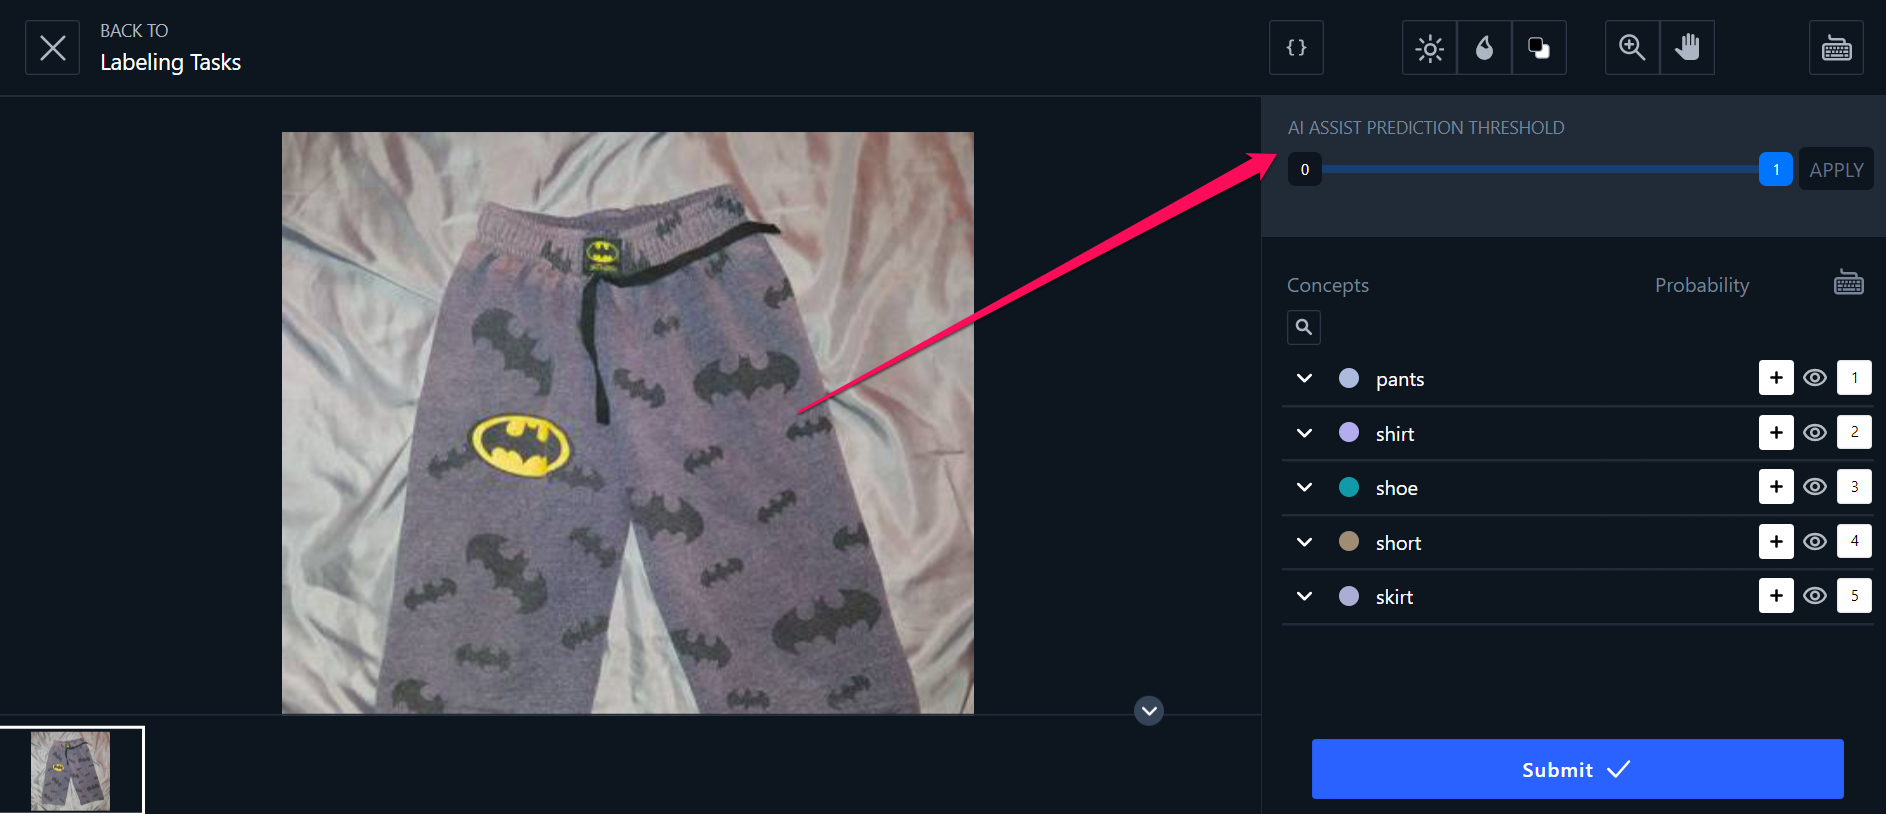
Step 5: Turn Off or Enable AI-Assist
Manual labeling of data is crucial for ensuring high-quality training data, handling complex and ambiguous cases, and providing accurate validation benchmarks. It also ensures data diversity and reduces bias, especially in sensitive applications. It's best for new domains with scarce pre-labeled data and niche datasets where the team is building collective concept definitions and libraries.
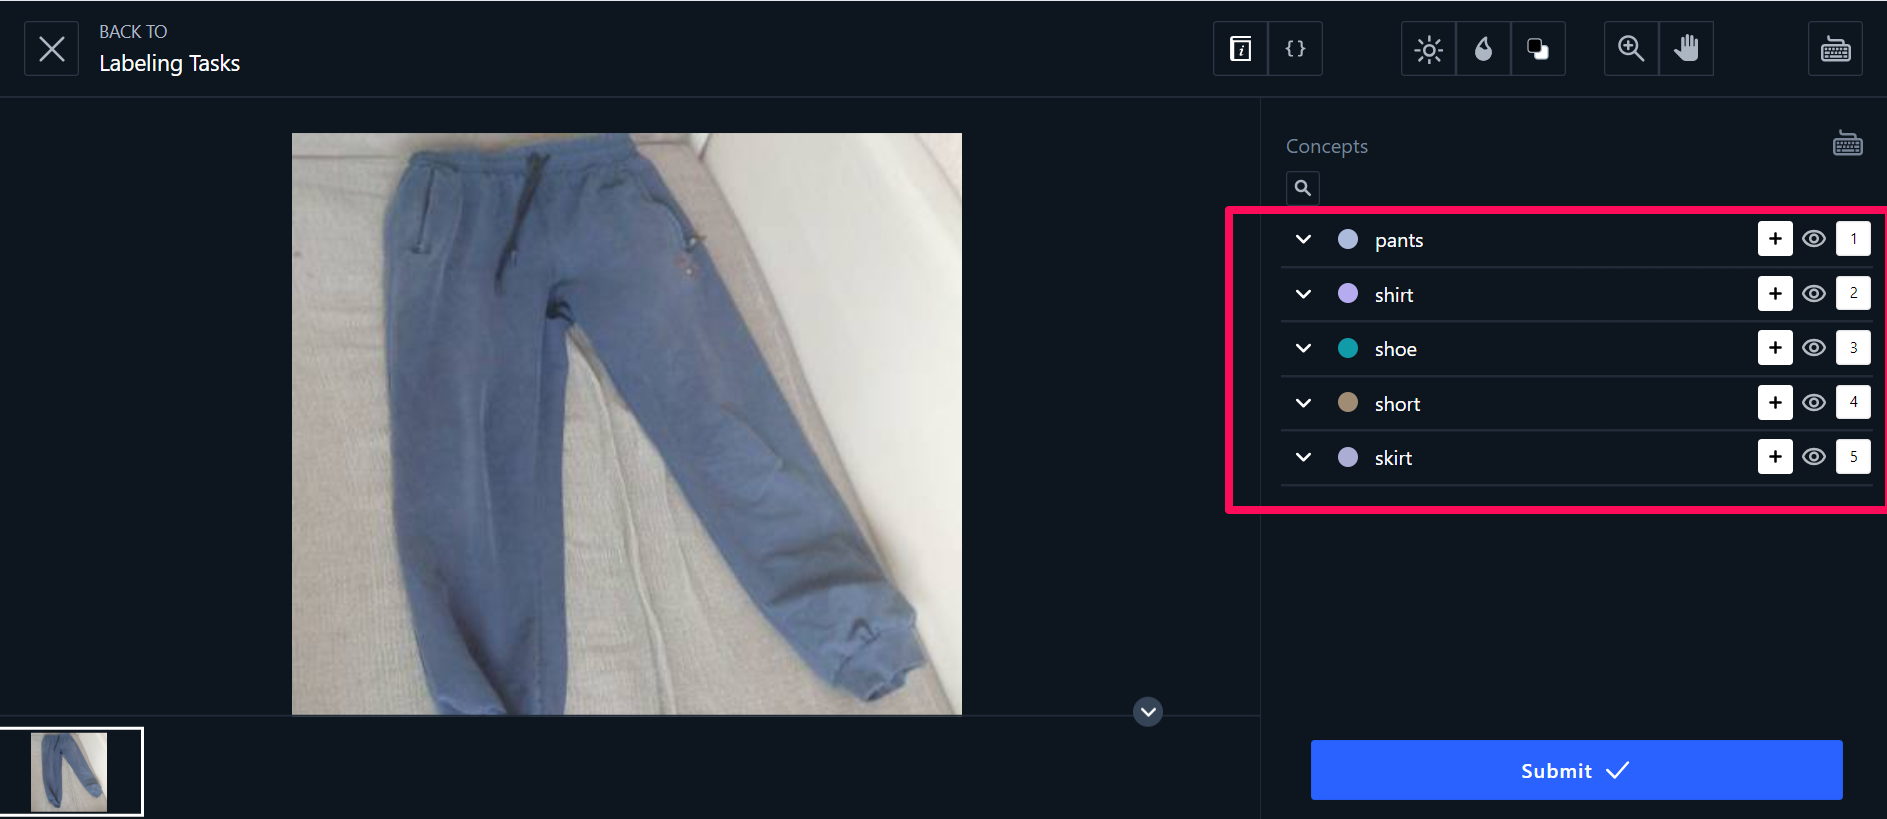
To label a batch of data manually, select the No option when asked if you want to enable AI-assist. This will turn off AI-assist and enable you to label your inputs manually.
Next, use the Search concepts field to find and add existing concepts from your app that you want to use for the labeling exercise. The concepts you've selected will appear underneath the search box. For this example, we'll add these concepts: pants, shirt, shoe, short, and skirt.

You can also create new concepts, and select them. Type the concept name in the Search concepts field. Then, click the Add new concept button that appears underneath the search box to create the new concept and also add it to your app.

AI-assisted labeling is a semi-automated approach with human-in-the-loop that combines the power of existing models and workflows with the flexibility and accuracy of manual labeling. This method speeds up the labeling process by automating straightforward tasks while allowing human labelers to focus on complex or ambiguous cases. The AI model provides initial labels that humans can review and refine, ensuring high-quality and consistent annotations. This combines the strengths of both automated systems and human oversight.
To label using AI-assist, select the Yes option.
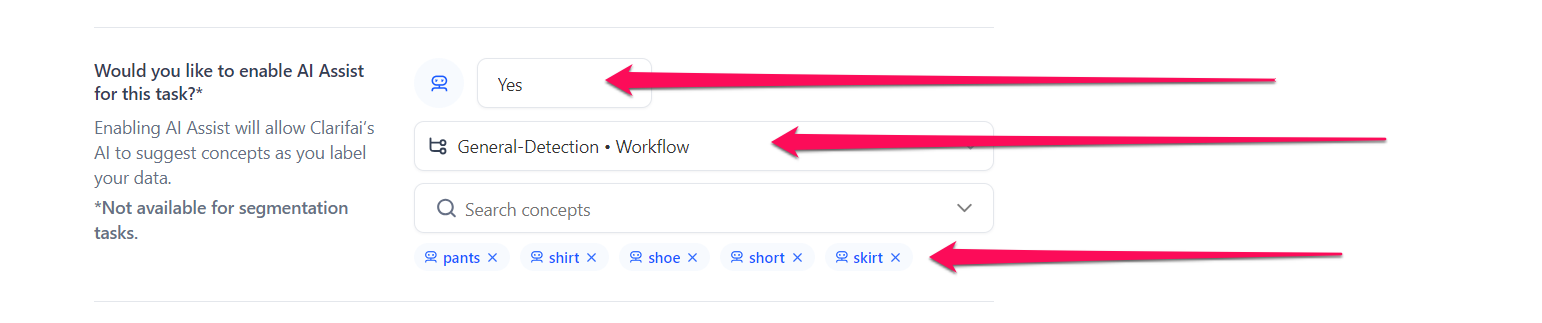
Then, choose a model or workflow from the available options — either one you own or one publicly available in the Community. For this example, let’s select the General-Detection workflow that detects a variety of common objects in images by drawing bounding boxes around them.
Next, use the Search Concepts field to select the concepts you want to use. Note that you can choose concepts already included in the workflow or model, or create new ones, as illustrated earlier. For this example, let’s select these concepts already existing in the workflow: pants, shirt, shoe, short, and skirt.
The concepts you've selected will appear underneath the search box. Notice that there is a small AI-assist robot icon on the left side of each concept you've selected. The presence of the robot implies that the labeling task is going to be AI-assisted. Otherwise, the icon does not appear.
AI-assist is not available for segmentation labeling tasks.
Step 6: Add Collaborators
Delegating labeling tasks to a team provides several benefits, such as enhancing the overall quality of the exercise, expediting the process, and leveraging a diverse range of skills from various backgrounds.
If you do not want to add any collaborator to help you with the task, select the No option.

If you want to add a collaborator(s), select the Yes option.

To assign the labeling work to a worker or a group of workers, click the Select Labelers search box and select a worker(s) you've already added as a collaborator(s) within your app. You can also assign the task to yourself. The inputs to be labeled will be evenly distributed among all the workers, ensuring that each input is assigned to only one worker and there is no duplication of work.
To assign the reviewing work to a worker or a group of workers, click the Select Reviewers search box and select a reviewer(s) for the task. Adding human review adds a critical layer of verification and validation, ensuring that the annotations are both accurate and reliable.
- Clicking the New collaborator button will open a pop-up, enabling you to add new collaborators to the app and assign them to the labeling or reviewing task. You can learn how to add a collaborator here.
- Clicking the Add all collaborators button will assign the task to all collaborators in your app. On the other hand, clicking the Remove all collaborators button will unassign the task from all collaborators in your app.
Distributing inputs across multiple reviewers allows you to automatically assign labeled assets to multiple reviewers. This approach improves the speed of the review process and reduces the risk of a single point of dependence. The labeled inputs will be evenly partitioned among all reviewers without duplication of the reviewing work.
Step 7: Set Task Name
Specify the name of the task to facilitate easy identification.

Step 8: Add Instructions
Optionally, you can provide instructions for your labelers to help them with the labeling task.
Click the Add button to add the instructions.

Step 9: Create Labeling Task
Click the Create Labeling Task button to create the labeling task. Or, click the Cancel button to cancel the process.
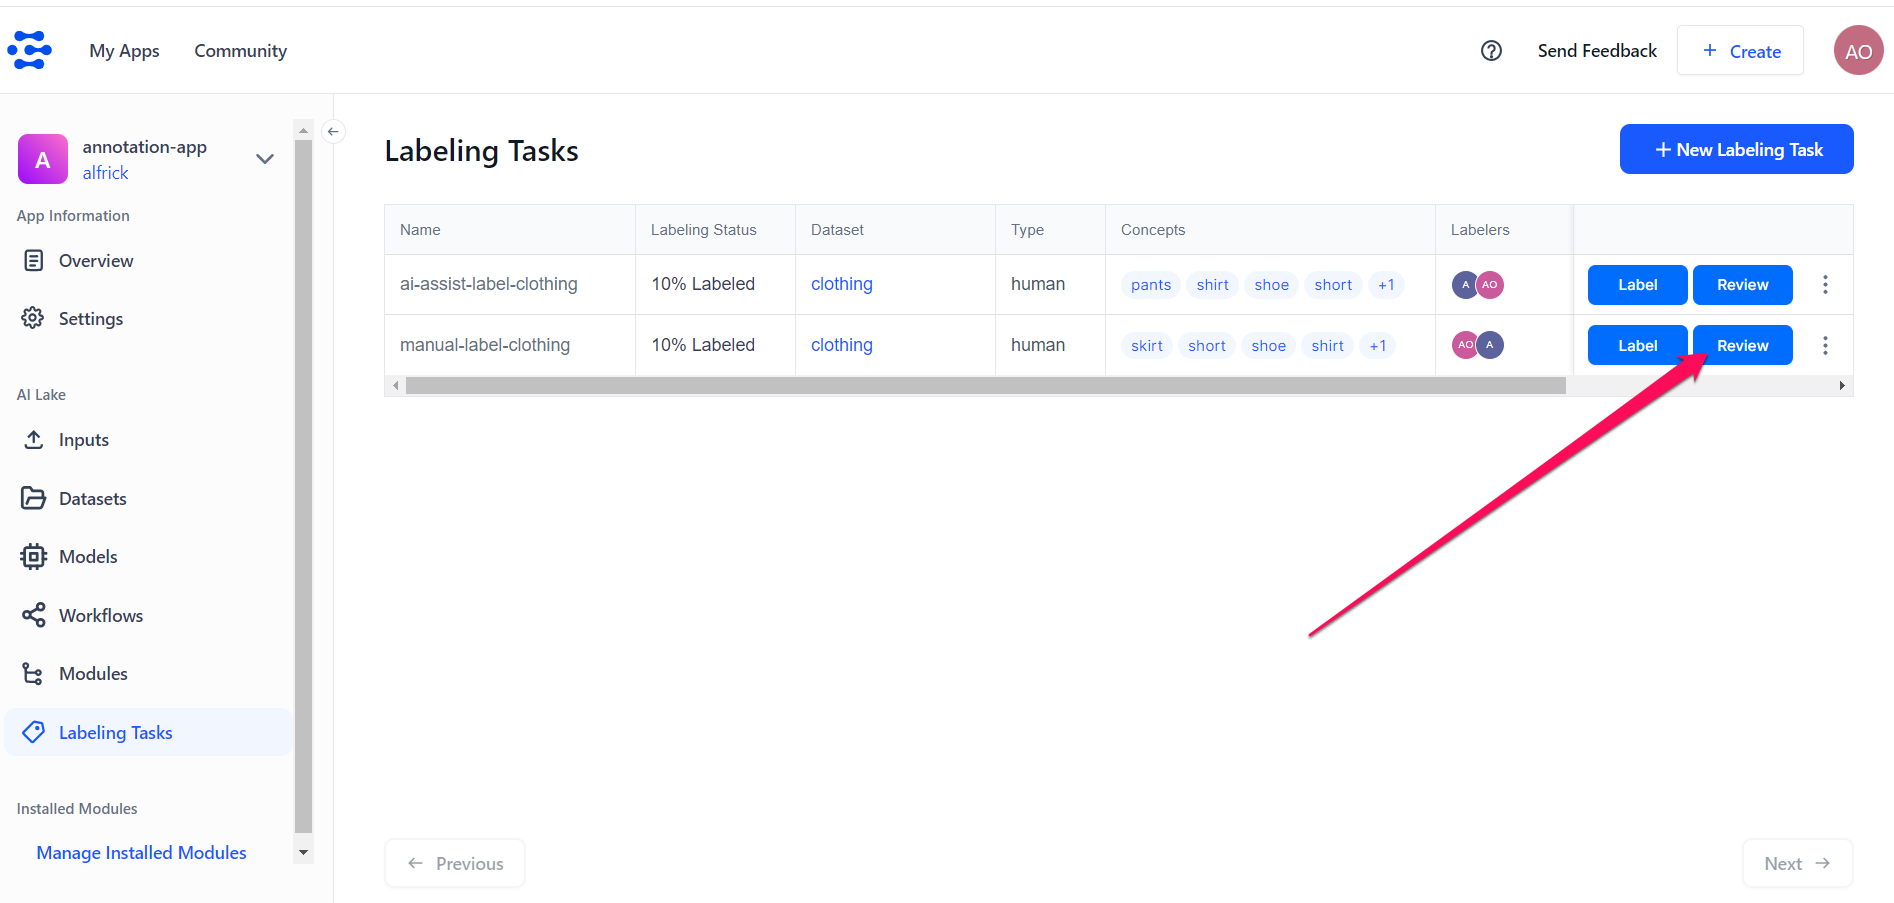
You’ll be redirected to the Labeling Tasks page, where you can see the newly created task listed in the table.
For this example, you can see the two tasks we created: one for manual labeling and another for AI-assisted labeling.

You can monitor the progress of the annotation exercise in the "Labeling Status" column, where the status will be displayed. Once the process is complete, the status will change to "Complete."
You can also view other details of the annotation exercise, including the dataset used, the type of annotation, the concepts applied, the labelers involved, and the number of inputs.
If you click the ellipsis icon at the end of the row for your selected task, a drop-down menu will appear. This menu allows you to perform various task management activities, such as copying the task ID, creating a new dataset version, editing the task, or deleting the task.
Step 10: Start Labeling
To start labeling your inputs, click the Label button on the Labeling Tasks page.
-
After completing the labeling process, the Label button will become inactive, preventing further clicks.
-
After labeling the inputs, the Review button will become active, allowing you to click it to proceed with reviewing.
You'll be redirected to the Labeling Tasks tool, where you can begin annotating your inputs.
If you enabled AI-assist when you created a new labeling task, you'll notice that capability enabled in the tool.
If you did not enable AI-assist, you'll be able to label the inputs manually.
Click here to learn how to use the Labeling Tasks tool to add bounding box annotations to your batch of inputs.
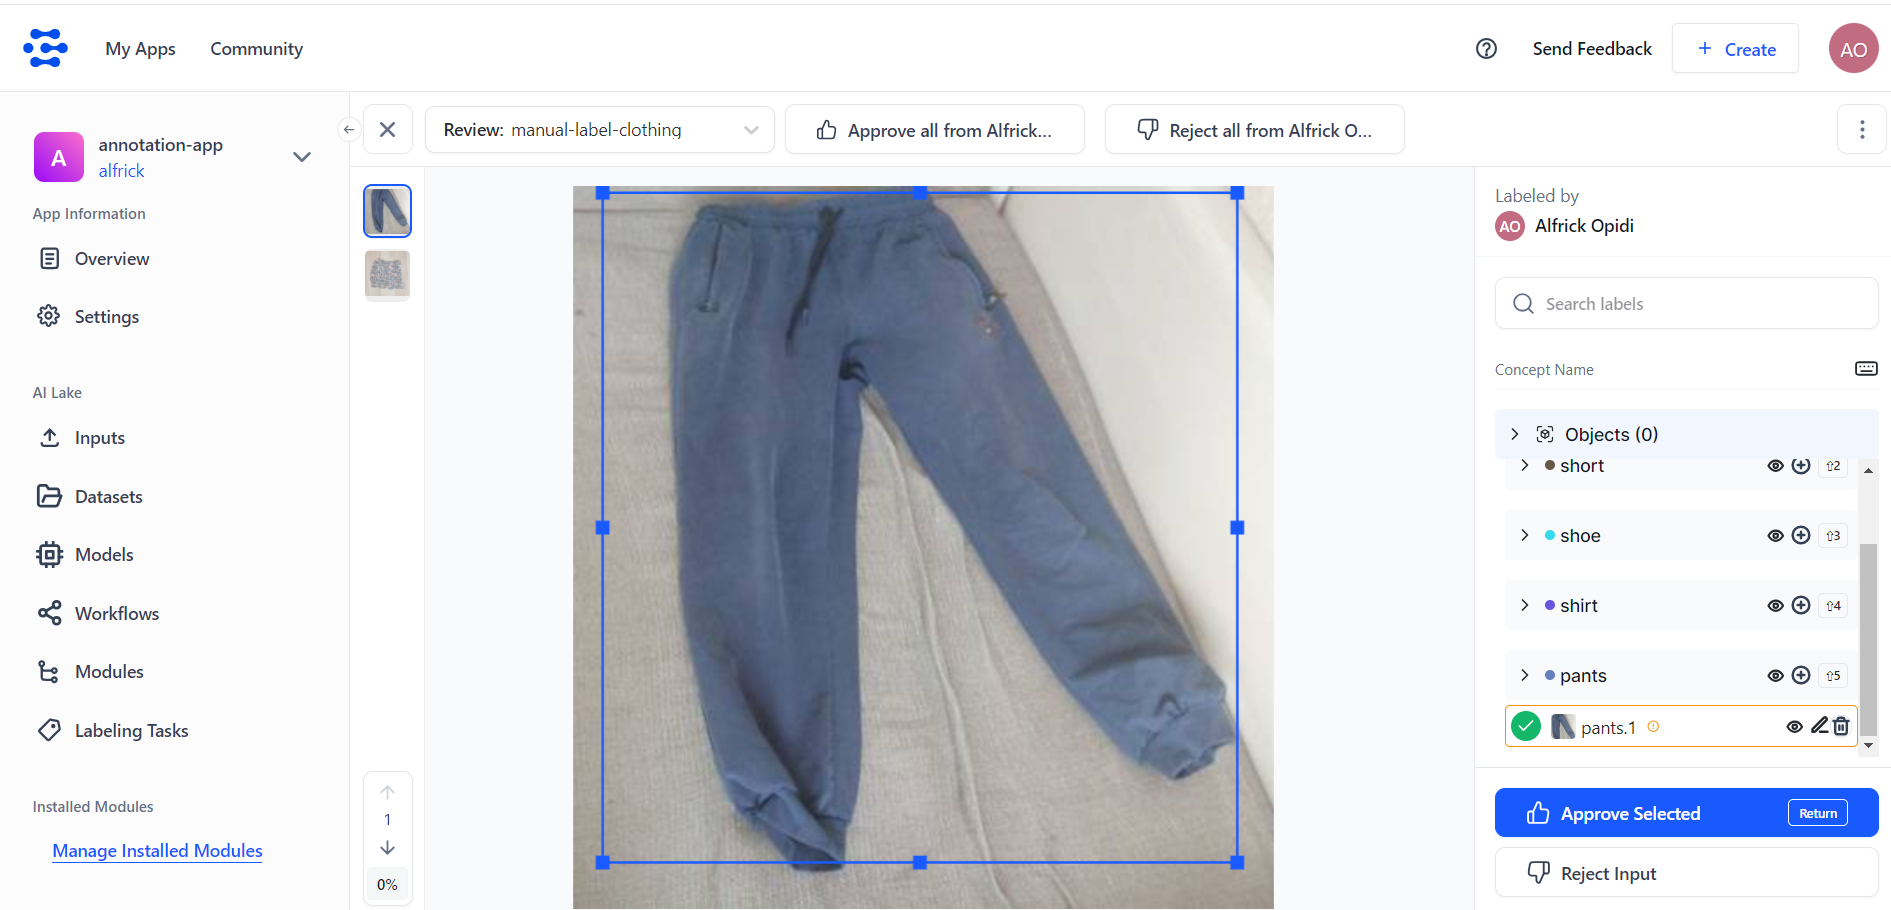
Step 11: Start Reviewing
To start reviewing your inputs, click the Review button on the Labeling Tasks page.
You’ll be redirected to the tasks reviewing page, where you can start reviewing the annotations for quality control purposes.
Click here to learn how to review the annotations created manually or with AI assistance.
- Members of an organization can create new labeling tasks and utilize the Labeling Tasks tool. They can add collaborators who already exist within the app as well as other organization members. These can be assigned roles as either task workers or task reviewers. Furthermore, there are convenient options available for quickly adding all collaborators or all organization members.
- Similarly, app collaborators can also create labeling tasks and assign them to other collaborators who already exist within the app.