Build Custom MCP Servers
Build performant MCP servers with FastMCP for Clarifai
The Model Context Protocol (MCP) is an open standard developed by Anthropic that acts as a universal language for AI models, particularly large language models (LLMs), to interact with external data sources (like GitHub, Slack, or databases) and extend their capabilities.
With MCP, you can build intelligent agents and complex workflows on top of LLMs, enabling secure and efficient access to contextual information.
How it Works
At its core, MCP follows a client-server architecture where a host application (like an AI chatbot or an IDE with AI features) can connect to an MCP server. The server acts as a gateway to specific external data, tools, or functionalities.
An MCP server can expose several key capabilities — most notably, tools that function as callable actions for LLMs, such as updating records or interacting with external systems.
While MCP provides the specification, implementing clients and servers that adhere to it can involve substantial boilerplate code and intricate protocol handling. This is exactly where FastMCP excels. FastMCP is a high-level framework that significantly simplifies the development of MCP servers and clients.
Clarifai allows you to build performant MCP servers with FastMCP by providing the necessary infrastructure needed to define, deploy, and manage custom MCP servers at scale.
Build an MCP Server
Building an MCP server with FastMCP using Clarifai follows the same intuitive pattern as building and uploading models on the platform.
Let's demonstrate how you can build a simple MCP server using the FastMCP framework. This server will expose callable tools for LLMs or other AI agents, and we'll upload it to the Clarifai platform as a custom model, making its functionalities accessible within the Clarifai ecosystem.
Step 1: Perform Prerequisites
Install Packages
You need to install the following Python packages:
-
clarifai– The latest version of the Clarifai Python SDK required for integrating your MCP server with the Clarifai platform. This also installs the Clarifai Command Line Interface (CLI), which we'll use for uploading the server. -
fastmcp– This is the core framework used to define and manage the MCP server. -
pydantic– Pydantic is essential for data validation and defining the structure (schema) of your tool arguments, particularly usingField. We'll pair it withAnyandAnnotatedfrom Python'stypingmodule to add vital metadata, like descriptions, to function arguments, which is key forfastmcp's type hinting and automatic schema generation.
You can run the following command to install them:
- Bash
pip install --upgrade fastmcp pydantic clarifai
Or, you can define the packages in a requirements.txt file and run the following command to install them:
- Bash
pip install -r requirements.txt
Set a PAT Key
You need to have a Personal Access Token (PAT) to authenticate your connection with the Clarifai platform. You can get one by navigating to Settings in the collapsible left sidebar, selecting Secrets, and creating or copying an existing token from there.
Then, set the CLARIFAI_PAT as an environment variable.
- Unix-Like Systems
- Windows
export CLARIFAI_PAT=YOUR_PERSONAL_ACCESS_TOKEN_HERE
set CLARIFAI_PAT=YOUR_PERSONAL_ACCESS_TOKEN_HERE
Create Files
Create a project directory and organize your files as indicated below to fit the requirements of building custom models for the Clarifai platform.
your_model_directory/
├── 1/
│   └── model.py
├── requirements.txt
└── config.yaml
└── client.py
You can automatically generate these files by running this CLI command: clarifai model init --toolkit mcp. You can then edit them as needed.
- your_model_directory/ – The root directory containing all files related to your server.
- 1/ – A subdirectory that holds the model file (Note that the folder is named as 1).
- model.py – Contains the main logic for the MCP server implementation.
- requirements.txt – Lists the Python dependencies required to run your server.
- config.yaml – Contains metadata and configuration settings needed for uploading the model to Clarifai.
- client.py – Only contains an example client for demonstrating MCP usage after uploading the model to Clarifai.
- 1/ – A subdirectory that holds the model file (Note that the folder is named as 1).
Step 2: Prepare model.py File
model.py is the main file where you'll implement your MCP server's logic.
Here's the model.py file for the custom model (or, in this case, a server) we want to build:
- Python
from typing import Any

from fastmcp import FastMCP
from pydantic import Field

from clarifai.runners.models.mcp_class import MCPModelClass

server = FastMCP("my-mcp-server", instructions="A sample MCP server.", stateless_http=True)


@server.tool("hello", description="Say hello to someone")
def hello(name: str = Field(description="Name to greet")) -> str:
    """Greet a user by name."""
    return f"Hello, {name}!"


@server.resource("config://version")
def get_version():
    """Return the server version."""
    return "1.0.0"


class MyModel(MCPModelClass):
    """MCP model that exposes tools, resources, and prompts."""

    def get_server(self) -> FastMCP:
        """Return the FastMCP server instance."""
        return server
Let’s break down what each part of the file does.
a. Initialize the FastMCP Server
You'll start by creating an instance of the FastMCP class to set up your server.
Here are the key arguments you can pass to the FastMCP constructor:
name– An optional identifier for your MCP server. This is useful for distinguishing it in logs or when managing multiple servers in client applications.instructions– An optional, short description that helps clients understand the server's purpose or how to best interact with its functionalities.stateless_http– A boolean flag (True/False) that configures the server to operate over stateless HTTP. Turning this on is ideal for lightweight deployments, as it simplifies communication by not requiring persistent sessions.
b. Define Tools
An empty MCP server isn't very useful; its power comes from the tools it exposes. We define these tools by applying the @server.tool(...) decorator directly to Python functions. This decorator registers the function as an MCP "tool," making it discoverable and invokable by any MCP client (like an LLM).
Each tool is enriched with essential metadata:
- Tool-level metadata – The
@server.tool()decorator itself takes anameanddescriptionto explain the tool's overall purpose. - Input descriptions – The tool's input arguments are precisely described using
Annotatedin conjunction withField.
In our example, we define a tool and a resource:
hello– A tool that takes anameparameter and returns a greeting message.config://version– A resource that returns the server version.
For details on adding other useful MCP server components, like Resources and Prompts, you can refer to the official MCP documentation.
c. Define Clarifai's Model Class
The custom-named model class serves as the integration point between your MCP server and the Clarifai platform.
You must define it by subclassing Clarifai's MCPModelClass and implementing the get_server() method. This method returns the FastMCP server instance (such as server) that Clarifai should use when running your model.
When Clarifai runs the model, it calls get_server() to load your MCP server and expose its defined tools and capabilities to LLMs or other agents.
StdioMCPModelClass— Use this when wrapping an existing stdio-based MCP server (e.g., an open-source server launched as a subprocess). See Deploy Open-Source MCP Servers for a full walkthrough.AgenticModelClass— Use this when building an LLM-based model that should autonomously discover and call MCP tools during inference. See the agentic model section in Deploy Open-Source MCP Servers for details.
Step 3: Prepare config.yaml File
The config.yaml file is used to configure the build and deployment settings for a custom model on the Clarifai platform. It tells Clarifai how to build your model's environment and where to place it within your account.
This is the config.yaml file for the custom model (or, in this case, a server) we want to build:
- YAML
model:
  id: "my-mcp-server"
  model_type_id: "mcp"

compute:
  instance: g5.xlarge  # Run 'clarifai list-instances' to see all options.
  # cloud: aws          # Cloud provider (aws, gcp, vultr). Auto-detected from instance.
  # region: us-east-1   # Cloud region. Auto-detected from instance.

# Uncomment to auto-download model checkpoints:
# checkpoints:
#   repo_id: owner/model-name
Let’s break down what each part of the file does.
model.id– A unique identifier for your model. You can choose any name you want.model.model_type_id– Set to"mcp"to indicate this is an MCP server model.compute.instance– The compute instance type for deployment. Runclarifai list-instancesto see all available options.checkpoints– (Optional) Uncomment to auto-download model checkpoints from Hugging Face at runtime.
user_idandapp_idare auto-filled from your active context at deploy time. You don’t need to add them manually.
Step 4: Define Dependencies in requirements.txt
The requirements.txt file lists all the Python packages your MCP server depends on. Clarifai uses this file during deployment to automatically install the necessary libraries, ensuring your server runs correctly.
Here's the requirements.txt file for the custom model (or, in this case, a server) we want to build:
- txt
clarifai
fastmcp
Step 5: Test the Model Locally
Before uploading your server to the Clarifai platform, you can test it locally to catch any typos or misconfigurations in the code.
a. Local Runners
You can use the Clarifai CLI to test and run your model as a local development runner. You can learn how to use the tool here.
- Bash
clarifai model serve
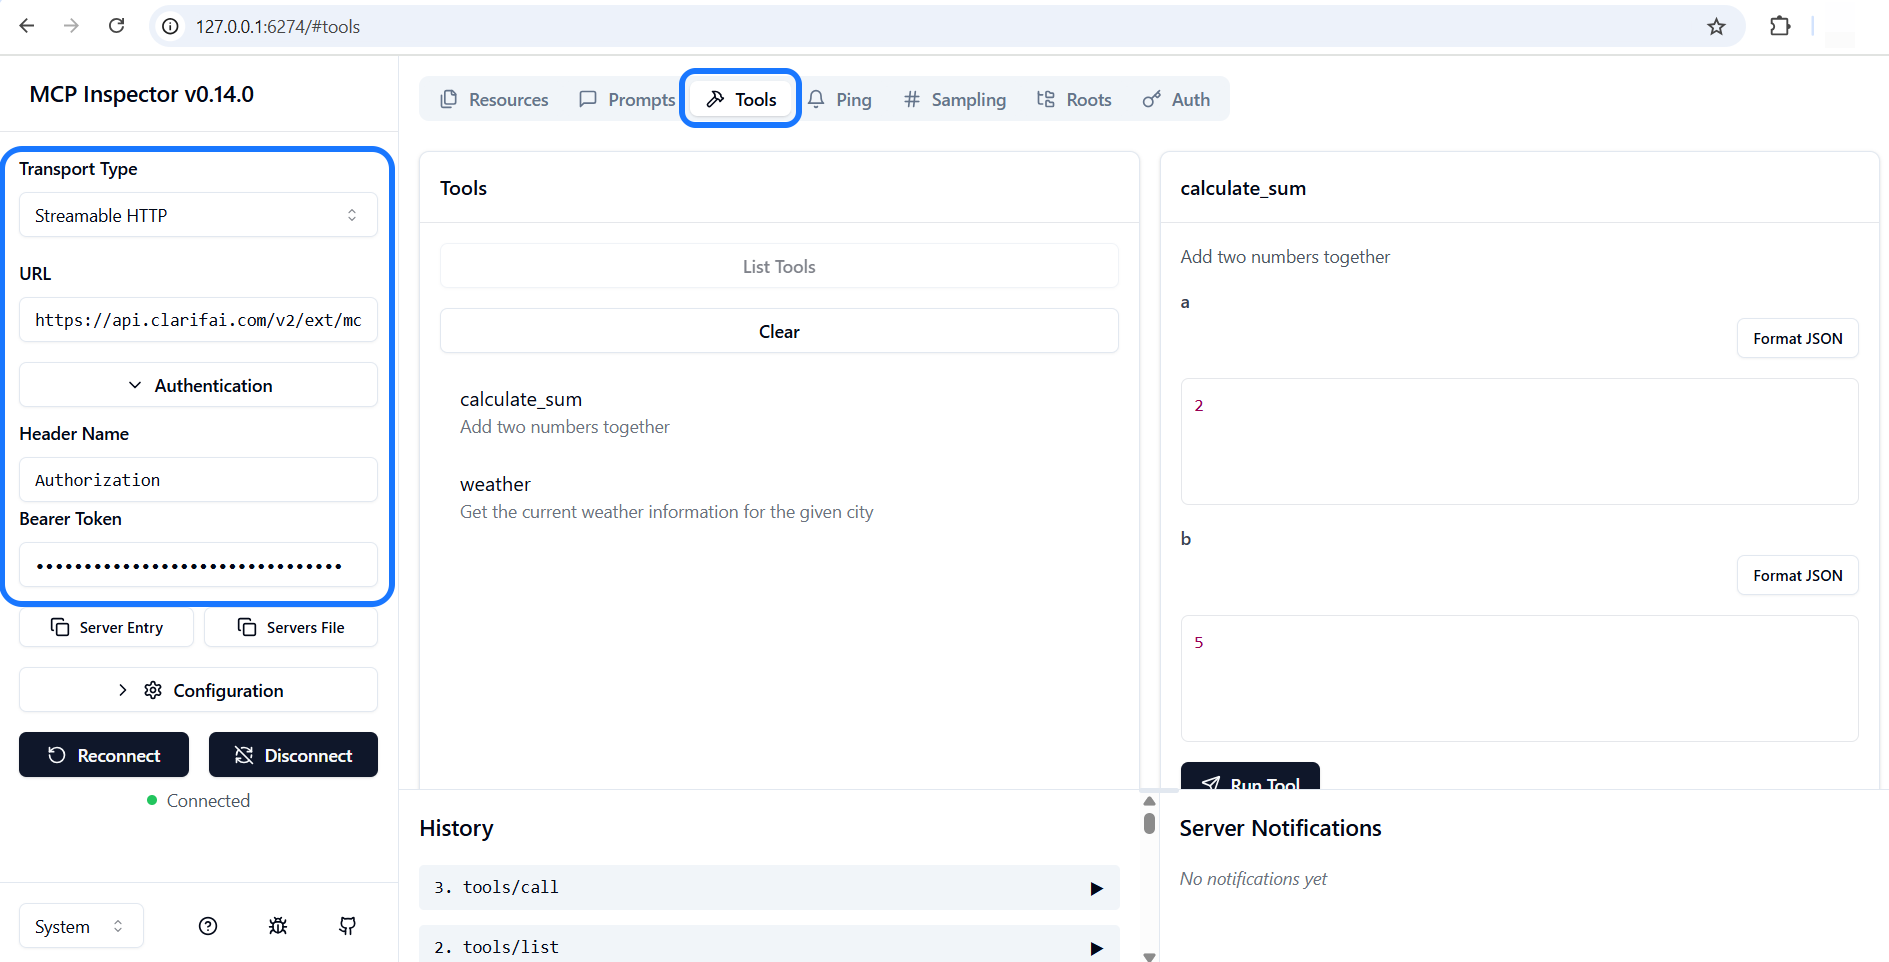
b. MCP Inspector
You can also use the MCP Inspector to easily test and debug your MCP server through a user-friendly, web-based interface that allows you to connect to your server and explore its capabilities.
To launch the Inspector, run the following command.
- Bash
npx @modelcontextprotocol/inspector
Once the interface opens, set the Transport Type to Streamable HTTP and provide the URL of your deployed MCP server on the Clarifai platform (learn how to get the URL in the next step). In the Authentication section, enter Authorization as the Header Name, and supply your Clarifai PAT in the Bearer Token field.
After entering these details, click the Connect button to establish a connection and begin inspecting your server’s capabilities.
MCP Inspector UI
Step 6: Deploy to Clarifai
You can deploy the MCP server to the Clarifai platform using a single command. Navigate to its root directory and run:
- CLI
clarifai model deploy
This command handles everything — building, uploading, and deploying your model. The CLI automatically creates the required compute infrastructure (cluster, nodepool, deployment).
Once the deployment is complete, the output will display the URL of your deployed MCP server, which you'll use to enable your AI agents or clients to communicate with the server. This URL is constructed by combining the MCP API base URL (https://api.clarifai.com/v2/ext/mcp/v1) with your specific Clarifai identifiers: your user ID, app ID, and the model ID of your deployed MCP server. For example: https://api.clarifai.com/v2/ext/mcp/v1/users/user-id/apps/app-id/models/model-id.
Build Logs Example
C:\################> clarifai model upload
[INFO] 14:07:44.107939 No checkpoints specified in the config file |  thread=24100
[INFO] 14:07:44.123482 Using Python version 3.12 from the config file to build the Dockerfile |  thread=24100
[INFO] 14:07:44.450947 New model will be created at https://clarifai.com/alfrick/upload-models-2/models/mcp-three with it's first version. |  thread=24100
Press Enter to continue...
[INFO] 14:07:50.242006 Uploading file... |  thread=2892
[INFO] 14:07:50.243957 Upload complete! |  thread=2892
Status: Upload in progress, Progress: 0% - Starting upload.  request_id: sdk-python-11.4.10-aaaab087fab14d2f8f018ecff24bStatus: Upload done, Progress: 0% - Completed upload of files, initiating model version image build..  request_id: sdk-pStatus: Model image is currently being built., Progress: 0% - Model version image is being built.  request_id: sdk-pytho[INFO] 14:07:50.844814 Created Model Version ID: 42033db33ed84d66a5430f0f2110727d |  thread=24100
[INFO] 14:07:50.846830 Full url to that version is: https://clarifai.com/alfrick/upload-models-2/models/mcp-three |  thread=24100
[INFO] 14:07:56.510575 2025-06-11 11:07:49.677842 INFO: Downloading uploaded model from storage...

2025-06-11 11:07:50.426948 INFO: Done downloading model

2025-06-11 11:07:50.429705 INFO: Extracting upload...

2025-06-11 11:07:50.433688 INFO: Done extracting upload

2025-06-11 11:07:50.435837 INFO: Parsing requirements file for model version ID ****0f0f2110727d

2025-06-11 11:07:50.462053 INFO: Dockerfile found at /shared/context/Dockerfile

cat: /shared/context/downloader/hf_token: No such file or directory

2025-06-11 11:07:51.114036 INFO: Setting up credentials

amazon-ecr-credential-helper

Version:    0.8.0

Git commit: ********

2025-06-11 11:07:51.117969 INFO: Building image...

#1 \[internal] load build definition from Dockerfile

#1 transferring dockerfile: 2.61kB done

#1 DONE 0.0s


#2 resolve image config for docker-image://docker.io/docker/dockerfile:1.13-labs

#2 DONE 0.1s


#3 docker-image://docker.io/docker/dockerfile:1.13-labs@sha256:************18b8

#3 resolve docker.io/docker/dockerfile:1.13-labs@sha256:************18b8 done

#3 CACHED


#4 \[internal] load metadata for public.ecr.aws/clarifai-models/python-base:3.12-********

#4 DONE 0.1s


#5 \[internal] load .dockerignore

#5 transferring context: 2B done

#5 DONE 0.0s


#6 \[internal] load build context

#6 transferring context: 2.43kB done

#6 DONE 0.0s


#7 \[final 1/8] FROM public.ecr.aws/clarifai-models/python-base:3.12-********@sha256:************54b2

#7 resolve public.ecr.aws/clarifai-models/python-base:3.12-********@sha256:************54b2 done

#7 CACHED


#8 \[final 2/8] COPY --link requirements.txt /home/nonroot/requirements.txt

#8 merging done

#8 DONE 0.0s


#9 \[final 3/8] RUN ["pip", "install", "--no-cache-dir", "-r", "/home/nonroot/requirements.txt"]

#9 0.351 Collecting clarifai>=11.4.8 (from -r /home/nonroot/requirements.txt (line 1))

#9 0.385   Downloading clarifai-11.5.0-py3-none-any.whl.metadata (22 kB)

#9 0.399 Collecting fastmcp>=2.3.4 (from -r /home/nonroot/requirements.txt (line 2))

#9 0.403   Downloading fastmcp-2.8.0-py3-none-any.whl.metadata (17 kB)

#9 0.476 Collecting pydantic>=2.11.5 (from -r /home/nonroot/requirements.txt (line 3))

#9 0.478   Downloading pydantic-2.11.5-py3-none-any.whl.metadata (67 kB)

#9 0.508 Collecting clarifai-grpc>=11.5.5 (from clarifai>=11.4.8->-r /home/nonroot/requirements.txt (line 1))

#9 0.512   Downloading clarifai_grpc-11.5.5-py3-none-any.whl.metadata (4.4 kB)

#9 0.532 Collecting clarifai-protocol>=0.0.24 (from clarifai>=11.4.8->-r /home/nonroot/requirements.txt (line 1))

#9 0.536   Downloading clarifai_protocol-0.0.24-cp312-cp312-manylinux_2_17_x86_64.manylinux2014_x86_64.whl.metadata (14 kB)

#9 0.629 Collecting numpy>=1.22.0 (from clarifai>=11.4.8->-r /home/nonroot/requirements.txt (line 1))

#9 0.632   Downloading numpy-2.3.0-cp312-cp312-manylinux_2_28_x86_64.whl.metadata (62 kB)

#9 0.642 Requirement already satisfied: tqdm>=4.65.0 in /venv/lib/python3.12/site-packages (from clarifai>=11.4.8->-r /home/nonroot/requirements.txt (line 1)) (4.67.1)

#9 0.642 Requirement already satisfied: PyYAML>=6.0.1 in /venv/lib/python3.12/site-packages (from clarifai>=11.4.8->-r /home/nonroot/requirements.txt (line 1)) (6.0.2)

#9 0.648 Collecting schema==0.7.5 (from clarifai>=11.4.8->-r /home/nonroot/requirements.txt (line 1))

#9 0.651   Downloading schema-0.7.5-py2.py3-none-any.whl.metadata (34 kB)

#9 0.738 Collecting Pillow>=9.5.0 (from clarifai>=11.4.8->-r /home/nonroot/requirements.txt (line 1))

#9 0.742   Downloading pillow-11.2.1-cp312-cp312-manylinux_2_28_x86_64.whl.metadata (8.9 kB)

#9 0.750 Collecting tabulate>=0.9.0 (from clarifai>=11.4.8->-r /home/nonroot/requirements.txt (line 1))

#9 0.752   Downloading tabulate-0.9.0-py3-none-any.whl.metadata (34 kB)

#9 0.756 Requirement already satisfied: fsspec>=2024.6.1 in /venv/lib/python3.12/site-packages (from clarifai>=11.4.8->-r /home/nonroot/requirements.txt (line 1)) (2025.3.2)

#9 0.764 Collecting click>=8.1.7 (from clarifai>=11.4.8->-r /home/nonroot/requirements.txt (line 1))

#9 0.768   Downloading click-8.2.1-py3-none-any.whl.metadata (2.5 kB)

#9 0.769 Requirement already satisfied: requests>=2.32.3 in /venv/lib/python3.12/site-packages (from clarifai>=11.4.8->-r /home/nonroot/requirements.txt (line 1)) (2.32.3)

#9 1.037 Collecting aiohttp>=3.10.0 (from clarifai>=11.4.8->-r /home/nonroot/requirements.txt (line 1))

#9 1.039   Downloading aiohttp-3.12.12-cp312-cp312-manylinux_2_17_x86_64.manylinux2014_x86_64.whl.metadata (7.6 kB)

#9 1.047 Collecting contextlib2>=0.5.5 (from schema==0.7.5->clarifai>=11.4.8->-r /home/nonroot/requirements.txt (line 1))

#9 1.050   Downloading contextlib2-21.6.0-py2.py3-none-any.whl.metadata (4.1 kB)

#9 1.059 Collecting authlib>=1.5.2 (from fastmcp>=2.3.4->-r /home/nonroot/requirements.txt (line 2))

#9 1.062   Downloading authlib-1.6.0-py2.py3-none-any.whl.metadata (4.1 kB)

#9 1.069 Collecting exceptiongroup>=1.2.2 (from fastmcp>=2.3.4->-r /home/nonroot/requirements.txt (line 2))

#9 1.072   Downloading exceptiongroup-1.3.0-py3-none-any.whl.metadata (6.7 kB)

#9 1.083 Collecting httpx>=0.28.1 (from fastmcp>=2.3.4->-r /home/nonroot/requirements.txt (line 2))

#9 1.086   Downloading httpx-0.28.1-py3-none-any.whl.metadata (7.1 kB)

#9 1.094 Collecting mcp<2.0.0,>=1.9.2 (from fastmcp>=2.3.4->-r /home/nonroot/requirements.txt (line 2))

#9 1.097   Downloading mcp-1.9.3-py3-none-any.whl.metadata (28 kB)

#9 1.105 Collecting openapi-pydantic>=0.5.1 (from fastmcp>=2.3.4->-r /home/nonroot/requirements.txt (line 2))

#9 1.109   Downloading openapi_pydantic-0.5.1-py3-none-any.whl.metadata (10 kB)

#9 1.118 Collecting python-dotenv>=1.1.0 (from fastmcp>=2.3.4->-r /home/nonroot/requirements.txt (line 2))

#9 1.122   Downloading python_dotenv-1.1.0-py3-none-any.whl.metadata (24 kB)

#9 1.145 Collecting rich>=13.9.4 (from fastmcp>=2.3.4->-r /home/nonroot/requirements.txt (line 2))

#9 1.149   Downloading rich-14.0.0-py3-none-any.whl.metadata (18 kB)

#9 1.161 Collecting typer>=0.15.2 (from fastmcp>=2.3.4->-r /home/nonroot/requirements.txt (line 2))

#9 1.164   Downloading typer-0.16.0-py3-none-any.whl.metadata (15 kB)

#9 1.171 Collecting annotated-types>=0.6.0 (from pydantic>=2.11.5->-r /home/nonroot/requirements.txt (line 3))

#9 1.174   Downloading annotated_types-0.7.0-py3-none-any.whl.metadata (15 kB)

#9 1.549 Collecting pydantic-core==2.33.2 (from pydantic>=2.11.5->-r /home/nonroot/requirements.txt (line 3))

#9 1.552   Downloading pydantic_core-2.33.2-cp312-cp312-manylinux_2_17_x86_64.manylinux2014_x86_64.whl.metadata (6.8 kB)

#9 1.554 Requirement already satisfied: typing-extensions>=4.12.2 in /venv/lib/python3.12/site-packages (from pydantic>=2.11.5->-r /home/nonroot/requirements.txt (line 3)) (4.13.0)

#9 1.559 Collecting typing-inspection>=0.4.0 (from pydantic>=2.11.5->-r /home/nonroot/requirements.txt (line 3))

#9 1.562   Downloading typing_inspection-0.4.1-py3-none-any.whl.metadata (2.6 kB)

#9 1.572 Collecting aiohappyeyeballs>=2.5.0 (from aiohttp>=3.10.0->clarifai>=11.4.8->-r /home/nonroot/requirements.txt (line 1))

#9 1.575   Downloading aiohappyeyeballs-2.6.1-py3-none-any.whl.metadata (5.9 kB)

#9 1.582 Collecting aiosignal>=1.1.2 (from aiohttp>=3.10.0->clarifai>=11.4.8->-r /home/nonroot/requirements.txt (line 1))

#9 1.586   Downloading aiosignal-1.3.2-py2.py3-none-any.whl.metadata (3.8 kB)

#9 1.595 Collecting attrs>=17.3.0 (from aiohttp>=3.10.0->clarifai>=11.4.8->-r /home/nonroot/requirements.txt (line 1))

#9 1.598   Downloading attrs-25.3.0-py3-none-any.whl.metadata (10 kB)

#9 1.639 Collecting frozenlist>=1.1.1 (from aiohttp>=3.10.0->clarifai>=11.4.8->-r /home/nonroot/requirements.txt (line 1))

#9 1.642   Downloading frozenlist-1.7.0-cp312-cp312-manylinux_2_5_x86_64.manylinux1_x86_64.manylinux_2_17_x86_64.manylinux2014_x86_64.whl.metadata (18 kB)

#9 1.745 Collecting multidict<7.0,>=4.5 (from aiohttp>=3.10.0->clarifai>=11.4.8->-r /home/nonroot/requirements.txt (line 1))

#9 1.748   Downloading multidict-6.4.4-cp312-cp312-manylinux_2_17_x86_64.manylinux2014_x86_64.whl.metadata (5.3 kB)

#9 1.770 Collecting propcache>=0.2.0 (from aiohttp>=3.10.0->clarifai>=11.4.8->-r /home/nonroot/requirements.txt (line 1))

#9 1.774   Downloading propcache-0.3.2-cp312-cp312-manylinux_2_17_x86_64.manylinux2014_x86_64.whl.metadata (12 kB)

#9 1.905 Collecting yarl<2.0,>=1.17.0 (from aiohttp>=3.10.0->clarifai>=11.4.8->-r /home/nonroot/requirements.txt (line 1))

#9 1.908   Downloading yarl-1.20.1-cp312-cp312-manylinux_2_17_x86_64.manylinux2014_x86_64.whl.metadata (73 kB)

#9 2.019 Collecting cryptography (from authlib>=1.5.2->fastmcp>=2.3.4->-r /home/nonroot/requirements.txt (line 2))

#9 2.022   Downloading cryptography-45.0.4-cp311-abi3-manylinux_2_34_x86_64.whl.metadata (5.7 kB)

#9 2.279 Collecting grpcio>=1.53.2 (from clarifai-grpc>=11.5.5->clarifai>=11.4.8->-r /home/nonroot/requirements.txt (line 1))

#9 2.282   Downloading grpcio-1.73.0-cp312-cp312-manylinux_2_17_x86_64.manylinux2014_x86_64.whl.metadata (3.8 kB)

#9 2.367 Collecting protobuf>=3.20.3 (from clarifai-grpc>=11.5.5->clarifai>=11.4.8->-r /home/nonroot/requirements.txt (line 1))

#9 2.370   Downloading protobuf-6.31.1-cp39-abi3-manylinux2014_x86_64.whl.metadata (593 bytes)

#9 2.380 Collecting googleapis-common-protos>=1.57.0 (from clarifai-grpc>=11.5.5->clarifai>=11.4.8->-r /home/nonroot/requirements.txt (line 1))

#9 2.383   Downloading googleapis_common_protos-1.70.0-py3-none-any.whl.metadata (9.3 kB)

#9 2.418 Collecting anyio (from httpx>=0.28.1->fastmcp>=2.3.4->-r /home/nonroot/requirements.txt (line 2))

#9 2.420   Downloading anyio-4.9.0-py3-none-any.whl.metadata (4.7 kB)

#9 2.423 Requirement already satisfied: certifi in /venv/lib/python3.12/site-packages (from httpx>=0.28.1->fastmcp>=2.3.4->-r /home/nonroot/requirements.txt (line 2)) (2025.1.31)

#9 2.433 Collecting httpcore==1.* (from httpx>=0.28.1->fastmcp>=2.3.4->-r /home/nonroot/requirements.txt (line 2))

#9 2.436   Downloading httpcore-1.0.9-py3-none-any.whl.metadata (21 kB)

#9 2.439 Requirement already satisfied: idna in /venv/lib/python3.12/site-packages (from httpx>=0.28.1->fastmcp>=2.3.4->-r /home/nonroot/requirements.txt (line 2)) (3.10)

#9 2.444 Collecting h11>=0.16 (from httpcore==1.*->httpx>=0.28.1->fastmcp>=2.3.4->-r /home/nonroot/requirements.txt (line 2))

#9 2.448   Downloading h11-0.16.0-py3-none-any.whl.metadata (8.3 kB)

#9 2.457 Collecting httpx-sse>=0.4 (from mcp<2.0.0,>=1.9.2->fastmcp>=2.3.4->-r /home/nonroot/requirements.txt (line 2))

#9 2.460   Downloading httpx_sse-0.4.0-py3-none-any.whl.metadata (9.0 kB)

#9 2.471 Collecting pydantic-settings>=2.5.2 (from mcp<2.0.0,>=1.9.2->fastmcp>=2.3.4->-r /home/nonroot/requirements.txt (line 2))

#9 2.474   Downloading pydantic_settings-2.9.1-py3-none-any.whl.metadata (3.8 kB)

#9 2.491 Collecting python-multipart>=0.0.9 (from mcp<2.0.0,>=1.9.2->fastmcp>=2.3.4->-r /home/nonroot/requirements.txt (line 2))

#9 2.494   Downloading python_multipart-0.0.20-py3-none-any.whl.metadata (1.8 kB)

#9 2.503 Collecting sse-starlette>=1.6.1 (from mcp<2.0.0,>=1.9.2->fastmcp>=2.3.4->-r /home/nonroot/requirements.txt (line 2))

#9 2.506   Downloading sse_starlette-2.3.6-py3-none-any.whl.metadata (10 kB)

#9 2.544 Collecting starlette>=0.27 (from mcp<2.0.0,>=1.9.2->fastmcp>=2.3.4->-r /home/nonroot/requirements.txt (line 2))

#9 2.547   Downloading starlette-0.47.0-py3-none-any.whl.metadata (6.2 kB)

#9 2.564 Collecting uvicorn>=0.23.1 (from mcp<2.0.0,>=1.9.2->fastmcp>=2.3.4->-r /home/nonroot/requirements.txt (line 2))

#9 2.568   Downloading uvicorn-0.34.3-py3-none-any.whl.metadata (6.5 kB)

#9 2.585 Requirement already satisfied: charset-normalizer<4,>=2 in /venv/lib/python3.12/site-packages (from requests>=2.32.3->clarifai>=11.4.8->-r /home/nonroot/requirements.txt (line 1)) (3.4.1)

#9 2.585 Requirement already satisfied: urllib3<3,>=1.21.1 in /venv/lib/python3.12/site-packages (from requests>=2.32.3->clarifai>=11.4.8->-r /home/nonroot/requirements.txt (line 1)) (2.3.0)

#9 2.594 Collecting markdown-it-py>=2.2.0 (from rich>=13.9.4->fastmcp>=2.3.4->-r /home/nonroot/requirements.txt (line 2)) |  thread=24100
[INFO] 14:08:01.520618 #9 2.494   Downloading python_multipart-0.0.20-py3-none-any.whl.metadata (1.8 kB)

#9 2.503 Collecting sse-starlette>=1.6.1 (from mcp<2.0.0,>=1.9.2->fastmcp>=2.3.4->-r /home/nonroot/requirements.txt (line 2))

#9 2.506   Downloading sse_starlette-2.3.6-py3-none-any.whl.metadata (10 kB)

#9 2.544 Collecting starlette>=0.27 (from mcp<2.0.0,>=1.9.2->fastmcp>=2.3.4->-r /home/nonroot/requirements.txt (line 2))

#9 2.547   Downloading starlette-0.47.0-py3-none-any.whl.metadata (6.2 kB)

#9 2.564 Collecting uvicorn>=0.23.1 (from mcp<2.0.0,>=1.9.2->fastmcp>=2.3.4->-r /home/nonroot/requirements.txt (line 2))

#9 2.568   Downloading uvicorn-0.34.3-py3-none-any.whl.metadata (6.5 kB)

#9 2.585 Requirement already satisfied: charset-normalizer<4,>=2 in /venv/lib/python3.12/site-packages (from requests>=2.32.3->clarifai>=11.4.8->-r /home/nonroot/requirements.txt (line 1)) (3.4.1)

#9 2.585 Requirement already satisfied: urllib3<3,>=1.21.1 in /venv/lib/python3.12/site-packages (from requests>=2.32.3->clarifai>=11.4.8->-r /home/nonroot/requirements.txt (line 1)) (2.3.0)

#9 2.594 Collecting markdown-it-py>=2.2.0 (from rich>=13.9.4->fastmcp>=2.3.4->-r /home/nonroot/requirements.txt (line 2))

#9 2.597   Downloading markdown_it_py-3.0.0-py3-none-any.whl.metadata (6.9 kB)

#9 2.612 Collecting pygments<3.0.0,>=2.13.0 (from rich>=13.9.4->fastmcp>=2.3.4->-r /home/nonroot/requirements.txt (line 2))

#9 2.615   Downloading pygments-2.19.1-py3-none-any.whl.metadata (2.5 kB)

#9 2.630 Collecting shellingham>=1.3.0 (from typer>=0.15.2->fastmcp>=2.3.4->-r /home/nonroot/requirements.txt (line 2))

#9 2.633   Downloading shellingham-1.5.4-py2.py3-none-any.whl.metadata (3.5 kB)

#9 2.653 Collecting sniffio>=1.1 (from anyio->httpx>=0.28.1->fastmcp>=2.3.4->-r /home/nonroot/requirements.txt (line 2))

#9 2.656   Downloading sniffio-1.3.1-py3-none-any.whl.metadata (3.9 kB)

#9 2.701 Collecting mdurl~=0.1 (from markdown-it-py>=2.2.0->rich>=13.9.4->fastmcp>=2.3.4->-r /home/nonroot/requirements.txt (line 2))

#9 2.704   Downloading mdurl-0.1.2-py3-none-any.whl.metadata (1.6 kB)

#9 2.794 Collecting cffi>=1.14 (from cryptography->authlib>=1.5.2->fastmcp>=2.3.4->-r /home/nonroot/requirements.txt (line 2))

#9 2.798   Downloading cffi-1.17.1-cp312-cp312-manylinux_2_17_x86_64.manylinux2014_x86_64.whl.metadata (1.5 kB)

#9 2.805 Collecting pycparser (from cffi>=1.14->cryptography->authlib>=1.5.2->fastmcp>=2.3.4->-r /home/nonroot/requirements.txt (line 2))

#9 2.808   Downloading pycparser-2.22-py3-none-any.whl.metadata (943 bytes)

#9 2.819 Downloading clarifai-11.5.0-py3-none-any.whl (229 kB)

#9 2.824 Downloading schema-0.7.5-py2.py3-none-any.whl (17 kB)

#9 2.828 Downloading fastmcp-2.8.0-py3-none-any.whl (137 kB)

#9 2.832 Downloading pydantic-2.11.5-py3-none-any.whl (444 kB)

#9 2.835 Downloading pydantic_core-2.33.2-cp312-cp312-manylinux_2_17_x86_64.manylinux2014_x86_64.whl (2.0 MB)

#9 2.840    ━━━━━━━━━━━━━━━━━━━━━━━━━━━━━━━━━━━━━━━━ 2.0/2.0 MB 585.2 MB/s eta 0:00:00

#9 2.843 Downloading aiohttp-3.12.12-cp312-cp312-manylinux_2_17_x86_64.manylinux2014_x86_64.whl (1.7 MB)

#9 2.848    ━━━━━━━━━━━━━━━━━━━━━━━━━━━━━━━━━━━━━━━━ 1.7/1.7 MB 460.3 MB/s eta 0:00:00

#9 2.851 Downloading annotated_types-0.7.0-py3-none-any.whl (13 kB)

#9 2.854 Downloading authlib-1.6.0-py2.py3-none-any.whl (239 kB)

#9 2.858 Downloading clarifai_grpc-11.5.5-py3-none-any.whl (290 kB)

#9 2.863 Downloading clarifai_protocol-0.0.24-cp312-cp312-manylinux_2_17_x86_64.manylinux2014_x86_64.whl (412 kB)

#9 2.868 Downloading click-8.2.1-py3-none-any.whl (102 kB)

#9 2.870 Downloading exceptiongroup-1.3.0-py3-none-any.whl (16 kB)

#9 2.873 Downloading httpx-0.28.1-py3-none-any.whl (73 kB)

#9 2.876 Downloading httpcore-1.0.9-py3-none-any.whl (78 kB)

#9 2.880 Downloading mcp-1.9.3-py3-none-any.whl (131 kB)

#9 2.883 Downloading numpy-2.3.0-cp312-cp312-manylinux_2_28_x86_64.whl (16.6 MB)

#9 2.916    ━━━━━━━━━━━━━━━━━━━━━━━━━━━━━━━━━━━━━━━━ 16.6/16.6 MB 517.3 MB/s eta 0:00:00

#9 2.920 Downloading openapi_pydantic-0.5.1-py3-none-any.whl (96 kB)

#9 2.923 Downloading pillow-11.2.1-cp312-cp312-manylinux_2_28_x86_64.whl (4.6 MB)

#9 2.932    ━━━━━━━━━━━━━━━━━━━━━━━━━━━━━━━━━━━━━━━━ 4.6/4.6 MB 560.3 MB/s eta 0:00:00

#9 2.935 Downloading python_dotenv-1.1.0-py3-none-any.whl (20 kB)

#9 2.938 Downloading rich-14.0.0-py3-none-any.whl (243 kB)

#9 2.941 Downloading tabulate-0.9.0-py3-none-any.whl (35 kB)

#9 2.944 Downloading typer-0.16.0-py3-none-any.whl (46 kB)

#9 2.947 Downloading typing_inspection-0.4.1-py3-none-any.whl (14 kB)

#9 2.950 Downloading aiohappyeyeballs-2.6.1-py3-none-any.whl (15 kB)

#9 2.953 Downloading aiosignal-1.3.2-py2.py3-none-any.whl (7.6 kB)

#9 2.956 Downloading anyio-4.9.0-py3-none-any.whl (100 kB)

#9 2.959 Downloading attrs-25.3.0-py3-none-any.whl (63 kB)

#9 2.962 Downloading contextlib2-21.6.0-py2.py3-none-any.whl (13 kB)

#9 2.965 Downloading frozenlist-1.7.0-cp312-cp312-manylinux_2_5_x86_64.manylinux1_x86_64.manylinux_2_17_x86_64.manylinux2014_x86_64.whl (241 kB)

#9 2.969 Downloading googleapis_common_protos-1.70.0-py3-none-any.whl (294 kB)

#9 2.972 Downloading grpcio-1.73.0-cp312-cp312-manylinux_2_17_x86_64.manylinux2014_x86_64.whl (6.0 MB)

#9 2.984    ━━━━━━━━━━━━━━━━━━━━━━━━━━━━━━━━━━━━━━━━ 6.0/6.0 MB 536.7 MB/s eta 0:00:00

#9 2.988 Downloading httpx_sse-0.4.0-py3-none-any.whl (7.8 kB)

#9 2.991 Downloading markdown_it_py-3.0.0-py3-none-any.whl (87 kB)

#9 2.994 Downloading multidict-6.4.4-cp312-cp312-manylinux_2_17_x86_64.manylinux2014_x86_64.whl (223 kB)

#9 2.997 Downloading propcache-0.3.2-cp312-cp312-manylinux_2_17_x86_64.manylinux2014_x86_64.whl (224 kB)

#9 3.000 Downloading protobuf-6.31.1-cp39-abi3-manylinux2014_x86_64.whl (321 kB)

#9 3.004 Downloading pydantic_settings-2.9.1-py3-none-any.whl (44 kB)

#9 3.007 Downloading pygments-2.19.1-py3-none-any.whl (1.2 MB)

#9 3.010    ━━━━━━━━━━━━━━━━━━━━━━━━━━━━━━━━━━━━━━━━ 1.2/1.2 MB 711.0 MB/s eta 0:00:00

#9 3.013 Downloading python_multipart-0.0.20-py3-none-any.whl (24 kB)

#9 3.016 Downloading shellingham-1.5.4-py2.py3-none-any.whl (9.8 kB)

#9 3.019 Downloading sse_starlette-2.3.6-py3-none-any.whl (10 kB)

#9 3.022 Downloading starlette-0.47.0-py3-none-any.whl (72 kB)

#9 3.025 Downloading uvicorn-0.34.3-py3-none-any.whl (62 kB)

#9 3.028 Downloading yarl-1.20.1-cp312-cp312-manylinux_2_17_x86_64.manylinux2014_x86_64.whl (355 kB)

#9 3.031 Downloading cryptography-45.0.4-cp311-abi3-manylinux_2_34_x86_64.whl (4.5 MB)

#9 3.041    ━━━━━━━━━━━━━━━━━━━━━━━━━━━━━━━━━━━━━━━━ 4.5/4.5 MB 494.2 MB/s eta 0:00:00

#9 3.044 Downloading cffi-1.17.1-cp312-cp312-manylinux_2_17_x86_64.manylinux2014_x86_64.whl (479 kB)

#9 3.048 Downloading h11-0.16.0-py3-none-any.whl (37 kB)

#9 3.051 Downloading mdurl-0.1.2-py3-none-any.whl (10.0 kB)

#9 3.054 Downloading sniffio-1.3.1-py3-none-any.whl (10 kB)

#9 3.057 Downloading pycparser-2.22-py3-none-any.whl (117 kB)

#9 3.211 Installing collected packages: typing-inspection, tabulate, sniffio, shellingham, python-multipart, python-dotenv, pygments, pydantic-core, pycparser, protobuf, propcache, Pillow, numpy, multidict, mdurl, httpx-sse, h11, grpcio, frozenlist, exceptiongroup, contextlib2, click, attrs, annotated-types, aiohappyeyeballs, yarl, uvicorn, schema, pydantic, markdown-it-py, httpcore, googleapis-common-protos, cffi, anyio, aiosignal, starlette, sse-starlette, rich, pydantic-settings, openapi-pydantic, httpx, cryptography, clarifai-grpc, aiohttp, typer, mcp, authlib, fastmcp, clarifai-protocol, clarifai

#9 7.324 Successfully installed Pillow-11.2.1 aiohappyeyeballs-2.6.1 aiohttp-3.12.12 aiosignal-1.3.2 annotated-types-0.7.0 anyio-4.9.0 attrs-25.3.0 authlib-1.6.0 cffi-1.17.1 clarifai-11.5.0 clarifai-grpc-11.5.5 clarifai-protocol-0.0.24 click-8.2.1 contextlib2-21.6.0 cryptography-45.0.4 exceptiongroup-1.3.0 fastmcp-2.8.0 frozenlist-1.7.0 googleapis-common-protos-1.70.0 grpcio-1.73.0 h11-0.16.0 httpcore-1.0.9 httpx-0.28.1 httpx-sse-0.4.0 markdown-it-py-3.0.0 mcp-1.9.3 mdurl-0.1.2 multidict-6.4.4 numpy-2.3.0 openapi-pydantic-0.5.1 propcache-0.3.2 protobuf-6.31.1 pycparser-2.22 pydantic-2.11.5 pydantic-core-2.33.2 pydantic-settings-2.9.1 pygments-2.19.1 python-dotenv-1.1.0 python-multipart-0.0.20 rich-14.0.0 schema-0.7.5 shellingham-1.5.4 sniffio-1.3.1 sse-starlette-2.3.6 starlette-0.47.0 tabulate-0.9.0 typer-0.16.0 typing-inspection-0.4.1 uvicorn-0.34.3 yarl-1.20.1

#9 7.398

#9 7.398 \[notice] A new release of pip is available: 25.0.1 -> 25.1.1

#9 7.398 \[notice] To update, run: pip install --upgrade pip

#9 DONE 7.6s |  thread=24100
[INFO] 14:08:06.501602 #9 DONE 7.6s)


#10 \[final 4/8] RUN ["pip", "show", "clarifai"]

#10 0.176 WARNING: The directory '/home/nonroot/.cache/pip' or its parent directory is not owned or is not writable by the current user. The cache has been disabled. Check the permissions and owner of that directory. If executing pip with sudo, you should use sudo's -H flag.

#10 0.246 Name: clarifai

#10 0.246 Version: 11.5.0

#10 0.246 Summary:

#10 0.246 Home-page: https://github.com/Clarifai/clarifai-python

#10 0.246 Author: Clarifai

#10 0.246 Author-email: support@clarifai.com

#10 0.246 License: Apache 2.0

#10 0.246 Location: /venv/lib/python3.12/site-packages

#10 0.246 Requires: aiohttp, clarifai-grpc, clarifai-protocol, click, fsspec, numpy, Pillow, PyYAML, requests, schema, tabulate, tqdm

#10 0.246 Required-by: clarifai-protocol

#10 DONE 0.3s


#11 \[final 5/8] COPY --chown=nonroot:nonroot downloader/unused.yaml /home/nonroot/main/1/checkpoints/.cache/unused.yaml

#11 DONE 0.0s


#12 \[final 6/8] RUN  ["python", "-m", "clarifai.cli", "model", "download-checkpoints", "/home/nonroot/main", "--out_path", "/home/nonroot/main/1/checkpoints", "--stage", "build"]

#12 0.382 [INFO] 11:07:59.706068 No checkpoints specified in the config file |  thread=139726749580864

#12 DONE 0.4s


#13 \[final 7/8] COPY --link=true 1 /home/nonroot/main/1

#13 DONE 0.0s


#14 \[final 8/8] COPY --link=true requirements.txt config.yaml /home/nonroot/main/

#14 DONE 0.0s


#15 exporting to image

#15 exporting layers |  thread=24100
[INFO] 14:08:11.515503 #15 exporting layers 4.4s done

#15 exporting manifest sha256:************197e done

#15 exporting config sha256:************73aa done

#15 pushing layers

#15 ...


#16 \[auth] sharing credentials for 891377382885.dkr.ecr.us-east-1.amazonaws.com

#16 DONE 0.0s


#15 exporting to image

#15 pushing layers 2.5s done

#15 pushing manifest for ****/prod/python:****0f0f2110727d@sha256:************197e

#15 pushing manifest for ****/prod/python:****0f0f2110727d@sha256:************197e 0.4s done

#15 DONE 7.3s

2025-06-11 11:08:07.113313 INFO: Done building image!!! |  thread=24100
[INFO] 14:08:13.260597 Model build complete! |  thread=24100
[INFO] 14:08:13.261596 Build time elapsed 22.4s) |  thread=24100
[INFO] 14:08:13.261596 Check out the model at https://clarifai.com/alfrick/upload-models-2/models/mcp-three version: 42033db33ed84d66a5430f0f2110727d |  thread=24100
[INFO] 14:08:13.280794

XXXXXXXXXXXXXXXXXXXXXXXXXXXXXXXXXXXXXXXXXXXXXXXXXXXXXX
# Here is a code snippet to use this model:
XXXXXXXXXXXXXXXXXXXXXXXXXXXXXXXXXXXXXXXXXXXXXXXXXXXXXXXXXXXXXX
                 |  thread=24100
[INFO] 14:08:13.280794
import asyncio
import os
from fastmcp import Client
from fastmcp.client.transports import StreamableHttpTransport

transport = StreamableHttpTransport(url="https://api.clarifai.com/v2/ext/mcp/v1/users/alfrick/apps/upload-models-2/models/mcp-three",
                                    headers={"Authorization": "Bearer " + os.environ["CLARIFAI_PAT"]})

async def main():
  async with Client(transport) as client:
    tools = await client.list_tools()
    print(f"Available tools: {tools}")
    # TODO: update the dictionary of arguments passed to call_tool to make sense for your MCP.
    result = await client.call_tool(tools[0].name, {"a": 5, "b": 3})
    print(f"Result: {result[0].text}")

if __name__ == "__main__":
  asyncio.run(main())
 |  thread=24100
Note: If you make changes to your server code and re-deploy it, Clarifai automatically creates a new version of your model.
If you prefer to upload the model first and deploy separately (e.g., to a specific nodepool), you can use clarifai model upload and then deploy via the UI or clarifai deployment create. See the deployments guide for details.
Step 8: Interact With Server
After uploading your server to Clarifai, you can create a separate client script to communicate with it and invoke its tools.
Here’s an example client.py that demonstrates how to interact with your deployed MCP server:
- Python
from clarifai.urls.helper import ClarifaiUrlHelper
from fastmcp import Client
from fastmcp.client.transports import StreamableHttpTransport
import asyncio
import os
import logging

# Suppress verbose MCP client HTTP logs
logging.getLogger('mcp.client.streamable_http').setLevel(logging.CRITICAL)

# Set as environment variable export CLARIFAI_PAT="YOUR_PAT_HERE"
PAT = os.environ['CLARIFAI_PAT']

# Retrieve MCP API base URL from your current Clarifai configuration (optional helper)
url = ClarifaiUrlHelper().mcp_api_url()
# url = ClarifaiUrlHelper().mcp_api_url(user_id="user-id-here", app_id="app-id-here", model_id="model-id-here") # Manually set MCP URL, and it takes precedence
print(url)

# Create MCP HTTP transport targeting your deployed MCP model on Clarifai
transport = StreamableHttpTransport(url=url, headers={"Authorization": "Bearer " + PAT})

async def main():
    print("=== Sample MCP Server Client Examples ===\n")

    async with Client(transport) as client:
        # List all available tools exposed by the MCP server
        print("Available tools:")
        tools = await client.list_tools()
        for tool in tools:
            print(f"- {tool.name}: {tool.description}")
        print("\n" + "=" * 50 + "\n")

        # Example 1: Call 'calculate_sum' tool
        print("1. Calling 'calculate_sum' to add two numbers:")
        try:
            result = await client.call_tool("calculate_sum", {"a": 10, "b": 25})
            print(f"Result of 10 + 25: {result[0].text}")
        except Exception as e:
            print(f"Error calling calculate_sum: {e}")
        print("\n" + "=" * 50 + "\n")

        # Example 2: Call 'weather' tool for different cities
        print("2. Calling 'weather' for different cities:")

        # Call for Philly
        try:
            result_philly = await client.call_tool("weather", {"city": "Philly"})
            print(f"Weather in Philly: {result_philly[0].text}")
        except Exception as e:
            print(f"Error calling weather for Philly: {e}")

        # Call for Seattle
        try:
            result_seattle = await client.call_tool("weather", {"city": "Seattle"})
            print(f"Weather in Seattle: {result_seattle[0].text}")
        except Exception as e:
            print(f"Error calling weather for Seattle: {e}")

if __name__ == "__main__":
    asyncio.run(main())
Let’s break down what each part of the file does.
-
Set up connection – We establish the connection to your deployed MCP server. The
StreamableHttpTransportinstance handles this, serving as a specialized FastMCP transport for HTTP communication. Itsurlparameter points directly to your MCP model on Clarifai. Instead of hardcoding this URL, we useClarifaiUrlHelper().mcp_api_url()as a convenient utility. Based on your current context, this helper provides the base URL where your MCP server lives and exposes its tools, ensuring flexibility and correctness. -
Main logic – We asynchronously open the MCP client session by initializing
fastmcp.Clientwith the configuredtransport. Once connected, we list all available tools exposed by the server and call them. Note the use ofasyncandawait; FastMCP clients operate asynchronously, requiring anasyncfunction and anasync with Clientblock to properly manage the client's lifecycle. -
Execution – Finally,
asyncio.run(main())executes the entire asynchronous interaction.
To execute the client example, run the following command:
- Bash
python client.py
If you encounter a Server error '503 Service Unavailable' while calling the server, it typically indicates that the model is in a cold state and still warming up. You may wait a moment before trying the request again.
Example Output
https://api.clarifai.com/v2/ext/mcp/v1/users/user-id/apps/app-id/models/model-id
=== Sample MCP Server Client Examples ===

Available tools:
- calculate_sum: Add two numbers together
- weather: Get the current weather information for the given city

==================================================

1. Calling 'calculate_sum' to add two numbers:
Result of 10 + 25: 35.0

==================================================

2. Calling 'weather' for different cities:
Weather in Philly: It's always sunny in Philadelphia!
Weather in Seattle: It's always rainy in Seattle!
Additional Examples
To learn more about building MCP servers using Clarifai, see the following examples: