Create Clusters and Nodepools
Set up capabilities that match your computational needs
A compute cluster serves as the main environment where models are deployed, whether for training or inference. Each cluster can contain multiple nodepools, which are groups of virtual machine instances with similar configurations (such as CPU/GPU type, memory).
After creating a custom cluster, you can configure nodepools within it to optimize resource usage. These nodepools will help tailor the infrastructure to meet the specific hardware, performance, cost, or regulatory compliance of your machine learning needs.
For example, you may create a nodepool for GPU-intensive tasks and another for lighter workloads running on CPUs.
With clusters and nodepools, you can organize and manage (orchestrate) the compute resources necessary for running your models and workflows.
You can connect your existing AWS, Google Cloud (GCP), or Oracle infrastructure to leverage your current investments. This lets you maintain full control over your data while optimizing for cost and flexibility. Contact our support team for assistance.
Via the UI
Step 1: Start Creating a Cluster
Log in to the Clarifai platform and select the Compute option in the collapsible left sidebar.
Then, select the Clusters option from the dropdown list. You’ll be redirected to the clusters page, where you can view and manage all compute clusters across your environments.
Click the Create a Cluster button to begin setting up a new cluster along with its associated nodepool.

You’ll be redirected to a page, where you can specify the configurations for your new cluster and nodepool.
Step 2: Select an Instance
Select an instance type that aligns with your specific requirements. The table displays essential details for each instance type, which helps you make an informed decision.
See Supported Cloud Instances to learn more about the instance types we provide.
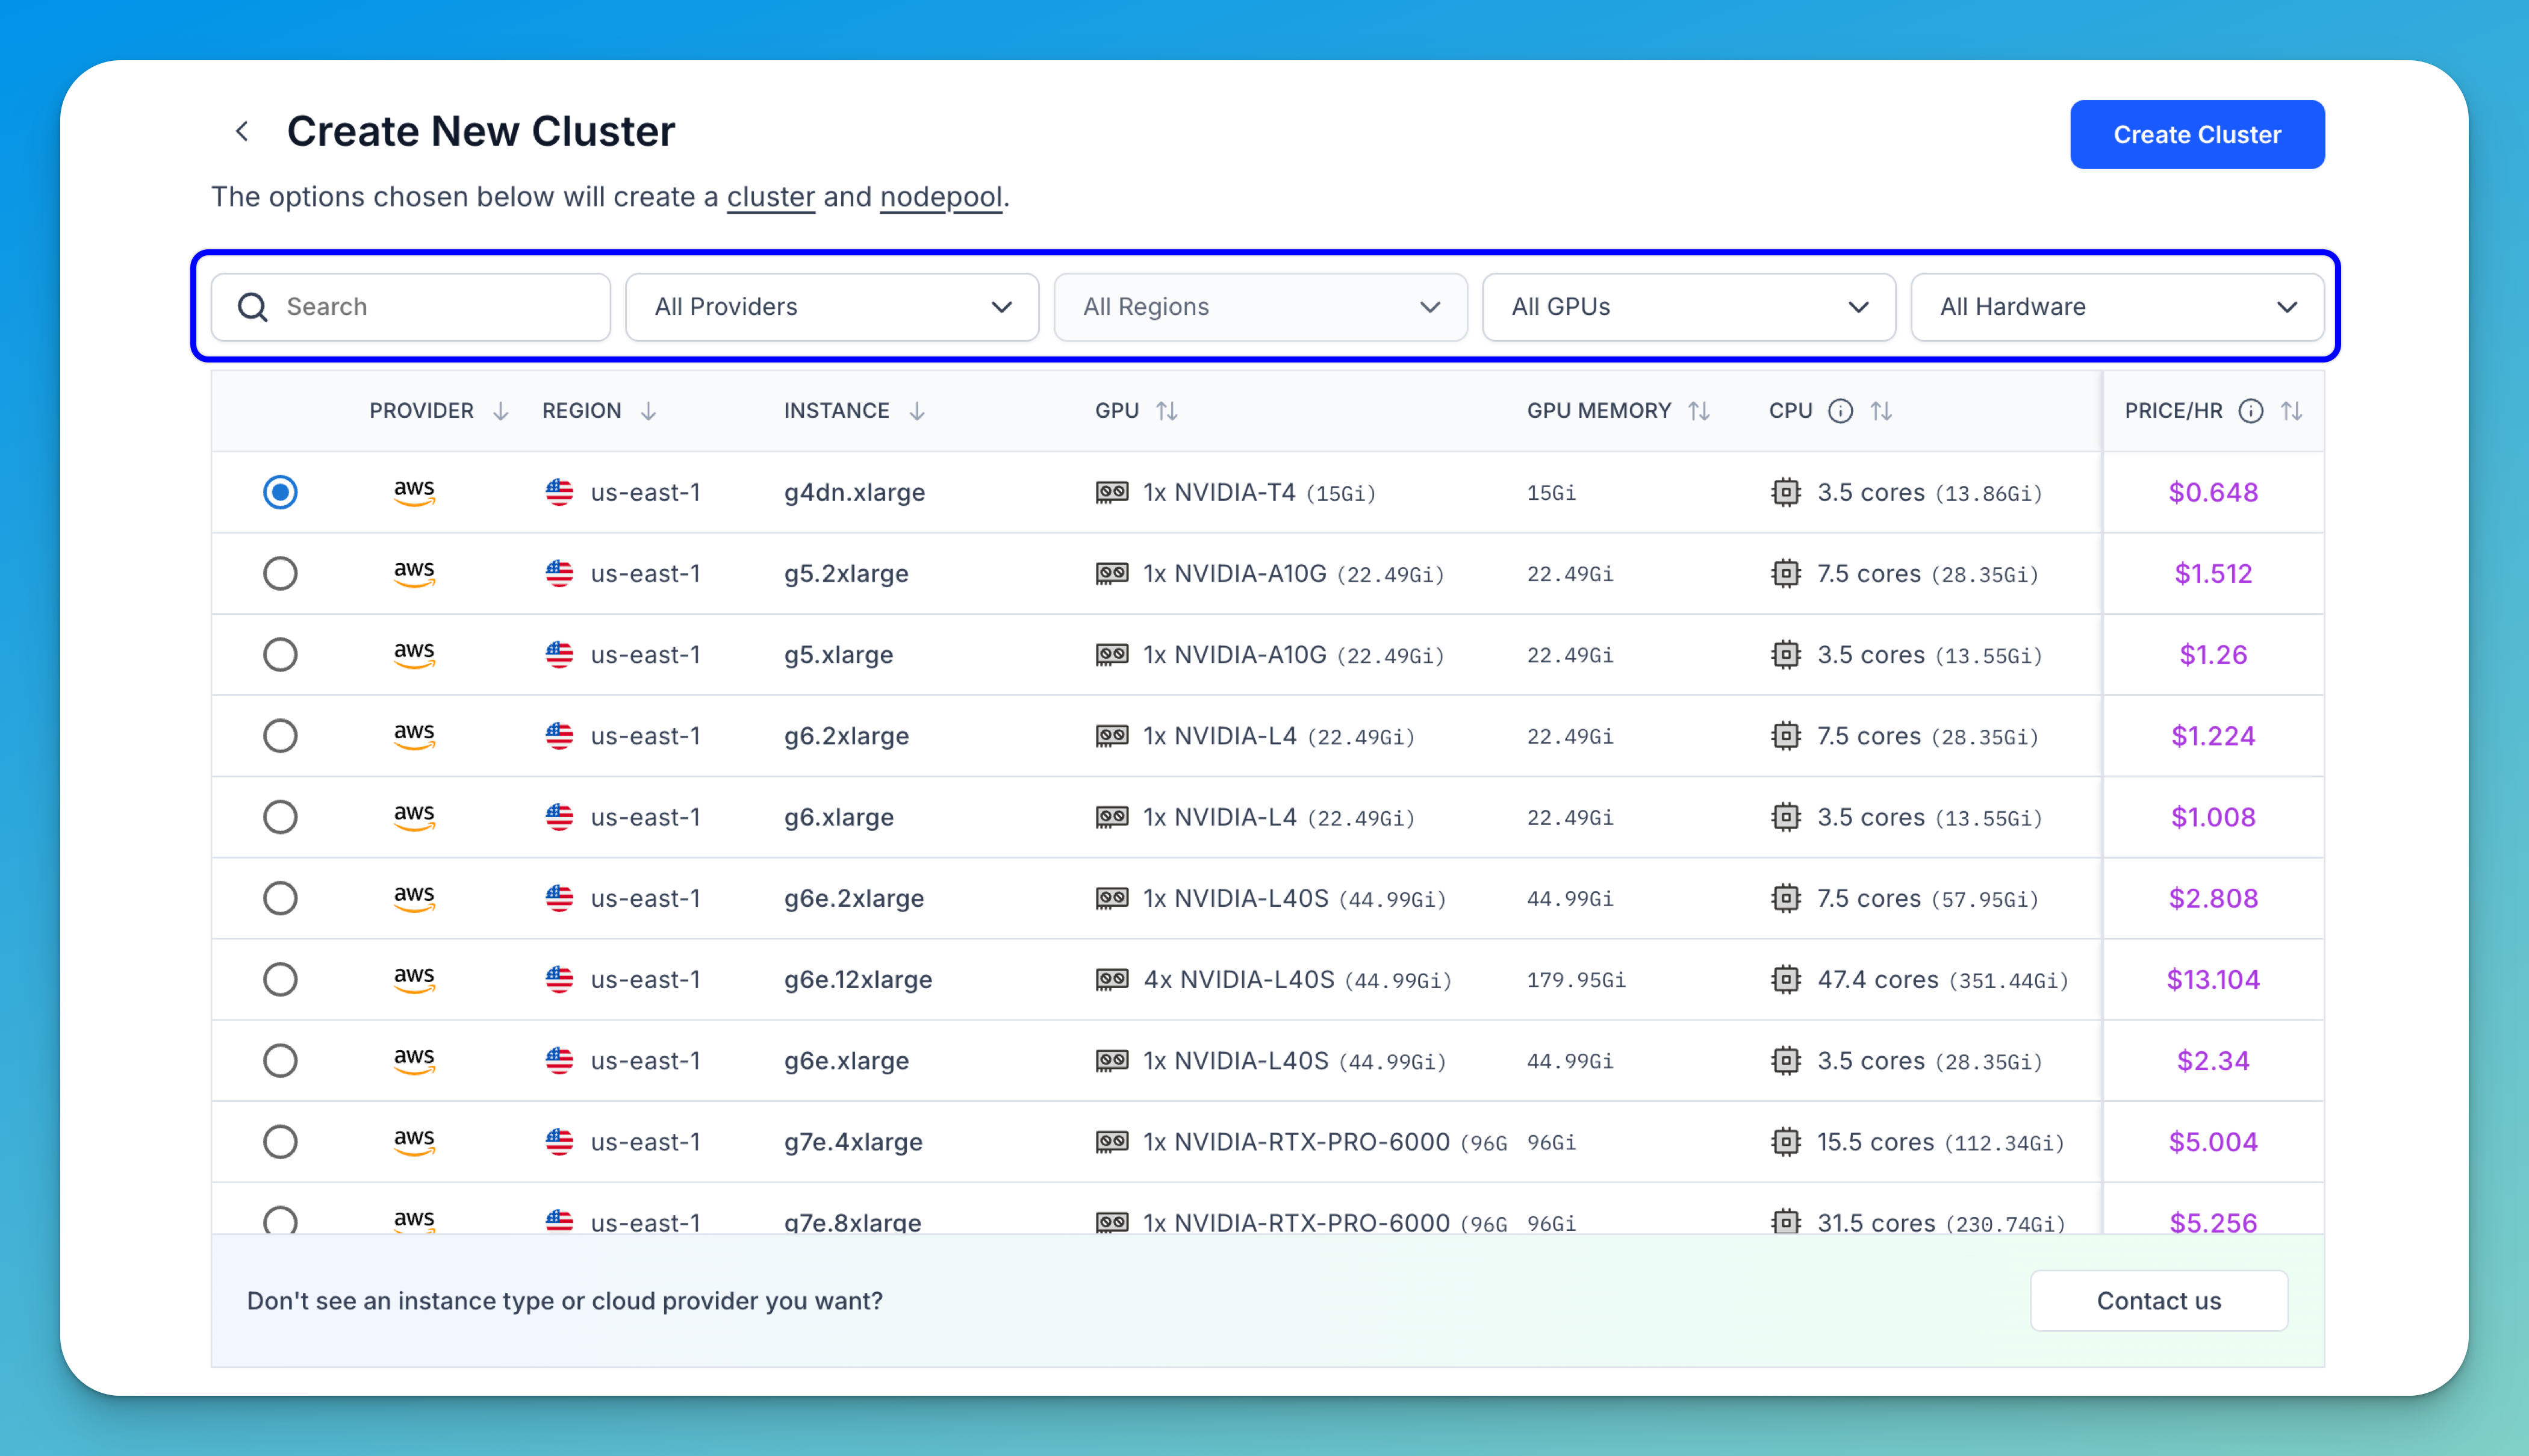
You can narrow down the displayed options using the filters and tools provided in the top bar:
- Search bar — Quickly find instance types by name.
- Provider filter — Choose from available cloud providers to match your preferred infrastructure.
- Region filter — Select the geographic location for the instance. Choosing a region closer to your users can reduce latency and improve performance.
- Instance type filter — Directly filter for a specific instance type if you already know what you're looking for.
- Hardware filter — Filter based on the instance's available hardware, such as CPU or GPU.
- Price/hour filter — Filter instances by their hourly cost, helping you manage your budget.
- Sorting controls — Click the sorting arrows next to each column header to sort values in ascending or descending order, making comparisons easier.
Before making your final choice, here are some key considerations to make:
- Workload requirements (CPU and memory) — For applications demanding significant processing power, opt for instances with a higher number of CPU cores. For example, a
t3a.2xlargeoffers7.6 cores, considerably more than at3a.mediumwith1.6 cores. Also, theGivalue displayed alongside the core count (such as2.99Gi) indicates the amount of RAM in Gigabytes. A higherGivalue signifies more available memory. - Cost sensitivity — The
PRICE/HRcolumn helps you evaluate cost. Choose an instance that balances price and performance according to your budget. - GPU requirements — If your workload involves intensive tasks like running models for video processing or other GPU-heavy tasks, you'll need to select instances equipped with GPUs.
- Regulatory compliance – Ensure the chosen region and instance type comply with any relevant data residency or industry-specific regulations.
Once you've found the right instance, click the circular radio button to the left of the row to select it.
For this example, let's select the AWS
g4dn.xlargeinstance in theus-east-1region. For the remaining details to be filled, we'll use the already provided default options. After selecting an instance, you can click the Create Cluster button to complete creating your cluster and nodepool. Otherwise, you can customize the rest of the settings to meet your needs.
Step 3: Set Node Autoscaling Range
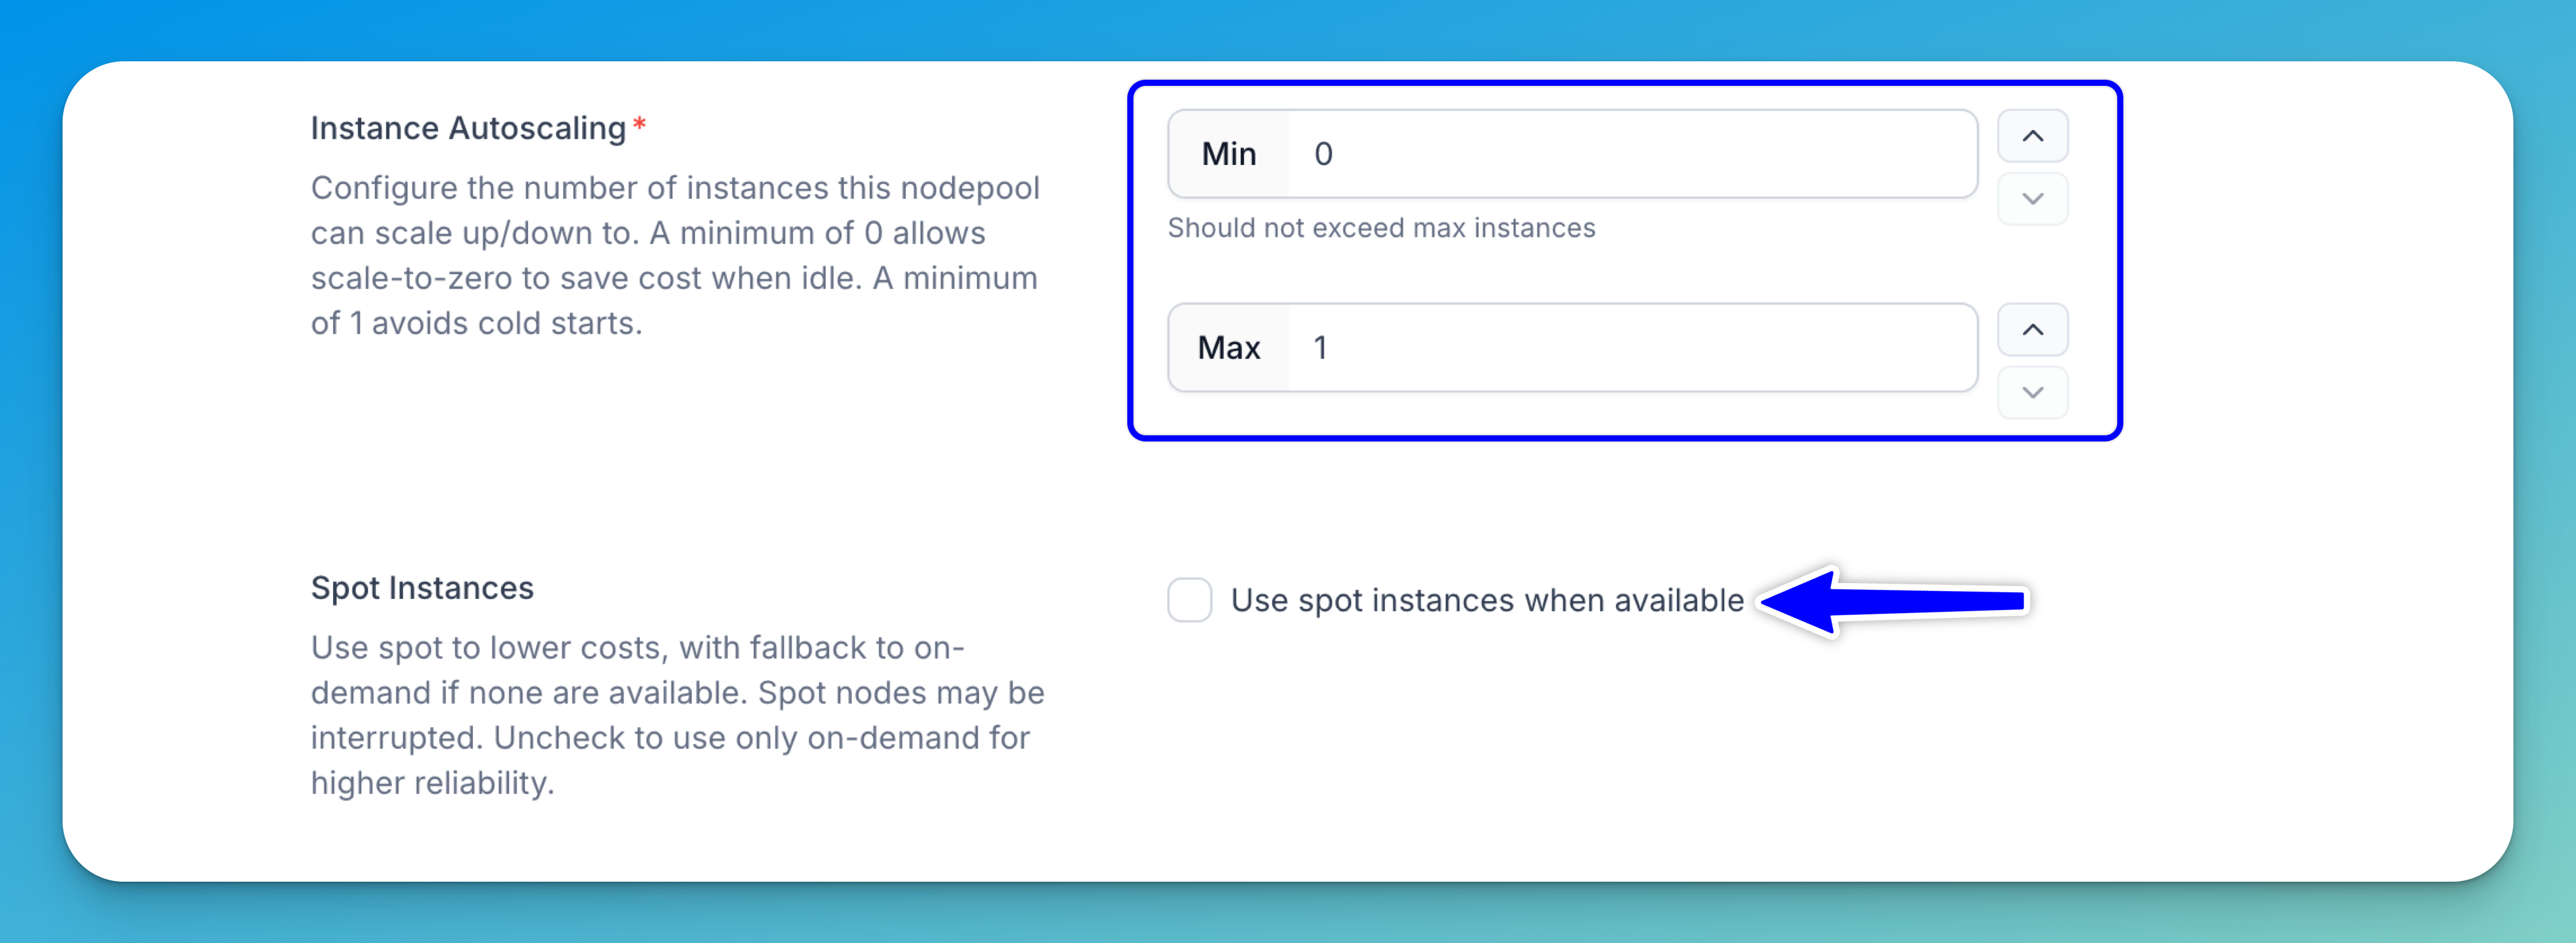
Define the minimum and maximum number of nodes your nodepool can scale to based on workload demand. This ensures your system automatically adjusts its capacity by adding nodes during high traffic and scaling down during low usage, which balances performance and cost.
For example, setting the autoscaling range to 1–5 nodes allows the nodepool to scale up to handle more requests and scale down when demand drops.
-
Setting a minimum of 1 ensures that at least one node is always running. This helps avoid cold start delays after periods of inactivity, which is crucial for maintaining low-latency response times. However, it also means incurring continuous compute costs.
-
Setting a minimum of 0 reduces costs during idle periods, as no nodes will be running. Keep in mind this can introduce cold starts when traffic resumes, potentially impacting response times.
Choose your range based on the balance you need between cost-efficiency and responsiveness.
Click here to learn how to configure model replicas to distribute your workload efficiently across multiple instances of a model.
Step 4: Enable Spot Instances
You can enable this option (default is off) if you want to rent spare, unused compute capacity at significantly lower prices compared to regular on-demand instances.
These spot instances are sourced from the underlying cloud provider (such as AWS or GCP) based on the region and instance type you've selected.
If spot instances are unavailable, Clarifai will automatically fall back to on-demand instances to maintain service continuity.
Keep in mind that spot instances can be terminated at any time if the capacity is reclaimed by the provider, which may cause temporary disruptions. For higher reliability and uninterrupted service, it's recommended to leave this option disabled and use on-demand instances only.
Step 5: Provide Cluster and Nodepool Details
Fill out the form to specify the details for your cluster and nodepool.
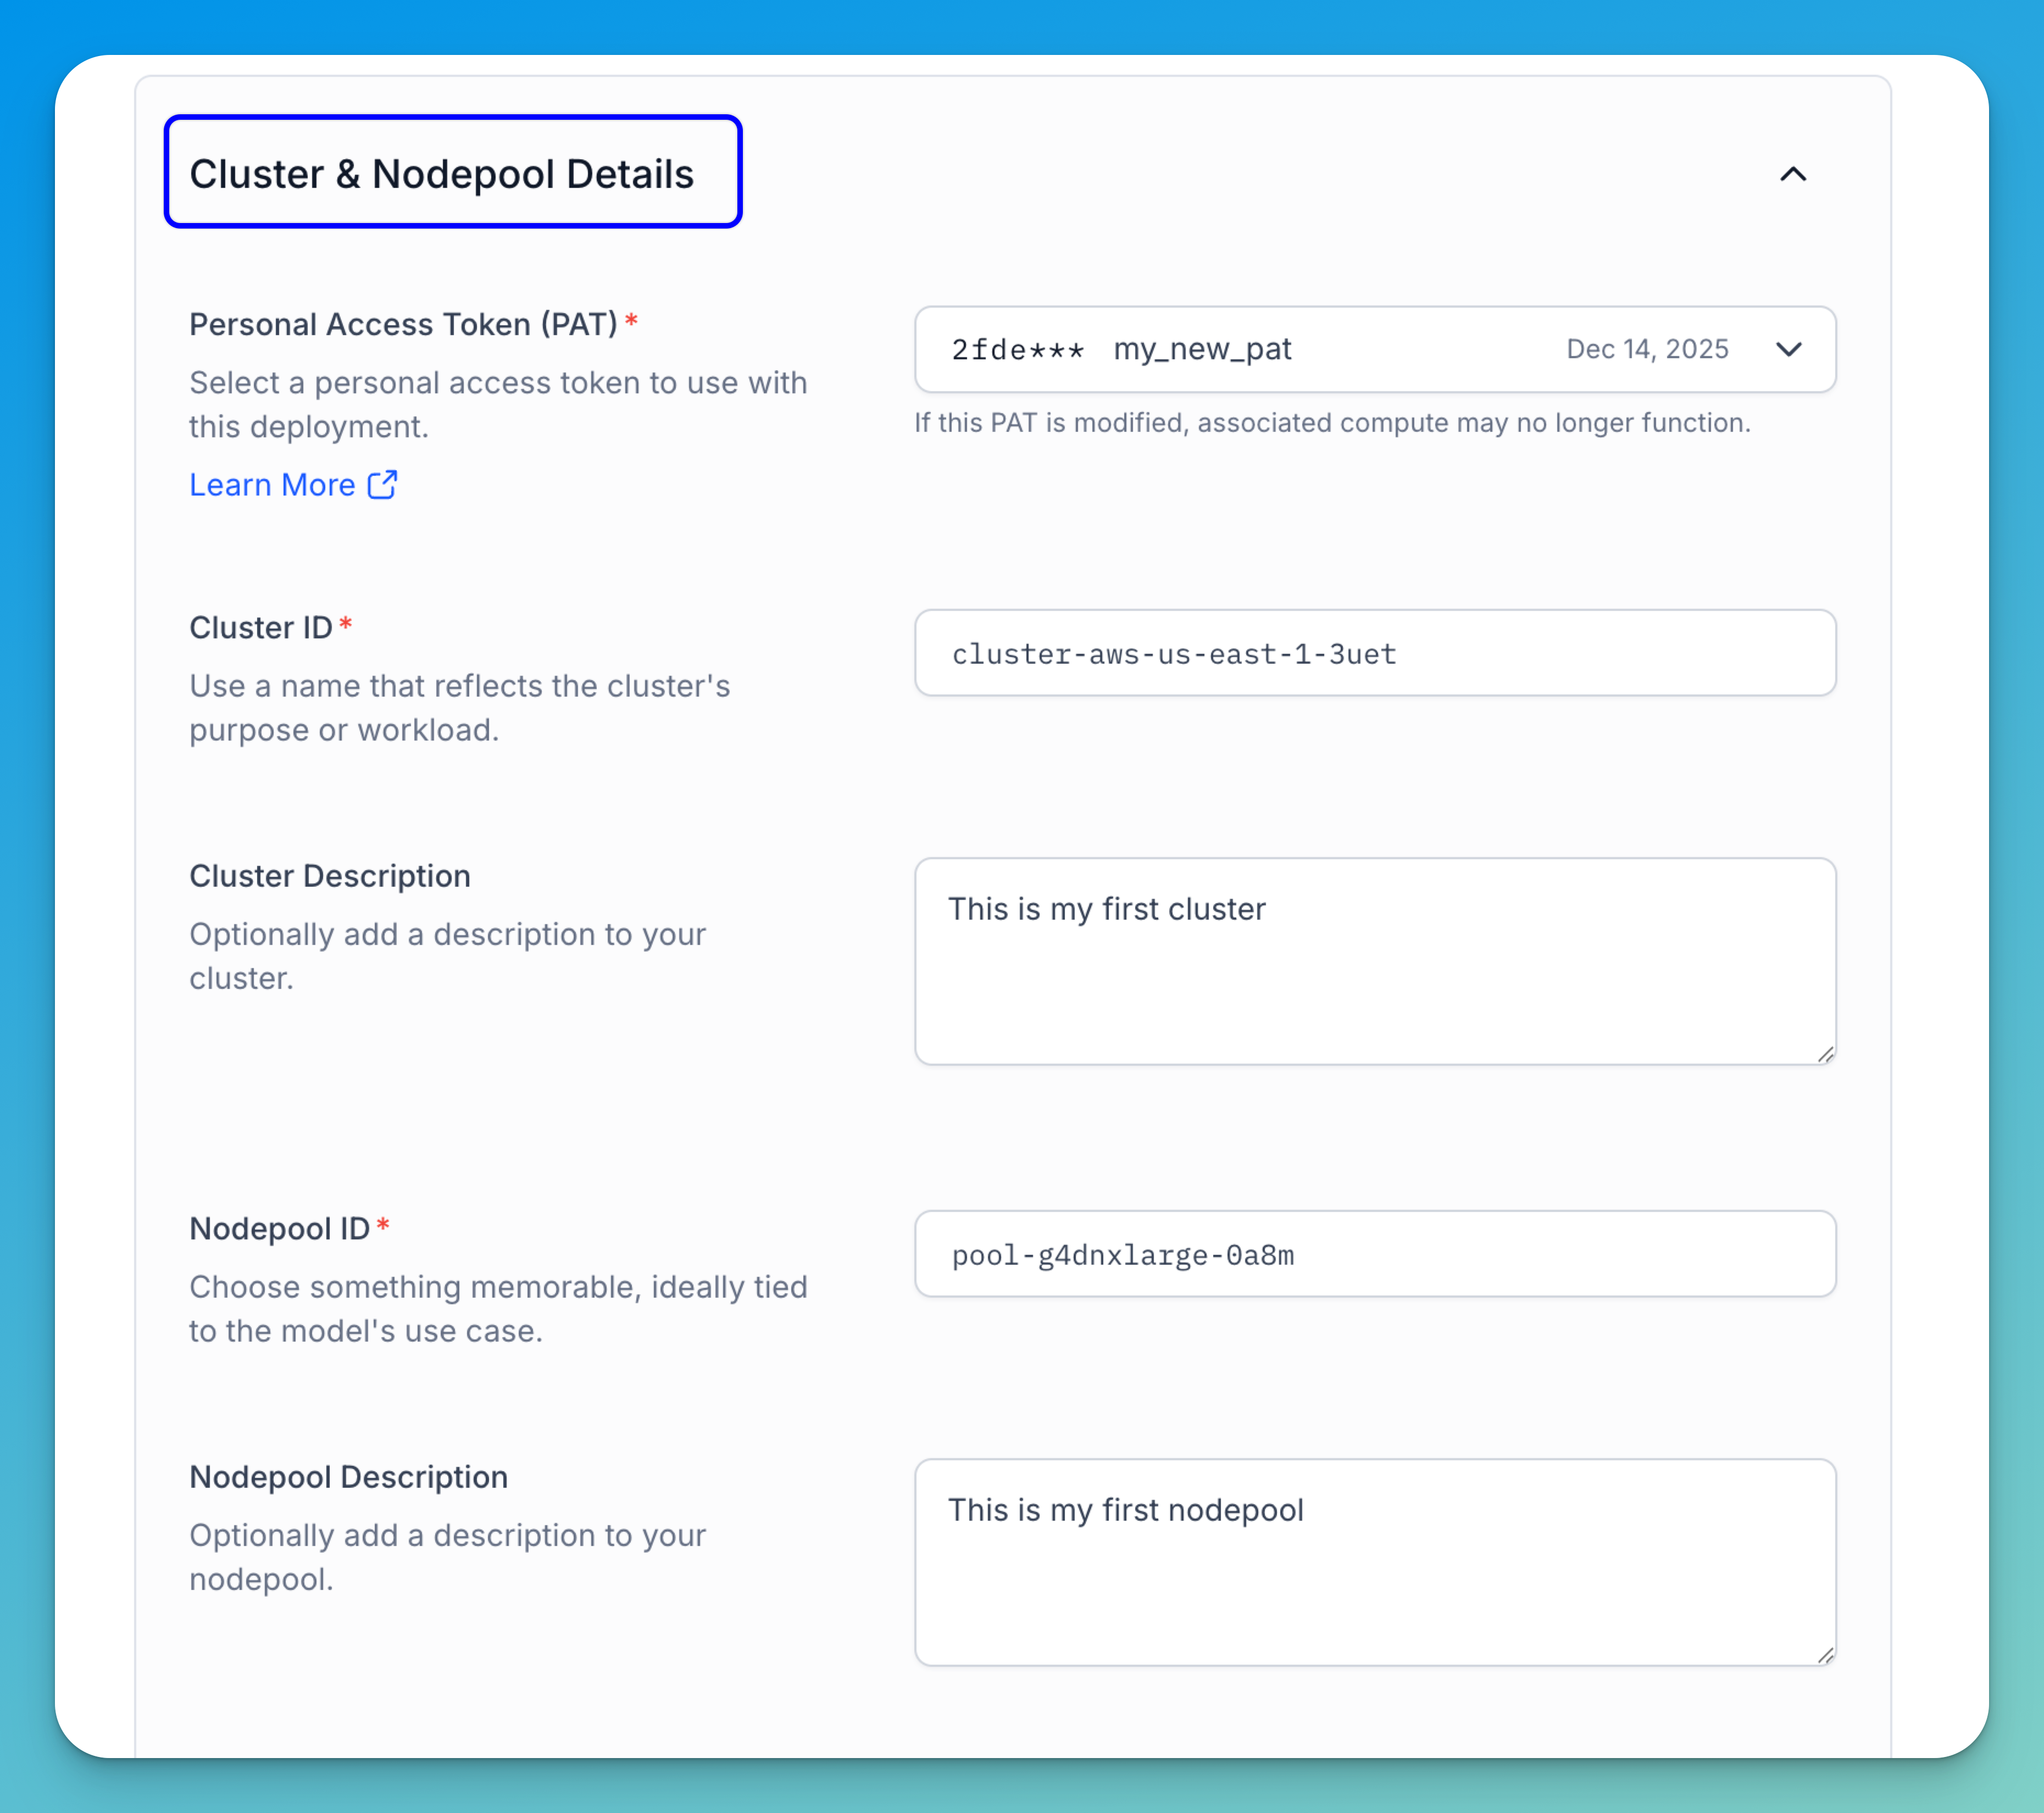
- Personal Access Token (PAT) — Use a PAT to authenticate your identity when connecting to the cluster. Click the dropdown to choose from existing tokens, or create a new one by selecting Create a new Personal Access Token or by visiting the Security section in your personal settings.
Note: The token must have the required permissions to manage compute resources. Also, if the selected PAT is deleted, any associated compute functionality will stop working.
- Cluster ID — Enter a unique identifier for your cluster. This ID is used when deploying models and should reflect the cluster’s purpose or workload. It is auto-filled based on your selected instance type, but you can modify it as needed.
- Cluster Description — Optionally, provide a short description that summarizes the details related to the cluster.
- Nodepool ID — Enter a unique identifier for your nodepool. This ID is used when deploying models and should reflect the nodepool’s purpose or workload. It is auto-filled based on your selected instance type, but you can modify it as needed.
- Nodepool Description — Optionally, provide a short description that summarizes the details related to the nodepool.
Step 6: Finalize and Create the Cluster
Before you enter the required details for creating a cluster, the Create Cluster button in the upper-right corner will be disabled (greyed out). After providing the details, the button will become active.
Click it to launch your cluster and nodepool.
You'll then be redirected to your newly created cluster's page, where the details of its associated nodepool will also be displayed.
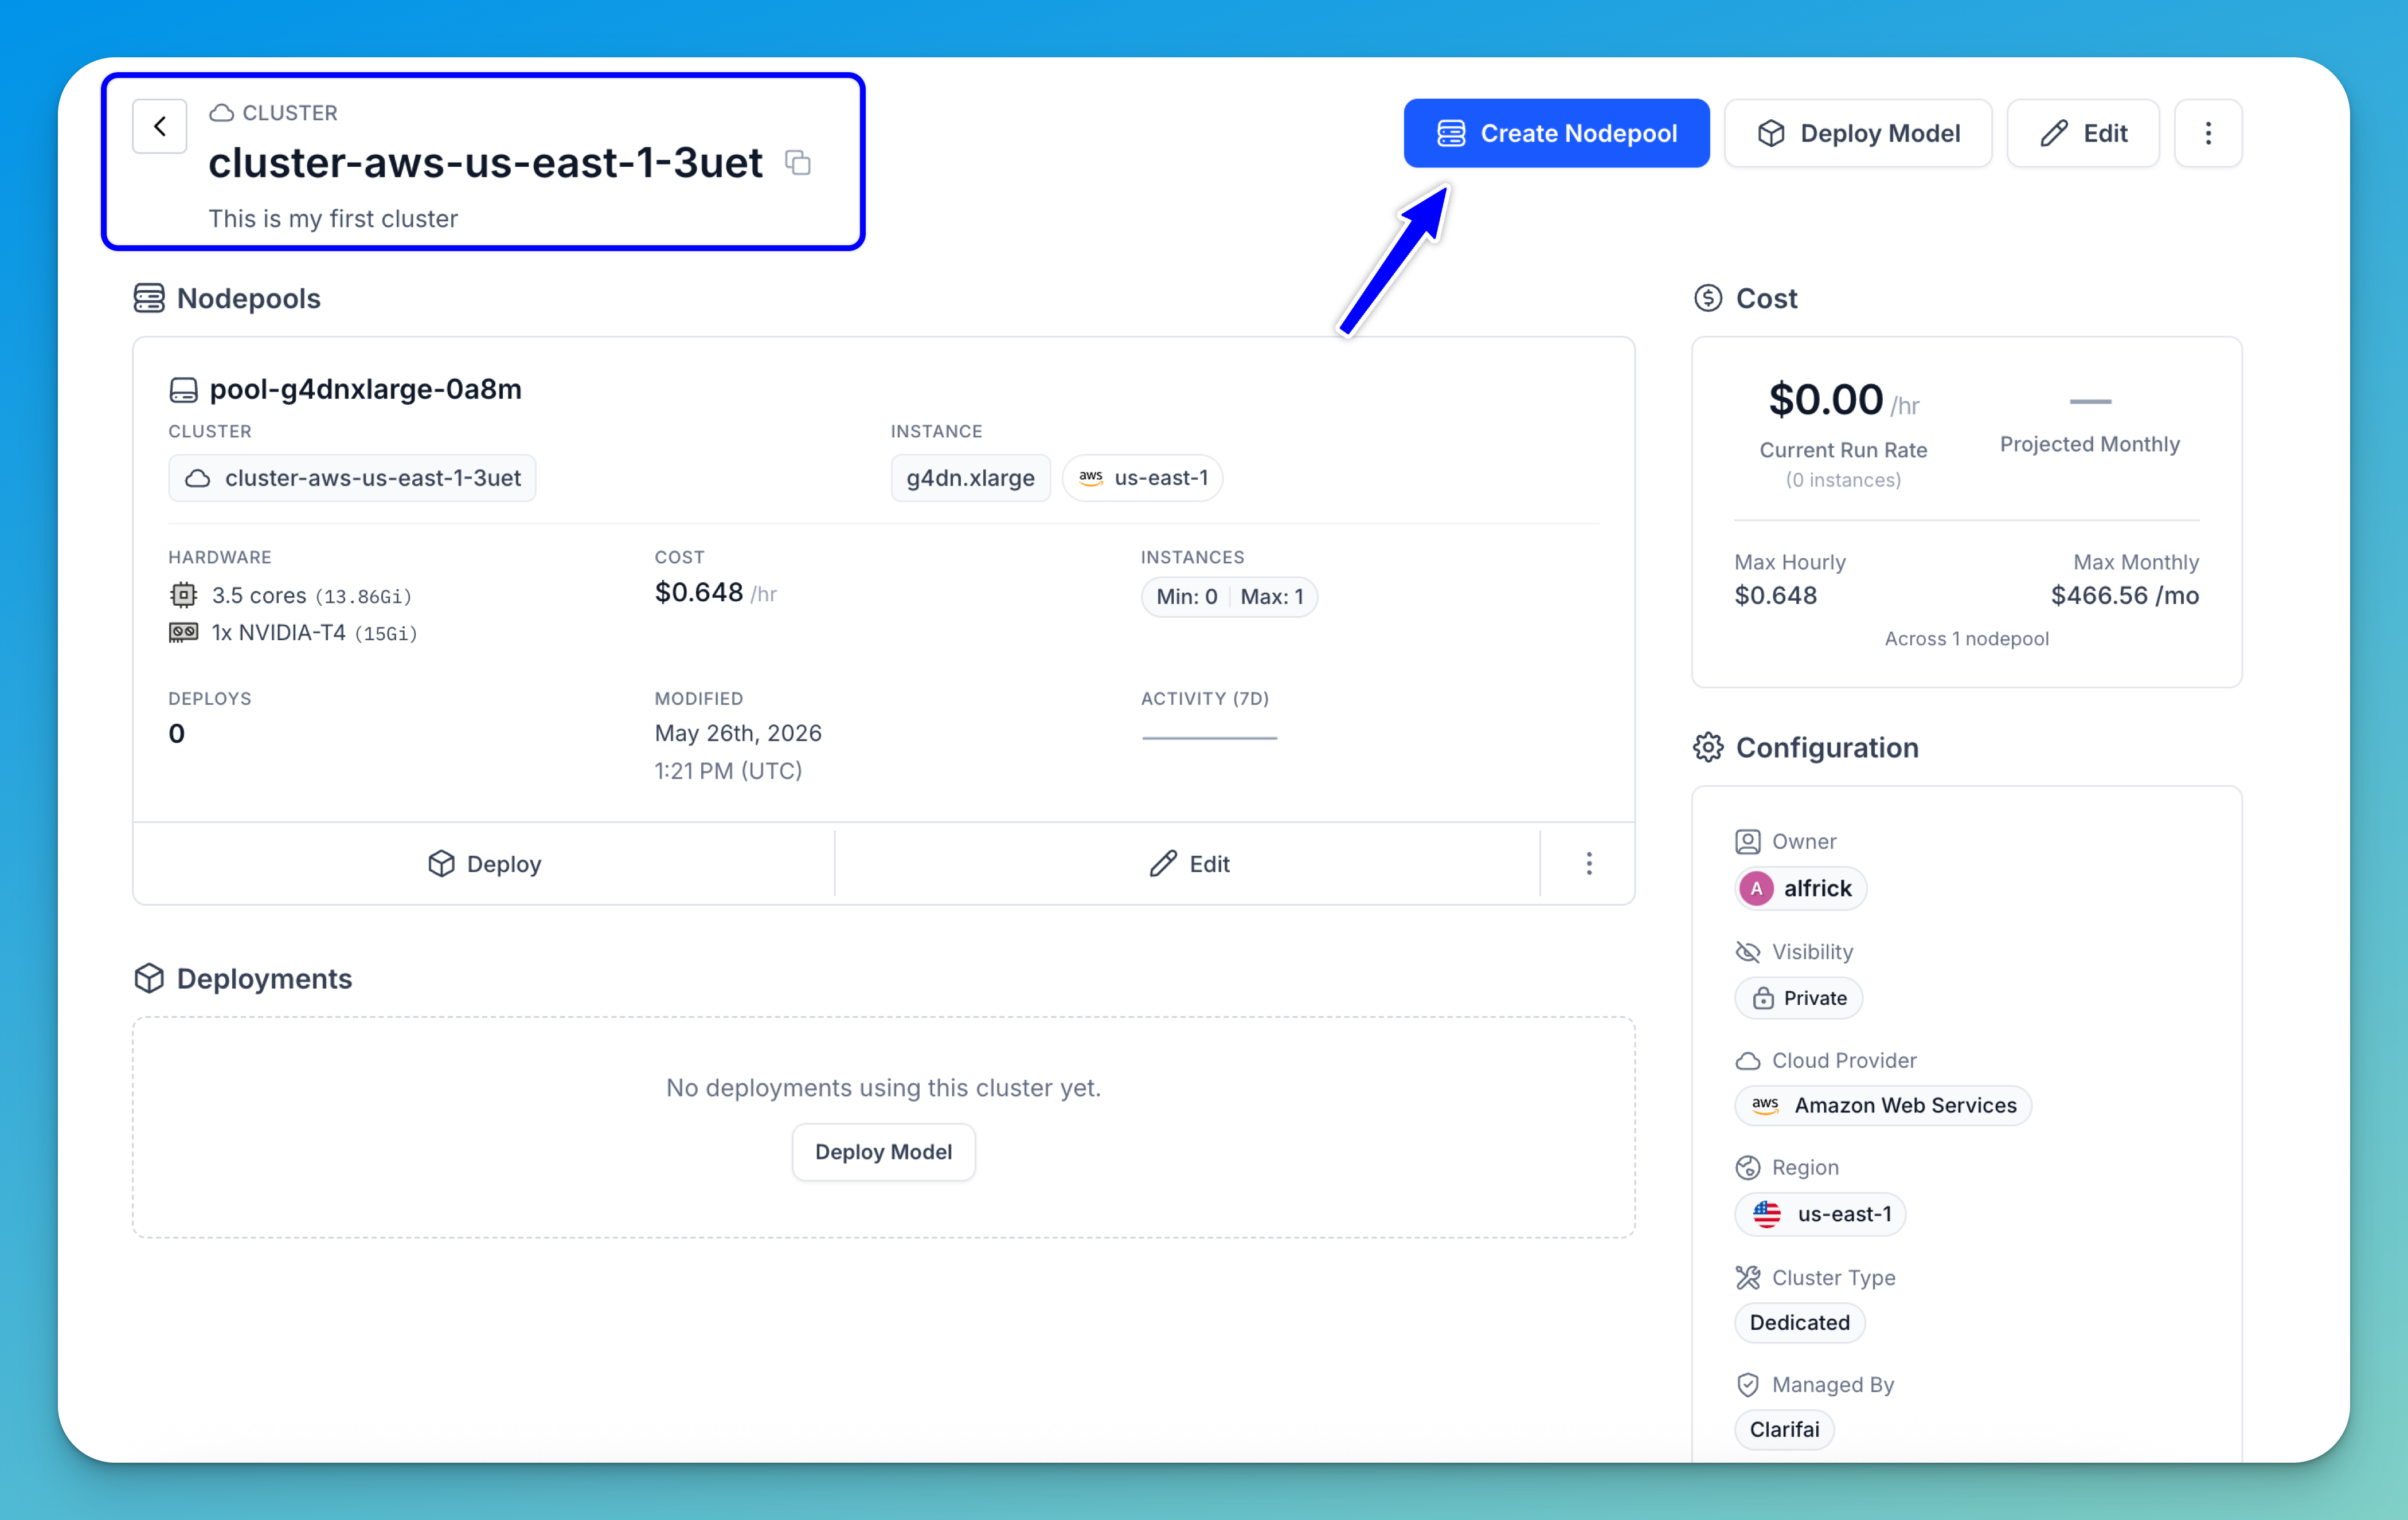
Note: You can also create a new nodepool from an existing cluster by clicking the Create Nodepool button in the upper-right corner of the cluster's page. You’ll be redirected to a page where you can specify the configurations for your new nodepool.
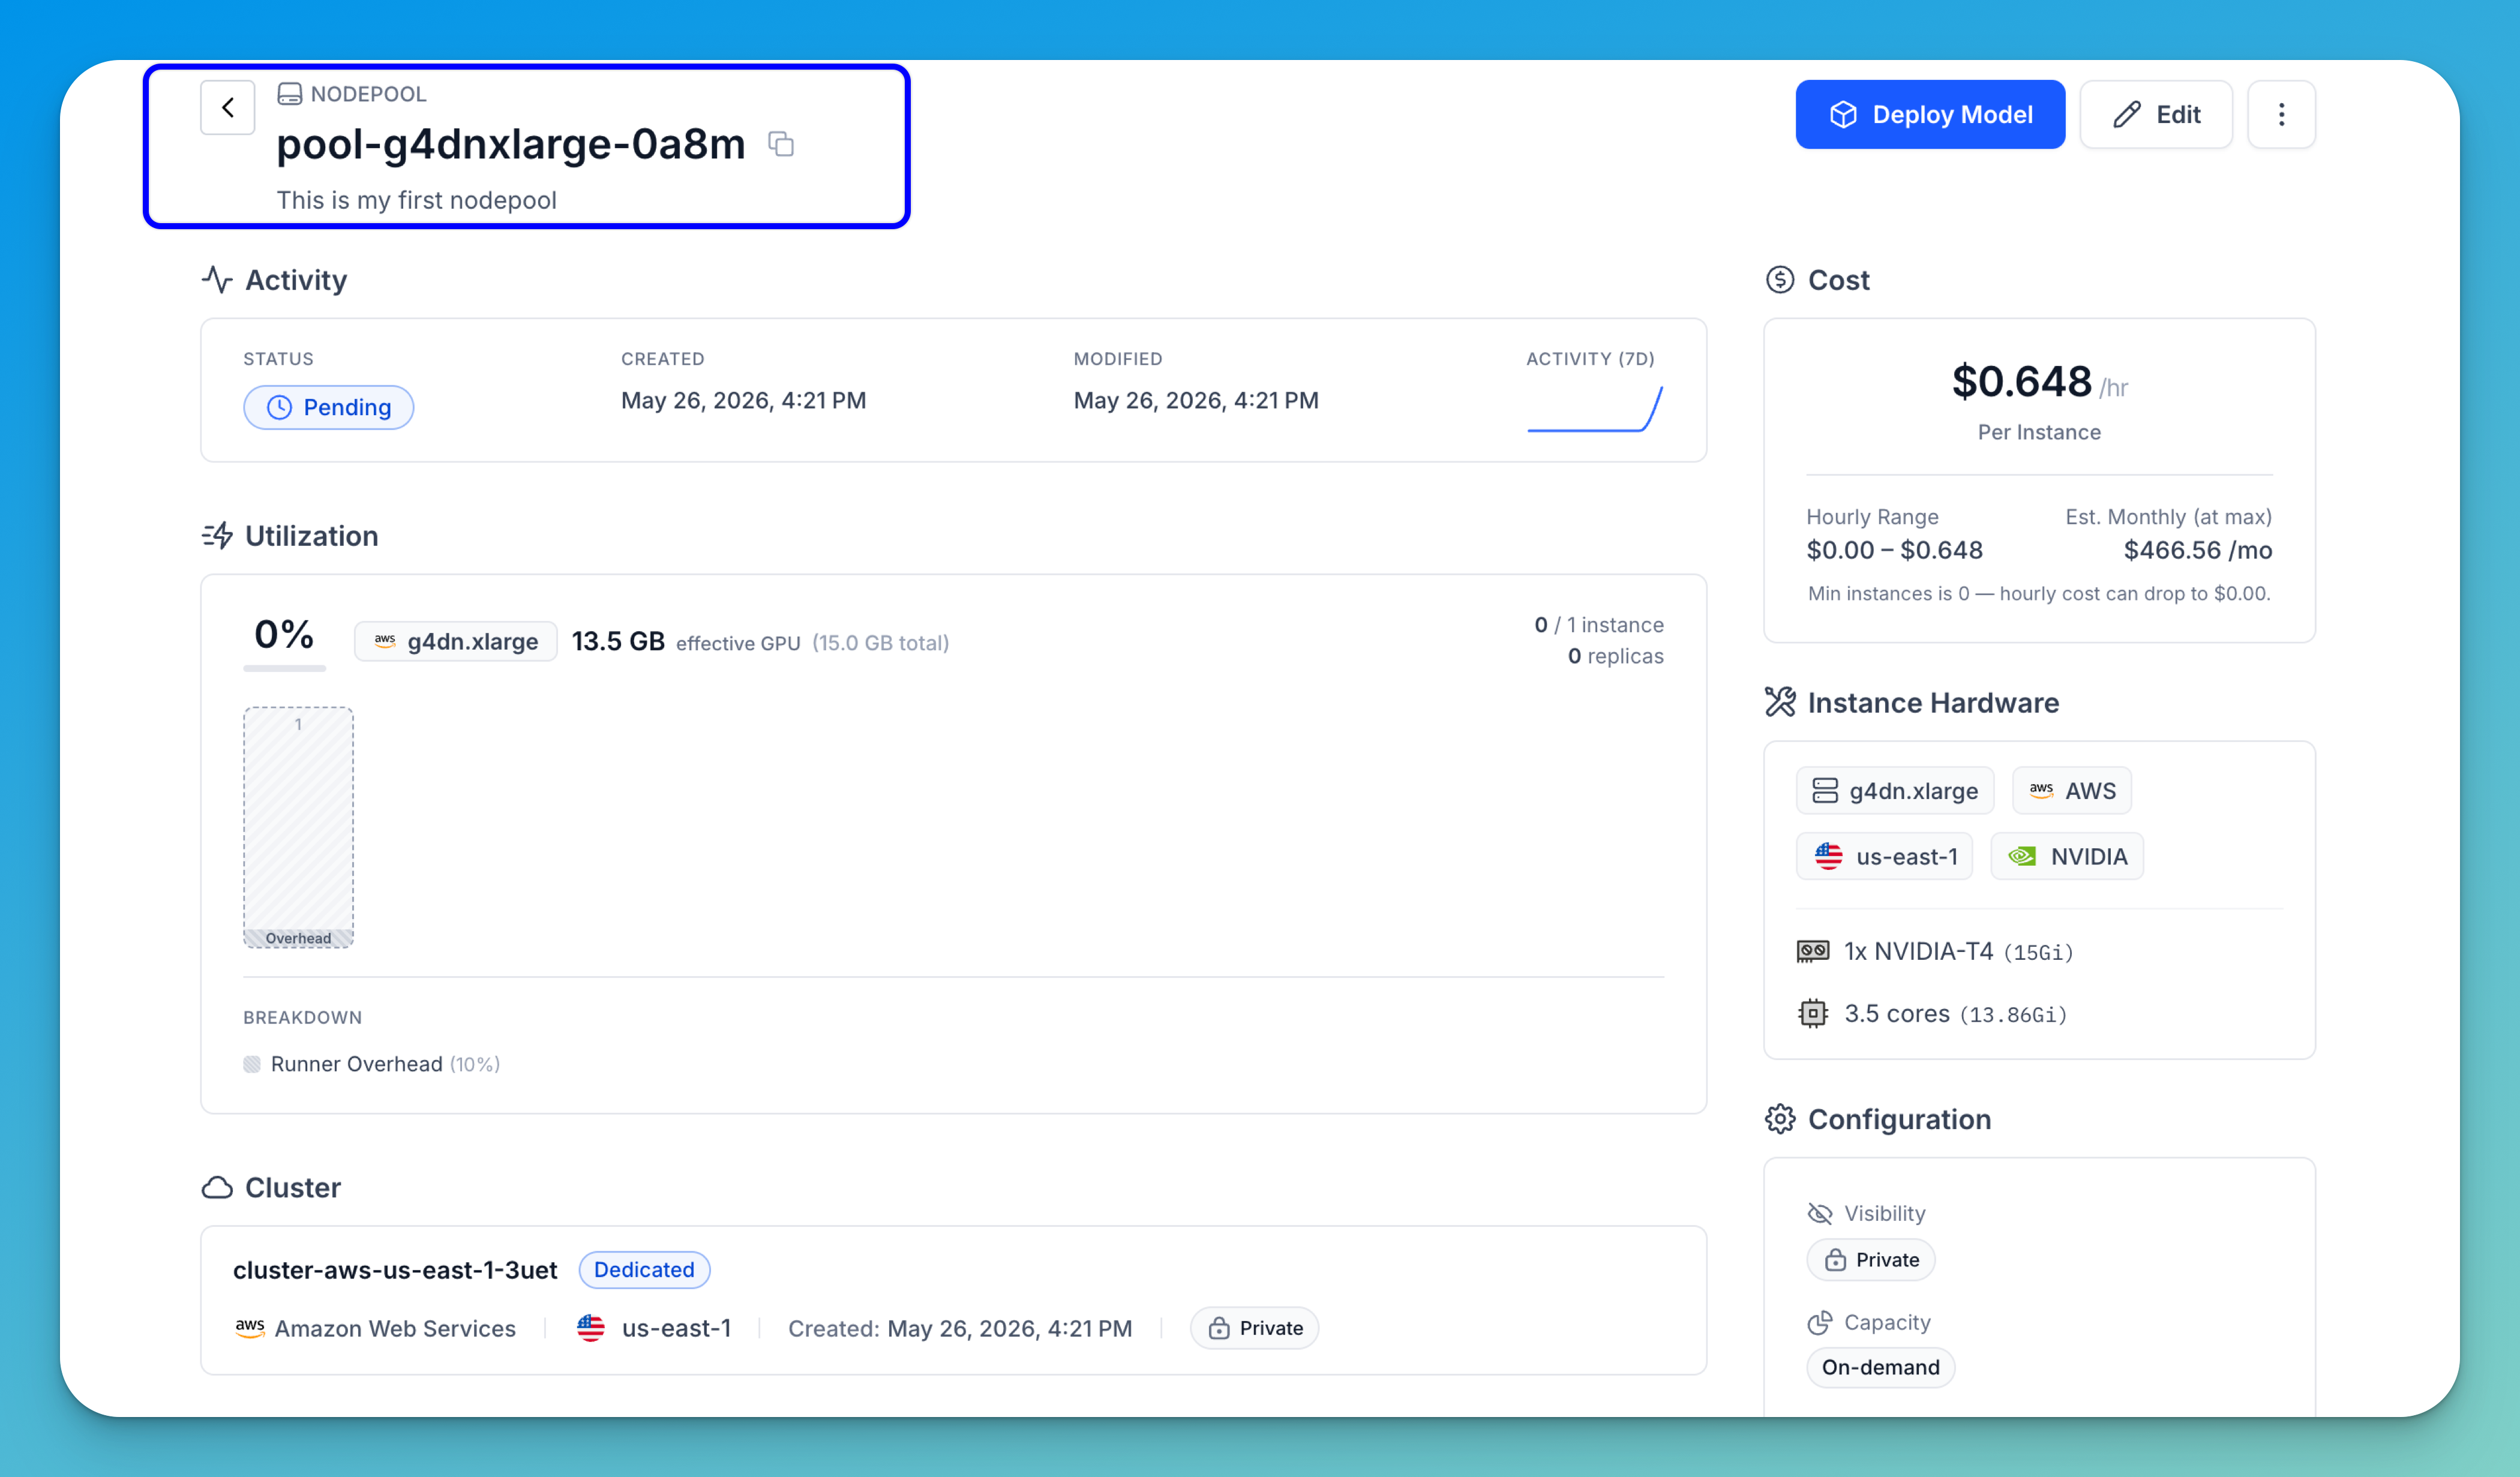
If you click on a nodepool displayed on the page, you'll be taken to its individual page, where you can view its detailed information, such as its activity status, extent of utilization, and any resource deployments associated with it.
Via the API
Prerequisites
Installation
To begin, install the latest version of the clarifai Python package. This will also install the Clarifai Command Line Interface (CLI), which we'll also use to demonstrate how to create clusters and nodepools.
pip install --upgrade clarifai
Get a PAT
You need a PAT (Personal Access Token) key to authenticate with the Clarifai platform. You can get one by navigating to Settings in the collapsible left sidebar, selecting Secrets, and creating or copying an existing token from there.
After generating it, set the token as an environment variable.
- Unix-Like Systems
- Windows
export CLARIFAI_PAT=YOUR_PERSONAL_ACCESS_TOKEN_HERE
set CLARIFAI_PAT=YOUR_PERSONAL_ACCESS_TOKEN_HERE
Note: When you set the PAT as an environment variable, you don’t need to hardcode it in your code. This also ensures that your CLI session is automatically authenticated with Clarifai.
Set up Project Directory
- Create an overarching directory to store your project files.
- Inside this directory, create a Python file for your Compute Orchestration code.
- Create a
configsfolder to store your YAML configuration files for clusters, nodepools, and deployments.
Here’s the structure of the directory:
project-directory/               # Overarching project folder
│
├── compute_orchestration.py     # Python file for your orchestration code
│
└── configs/                     # Folder for configuration files
    ├── compute_cluster_config.yaml
    ├── nodepool_config.yaml
    └── deployment_config.yaml
Then, add the following code snippets to their corresponding files in the configs folder.
1. compute_cluster_config.yaml
- YAML
compute_cluster:
  id: "test-compute-cluster"
  description: "My AWS compute cluster"
  cloud_provider:
      id: "aws"
  region: "us-east-1"
  managed_by: "clarifai"
  cluster_type: "dedicated"
  visibility:
    gettable: 10
compute_cluster— Defines the top-level configuration for the compute cluster.compute_cluster.id— A unique identifier for the cluster within the Clarifai workspace (here, named test-compute-cluster).compute_cluster.description— A human-readable description of the cluster.compute_cluster.cloud_provider.id— The cloud provider that will host the cluster. Clarifai supports a wide range of providers, such asawsandgcp.compute_cluster.region— Geographic region for the resources. Must be a region supported by the selected provider. Choosing the right region reduces latency to your data and can affect cost.compute_cluster.managed_by— Who is responsible for lifecycle management.clarifaimeans the platform will automatically handle patching, scaling, and health‑checks, rather than self-managed.compute_cluster.cluster_type— Mode of operation.dedicatedmeans the cluster’s compute resources are reserved exclusively for your workloads (not shared).compute_cluster.visibility.gettable— A numeric permission level that defines who can see or access the cluster.10means it's visible privately.50means it's visible publicly.
2. nodepool_config.yaml
- YAML
nodepool:
  id: "test-nodepool"
  compute_cluster:
    id: "test-compute-cluster"
  description: "First nodepool in AWS in a proper compute cluster"
  instance_types:
    - id: "g5.2xlarge"
      compute_info:
        cpu_limit: "8"
        cpu_memory: "28Gi"
        accelerator_type:
          - "a10"
        num_accelerators: 1
        accelerator_memory: "40Gi"
  node_capacity_type:
    capacity_types:
      - 1
  min_instances: 0
  max_instances: 1
nodepool— Defines the top-level configuration for the nodepool.nodepool.id— A unique identifier for the nodepool within the workspace (here, named test-nodepool).nodepool.compute_cluster.id— The ID of the parent compute cluster that this nodepool belongs to. The cluster must already exist.nodepool.description— A human-readable description of the nodepool.nodepool.instance_types— A list that details the types of instances (virtual machines) that will make up this nodepool.nodepool.instance_types[0].id— Specifies the type of instance to use; in this case, "g5.2xlarge," which is a type of GPU-optimized instance from AWS.nodepool.instance_types[0].compute_info— A nested object that provides detailed specifications for the instance.nodepool.instance_types[0].compute_info.cpu_limit— Number of virtual CPUs the instance provides. It's stored as a string (follows Kubernetes notation), and the value must match the provider’s specification for the chosen type.nodepool.instance_types[0].compute_info.cpu_memory— Amount of system memory (RAM) available to the node. The value can be expressed in gigabytes (Gi) or other supported memory units.nodepool.instance_types[0].compute_info.accelerator_type— A list specifying the type of accelerator. In this case, it's an NVIDIA A10.nodepool.instance_types[0].compute_info.num_accelerators— The number of accelerators (GPUs) per instance.nodepool.instance_types[0].compute_info.accelerator_memory— The memory of the accelerator.nodepool.node_capacity_type.capacity_types— A list of numerical values specifying allowed capacity modes for the nodepool. In this case,1correspond to "on-demand" instances (standard pricing) and2for "spot" instances (lower cost, but can be reclaimed).nodepool.min_instances— The minimum number of instances that must run in the nodepool at any time. A value of0allows the pool to scale down to zero instances when idle.nodepool.max_instances— The maximum number of instances the nodepool can scale to. A value of0disables the pool, while higher values (e.g.,10) allow scaling out as demand increases.
3. deployment_config.yaml
We'll use this later to deploy the model.
- YAML
deployment:
 id: "test-deployment"
 description: "some random deployment"
 autoscale_config:
   min_replicas: 0
   max_replicas: 5
   traffic_history_seconds: 300
   scale_down_delay_seconds: 300
   scale_to_zero_delay_seconds: 1800
   scale_up_delay_seconds: 300
   disable_packing: false
 worker:
   model:
     id: "Llama-3_2-3B-Instruct"
     model_version:
       id: "fe271b43266a45a5b068766b6437687f"
     user_id: "meta"
     app_id: "Llama-3"
 scheduling_choice: 4
 nodepools:
   - id: "test-nodepool"
     compute_cluster:
         id: "test-compute-cluster"
deployment— Defines the top-level deployment configuration, which specifies how a model runs in a compute environment.deployment.id— A unique identifier for this deployment. (here, named test-deployment).deployment.description— A human-readable description of the deployment.deployment.autoscale_config— This section dictates how the deployment will automatically adjust its resources based on demand.deployment.autoscale_config.min_replicas— The minimum number of running replicas the deployment is allowed to have. Setting it to 0 means the service can shut down completely when there is no traffic, saving costs.deployment.autoscale_config.max_replicas— The maximum number of concurrent replicas. Setting it to 1 means the deployment will never have more than one copy of the model running.deployment.autoscale_config.traffic_history_seconds— Length of the sliding window (in seconds) that the autoscaler looks at to decide whether to scale up or down. A longer window smooths out spikes; a shorter window reacts faster.deployment.autoscale_config.scale_down_delay_seconds— The waiting period (in seconds) before scaling down after low traffic. This prevents “thrashing” when traffic briefly dips.deployment.autoscale_config.scale_to_zero_delay_seconds— The waiting period (in seconds) before scaling all the way down to zero replicas after traffic stops. It must be greater than or equal toscale_down_delay_secondsto ensure that normal scale-down events happen before the system completely shuts down idle workers.deployment.autoscale_config.scale_up_delay_seconds— The waiting period (in seconds) before scaling up after detecting higher demand. This gives the system a chance to see if the spike is sustained.deployment.autoscale_config.disable_packing— Packing means placing multiple replicas on the same node when possible (to improve bin‑packing and reduce costs).falsemeans packing is allowed (the default). Set totrueif you want each replica on a dedicated node for isolation.deployment.worker— This section specifies the core component of the deployment, which is the machine learning model itself.deployment.worker.model— Specifies which model this deployment serves.deployment.worker.model.id— The model ID.deployment.worker.model.model_version.id— Refers to a specific version of the model.deployment.worker.model.user_id— The model owner’s Clarifai user ID.deployment.worker.model.app_id— The application (or project) under which the model lives.deployment.scheduling_choice— An integer that maps to a pre‑defined scheduling policy. Typical mapping: 1 = Spread (maximise fault‑tolerance), < 2 = Pack, < 3 = Spot‑first, 4 = Hybrid (prefer on‑demand, fall back to spot), etc.deployment.nodepools— Lists the nodepools where the deployment’s workers can run.deployment.nodepools[0].id— Refers to the specific nodepool where the deployment will be hosted.deployment.nodepools[0].compute_cluster.id— Ensures this deployment is tied to the right, parent compute cluster.
Multi-Nodepool Deployment
We support universal model routing to provide high availability and optimal load distribution across all model services. This allows intelligent routing logic across multiple model-serving nodepools, including spillover handling and routing across different data centers.
To enable it, create a deployment_config.yaml file that references multiple pre-existing nodepools. These nodepools do not have to belong to the same compute cluster — they can span multiple clusters, cloud providers, or on-prem compute planes.
By default, nodepools are treated as an ordered priority list. Requests are routed to the first nodepool unless:
- There is a backlog of queued requests that exceeds an age and/or quantity threshold, and
- The deployment has reached its
max_replicas, or the nodepool has reached its maximum instances.
When these conditions are met, that nodepool is considered fully loaded. The next nodepool in the priority list is automatically warmed, and a portion of requests is routed to it.
Note: A deployment’s
min_replicasapplies only to the first nodepool in the list. A deployment’smax_replicasapplies to each nodepool individually, not as a sum across them.
Examples
- deployment_config.yaml
- cURL
deployment:
  id: "test-deployment"
  description: "some random deployment"
  autoscale_config:
    min_replicas: 0
    max_replicas: 5
    traffic_history_seconds: 300
    scale_down_delay_seconds: 300
    scale_to_zero_delay_seconds: 1800
    scale_up_delay_seconds: 300
    disable_packing: false
  worker:
    model:
      id: "Llama-3_2-3B-Instruct"
      model_version:
        id: "fe271b43266a45a5b068766b6437687f"
      user_id: "meta"
      app_id: "Llama-3"
  scheduling_choice: 4
  nodepools:
    - id: "test-nodepool"
      compute_cluster:
          id: "test-compute-cluster"
    - id: "test-nodepool-2"           # Added new nodepool
      compute_cluster:
          id: "test-compute-cluster"  # Can also be a different cluster
curl -X POST "https://api.clarifai.com/v2/users/YOUR_USER_ID_HERE/deployments/" \
  -H "Authorization: Key YOUR_PAT_HERE" \
  -H "Content-Type: application/json" \
  -d '{
    "deployments": [
      {
        "id": "test-deployment",
        "description": "test deployment",
        "user_id": "YOUR_USER_ID_HERE",
        "autoscale_config": {
          "min_replicas": 1,
          "max_replicas": 20,
          "traffic_history_seconds": 100,
          "scale_down_delay_seconds": 30,
          "scale_to_zero_delay_seconds": 30,
          "scale_up_delay_seconds": 30,
          "disable_packing": false
        },
        "worker": {
          "model": {
            "id": "Llama-3_2-3B-Instruct",
            "model_version": {
              "id": "fe271b43266a45a5b068766b6437687f"
            },
            "user_id": "meta",
            "app_id": "Llama-3"
          }
        },
        "scheduling_choice": 4,
        "nodepools": [
          {
            "id": "test-nodepool",
            "compute_cluster": {
              "id": "test-compute-cluster",
              "user_id": "YOUR_USER_ID_HERE"
            }
          },
          {
            "id": "test-nodepool-2",
            "compute_cluster": {
              "id": "test-compute-cluster",
              "user_id": "YOUR_USER_ID_HERE"
            }
          }
        ],
        "visibility": {
          "gettable": 10
        }
      }
    ]
  }'
Create a Cluster
To create a new compute cluster, pass the compute_cluster_id and config_filepath as arguments to the create_compute_cluster method of the User class.
- Python SDK
- CLI
- cURL
from clarifai.client.user import User

# Set PAT as an environment variable
#   export CLARIFAI_PAT=YOUR_PAT_HERE # Unix-Like Systems
#   set CLARIFAI_PAT=YOUR_PAT_HERE  # Windows

# Initialize the client
client = User(
    user_id="YOUR_USER_ID_HERE"
)

# Create a new compute cluster
compute_cluster = client.create_compute_cluster(
    compute_cluster_id="test-compute-cluster",
    config_filepath="./configs/compute_cluster_config.yaml"
)
clarifai computecluster create COMPUTE_CLUSTER_ID --config COMPUTE-CLUSTER-CONFIG-FILEPATH
curl -X POST "https://api.clarifai.com/v2/users/YOUR_USER_ID_HERE/compute_clusters/" \
  -H "Authorization: Key YOUR_PAT_HERE" \
  -H "Content-Type: application/json" \
  -d '{
    "compute_clusters": [
      {
        "id": "test-aws-cluster",
        "description": "My AWS cluster",
        "cloud_provider": {
          "id": "aws"
        },
        "region": "us-east-1",
        "visibility": {
          "gettable": 50
        },
        "managed_by": "clarifai",
        "cluster_type": "dedicated",
        "key": {
          "id": "YOUR_PAT_HERE"
        }
      }
    ]
  }'
Example Output
[INFO] 22:41:42.362861 Compute Cluster with ID 'test-compute-cluster' is created:
code: SUCCESS
description: "Ok"
req_id: "sdk-python-11.7.5-1a5ceed7df3346dbb2451f2501f37f66"
After creating it, initialize the ComputeCluster class by providing the user_id and compute_cluster_id parameters.
Note: Initialization is essential because it establishes the specific user and compute cluster context, which allows the subsequent operations to accurately target and manage the intended resources.
- Python SDK
from clarifai.client.compute_cluster import ComputeCluster

# Initialize the ComputeCluster instance
compute_cluster = ComputeCluster(
    user_id="YOUR_USER_ID_HERE",
    compute_cluster_id="test-compute-cluster"
)
Create a Nodepool
To create a new nodepool within an already existing cluster, use the create_nodepool method with the nodepool_id and config_filepath parameters.
- Python SDK
- CLI
- cURL
from clarifai.client.compute_cluster import ComputeCluster

# Set PAT as an environment variable
#   export CLARIFAI_PAT=YOUR_PAT_HERE # Unix-Like Systems
#   set CLARIFAI_PAT=YOUR_PAT_HERE  # Windows

# Initialize the ComputeCluster instance
compute_cluster = ComputeCluster(
    user_id="YOUR_USER_ID_HERE",
    compute_cluster_id="test-compute-cluster"
)

# Create a new nodepool
nodepool = compute_cluster.create_nodepool(
    nodepool_id="test-nodepool",
    config_filepath="./configs/nodepool_config.yaml"
)
clarifai nodepool create COMPUTE_CLUSTER_ID NODEPOOL_ID --config NODEPOOL-CONFIG-FILEPATH
curl -X POST "https://api.clarifai.com/v2/users/YOUR_USER_ID_HERE/compute_clusters/YOUR_CLUSTER_ID_HERE/nodepools" \
  -H "Authorization: Key YOUR_PAT_HERE" \
  -H "Content-Type: application/json" \
  -d '{
    "nodepools": [
      {
        "id": "test-nodepool-6",
        "description": "testing nodepool",
        "metadata": {
          "date": "03-04-2026"
        },
        "instance_types": [
          {
            "id": "g5.2xlarge",
            "compute_info": {
              "cpu_limit": "8",
              "cpu_memory": "28Gi",
              "accelerator_type": ["a10"],
              "num_accelerators": 1,
              "accelerator_memory": "40Gi"
            }
          }
        ],
        "node_capacity_type": {
          "capacity_types": [1]
        },
        "visibility": {
          "gettable": 10
        },
        "min_instances": 1,
        "max_instances": 5
      }
    ]
  }'
Example Output
[INFO] 23:09:07.978155 Nodepool with ID 'test-nodepool' is created:
code: SUCCESS
description: "Ok"
req_id: "sdk-python-11.7.5-99ad19030249400cabd9be8ade0df602"
After creating it, initialize the Nodepool class by providing the user_id and nodepool_id parameters.
- Python SDK
from clarifai.client.nodepool import Nodepool

# Initialize the Nodepool instance
nodepool = Nodepool(
    user_id="YOUR_USER_ID_HERE",
    nodepool_id="test-nodepool"
)