Deploy a Model
Deploy a model into your created cluster and nodepool
Clarifai’s Compute Orchestration provides efficient capabilities for you to deploy any model on any compute infrastructure, at any scale.
You can configure your compute environment and deploy your models into nodepools with your preferred settings, optimizing for both cost and scalability.
With model deployment, you can quickly take a trained model and set it up for inference.
Learn how Clarifai routes prediction requests for optimal performance here.
Only one deployment per model version is allowed per nodepool. Attempting to deploy a model version that already has an existing deployment on the selected nodepool will result in an error.
Via the UI
Step 1: Start Creating a Deployment
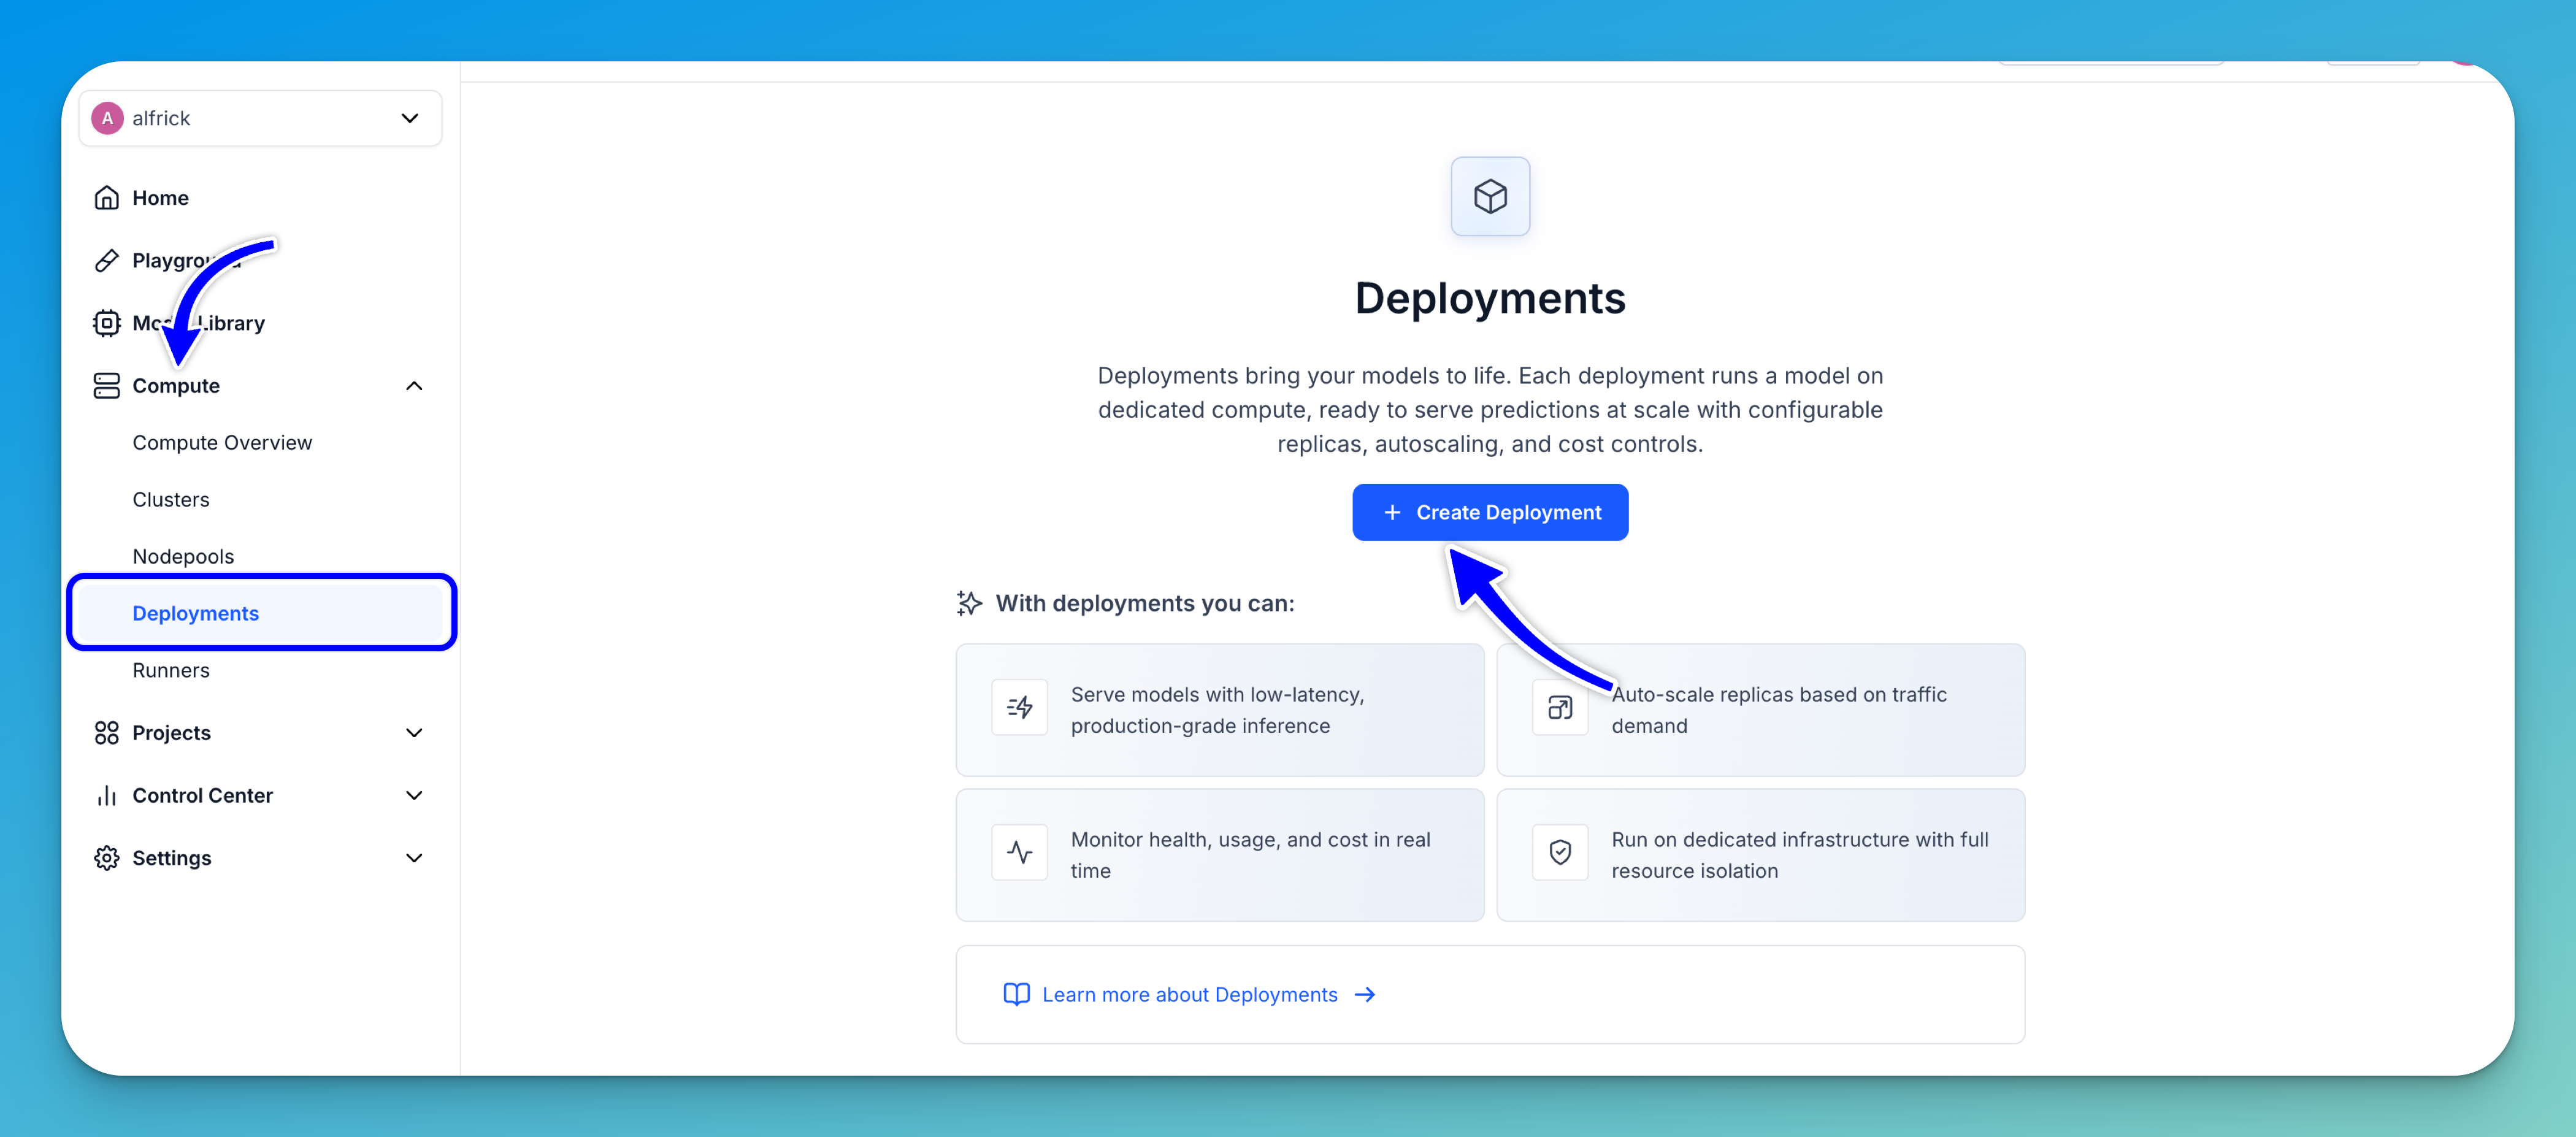
To create a deployment, go to the Compute option in the collapsible left sidebar. Then, select Deployments from the dropdown list.
You'll be redirected to the Deployments page, where you can view and manage deployments across your Clarifai compute resources.
To start creating a deployment, click the Create Deployment button.
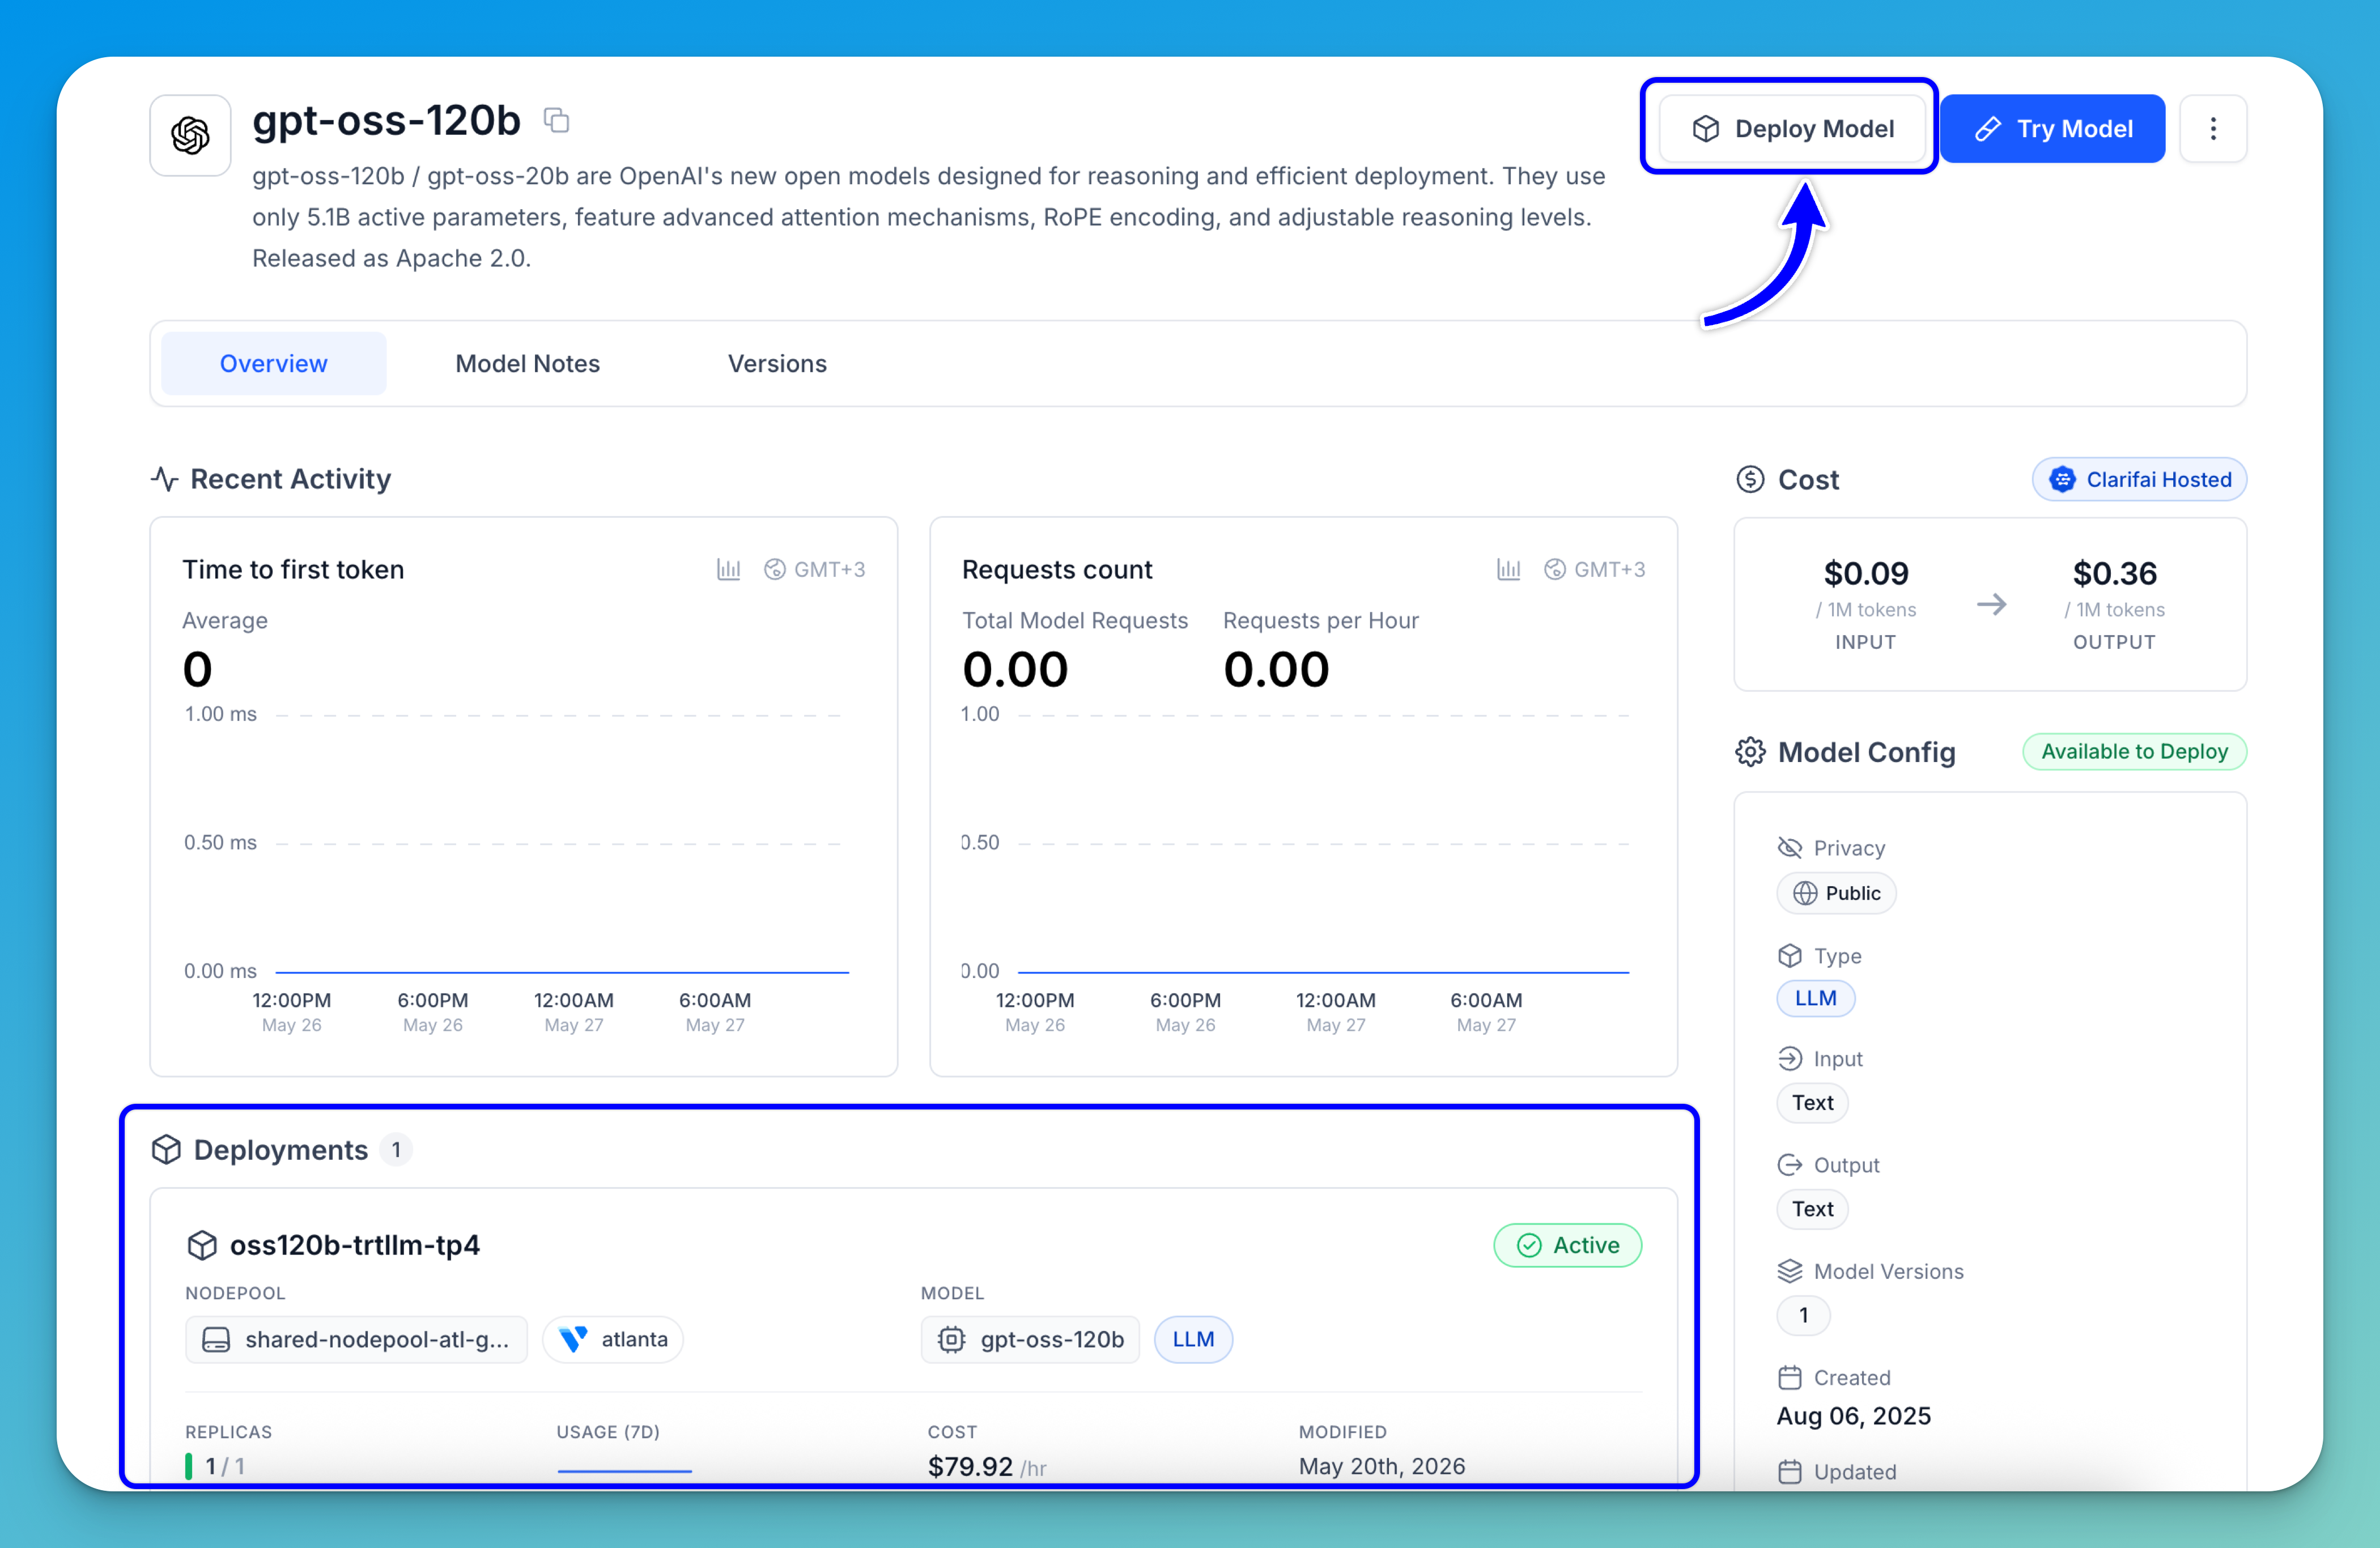
You can create a deployment directly from other areas within the platform. For example, to deploy from a specific model, go to the individual page of the model you want to deploy and click the Deploy Model button. You can also create a deployment from a particular cluster or nodepool by navigating to its page and clicking Deploy Model there.
Note: On an individual model page, you can go to the Deployments section to check if it is already running on any compute environments.
Step 2: Select a Model
You’ll be redirected to a page where you can choose a model to deploy. A selection modal will appear, allowing you to pick a model from the results before continuing with the deployment configuration.
You can browse the listed models or use the search bar to quickly find a specific one.
For this example, let's select the gpt-oss-20b model.
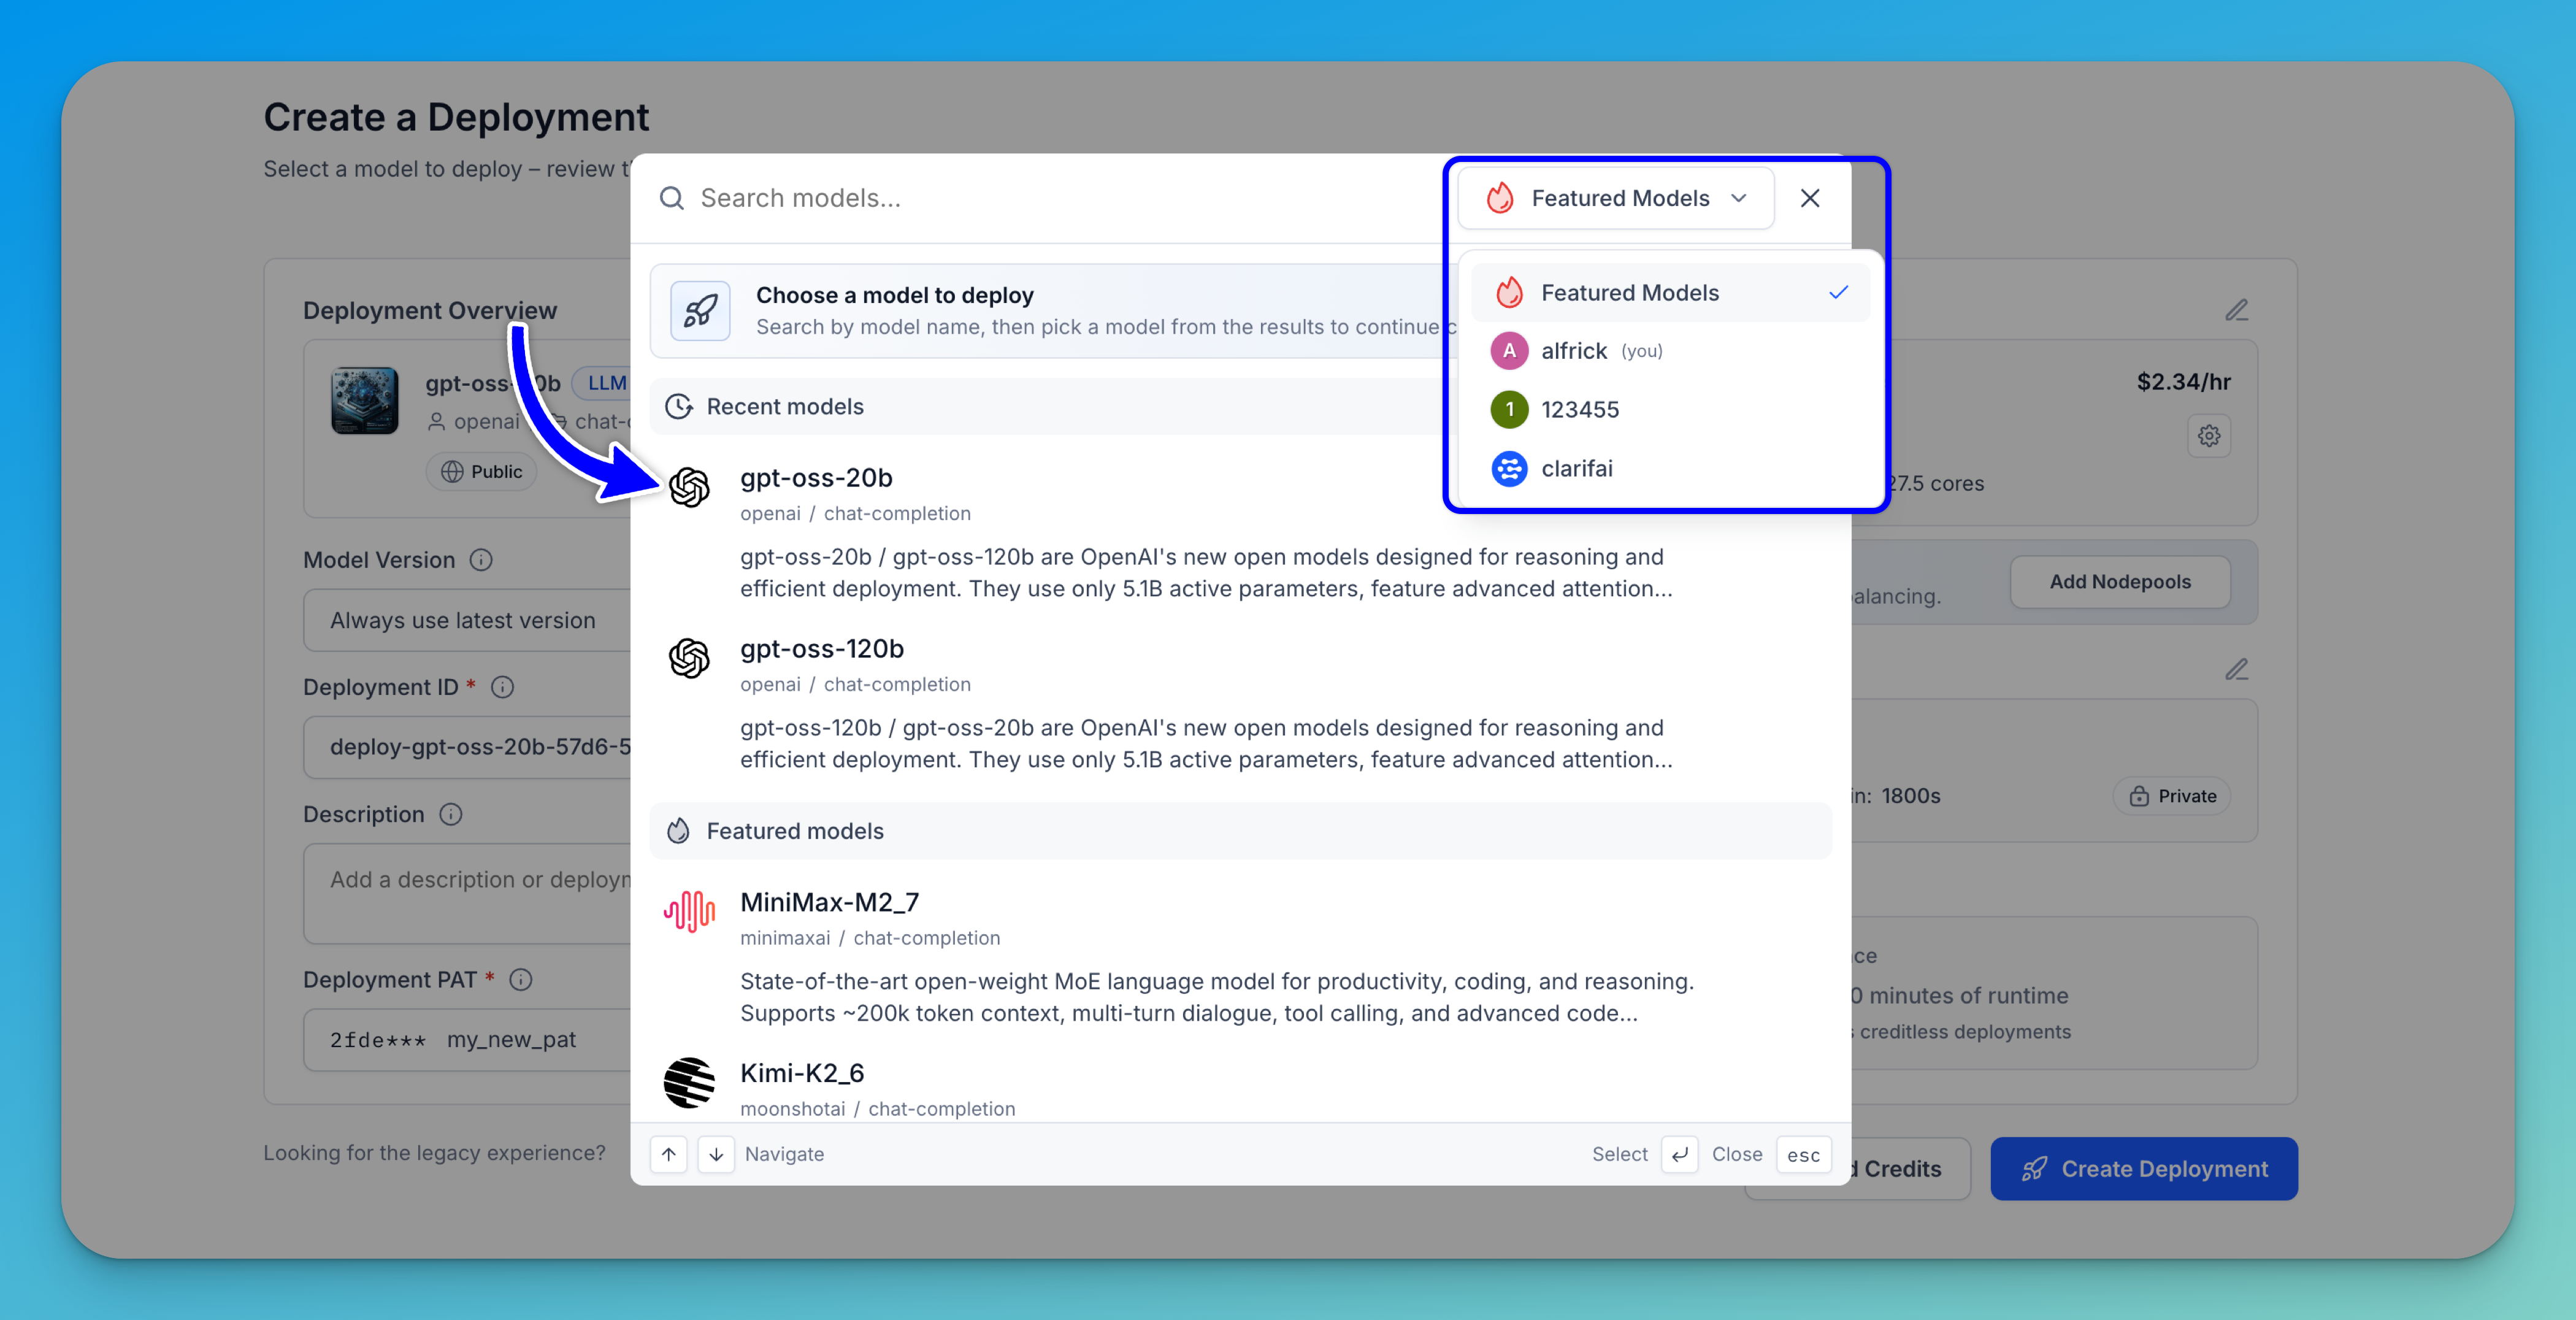
Note: In the upper-right corner of the modal, there’s an account selector that lets you switch between different sources — such as featured models, your personal workspace, any organizations you belong to, or the public Clarifai model library. Selecting a different source updates the list to show the available models from that account or library.
Note: You can use the keyboard shortcuts shown at the bottom of the modal to navigate and select models:
↑ / ↓ (Navigate)— Use the up and down arrow keys to move through the model list without using your mouse.↵ (Select)— Press Enter to select the currently highlighted model.Esc (Close)— Press Escape to close the dialog without making a selection.
After selecting your desired model, it will be listed in the Deployment Overview section. If you want to change to another model, click the Change Model button.
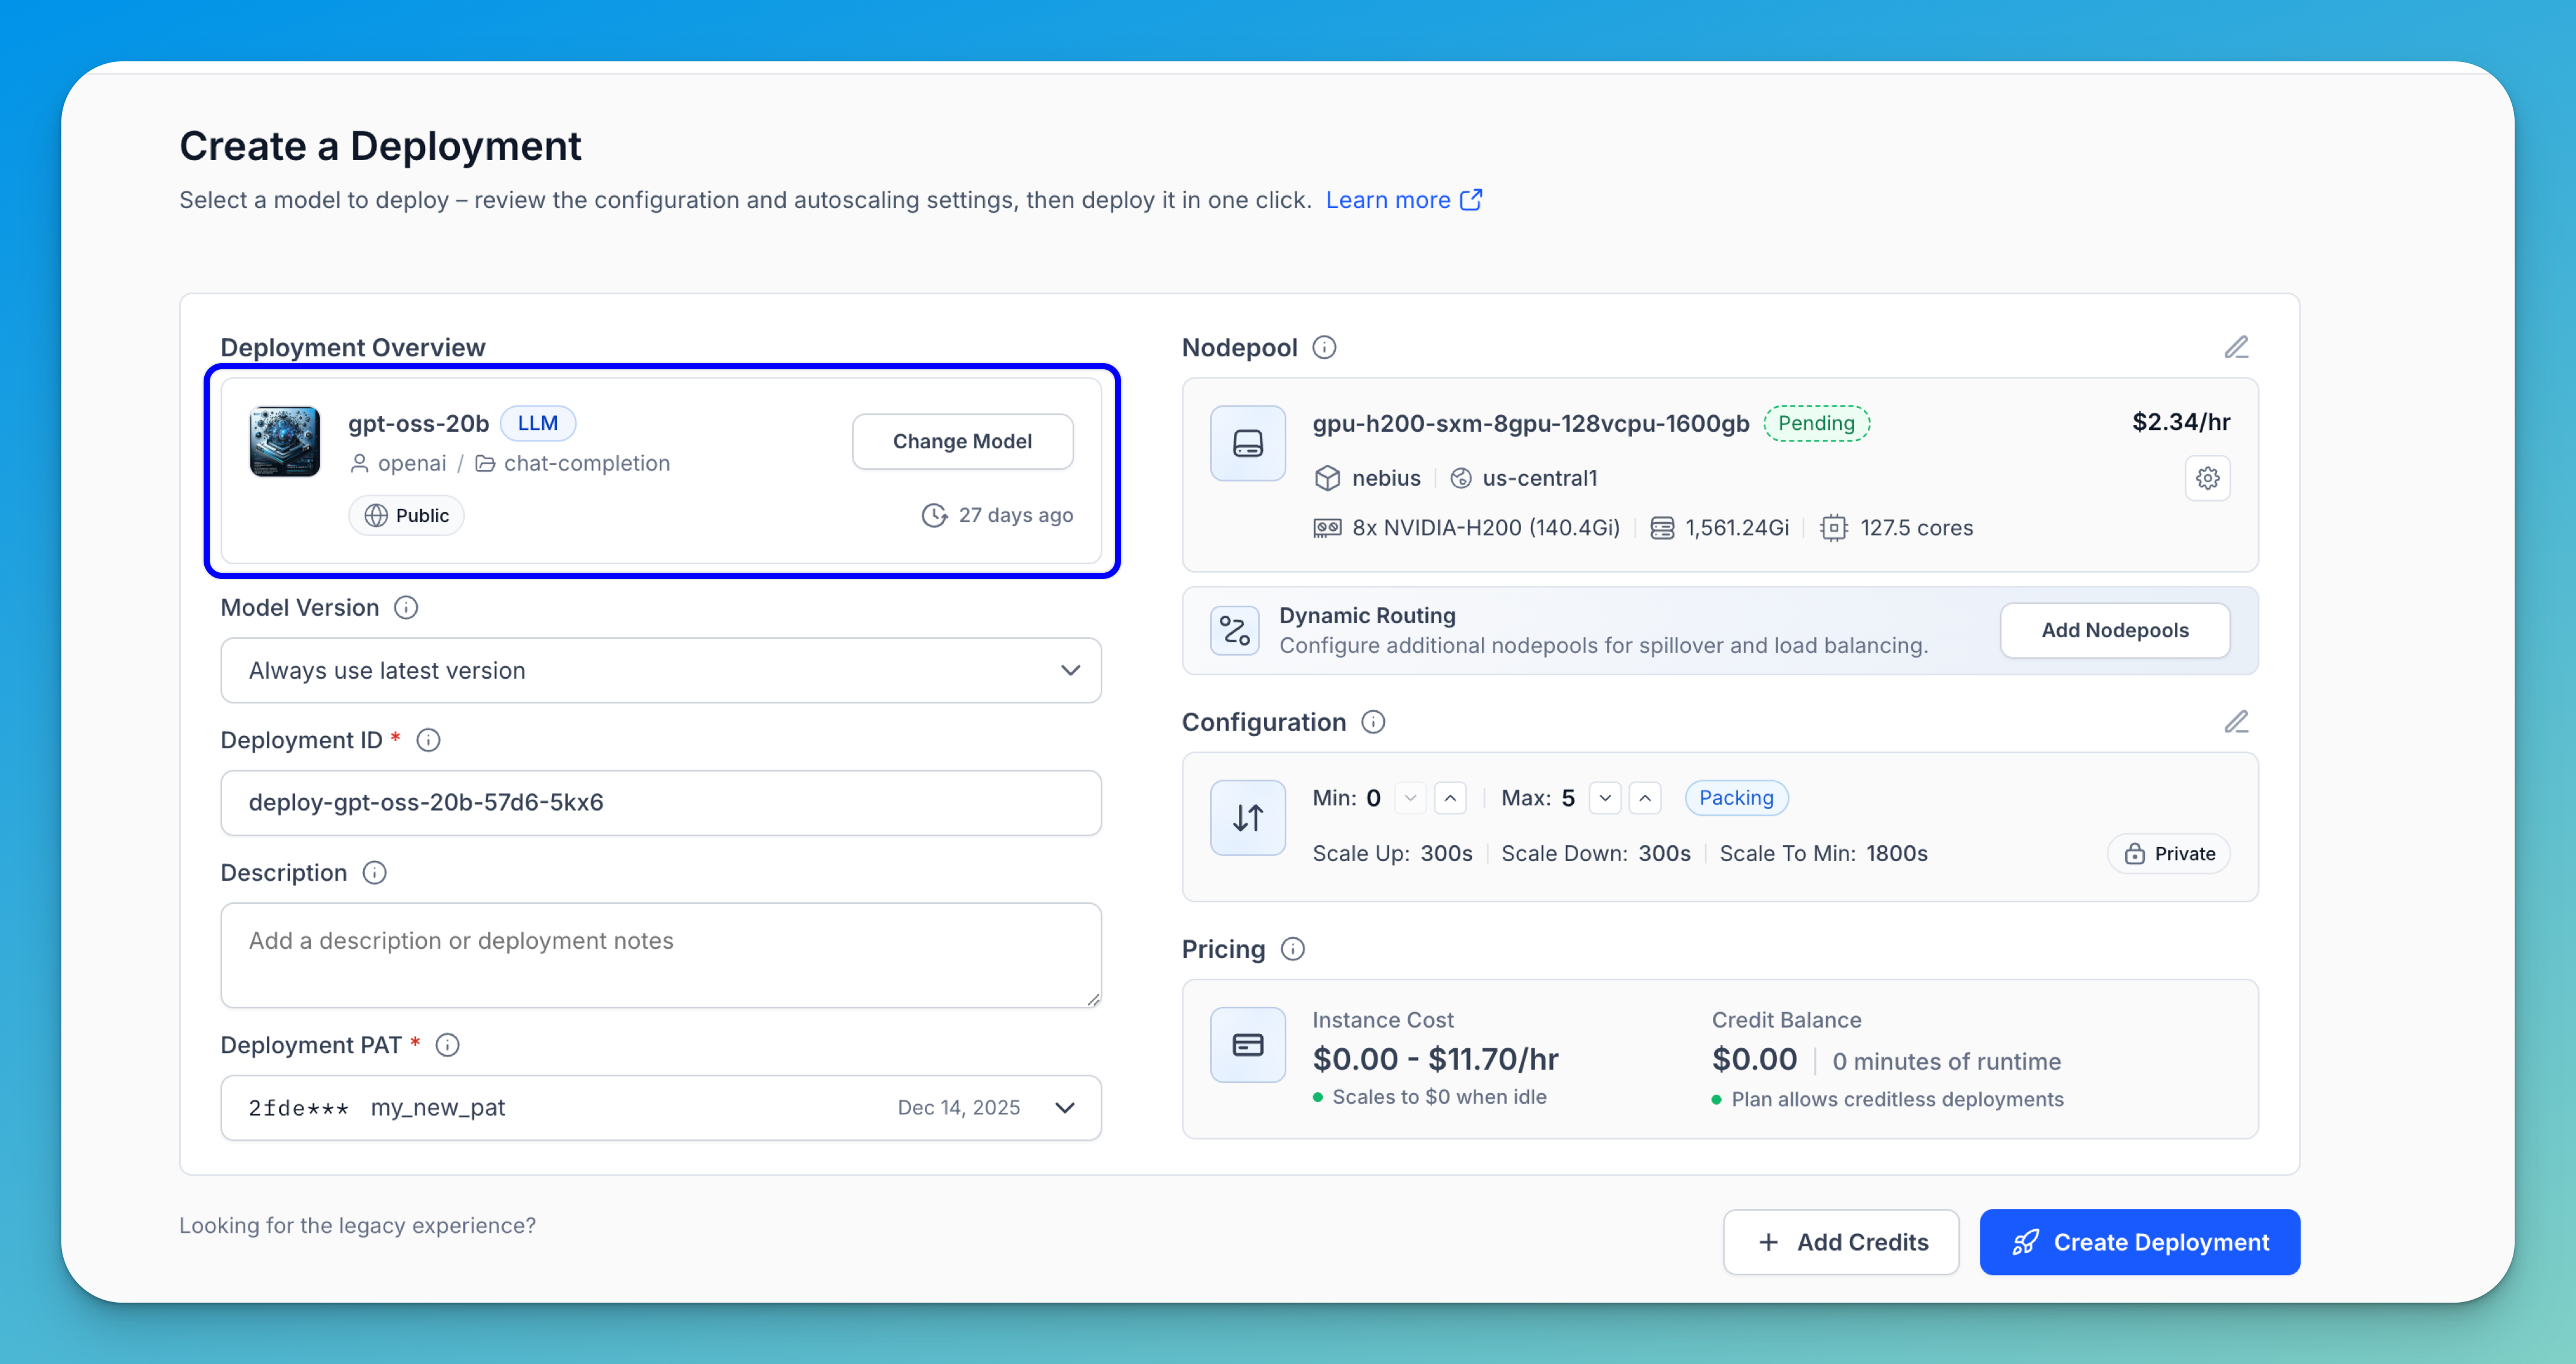
You can also configure the following settings:
- Model Version — Determines which version of the model will be used when the deployment is initialized. By default, the latest version is selected, but you can use the provided field to choose a different version if needed.
- Deployment ID — A unique identifier for your deployment, used in API calls and URLs. You can keep the automatically generated ID or provide a custom one.
- Description ��— Optionally add a description to provide additional context about the deployment.
- Deployment PAT — A Personal Access Token (PAT) authorizes access to the resources required for your deployment to run. You can use the automatically selected token or choose a different one. If you don’t already have a suitable PAT, you can generate one using the provided button.
Caution: Be cautious when changing the PAT after the deployment has been created, as this may cause the associated compute resources to stop functioning properly.
After selecting a model, a compatible nodepool will be automatically assigned.
- If no compatible nodepool exists in your account, a new nodepool is automatically created and marked with a
Pendingstatus while the required infrastructure is being provisioned. - If a compatible nodepool already exists, it is selected automatically and assigned a
Provisionedstatus, indicating that the infrastructure is already configured and ready to host the deployment.
Step 3: Select a Nodepool
Next, choose a cloud instance type and hardware configuration that best fits your model’s compute requirements and performance goals.
Note: See Supported Cloud Instances for a full list of available GPUs, TPUs, and CPU-only options across supported cloud providers.
To select or modify a nodepool, click the pencil icon in the upper-right corner. An Edit Nodepool Configuration modal will appear, allowing you to choose an already existing nodepool or select a recommended one that best fits your deployment requirements.
The details of the nodepools will be displayed, such as GPU type, available memory, CPU cores, and cost per hour.
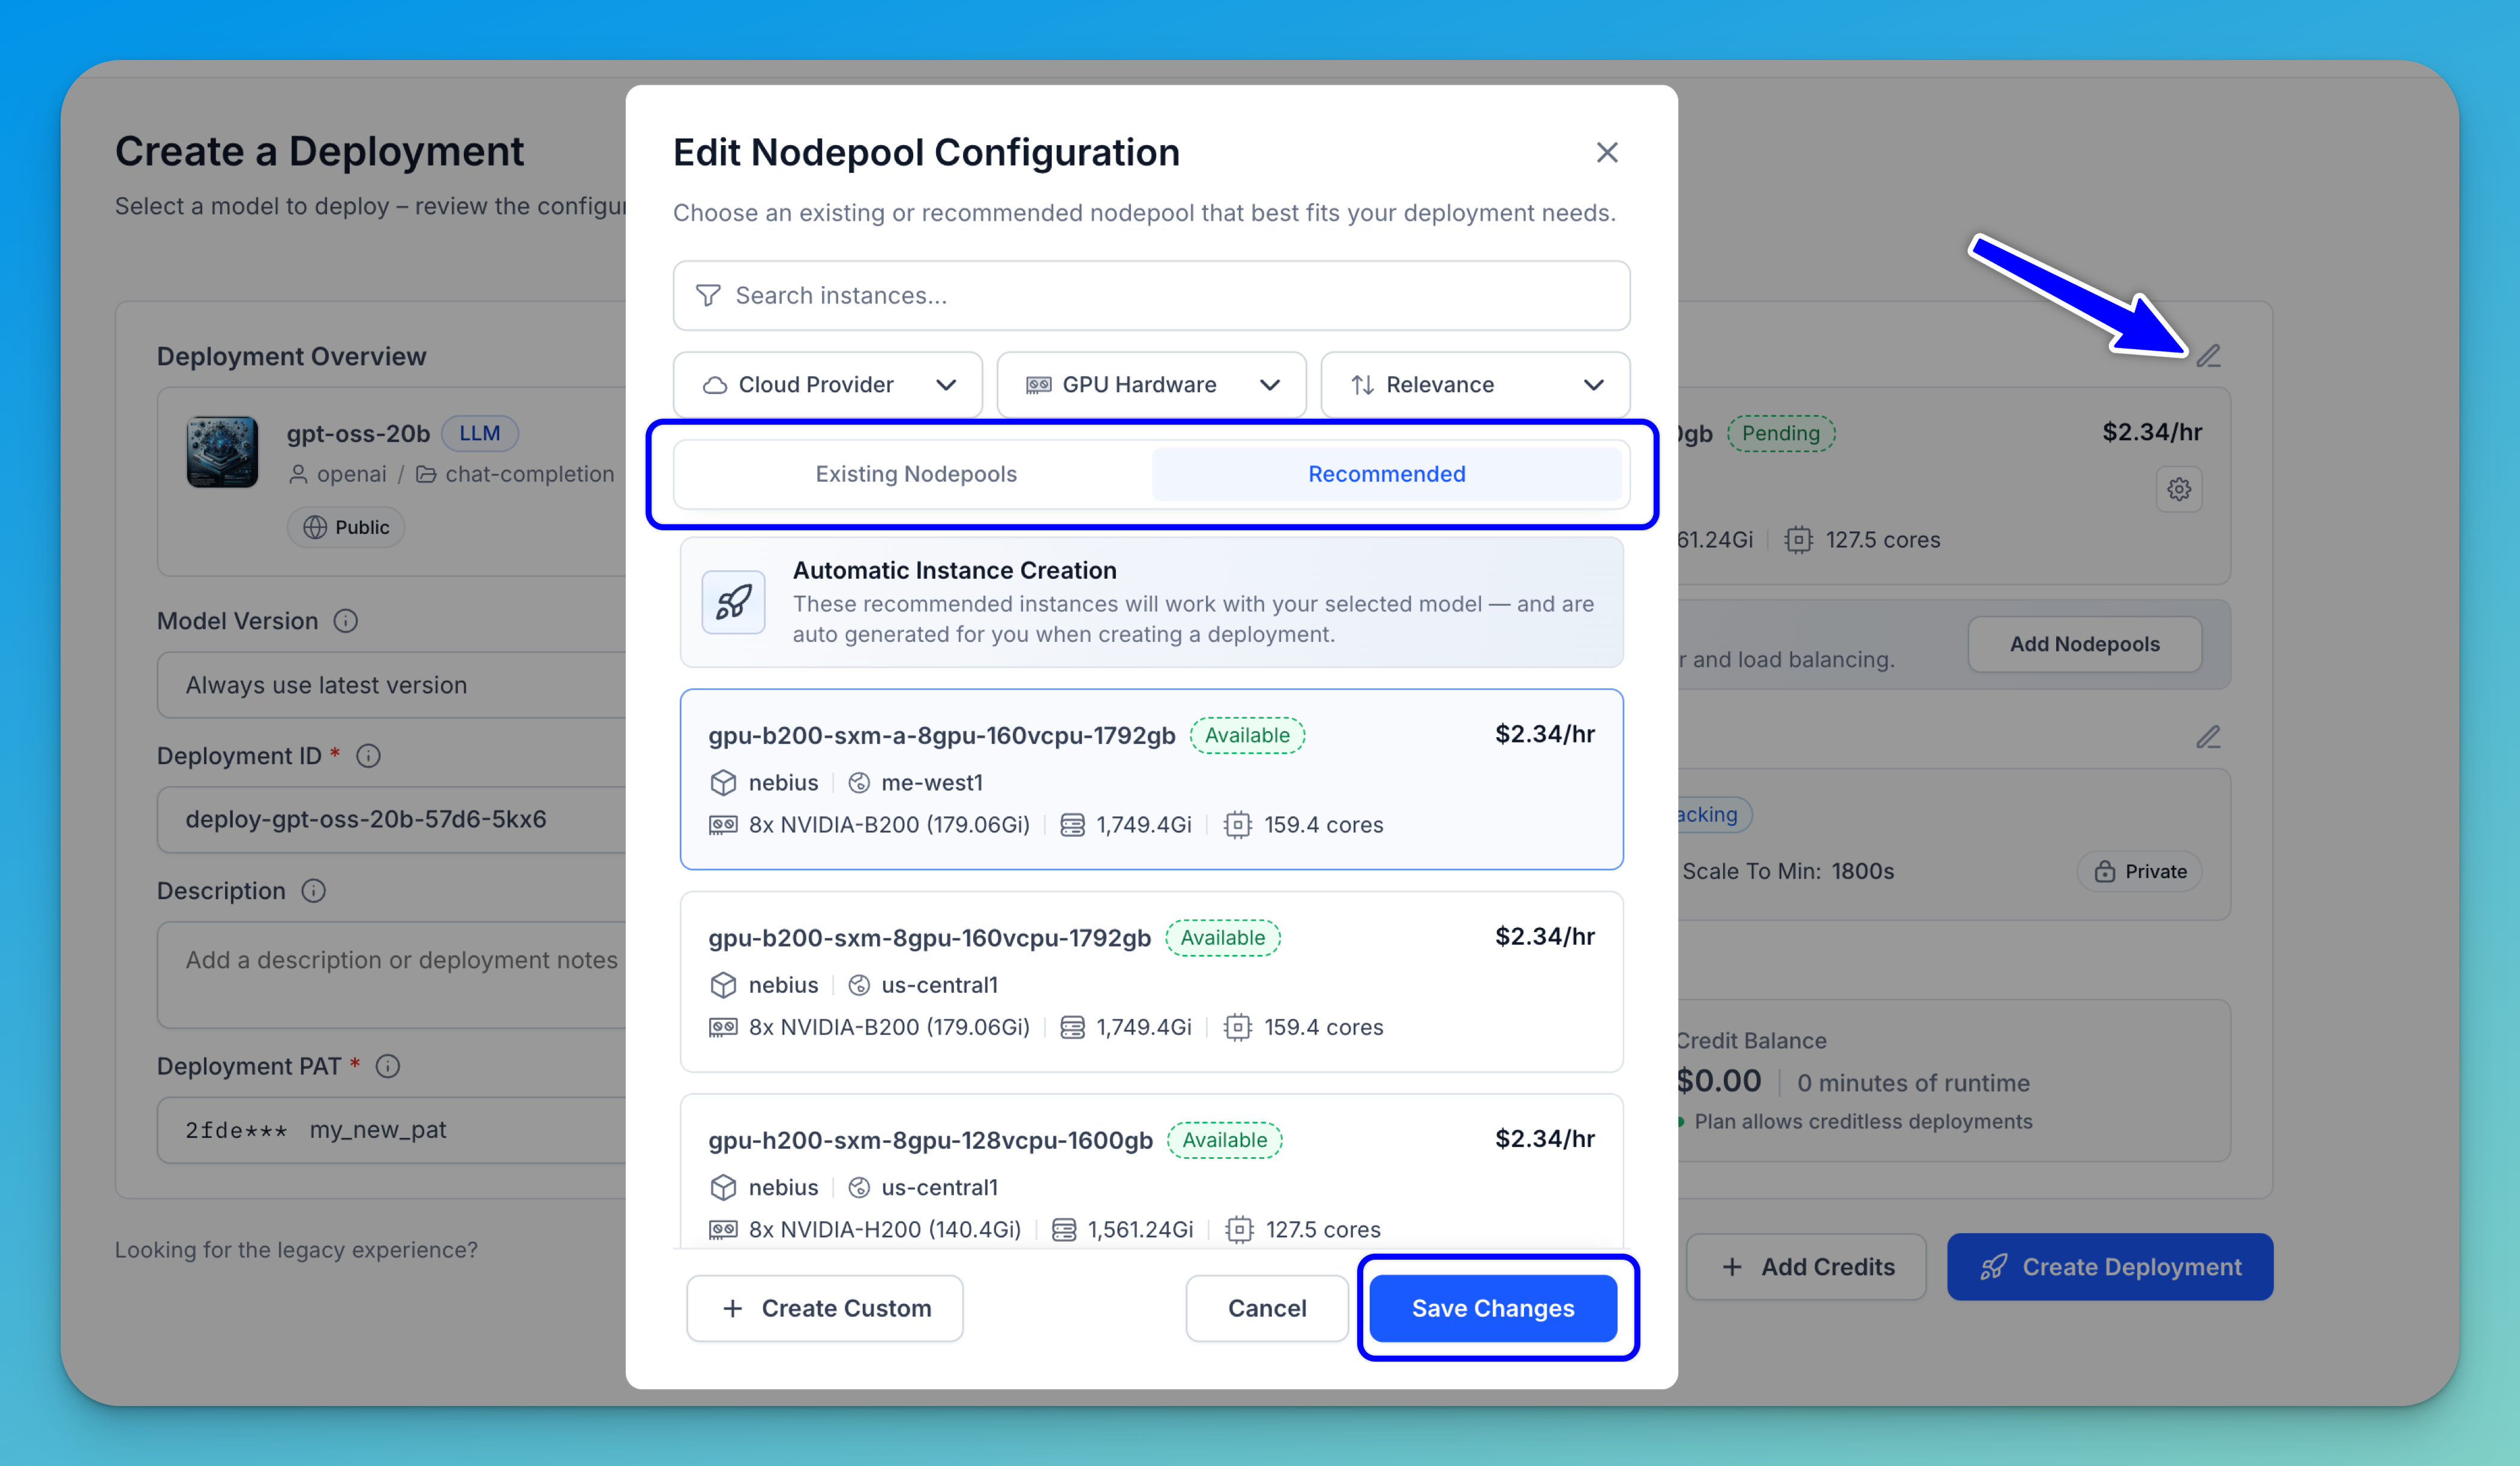
The modal allows you to accomplish various tasks, including:
- Search for an instance — Use the search bar at the top to quickly find a specific nodepool by name.
- Filter the results — Use the three dropdown filters to narrow down your options by Cloud Provider, GPU Hardware, and Relevance (sort order).
- Switch between tabs — Choose between Existing Nodepools (nodepools already set up in your environment) and Recommended (pre-configured nodepools automatically suggested based on your model’s compatibility and resource needs).
- Select a nodepool — Browse the listed nodepools and click one to select it. Each entry shows key details including the cloud provider, cluster, region, GPU specs, memory, cores, pricing per hour, and min/max scaling limits.
- Review incompatible instances — Select the Existing Nodepools tab and expand the "See instances incompatible with this model" section at the bottom to understand which options are incompatible with your model.
- Create a custom nodepool — If none of the listed options meet your needs, click + Create Custom to configure a new cluster and nodepool from scratch.
- Save or cancel — Click Save Changes to apply your selected nodepool configuration, or Cancel to close the pop-up without making any changes.
The selected nodepool will be displayed in the Nodepool section.
Edit Nodepool
To update the settings for a nodepool instance, click the gear icon next to the nodepool entry.

A configuration modal will appear, allowing you to configure both the cluster and nodepool settings for the deployment. The modal includes the following configurable fields and options:
- Use Existing Cluster — attach the nodepool to an existing cluster instead of creating a new one.
- Cluster ID — specify or update the cluster identifier.
- Cluster Description — add deployment notes or a description for the cluster.
- Nodepool ID — define or update the nodepool identifier.
- Nodepool Description — add notes or a description for the nodepool.
- Instance Autoscaling — configure how the nodepool scales based on workload demands:
- Minimum Instances — the minimum number of instances to keep running. Setting this value to
0allows the nodepool to scale down completely when idle. - Maximum Instances — the maximum number of instances the nodepool can scale up to during periods of high demand.
- Minimum Instances — the minimum number of instances to keep running. Setting this value to
The modal also displays the selected nodepool type, machine configuration, cluster name, and deployment region.
After updating the desired settings, click Save Changes to apply and finalize the configuration updates.
Step 4: Set Dynamic Routing (Optional)
Dynamic routing allows you to attach additional nodepools to a deployment so that incoming requests can be distributed across multiple compute resources. This multi-nodepool deployment helps improve availability, scalability, and performance, especially during periods of high traffic.
If you want to configure additional nodepools for spillover and load balancing, click the Add Nodepools button.
A modal will appear that allows you to select another nodepool to include in the deployment.
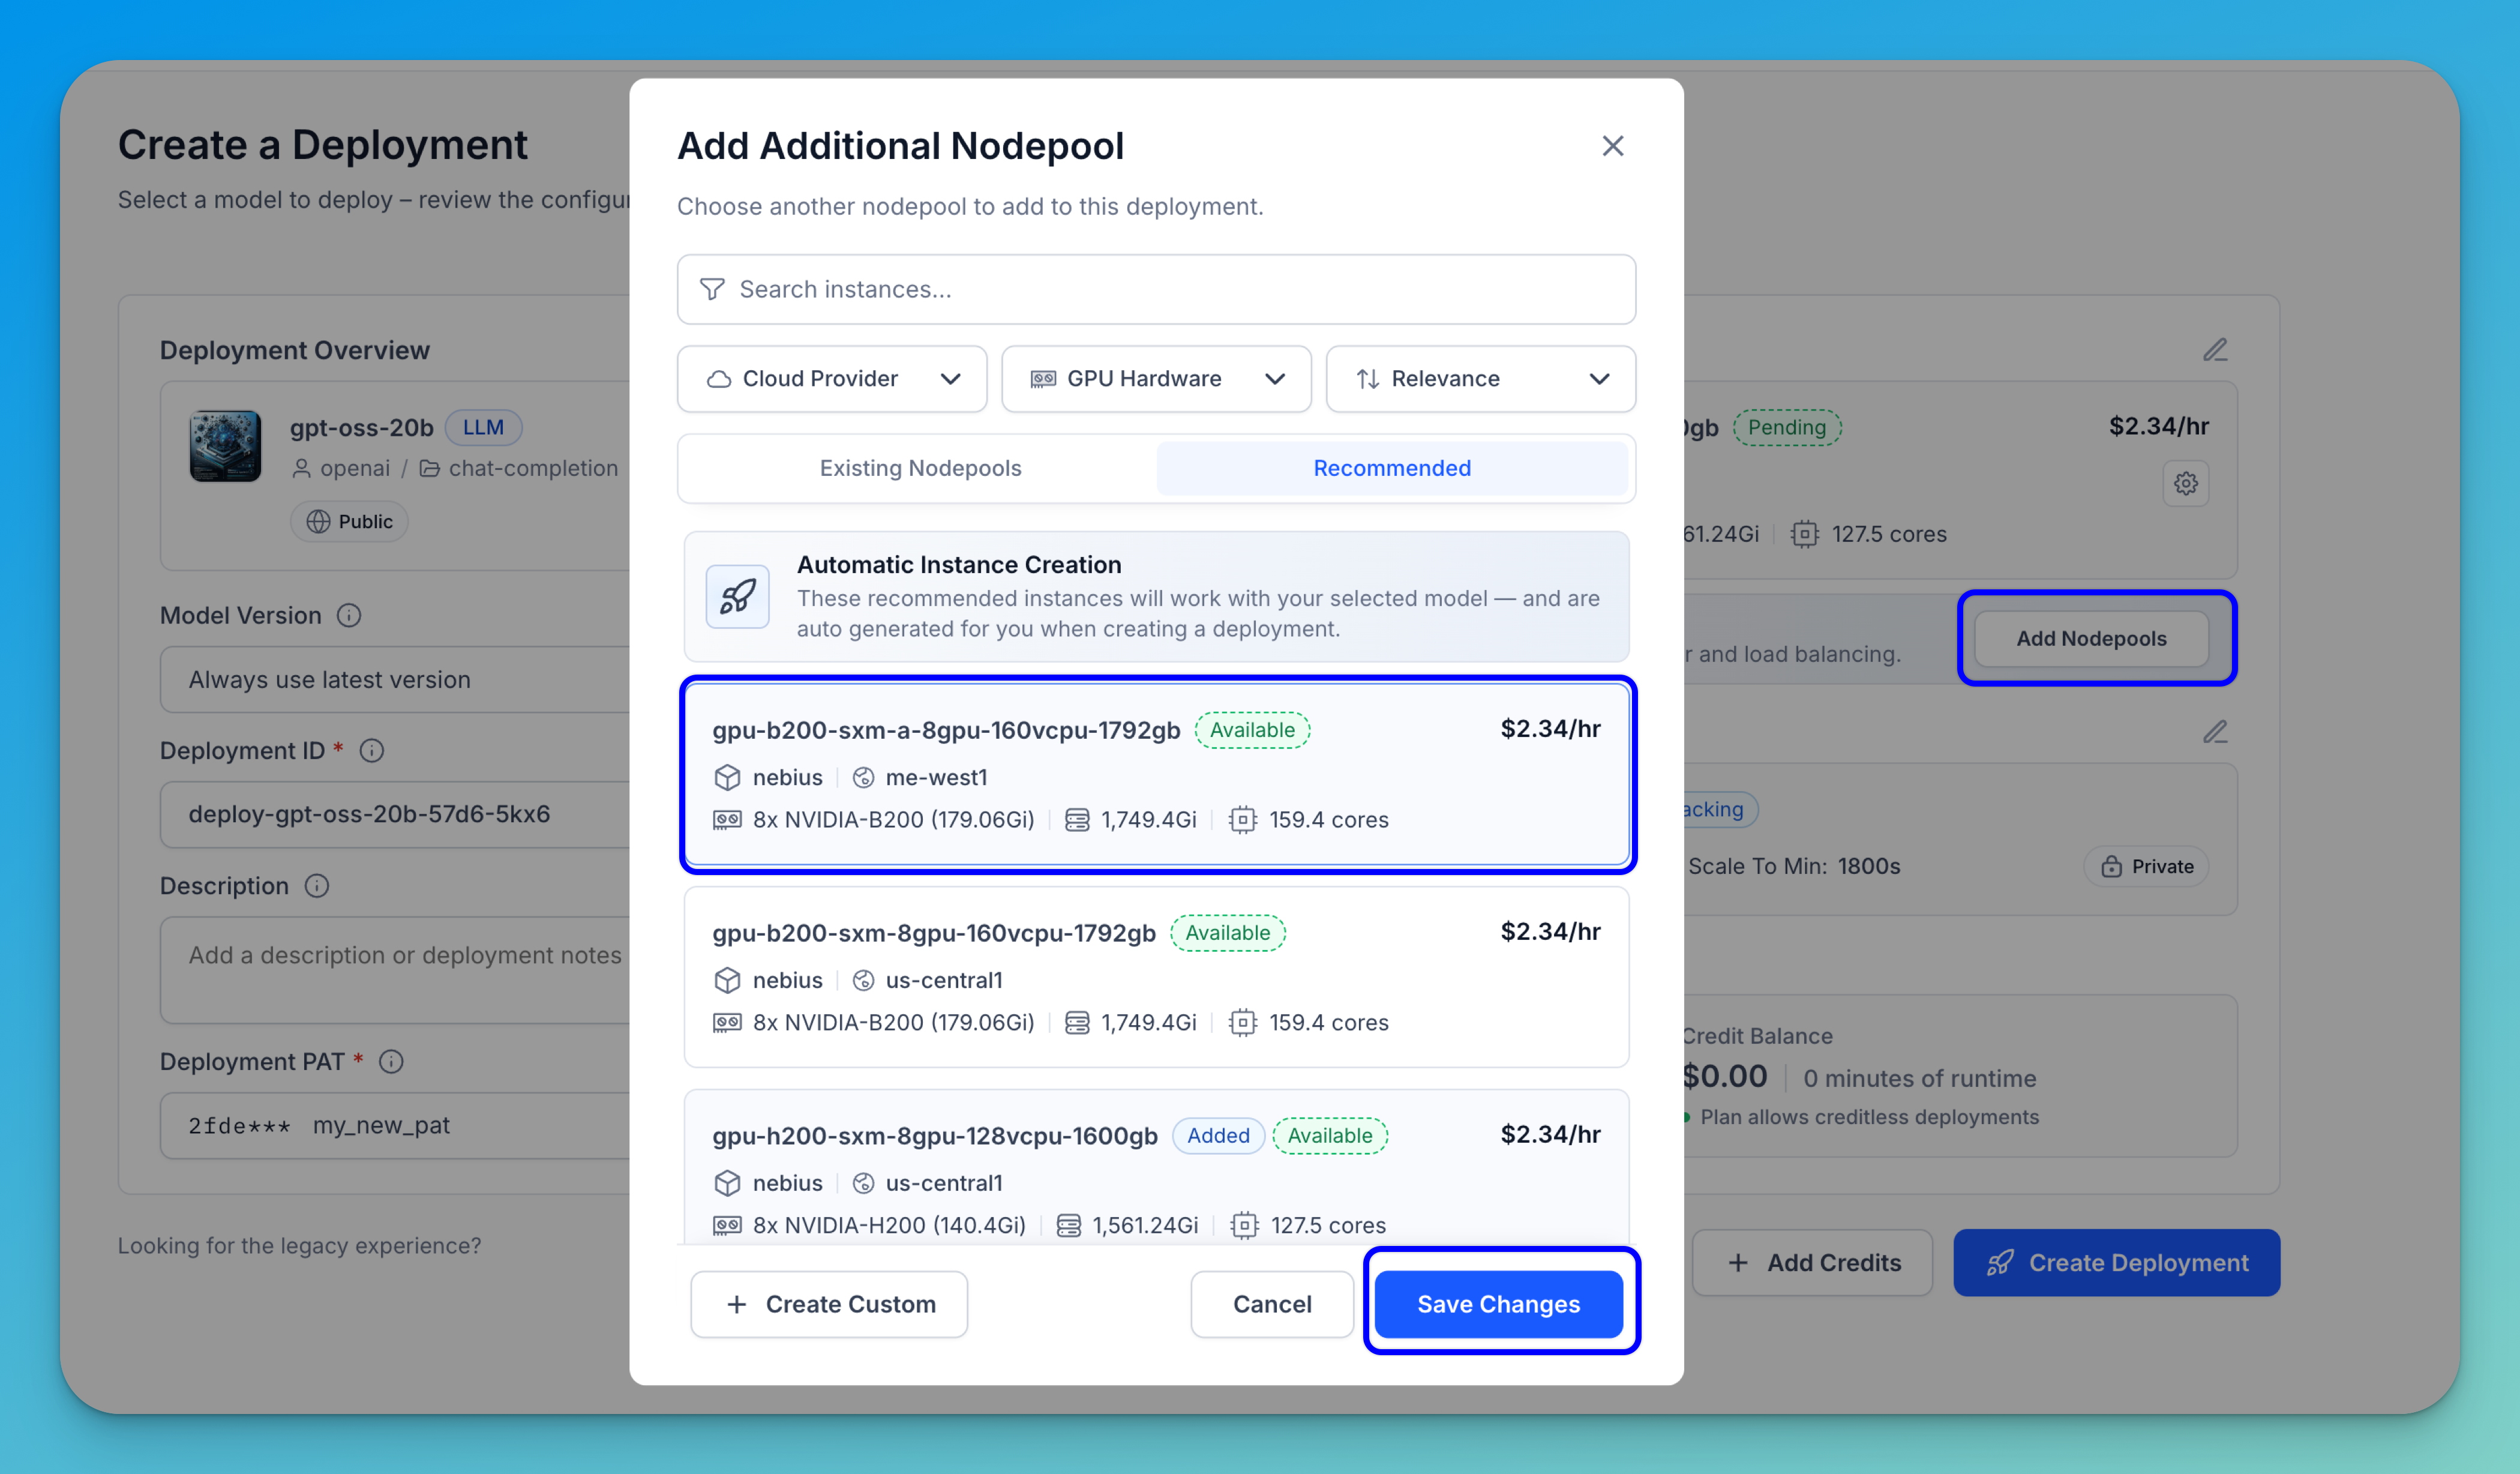
Once you’ve selected the additional nodepool, click Save Changes to apply the configuration.
The selected nodepools will then appear in the Nodepool section of your deployment setup.
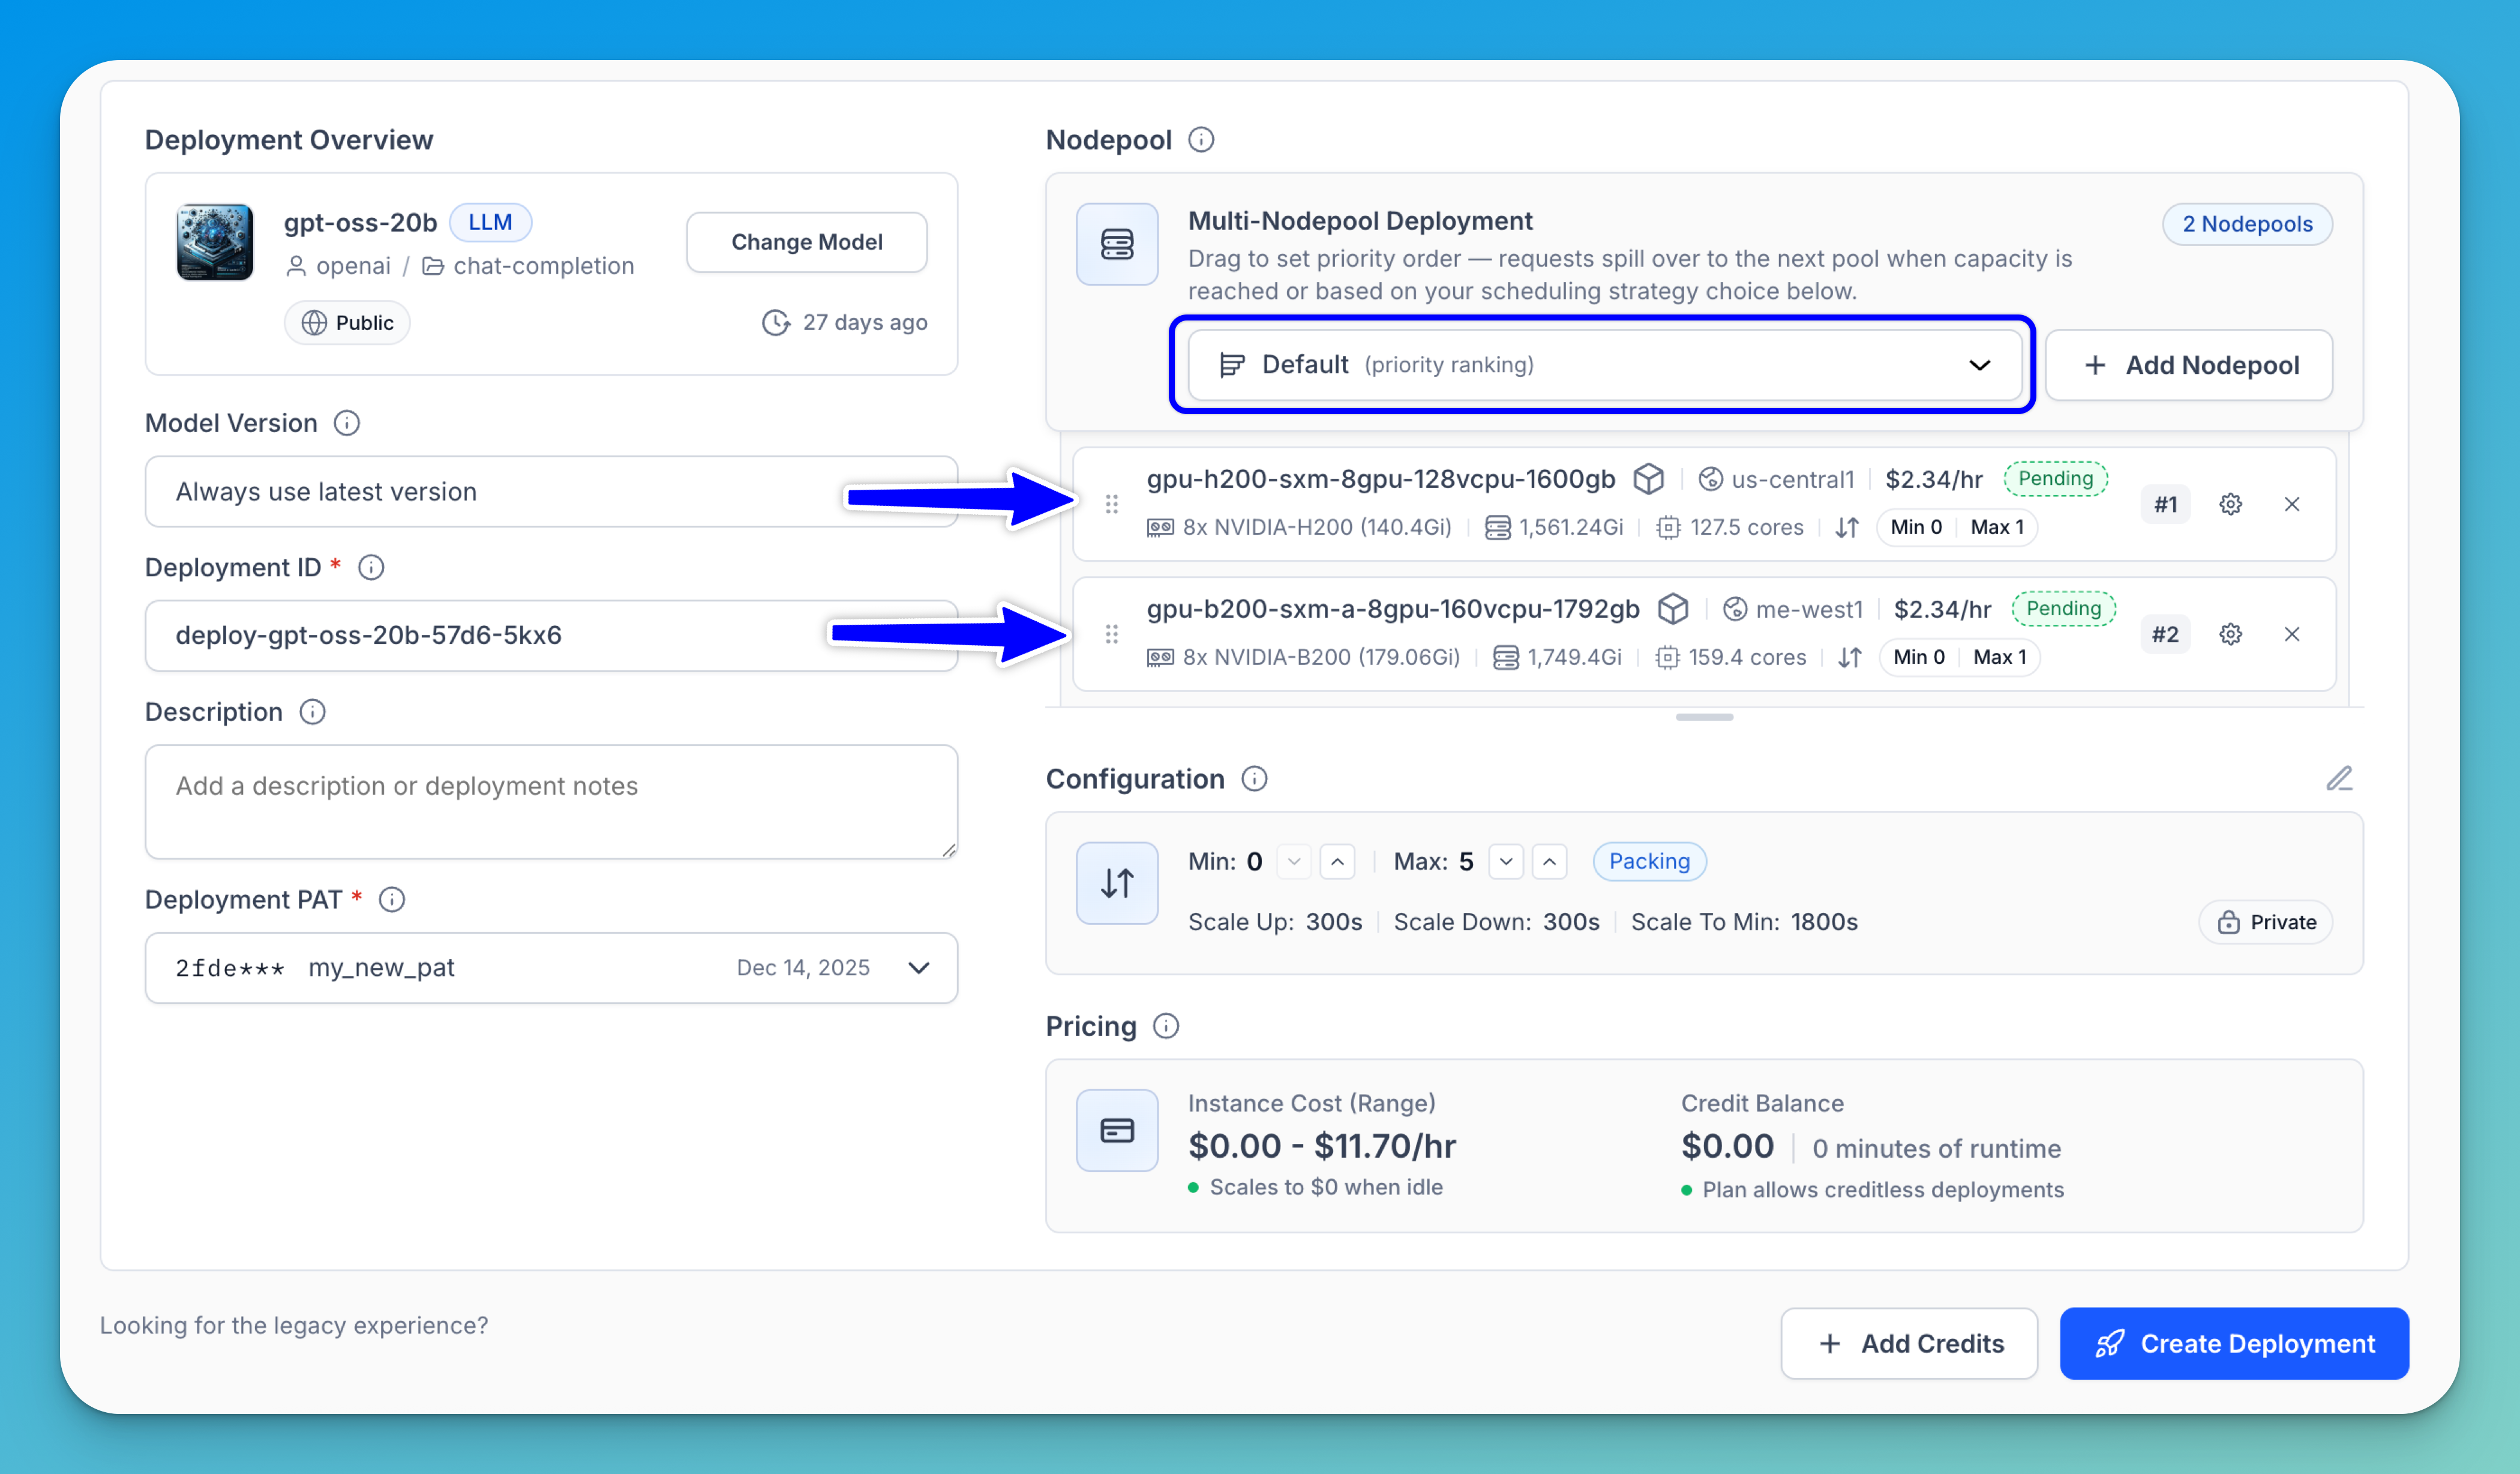
With dynamic routing, you can control how requests are distributed across nodepools — either spilling over to another pool when the primary nodepool reaches capacity or following the scheduling strategy you’ve configured.
Note: To set the priority order, use the drag handle (⠿) to reorder the nodepools — #1 will be scheduled first. To remove a nodepool from the scheduling configuration, click the remove (x) button.
You can use the dropdown list to select one of the following scheduling strategies:
- Default — Requests are routed by the priority order you set. The first nodepool is preferred; subsequent pools handle overflow.
- Performance — Schedule to the fastest known option based on hardware performance characteristics.
- Price — Choose the cheapest compute available across all nodepools.
- Utilization — Send to the least-used nodepool based on its current capacity.
- Network — Optimize based on network latency between client and compute.
- Random — Randomly distribute across all available nodepools.
- Prefer Spot — Prefer spot instances over on-demand for cost savings. Less reliable but cheaper.
- Prefer On-Demand — Prefer on-demand instances over spot for reliability. More expensive but stable.
Step 5: Customize Deployment Configuration
Next, configure the replica scaling and timing settings for your deployment. You can keep the default configuration or customize it to better match your workload and performance requirements.
To define the number of replicas, use the Min and Max fields. Each field includes arrow controls — click the down arrow (∨) to decrease the value or the up arrow (∧) to increase it.
Note: This specifies the minimum and maximum range of model replicas to deploy, adjusting based on your performance needs and anticipated workload. Adding replicas enables horizontal scaling, where the workload is distributed across several instances of the model rather than relying on a single one. However, increasing them consumes more resources and may lead to higher costs.
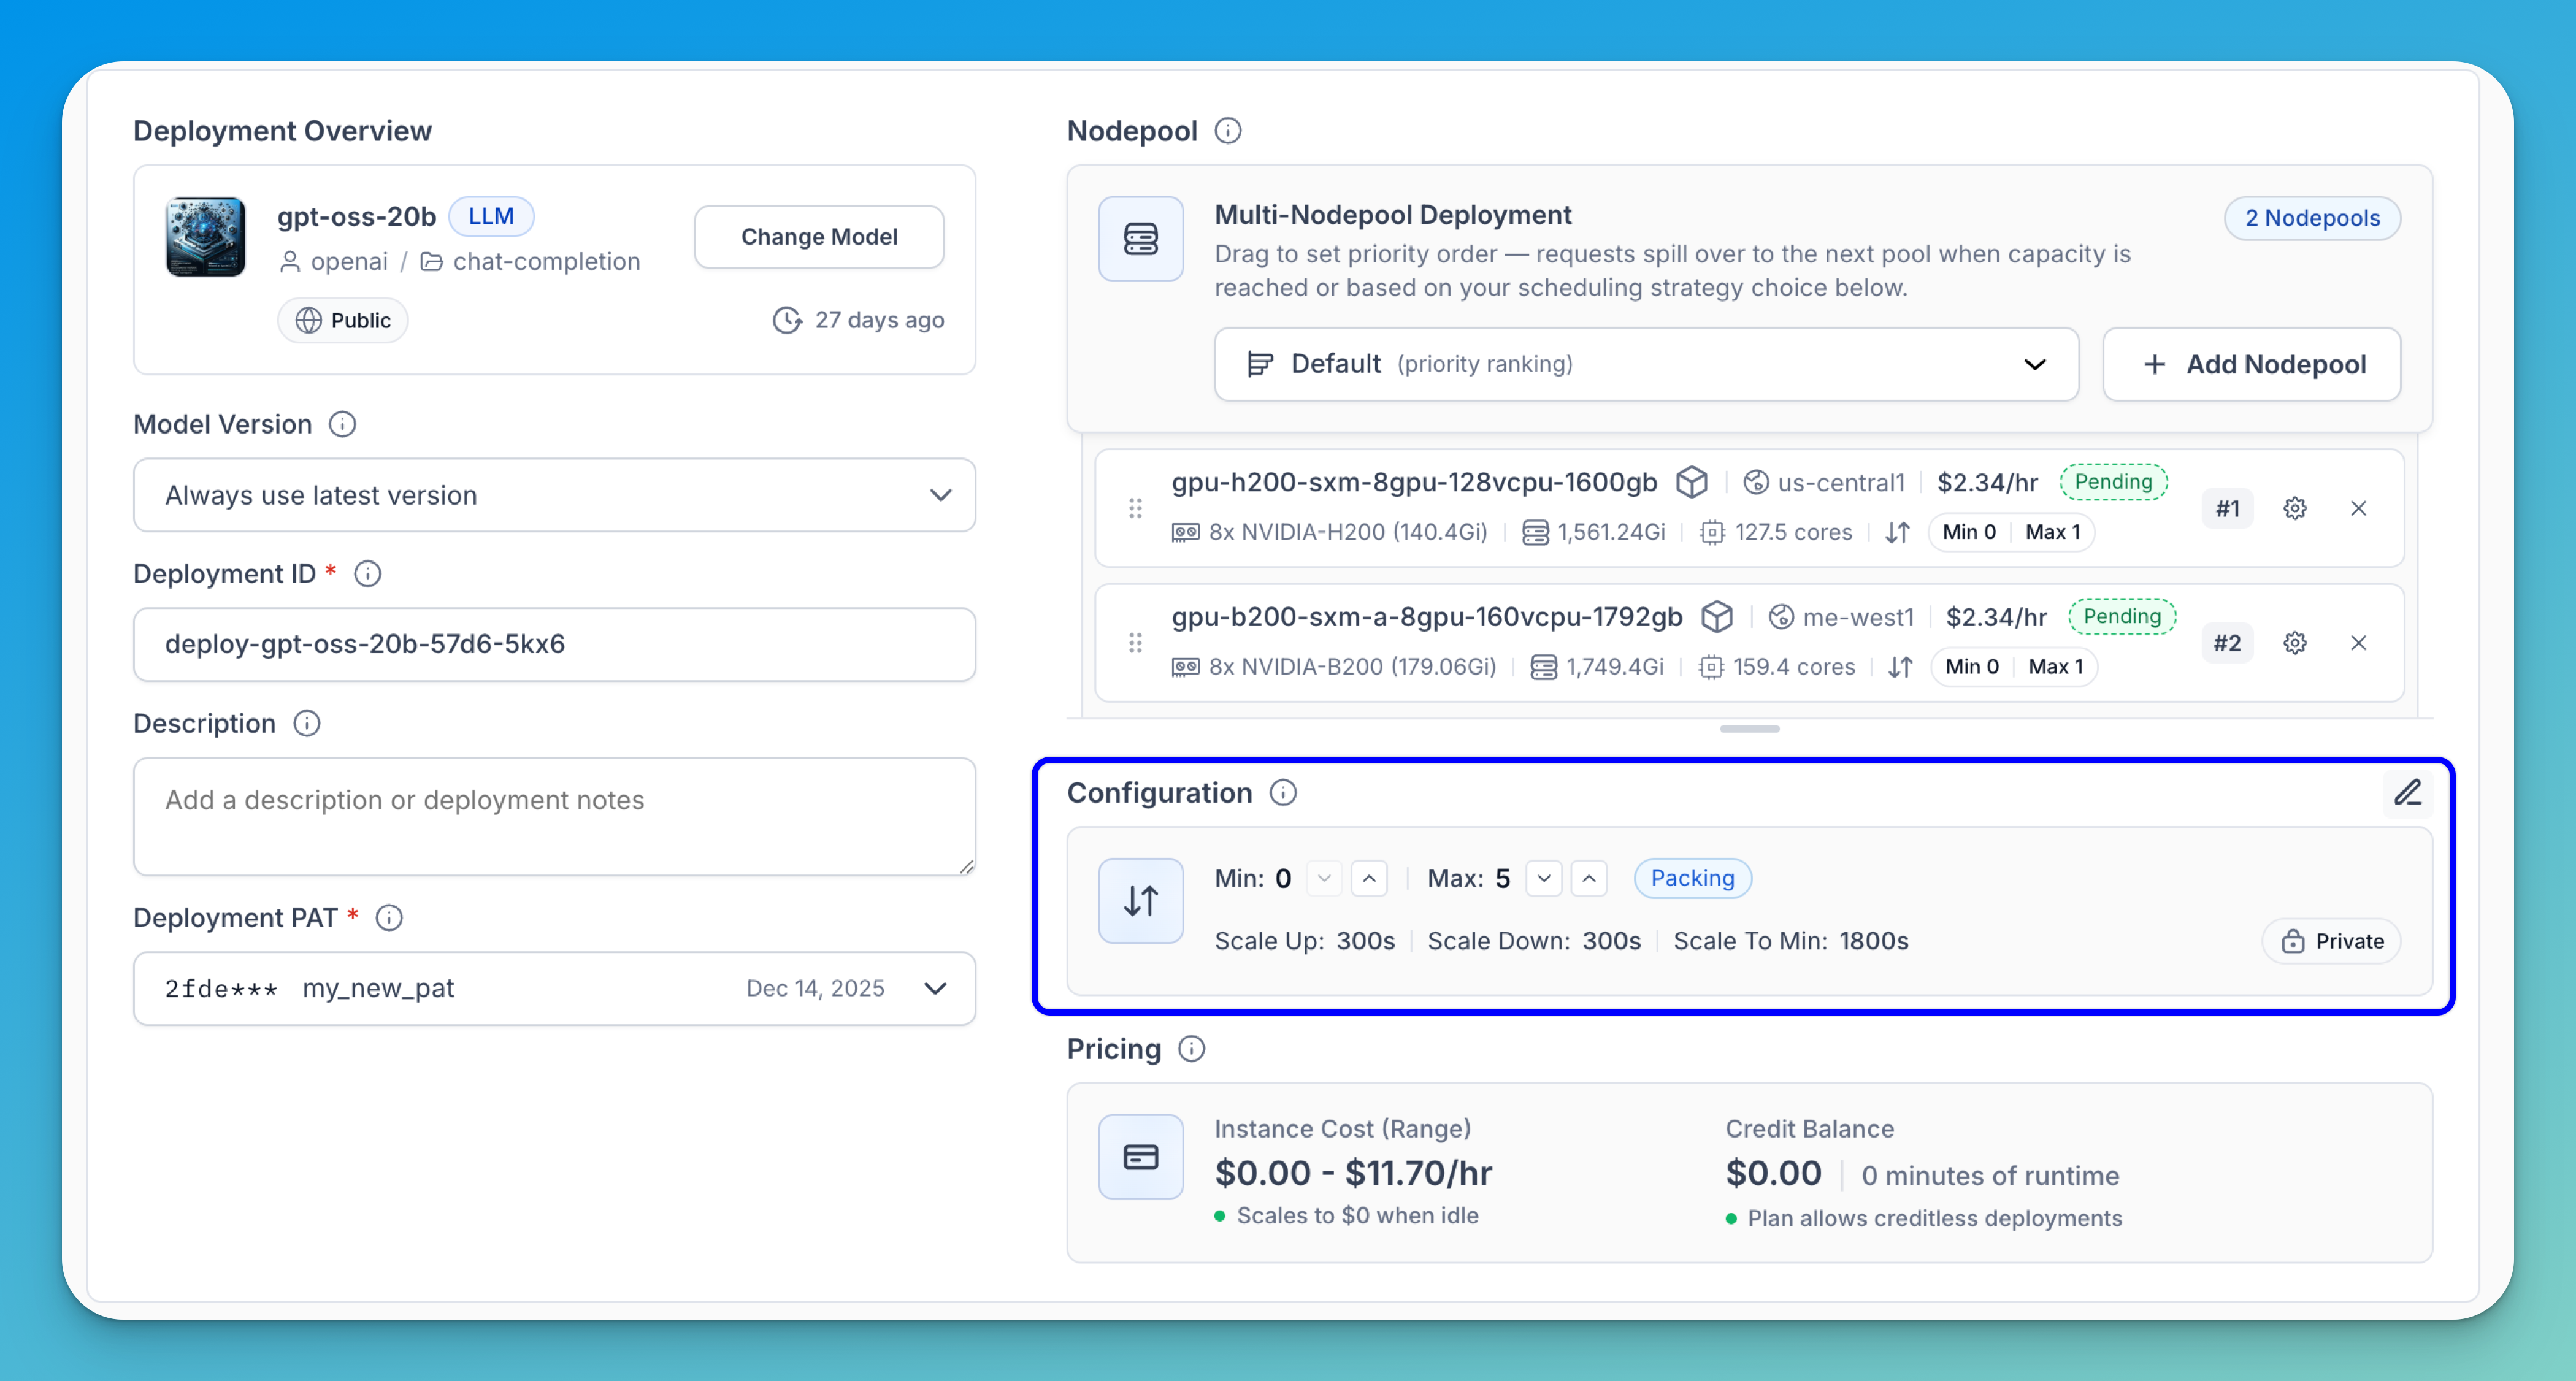
To make additional changes to the deployment configuration, click the pencil icon in the upper-right corner. A modal will appear with more advanced options for configuring the deployment.
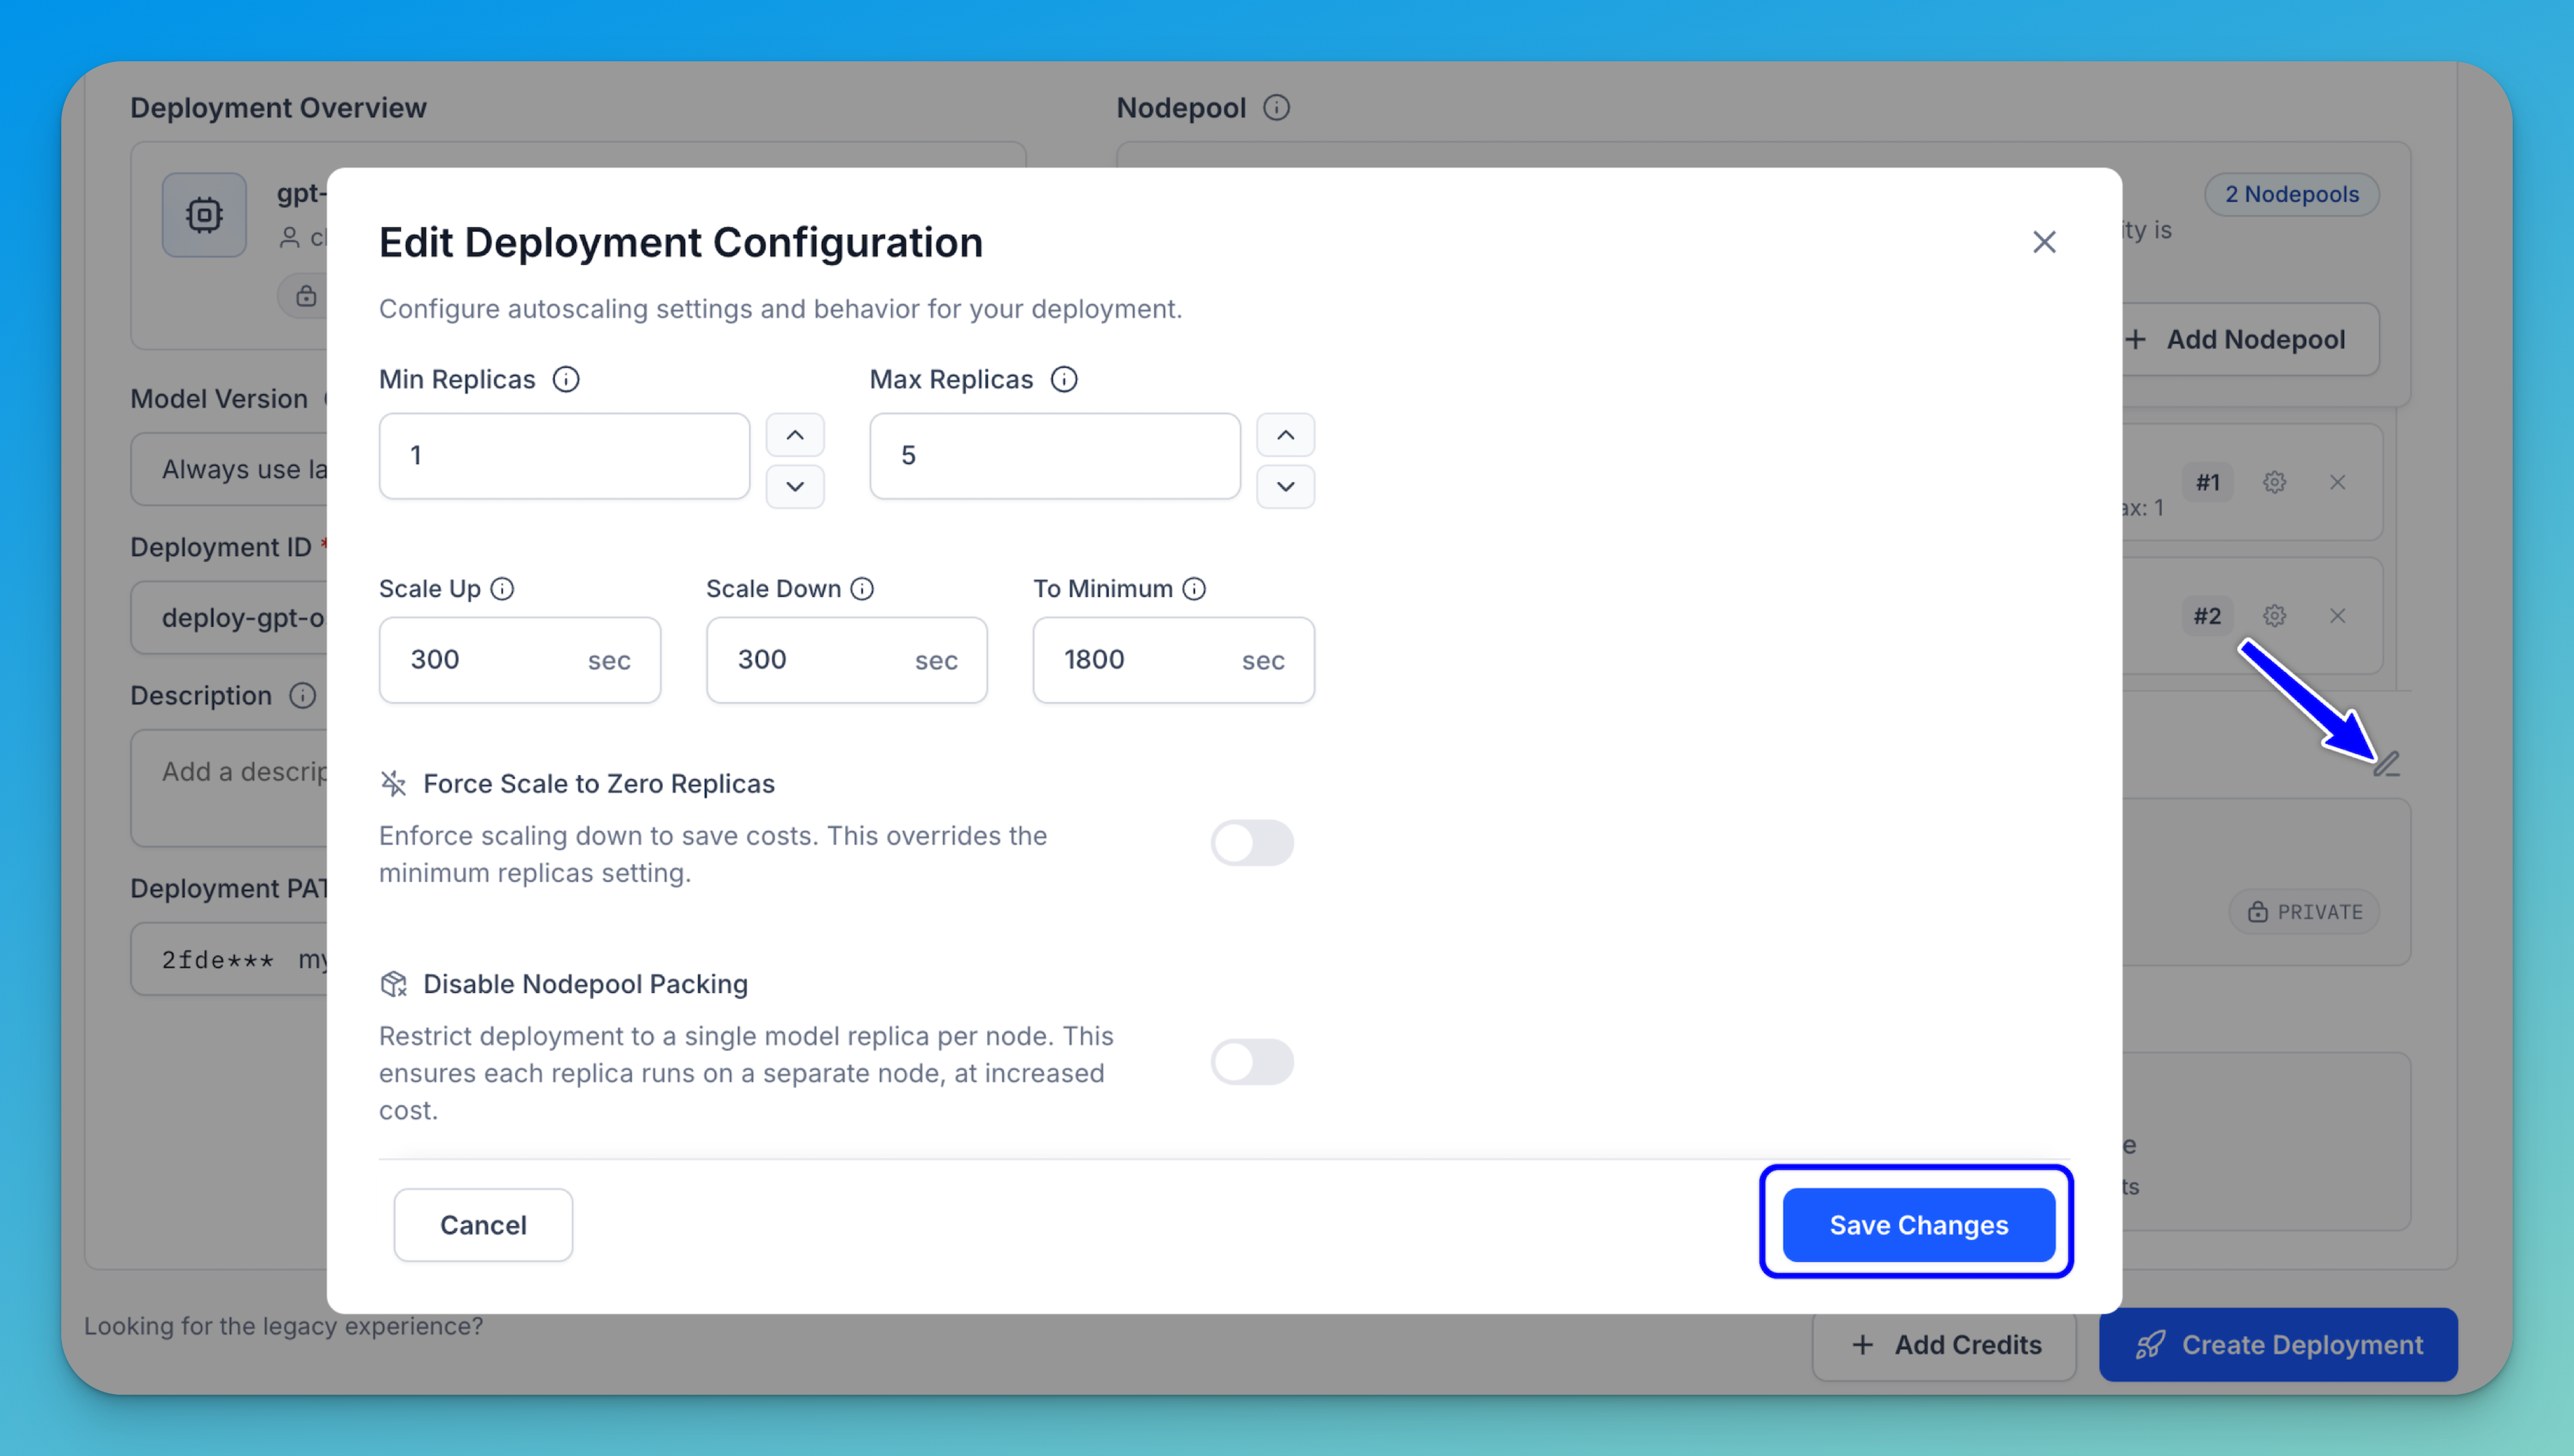
These are the additional autoscaling settings and behavior you can configure for your deployment:
- Min Replicas — As described earlier, this is the minimum number of replicas to maintain for the deployment. Setting this value to 1 or higher ensures the deployment remains persistent (always running), but may increase compute costs.
- Max Replicas — As described earlier, this is the maximum number of replicas allowed during autoscaling. Ensure that your nodepool has sufficient capacity to support this upper limit.
- Scale Up — This sets the waiting period (in seconds) before adding replicas in response to rising demand. Shorter delays respond faster, but may over-provision.
- Scale Down — This sets the waiting period (in seconds) before removing replicas after a demand decrease. A longer delay helps avoid unnecessary scale-downs during brief drips in activity. Note that your nodepool will only scale down to the minimum number of replica(s) configured.
- To Minimum — This sets the idle time (in seconds) the deployment waits after inactivity before scaling down to the configured minimum number of instances.
- Force Scale to Zero Replicas — Toggle this on to enforce scaling down to zero replicas to save costs. Note that this overrides the minimum replicas setting.
- Disable Nodepool Packing — Packing refers to placing multiple replicas on the same node to improve resource utilization and reduce costs. When set to
false(default), replicas may be packed together for efficiency. When set totrue, deployments are restricted to a single model replica per node, which can improve isolation or meet specific performance needs, but may result in underutilized nodes and higher costs.
Once you’ve configured your preferred scaling parameters, click Save Changes to apply the updates.
Click here to find out how to set up node autoscaling ranges to automatically adjust your infrastructure based on traffic demand.
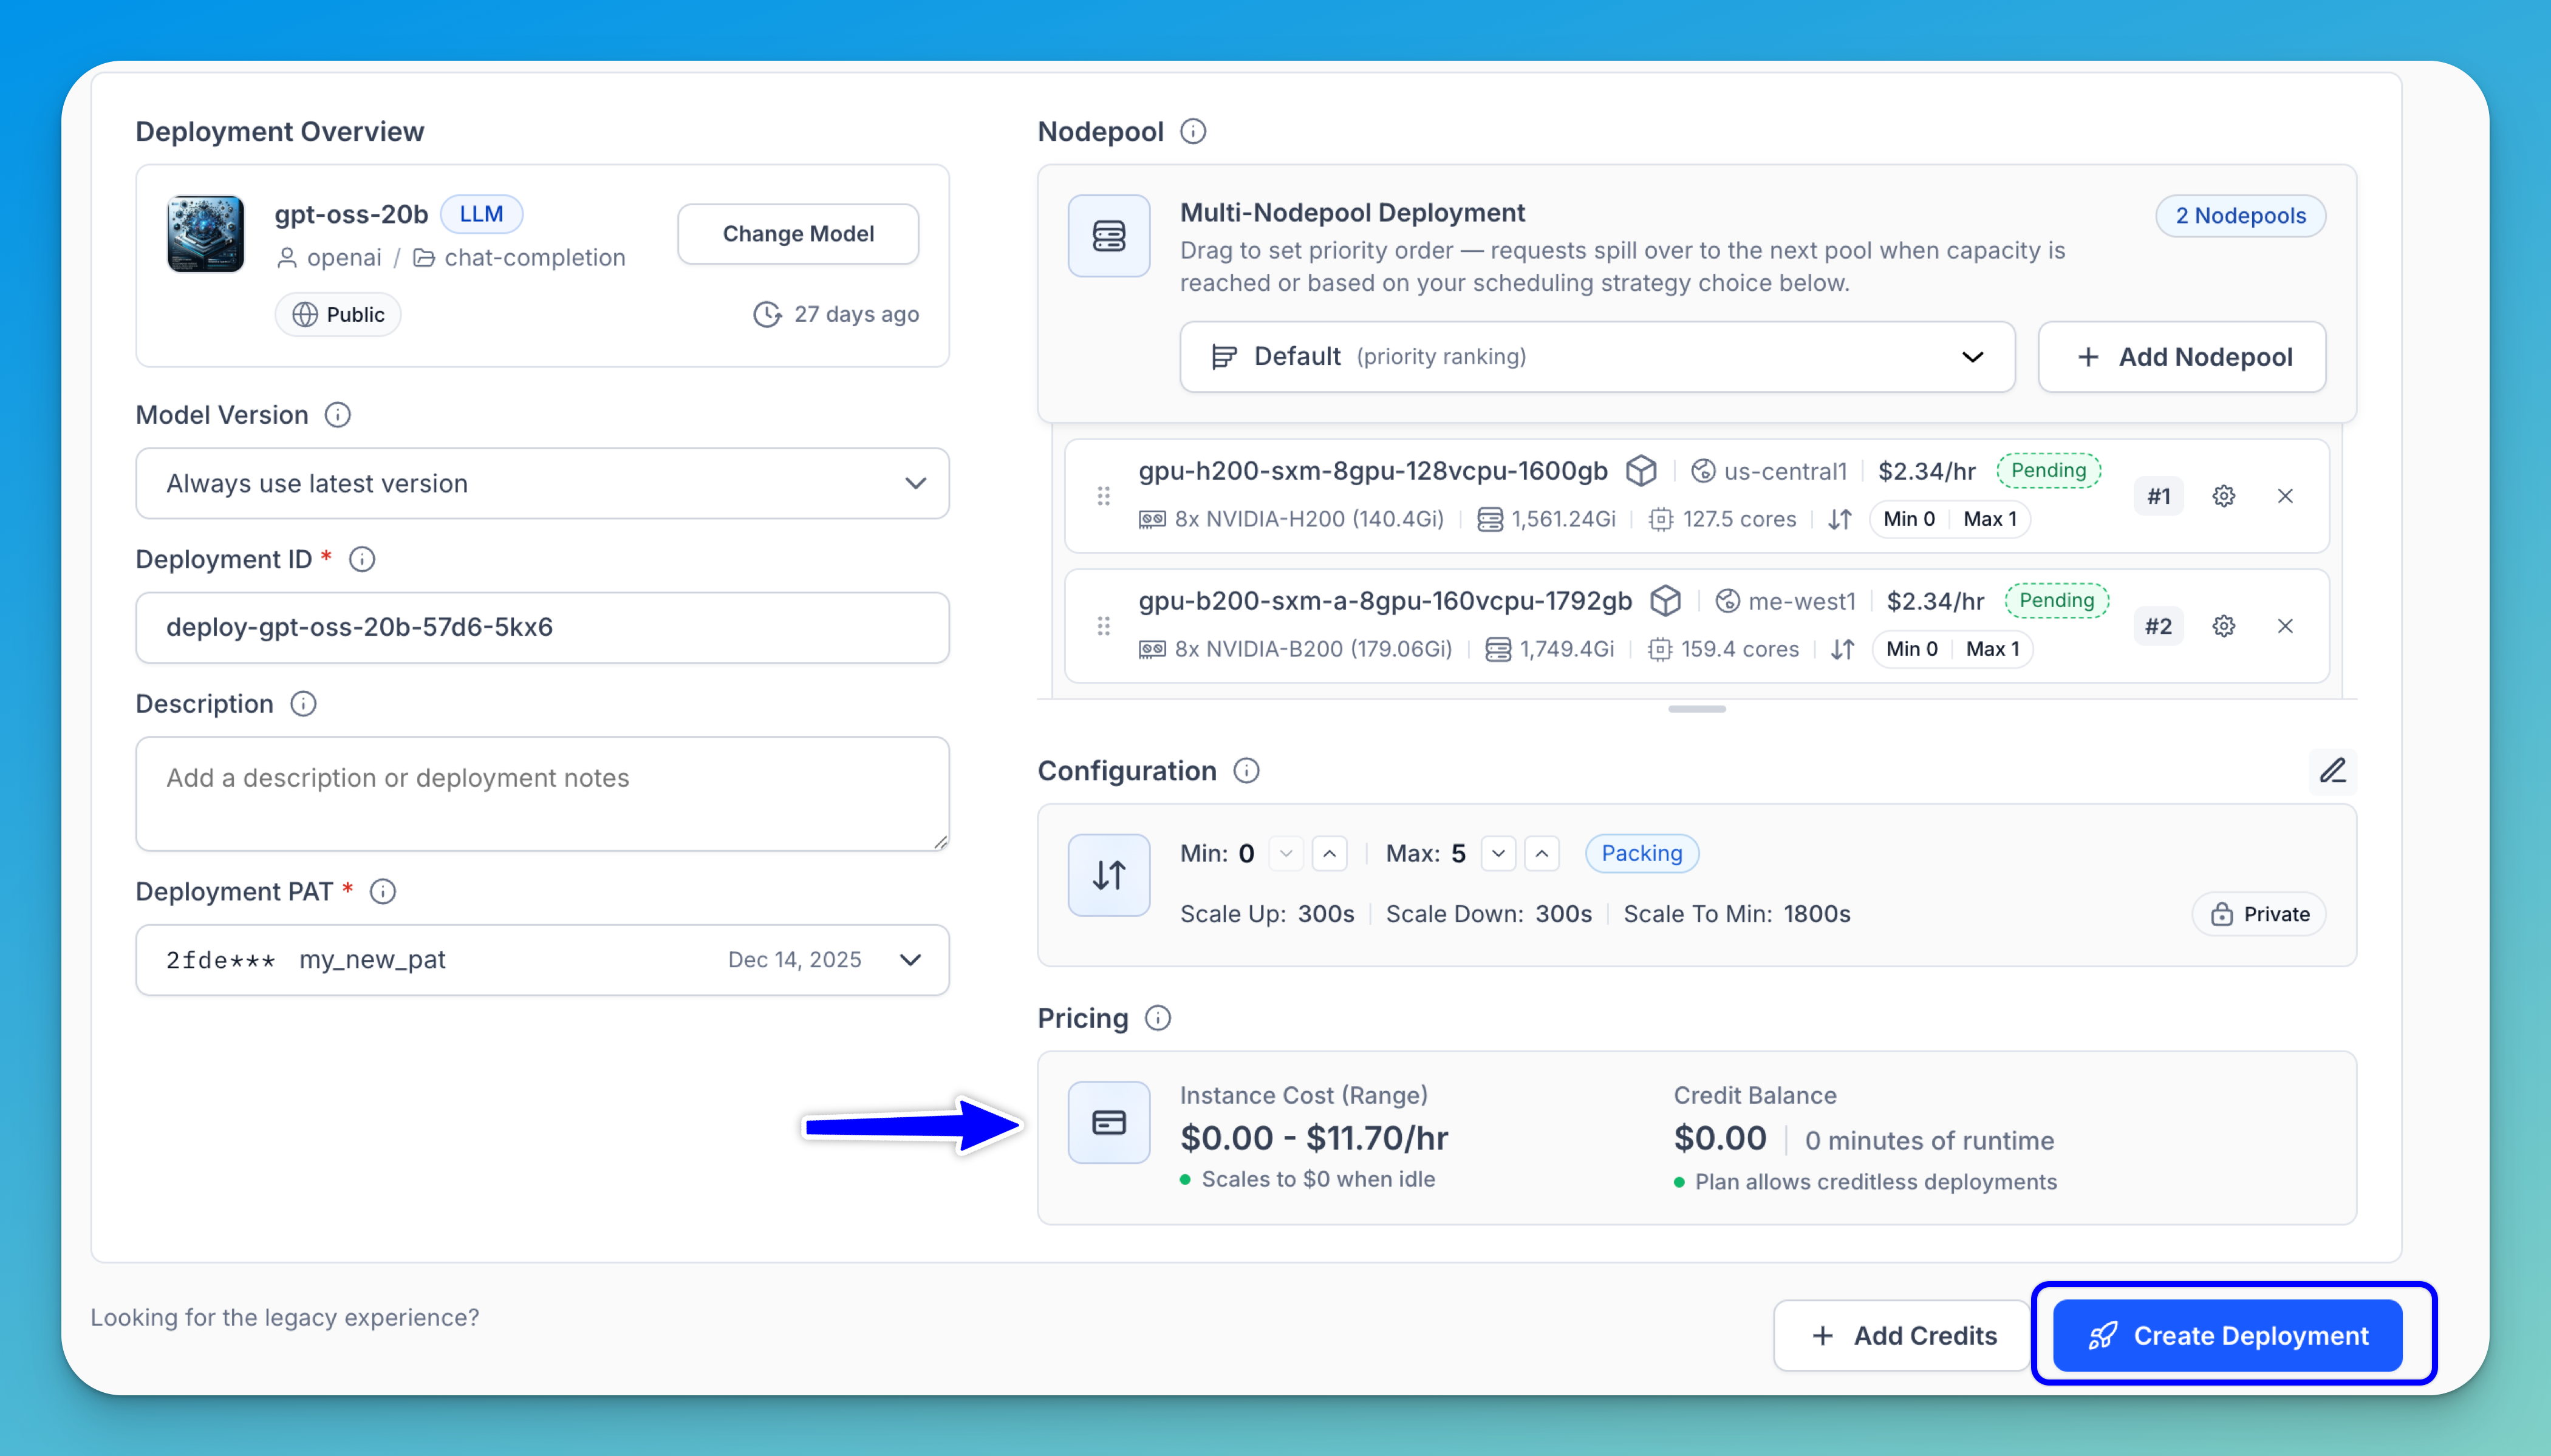
Step 6: Create a Deployment
Note: Review the price range displayed on the page to understand the estimated compute cost and credit runway for your deployment configuration. You can also click the Add Credits button to add more credits if needed. Learn more about pricing here.
After completing all the steps, click the Create Deployment button to deploy the model on your configured infrastructure.
Clarifai may send an automated email when a deployment has been running for some time. The email includes the deployment name, its runtime, and a View Deployment link to open the deployment details page. If the deployment is no longer needed, you can scale it down or delete it to avoid unnecessary compute costs.
Step 7: Review Deployment Details
Once the deployment is created, you’ll be redirected to the Deployment details page.
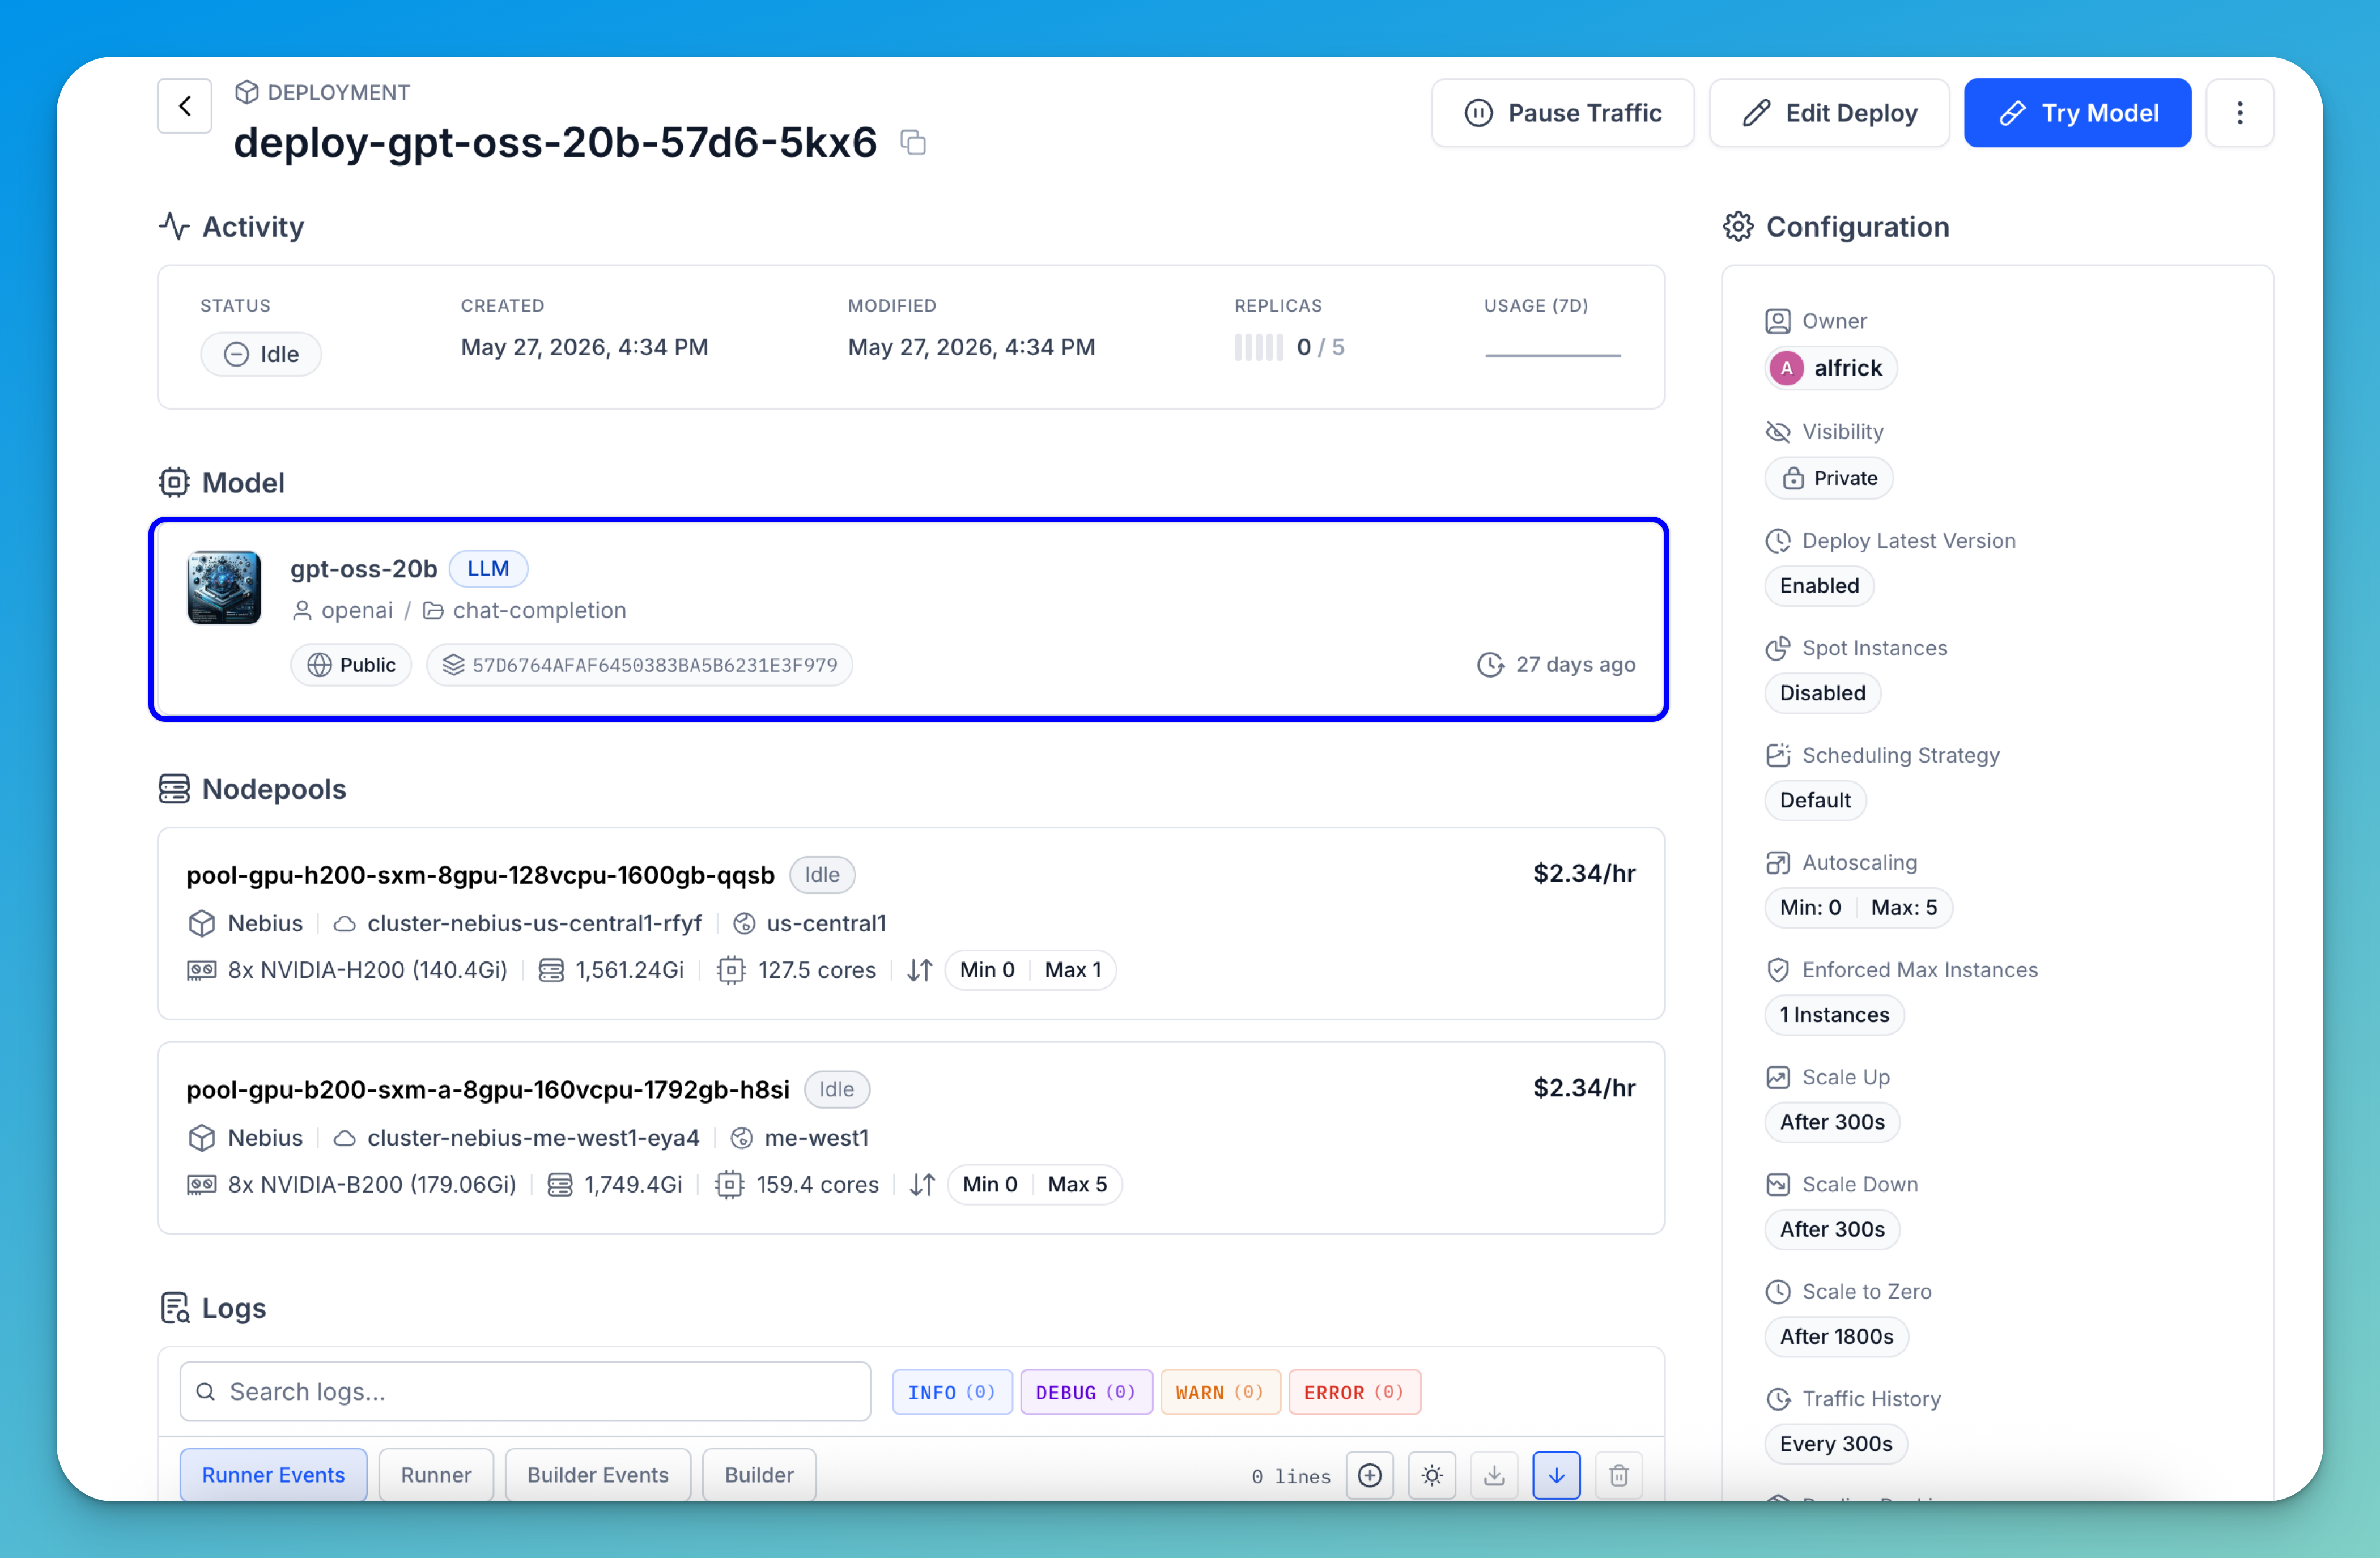
This page provides a comprehensive overview of your deployment, including the following sections:
- Deployment activity — At the top of the page, you can view key activity and status information related to the deployment, including:
- Deployment status, such as Scaling Up, which indicates that the platform is currently provisioning compute resources and starting replicas.
- Created and last modified timestamps.
- Replica indicator — for example,
0 / 5shows the number of active replicas compared to the configured maximum; in this case, no replicas are running yet, but the system is preparing to scale up. - Usage statistics, which display deployment events from audit logs over the past 12 hours.
- Resource — Displays the model or workflow that has been deployed.
- Nodepools — Shows the compute nodepools provisioned to run the deployment, including their hardware configuration and cost.
- Logs — Displays the deployment’s output stream and provides tools for monitoring and troubleshooting. In this section, you can:
- Search logs and filter by
INFO,DEBUG,WARN, andERRORmessages. - Use tabs to monitor different stages of the deployment lifecycle:
- Runner — Shows real-time logs from the running deployment instance, useful for monitoring live behavior and troubleshooting runtime issues.
- Runner Events — Displays system-level events related to the runner, such as instance startup, shutdown, and infrastructure or scheduling events.
- Builder — Shows logs from the build process, such as when the model image is built or packaged for deployment.
- Builder Events — Displays system-level events related to the build process, including build start, completion, or failure.
- Expand or collapse log entries for easier navigation.
- Download logs for offline review or debugging.
- Search logs and filter by
- Deployment management — In the upper-right section of the page, you can manage the deployment using the available controls:
- Edit the deployment configuration
- Try Model to run inference requests
- Open the three-dot menu to delete the deployment
- Configuration settings — Shows the deployment configuration, including scaling behavior, scheduling strategy, visibility, and other operational settings that determine how workloads are handled.
If you’d like to follow the guide for creating a deployment via the UI using the legacy experience, click here.
Via the CLI
The Clarifai CLI provides a one-command deployment workflow that handles all infrastructure creation automatically. No need to manually create clusters or nodepools first.
One-Command Deploy
Deploy a local model directory to the cloud in a single step:
- CLI
clarifai model deploy ./my-model --instance g5.xlarge
This uploads your model, creates a compute cluster and nodepool, deploys the model, and monitors until it's ready.
Deploy an Already-Uploaded Model
If your model is already uploaded to Clarifai, deploy it by URL:
- CLI
clarifai model deploy --model-url https://clarifai.com/user/app/models/my-model --instance g5.xlarge
Browse Available Instances
View all available hardware configurations using the dedicated list-instances command:
- CLI
# List all available instances
clarifai list-instances

# Filter by cloud provider
clarifai list-instances --cloud aws

# Filter by GPU type
clarifai list-instances --gpu L40S

# Or use the deploy flag shortcut
clarifai model deploy --instance-info
clarifai model deploy --instance-info --cloud aws
Override Instance Type
If your config.yaml already has a compute.instance value (auto-selected during model init), you can override it at deploy time. The --instance flag always takes priority over the config:
- CLI
# config.yaml has compute.instance: g5.xlarge, but deploy with a larger GPU
clarifai model deploy ./my-model --instance g6e.2xlarge
Autoscaling
Control how your deployment scales:
- CLI
clarifai model deploy ./my-model --instance g5.xlarge --min-replicas 2 --max-replicas 10
Lifecycle Management
After deployment, use these commands to manage it:
# Check status
clarifai model status --deployment <deployment-id>

# Stream logs
clarifai model logs --deployment <deployment-id>

# Remove deployment
clarifai model undeploy --deployment <deployment-id>
For the full options reference, see the CLI Reference.
Via the API
Create a Deployment
To deploy a model within a nodepool you've created, provide the deployment_id and config_filepath parameters to the create_deployment method of the Nodepool class.
You can learn how to create the deployment_config.yaml file, which contains the deployment configuration details, here.
Note: If you're creating a multi-nodepool deployment using the Python SDK, initializing the
Nodepoolinstance with the first nodepool only is sufficient.
- Python SDK
- cURL
from clarifai.client.nodepool import Nodepool

# Set PAT as an environment variable
#   export CLARIFAI_PAT=YOUR_PAT_HERE # Unix-Like Systems
#   set CLARIFAI_PAT=YOUR_PAT_HERE  # Windows

# Initialize the Nodepool instance
nodepool = Nodepool(
    user_id="YOUR_USER_ID_HERE",
    nodepool_id="test-nodepool"
)

# Create a new deployment
deployment = nodepool.create_deployment(
    deployment_id="test-deployment",
    config_filepath="./configs/deployment_config.yaml"
)
curl -X POST "https://api.clarifai.com/v2/users/YOUR_USER_ID_HERE/deployments/" \
  -H "Authorization: Key YOUR_PAT_HERE" \
  -H "Content-Type: application/json" \
  -d '{
    "deployments": [
      {
        "id": "test-deployment",
        "description": "test deployment",
        "user_id": "YOUR_USER_ID_HERE",
        "autoscale_config": {
          "min_replicas": 1,
          "max_replicas": 20,
          "traffic_history_seconds": 100,
          "scale_down_delay_seconds": 30,
          "scale_to_zero_delay_seconds": 30,
          "scale_up_delay_seconds": 30,
          "disable_packing": false
        },
        "worker": {
          "model": {
            "id": "Llama-3_2-3B-Instruct",
            "model_version": {
              "id": "fe271b43266a45a5b068766b6437687f"
            },
            "user_id": "meta",
            "app_id": "Llama-3"
          }
        },
        "scheduling_choice": 4,
        "nodepools": [
          {
            "id": "test-nodepool",
            "compute_cluster": {
              "id": "test-compute-cluster",
              "user_id": "YOUR_USER_ID"
            }
          }
        ],
        "visibility": {
          "gettable": 10
        }
      }
    ]
  }'
Example Output
[INFO] 14:45:29.871319 Deployment with ID 'test-deployment' is created:
code: SUCCESS
description: "Ok"
req_id: "sdk-python-11.7.5-1eb407b9e125478287d552fb76bc37dd"
After creating it, initialize the Deployment class by providing the user_id and deployment_id parameters.
- Python SDK
from clarifai.client.deployment import Deployment

# Initialize the deployment
deployment = Deployment(
    user_id="YOUR_USER_ID_HERE",
    deployment_id="test-deployment"
)
Restrict Deployments
You can specify the type of compute cluster an existing model you own is deployed to. By setting the deploy_restriction value, you can patch a model and define whether it runs on shared or dedicated resources.
These are the values you can set:
0(USAGE_RESTRICTION_NOT_SET) — The default where no explicit restriction is set.1(NO_LIMITS) — The model can be deployed on any kind of compute (shared or dedicated). There are no policy constraints.2(SHARED_COMPUTE_ONLY) — The model can only run on shared compute resources. This is typically cheaper but may have lower isolation or performance guarantees.3(DEDICATED_COMPUTE_ONLY) — The model can only run on dedicated compute resources. This is used when you need guaranteed performance, security isolation, or compliance.
- cURL
curl -X PATCH "https://api.clarifai.com/v2/users/YOUR_USER_ID_HERE/apps/YOUR_APP_ID_HERE/models" \
-H "Authorization: Key YOUR_PAT_HERE" \
-H "Content-Type: application/json" \
-d '{
"models": [
  {
    "id": "YOUR_MODEL_ID_HERE",
    "deploy_restriction": 2
  }
],
"action": "merge"
}'
Example Output
{
    "status": {
        "code": 10000,
        "description": "Ok",
        "req_id": "b6af331eac444e76b88abea88d2d4579"
    },
    "models": [{
        "id": "upload55",
        "name": "upload55",
        "created_at": "2025-08-21T17:05:33.491470Z",
        "modified_at": "2025-09-09T18:36:48.844230Z",
        "app_id": "uploaded-models",
        "model_version": {
            "id": "991d5569b152462aad563cfc24faf477",
            "created_at": "2025-08-21T17:05:34.086694Z",
            "status": {
                "code": 21100,
                "description": "Model is trained and ready for deployment"
            },
            "completed_at": "2025-08-21T17:05:41.982881Z",
            "visibility": {
                "gettable": 10
            },
            "app_id": "uploaded-models",
            "user_id": "alfrick",
            "metadata": {},
            "output_info": {
                "output_config": {
                    "max_concepts": 0,
                    "min_value": 0
                },
                "message": "Show output_info with: GET /models/{model_id}/output_info",
                "fields_map": {},
                "params": {
                    "max_tokens": 512,
                    "secrets": [],
                    "temperature": 1
                }
            },
            "input_info": {
                "fields_map": {}
            },
            "train_info": {},
            "import_info": {},
            "inference_compute_info": {
                "cpu_limit": "1",
                "cpu_memory": "13Gi",
                "cpu_requests": "1",
                "cpu_memory_requests": "2Gi",
                "num_accelerators": 1,
                "accelerator_memory": "15Gi",
                "accelerator_type": ["NVIDIA-*"]
            },
            "method_signatures": [{
                "name": "generate",
                "method_type": 2,
                "description": "This method streams multiple outputs instead of returning just one.\nIt takes an input string and yields a sequence of outputs.",
                "input_fields": [{
                    "name": "text1",
                    "type": 1
                }],
                "output_fields": [{
                    "name": "return",
                    "type": 1,
                    "iterator": true
                }]
            }]
        },
        "user_id": "alfrick",
        "model_type_id": "text-to-text",
        "visibility": {
            "gettable": 10
        },
        "metadata": {},
        "presets": {},
        "toolkits": [],
        "use_cases": [],
        "languages": [],
        "languages_full": [],
        "check_consents": [],
        "workflow_recommended": false,
        "featured_order": 0,
        "deploy_restriction": 2,
        "open_router_info": {
            "params": {}
        }
    }]
}