OpenHands
Run inference with Clarifai models locally using OpenHands
OpenHands is an AI-powered code assistance framework designed to streamline development by harnessing the flexibility of large language models (LLMs).
Let's walk through how to run inference with Clarifai models locally using OpenHands, while leveraging its intelligent assistance to boost your productivity.
Step 1: Perform Prerequisites
-
Get a PAT (Personal Access Token) key — To use OpenHands with Clarifai models, you need a PAT for authentication. Log in or sign up for a Clarifai account, then go to Settings in the collapsible left sidebar and select Secrets. From there, you can create a new token or copy an existing one to use with your requests.
-
Get a model — Clarifai's Community platform offers a wide selection of cutting-edge language models that you can run using OpenHands. Browse the platform to find a model that best fits your use case. For this example, we'll use the GPT-OSS-120B model.
-
Install Docker Desktop — OpenHands runs inside a Docker container, so you’ll need Docker installed and running on your system. You can download and install Docker Desktop for your operating system from the official Docker website. Be sure to follow the installation steps specific to your OS (Windows, macOS, or Linux).
-
Get a GitHub token — If you want to integrate OpenHands with GitHub, you’ll need a personal access token for authentication. You can follow GitHub’s documentation to generate one.
Step 2: Run OpenHands Locally
Option A: CLI Launcher (Recommended)
The simplest way to run OpenHands locally is by using the CLI launcher with the uv package manager. This approach provides better isolation from your existing project’s virtual environment and is needed for OpenHands’ default MCP servers.
If you don’t already have uv installed, follow the official uv installation guide for the latest instructions for your platform.
Then, use either of the following commands to launch OpenHands.
Launch by starting the GUI server:
uvx --python 3.12 openhands serve
Or, start in CLI mode:
uvx --python 3.12 openhands
Example Output
uvx --python 3.12 openhands serve
Installed 164 packages in 450ms
🚀 Launching OpenHands GUI server...

Pulling required Docker images...
Running Docker command: docker pull docker.openhands.dev/openhands/runtime:latest-nikolaik
latest-nikolaik: Pulling from openhands/runtime
Digest: sha256:95fc4d8e753f41d34cd564e78d3d64217c5d22296ea1cb7bf92614c8198de8f5
Status: Image is up to date for docker.openhands.dev/openhands/runtime:latest-nikolaik
docker.openhands.dev/openhands/runtime:latest-nikolaik

✅ Starting OpenHands GUI server...
The server will be available at: http://localhost:3000
Press Ctrl+C to stop the server.

Running Docker command: docker run -it --rm --pull=always -e SANDBOX_RUNTIME_CONTAINER_IMAGE=docker.openhands.dev/openhands/runtime:latest-nikolaik -e LOG_ALL_EVENTS=true -v /var/run/docker.sock:/var/run/docker.sock -v /Users/macbookpro/.openhands:/.openhands -p 3000:3000 --add-host host.docker.internal:host-gateway --name openhands-app docker.openhands.dev/openhands/openhands:latest
latest: Pulling from openhands/openhands
Digest: sha256:87c868e4f89ee453bf2ac57f89c71af2619c6d85b05748635b9da78254092d13
Status: Image is up to date for docker.openhands.dev/openhands/openhands:latest
Starting OpenHands...
Running OpenHands as root
18:07:28 - openhands:INFO: utils.py:152 - config.toml not found: [Errno 2] No such file or directory: 'config.toml'. Toml values have not been applied.
18:07:28 - openhands:INFO: server_config.py:55 - Using config class None
/app/.venv/lib/python3.13/site-packages/fastmcp/server/server.py:255: DeprecationWarning: Providing `stateless_http` when creating a server is deprecated. Provide it when calling `run` or as a global setting instead.
  self._handle_deprecated_settings(
INFO:     Started server process [8]
INFO:     Waiting for application startup.
INFO:mcp.server.streamable_http_manager:StreamableHTTP session manager started
INFO:alembic.runtime.migration:Context impl SQLiteImpl.
INFO:alembic.runtime.migration:Will assume non-transactional DDL.
INFO:alembic.runtime.migration:Running upgrade  -> 001, Sync DB with Models
INFO:alembic.runtime.migration:Running upgrade 001 -> 002, Sync DB with Models
INFO:     Application startup complete.
INFO:     Uvicorn running on http://0.0.0.0:3000 (Press CTRL+C to quit)
INFO:     192.168.65.1:18305 - "GET /getting-started/upload-model HTTP/1.1" 200 OK
INFO:     192.168.65.1:18305 - "GET /favicon.ico HTTP/1.1" 200 OK
INFO:     192.168.65.1:47254 - "GET /locales/en/translation.json HTTP/1.1" 200 OK
INFO:     192.168.65.1:47254 - "GET /api/options/config HTTP/1.1" 200 OK
INFO:     192.168.65.1:47254 - "GET /getting-started/upload-model HTTP/1.1" 200 OK
INFO:     192.168.65.1:47254 - "GET /favicon.ico HTTP/1.1" 200 OK
INFO:     192.168.65.1:18305 - "GET /locales/en/translation.json HTTP/1.1" 200 OK
INFO:     192.168.65.1:18305 - "GET /api/options/config HTTP/1.1" 200 OK
INFO:     192.168.65.1:18305 - "GET / HTTP/1.1" 200 OK
INFO:     192.168.65.1:18305 - "GET /locales/en/translation.json HTTP/1.1" 200 OK
INFO:     192.168.65.1:18305 - "GET /api/options/config HTTP/1.1" 200 OK
INFO:     192.168.65.1:18305 - "GET /api/options/config HTTP/1.1" 200 OK
18:08:27 - openhands:INFO: utils.py:152 - config.toml not found: [Errno 2] No such file or directory: 'config.toml'. Toml values have not been applied.
INFO:     192.168.65.1:18305 - "GET /api/settings HTTP/1.1" 200 OK
INFO:     192.168.65.1:47254 - "GET /api/conversations?limit=10 HTTP/1.1" 200 OK
INFO:     192.168.65.1:21619 - "GET /api/options/config HTTP/1.1" 200 OK
18:20:37 - openhands:INFO: utils.py:152 - config.toml not found: [Errno 2] No such file or directory: 'config.toml'. Toml values have not been applied.
INFO:     192.168.65.1:23329 - "GET /api/settings HTTP/1.1" 200 OK
INFO:     192.168.65.1:25938 - "GET /api/conversations?limit=10 HTTP/1.1" 200 OK
INFO:     192.168.65.1:32313 - "GET /api/options/config HTTP/1.1" 200 OK
18:33:48 - openhands:INFO: utils.py:152 - config.toml not found: [Errno 2] No such file or directory: 'config.toml'. Toml values have not been applied.
INFO:     192.168.65.1:33289 - "GET /api/settings HTTP/1.1" 200 OK
INFO:     192.168.65.1:25732 - "GET /api/conversations?limit=10 HTTP/1.1" 200 OK
INFO:     192.168.65.1:46086 - "GET /api/conversations?limit=10 HTTP/1.1" 200 OK
Option B: Docker
You can also run OpenHands using Docker.
Note that OpenHands uses a dedicated Docker image to provide a sandboxed execution environment. Pulling this image ahead of time from the All-Hands AI Docker registry can speed up the initial startup process.
Note: Always check the official OpenHands documentation for the latest recommended image tag, as it may change over time.
- CLI
docker pull docker.openhands.dev/openhands/runtime:0.62-nikolaik
Next, start OpenHands using the following comprehensive docker run command.
Note: This command works best in Linux or macOS environments, where Docker supports native Linux-style paths. If you're using Windows, you'll need to modify the volume mount paths and run the command within a WSL2 (Linux) shell for proper compatibility.
- CLI
docker run -it --rm --pull=always \
    -e SANDBOX_RUNTIME_CONTAINER_IMAGE=docker.openhands.dev/openhands/runtime:0.62-nikolaik \
    -e LOG_ALL_EVENTS=true \
    -v /var/run/docker.sock:/var/run/docker.sock \
    -v ~/.openhands:/.openhands \
    -p 3000:3000 \
    --add-host host.docker.internal:host-gateway \
    --name openhands-app \
    docker.openhands.dev/openhands/openhands:0.62
The above command:
- Launches a new Docker container to run OpenHands.
- Sets environment variables for the runtime image and logging.
- Grants the container access to the Docker engine for sandboxing.
- Maps port 3000 on your computer host to port 3000 in the container. This is how you access the OpenHands web interface or API locally.
- Mounts the
~/.openhandsfolder for persistent user data. - Enables the container to communicate with the host machine.
- Assigns the container the name
openhands-app. - Uses the OpenHands
0.62image from the official registry. - Automatically deletes the container after it exits.
Run OpenHands
After launching OpenHands, monitor the terminal for log output. Once the application finishes its startup process, open your preferred web browser and go to:
http://localhost:3000
At this point, OpenHands is successfully installed and running on your local machine.
Step 3: Connect to an LLM
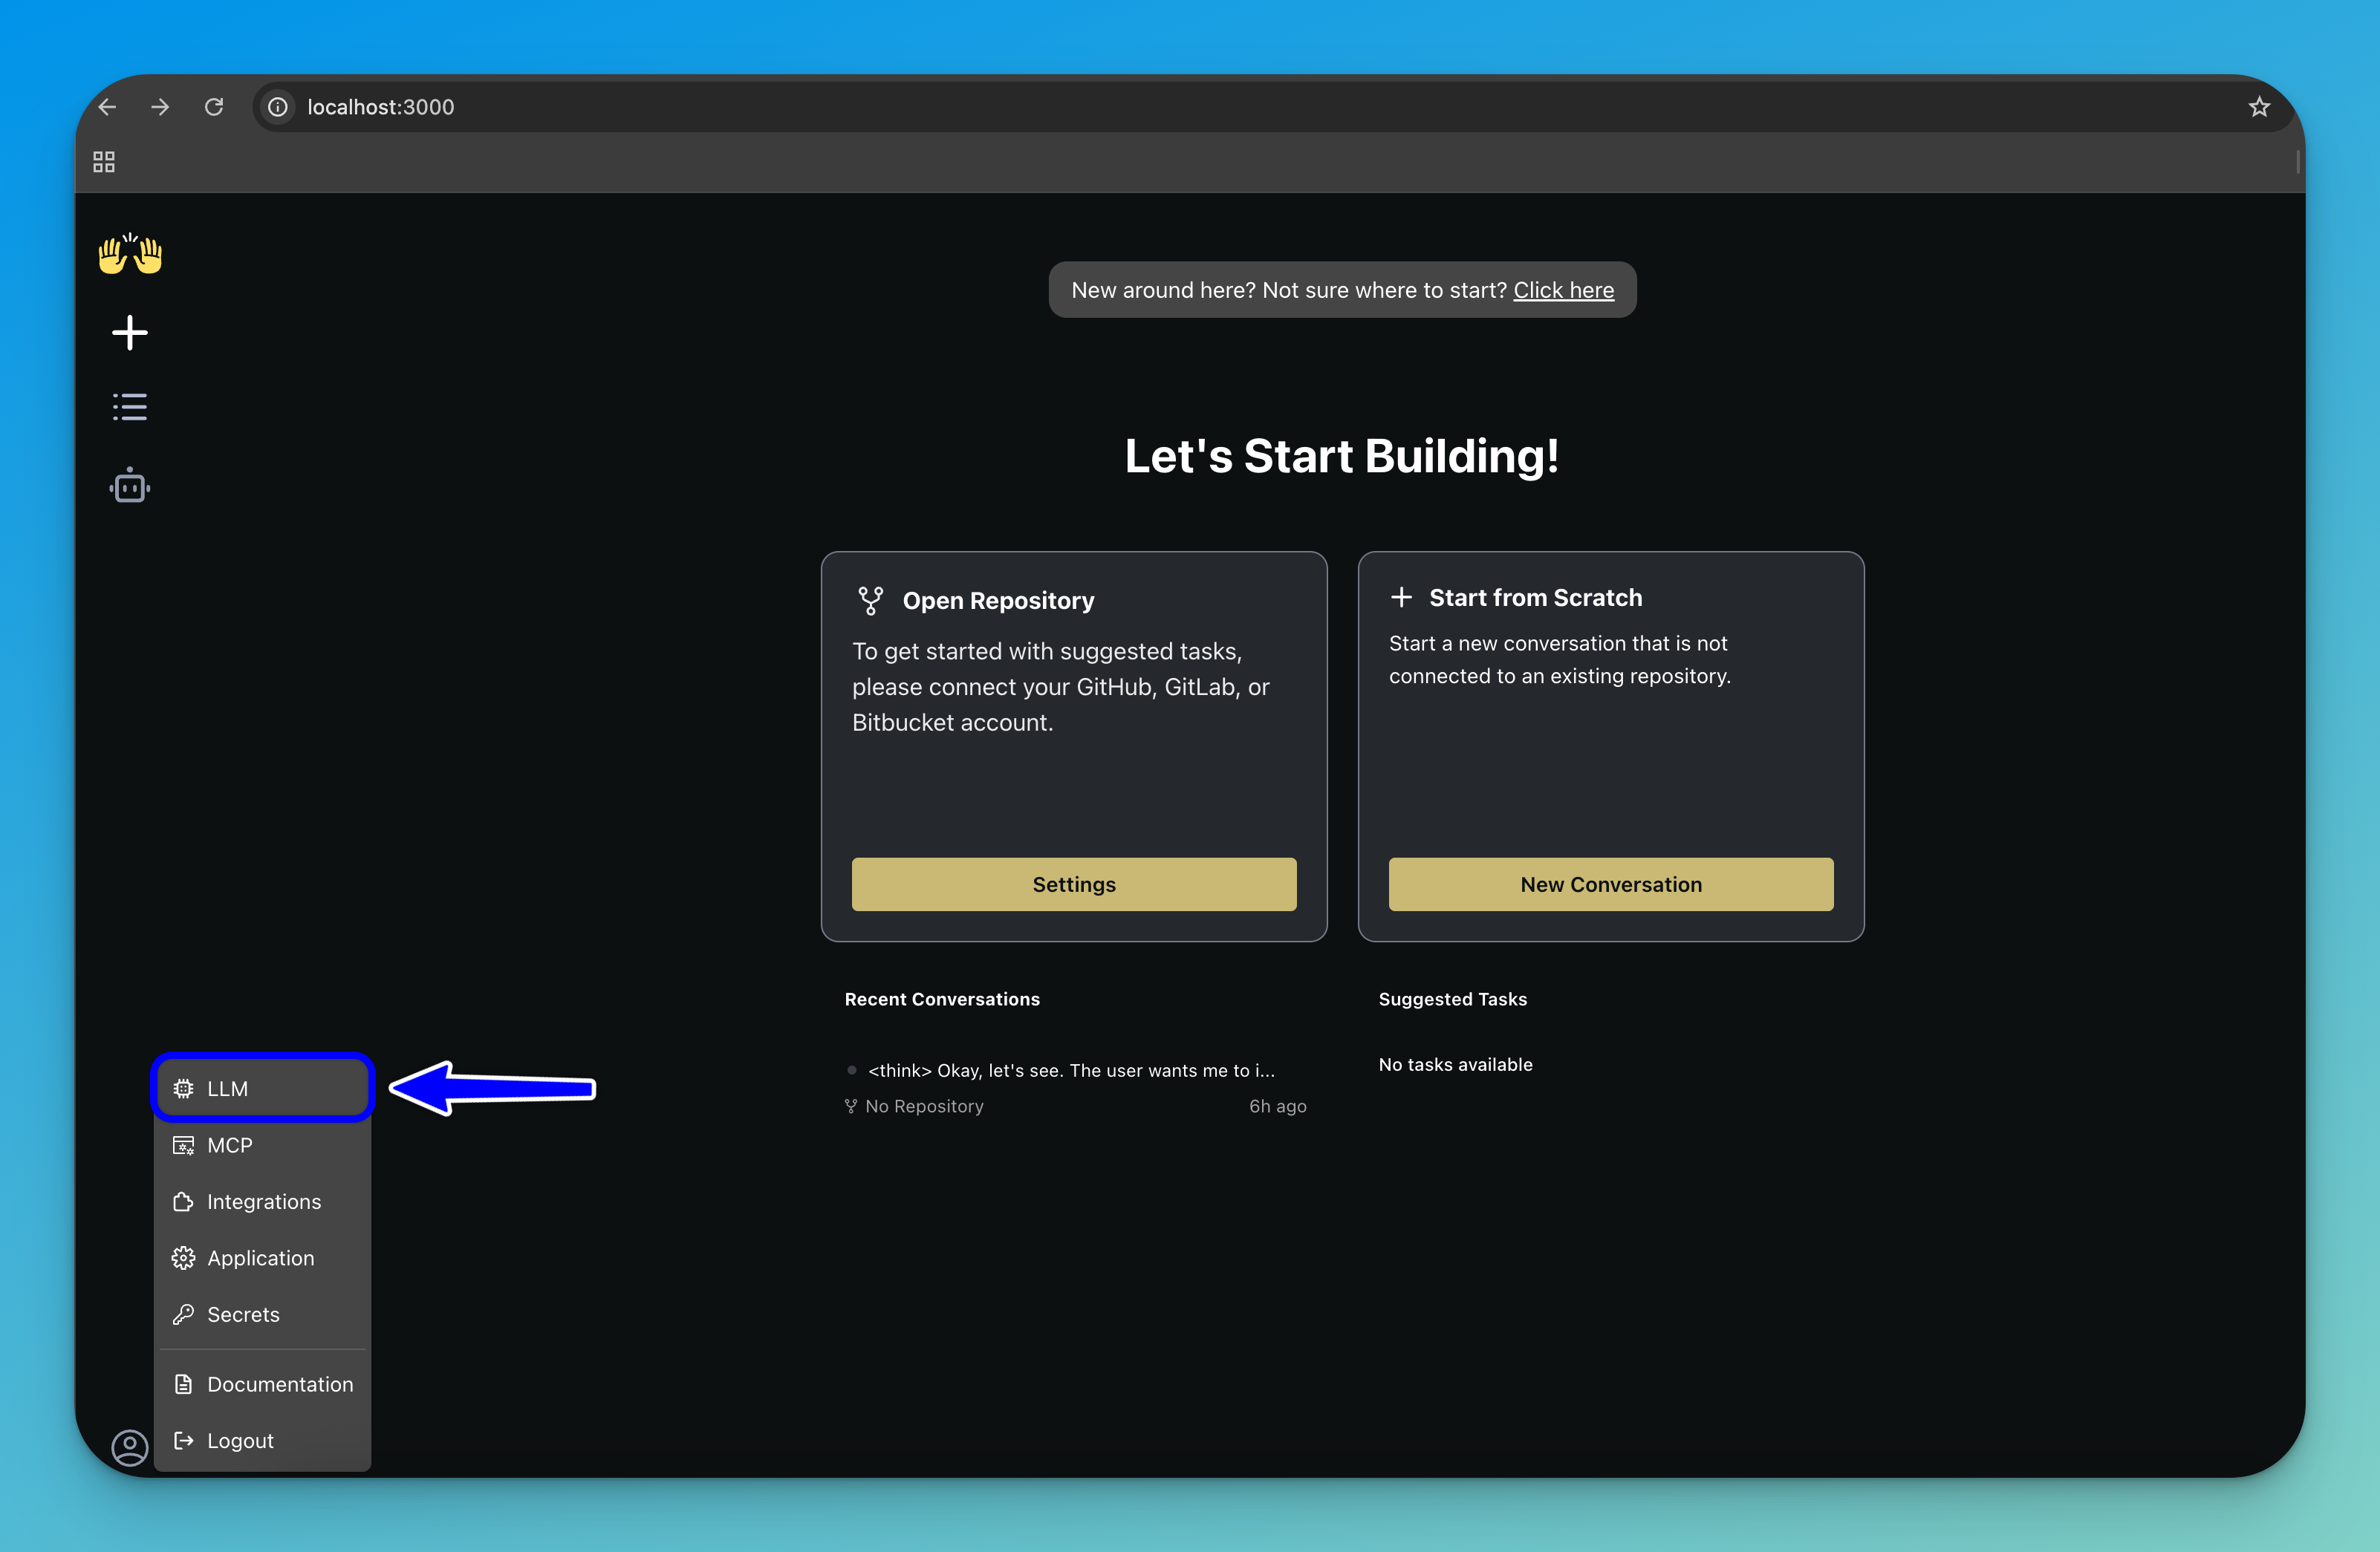
To configure OpenHands to use a Clarifai model as its cognitive engine, click the settings icon in the bottom-left corner of the sidebar.
In the menu that appears, select LLM to open the LLM configuration panel.
Here, you can set up the large language model that OpenHands will use for reasoning and task execution.

Fill in the following fields:
- LLM Provider — From the list of providers, select
Clarifai. - LLM Model — Choose the Clarifai model you want OpenHands to use.
- API Key — Enter your Clarifai PAT as described earlier.
After filling in the fields, click the Save Changes button in the bottom-right corner of the interface.
To access advanced configuration options, toggle the Advanced switch in the LLM configuration panel.
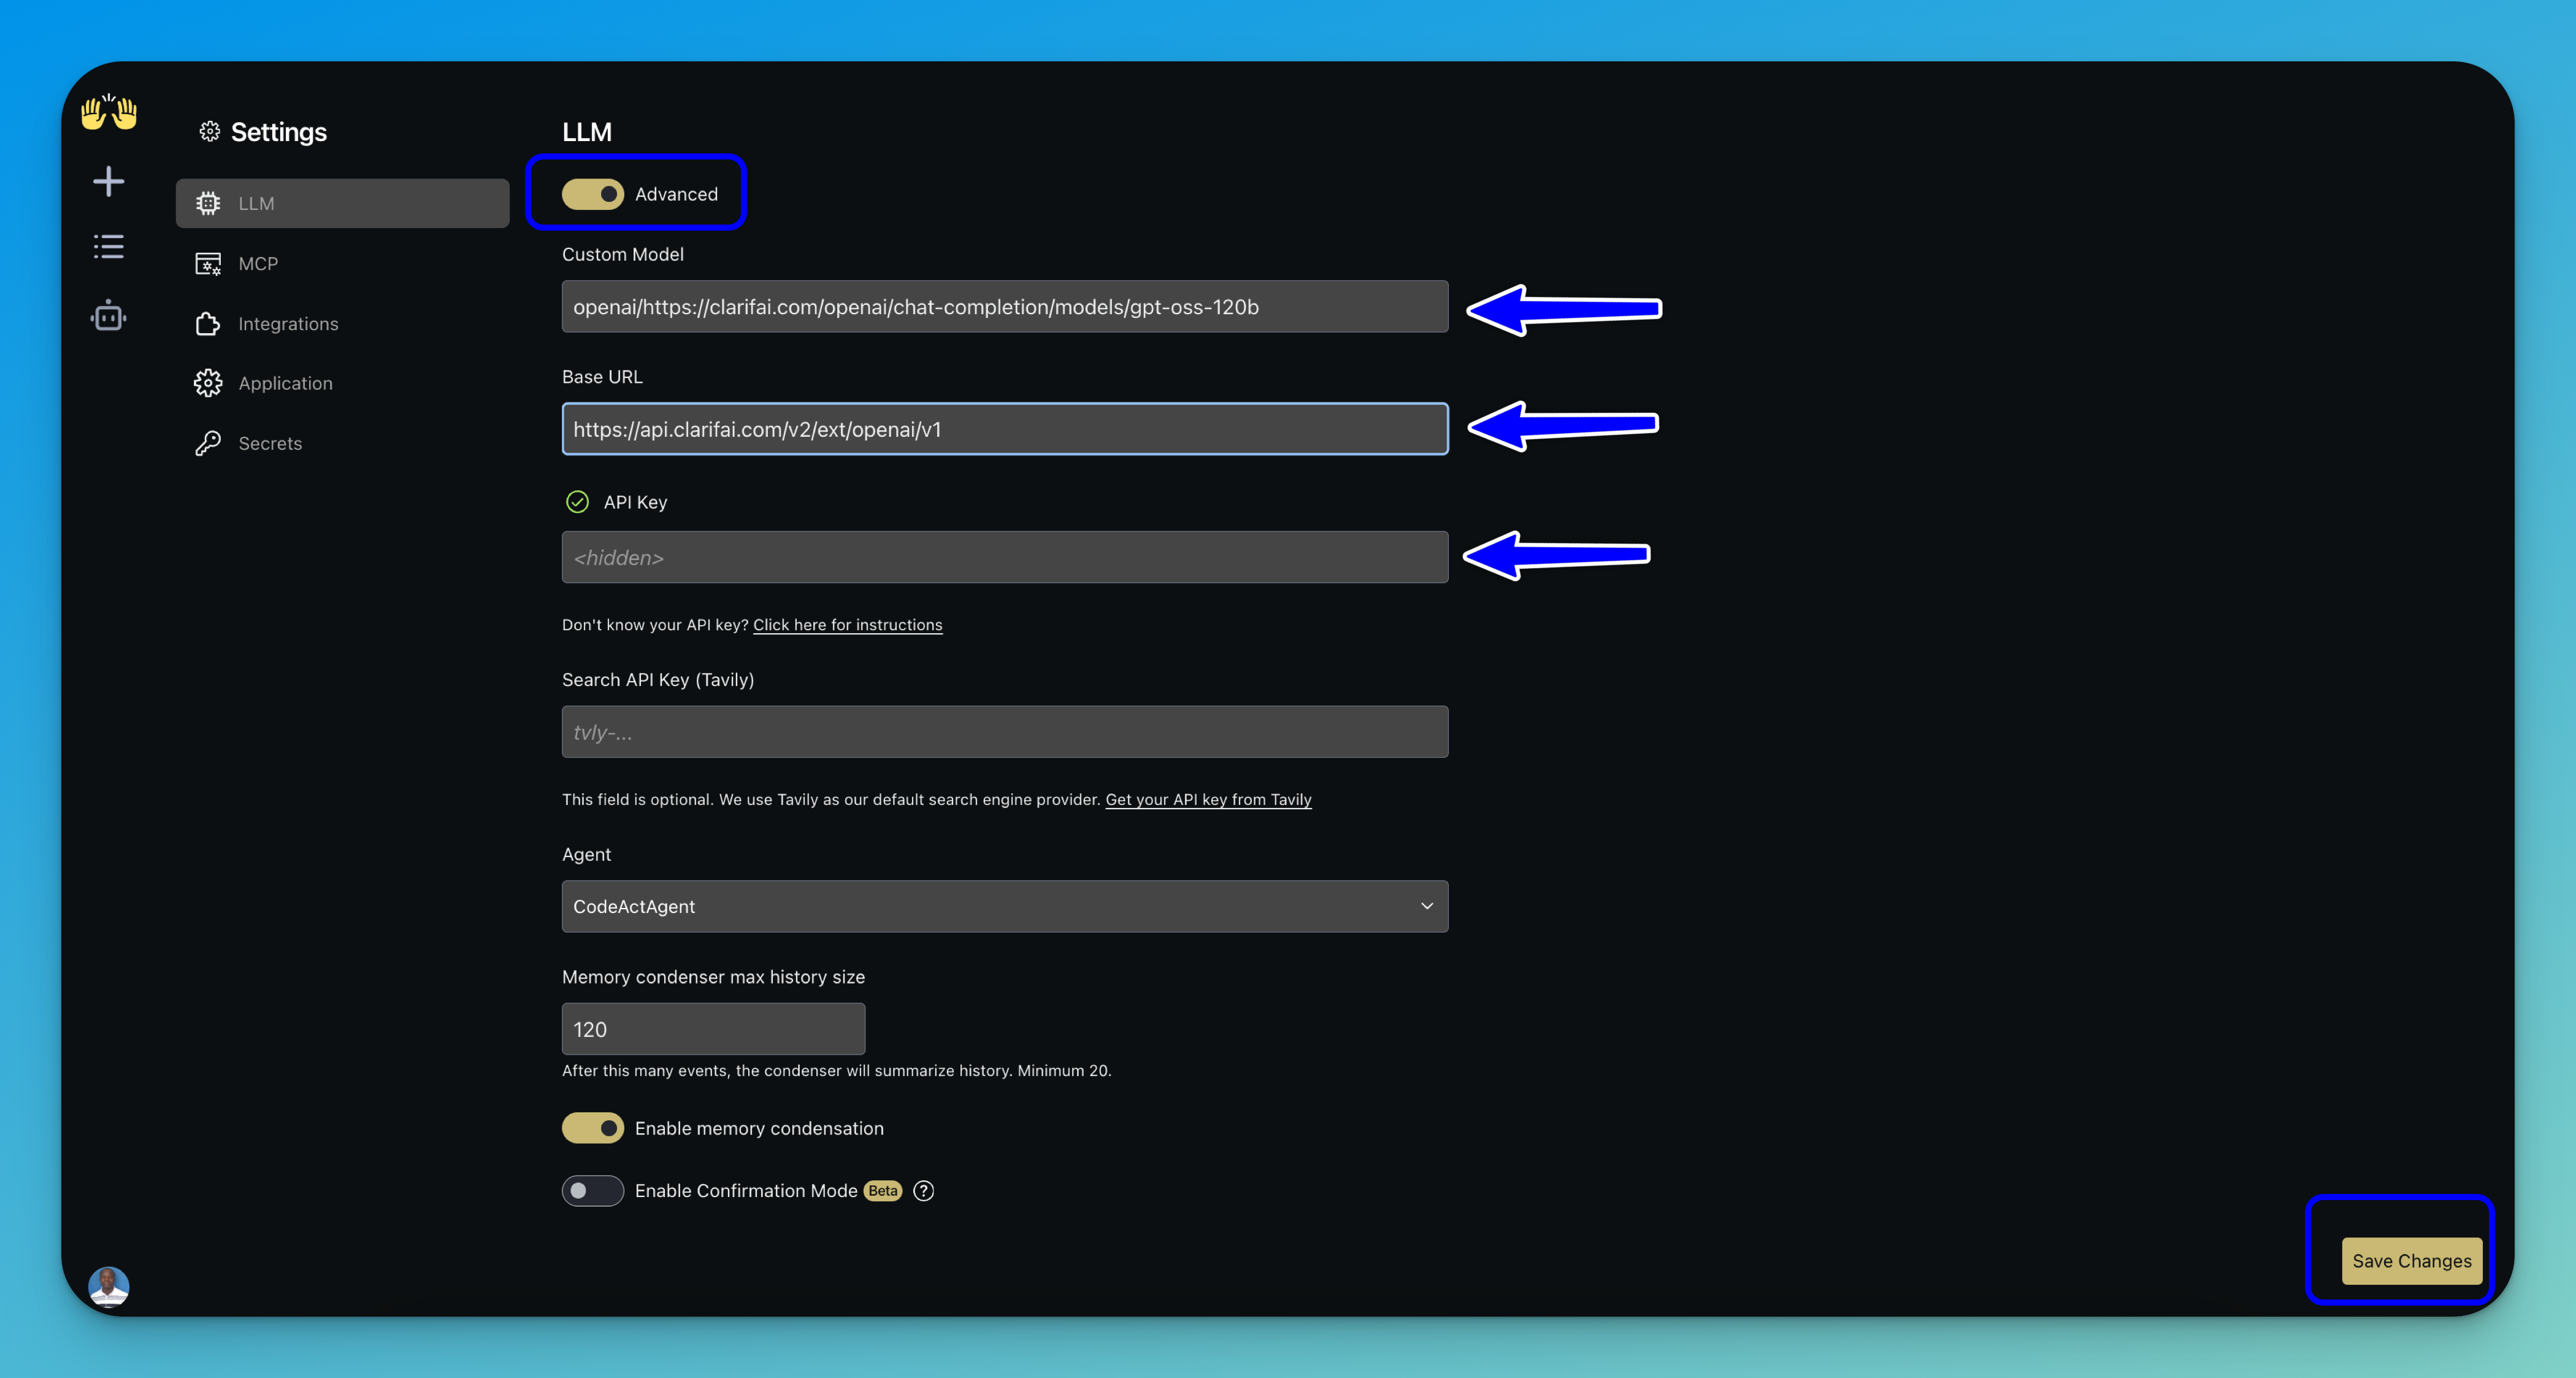
This allows you to specify a custom Clarifai model and adjust additional LLM options. This is helpful when the model you want to use is not available in the basic dropdown selection.
Then, fill in the following fields:
- Custom Model — Enter the Clarifai model URL you want to use. To ensure OpenAI compatibility, prefix the model path with
openai/, followed by the full Clarifai model URL. Here is an example:openai/https://clarifai.com/openai/chat-completion/models/gpt-oss-120b. - Base URL — Enter Clarifai's OpenAI-compatible API endpoint:
https://api.clarifai.com/v2/ext/openai/v1. - API Key — Enter your PAT, as explained earlier.
Note: You can leave all other fields at their default values, including the selected agent, unless you require custom behavior.
After filling in the fields, click the Save Changes button at the bottom-right corner of the interface.
Step 4: Integrate with GitHub
Integrating OpenHands with GitHub allows you to take advantage of version control, repository access, and collaboration features.
To set this up, open the Settings panel and navigate to the Integrations tab. Then, enter your GitHub personal access token in the designated field.
Optionally: If you are using a self-hosted or enterprise instance, you may also provide your GitHub host URL.
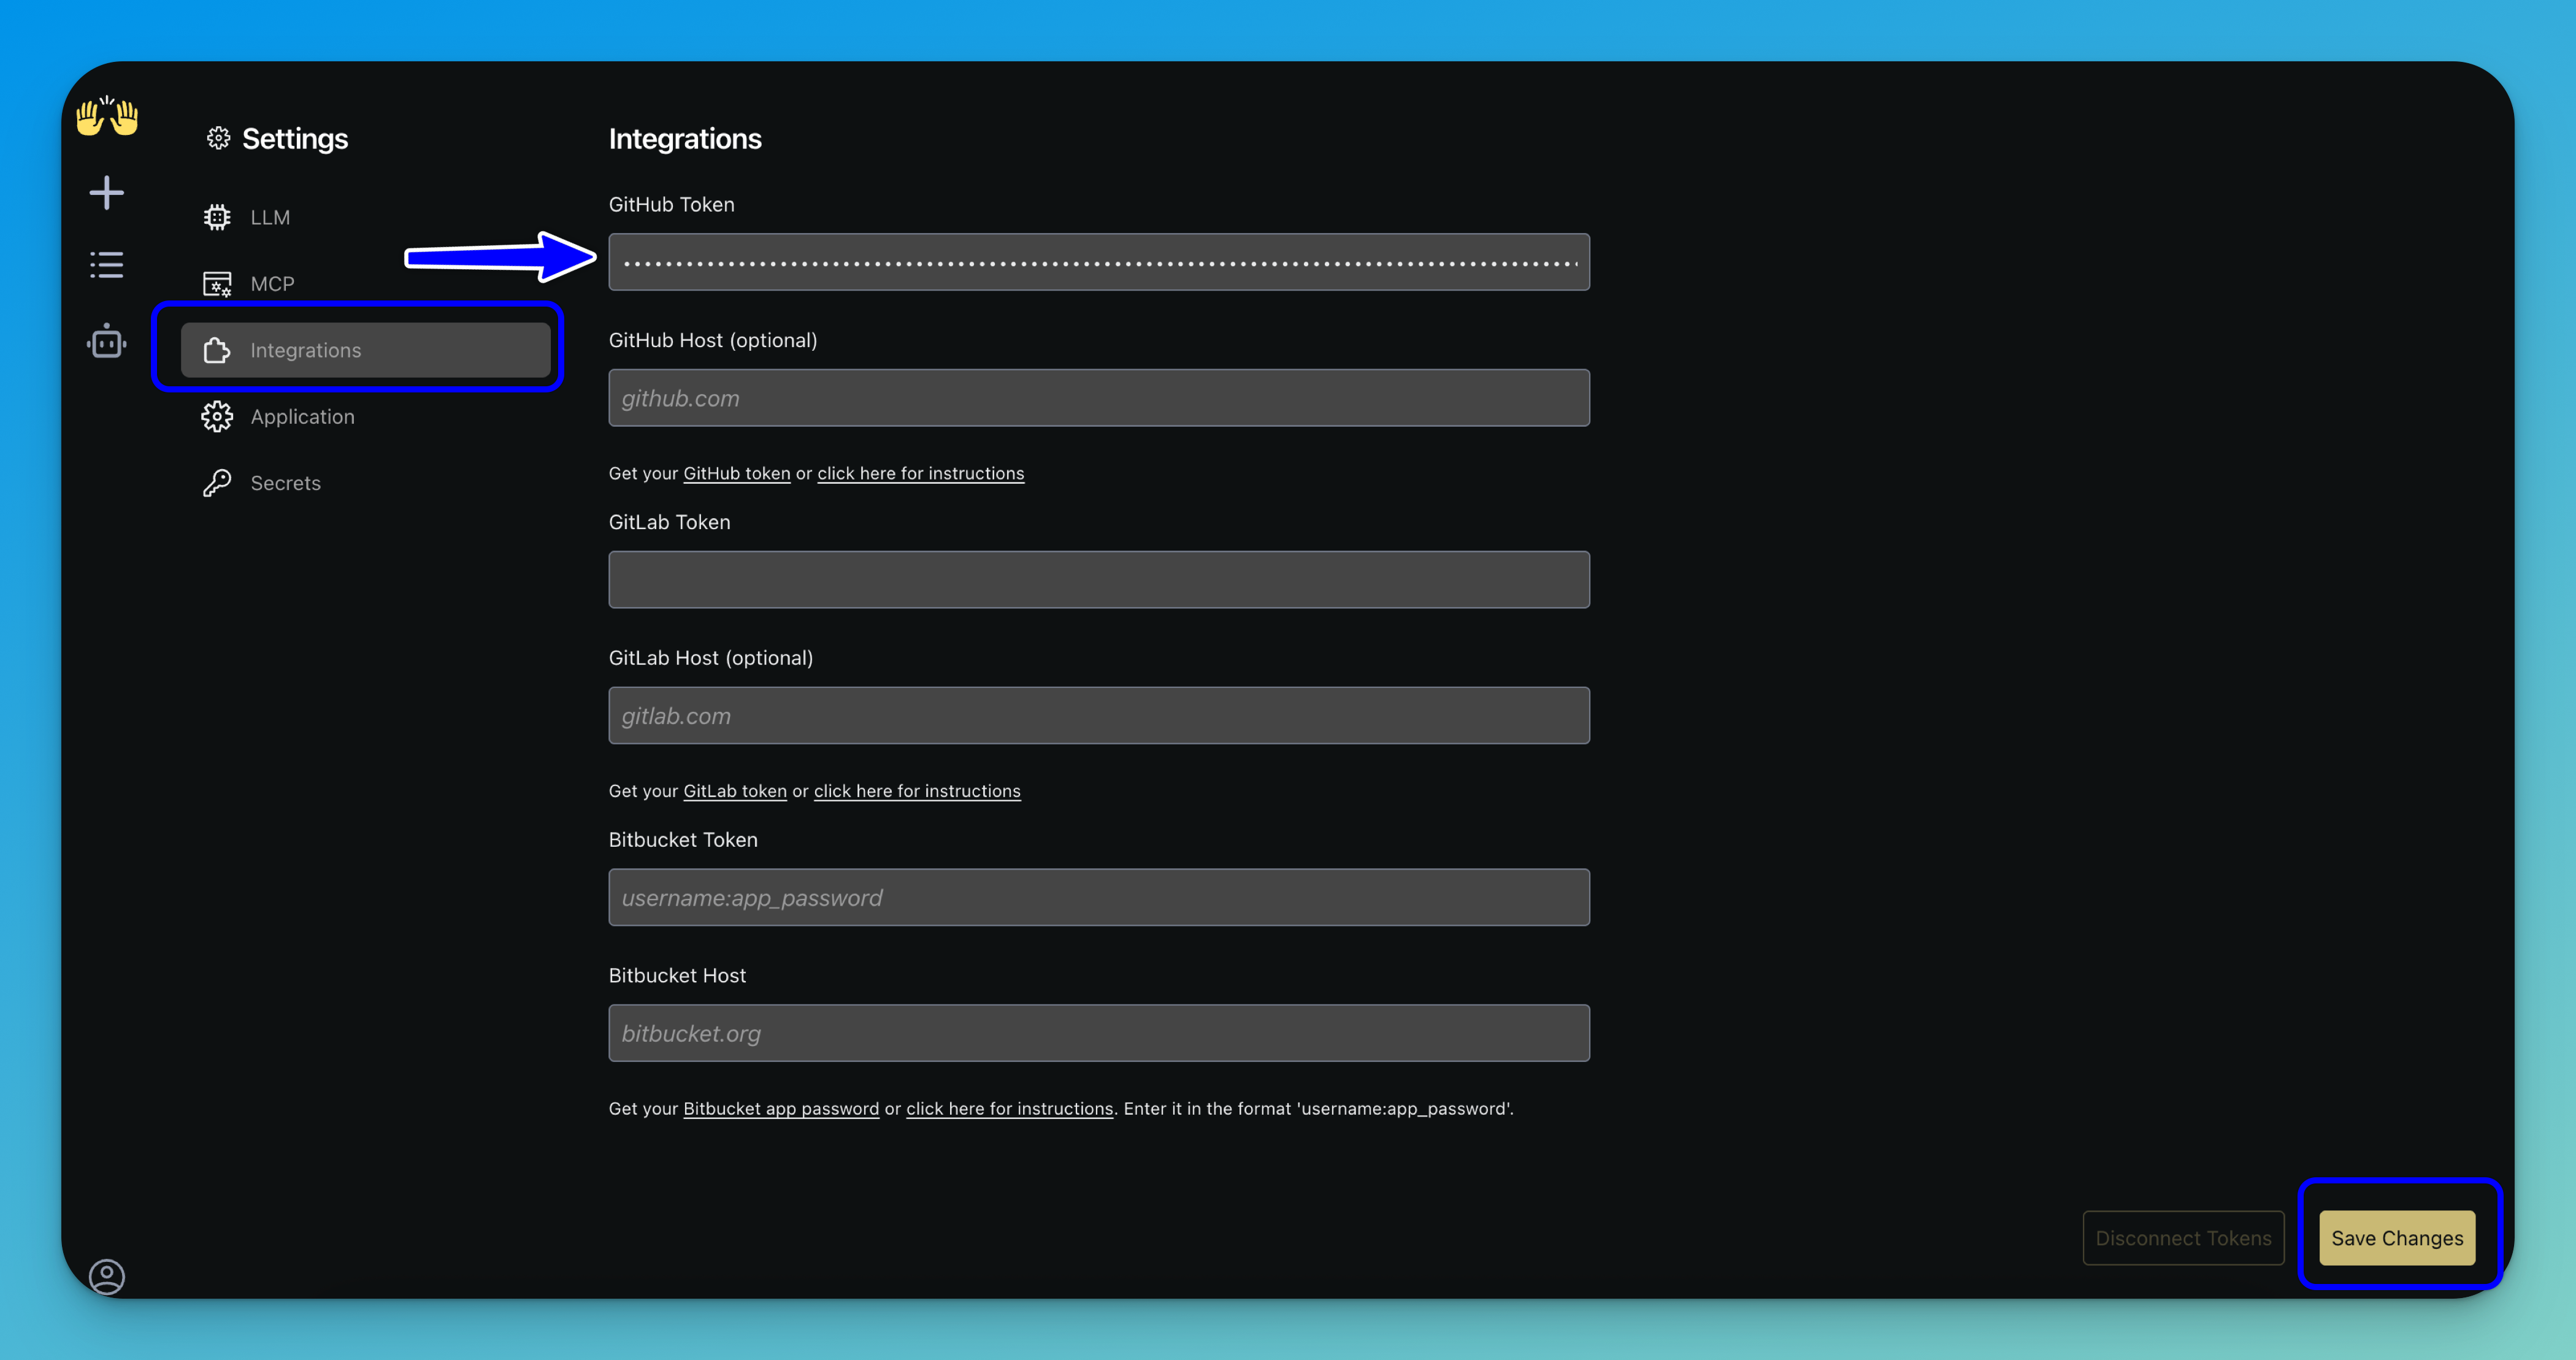
Note: You can also integrate with GitLab or Bitbucket by entering the corresponding token and host details.
Once everything is filled in, click Save Changes in the bottom-right corner to apply your integration settings.
Step 5: Start a Conversation
Next, click the plus (+) Start new conversation button at the top of the sidebar. From there, connect to a repository by selecting the desired repo and its branch.
Once selected, click the Launch button to begin your session.

Tip: You can also start a new conversation from scratch that is not connected to an existing repository.
Step 6: Start Building
In the main interface, use the input field to prompt the agent and begin working on your task. You can continue interacting with the agent to refine the results, extend the functionality, or troubleshoot issues as they arise.
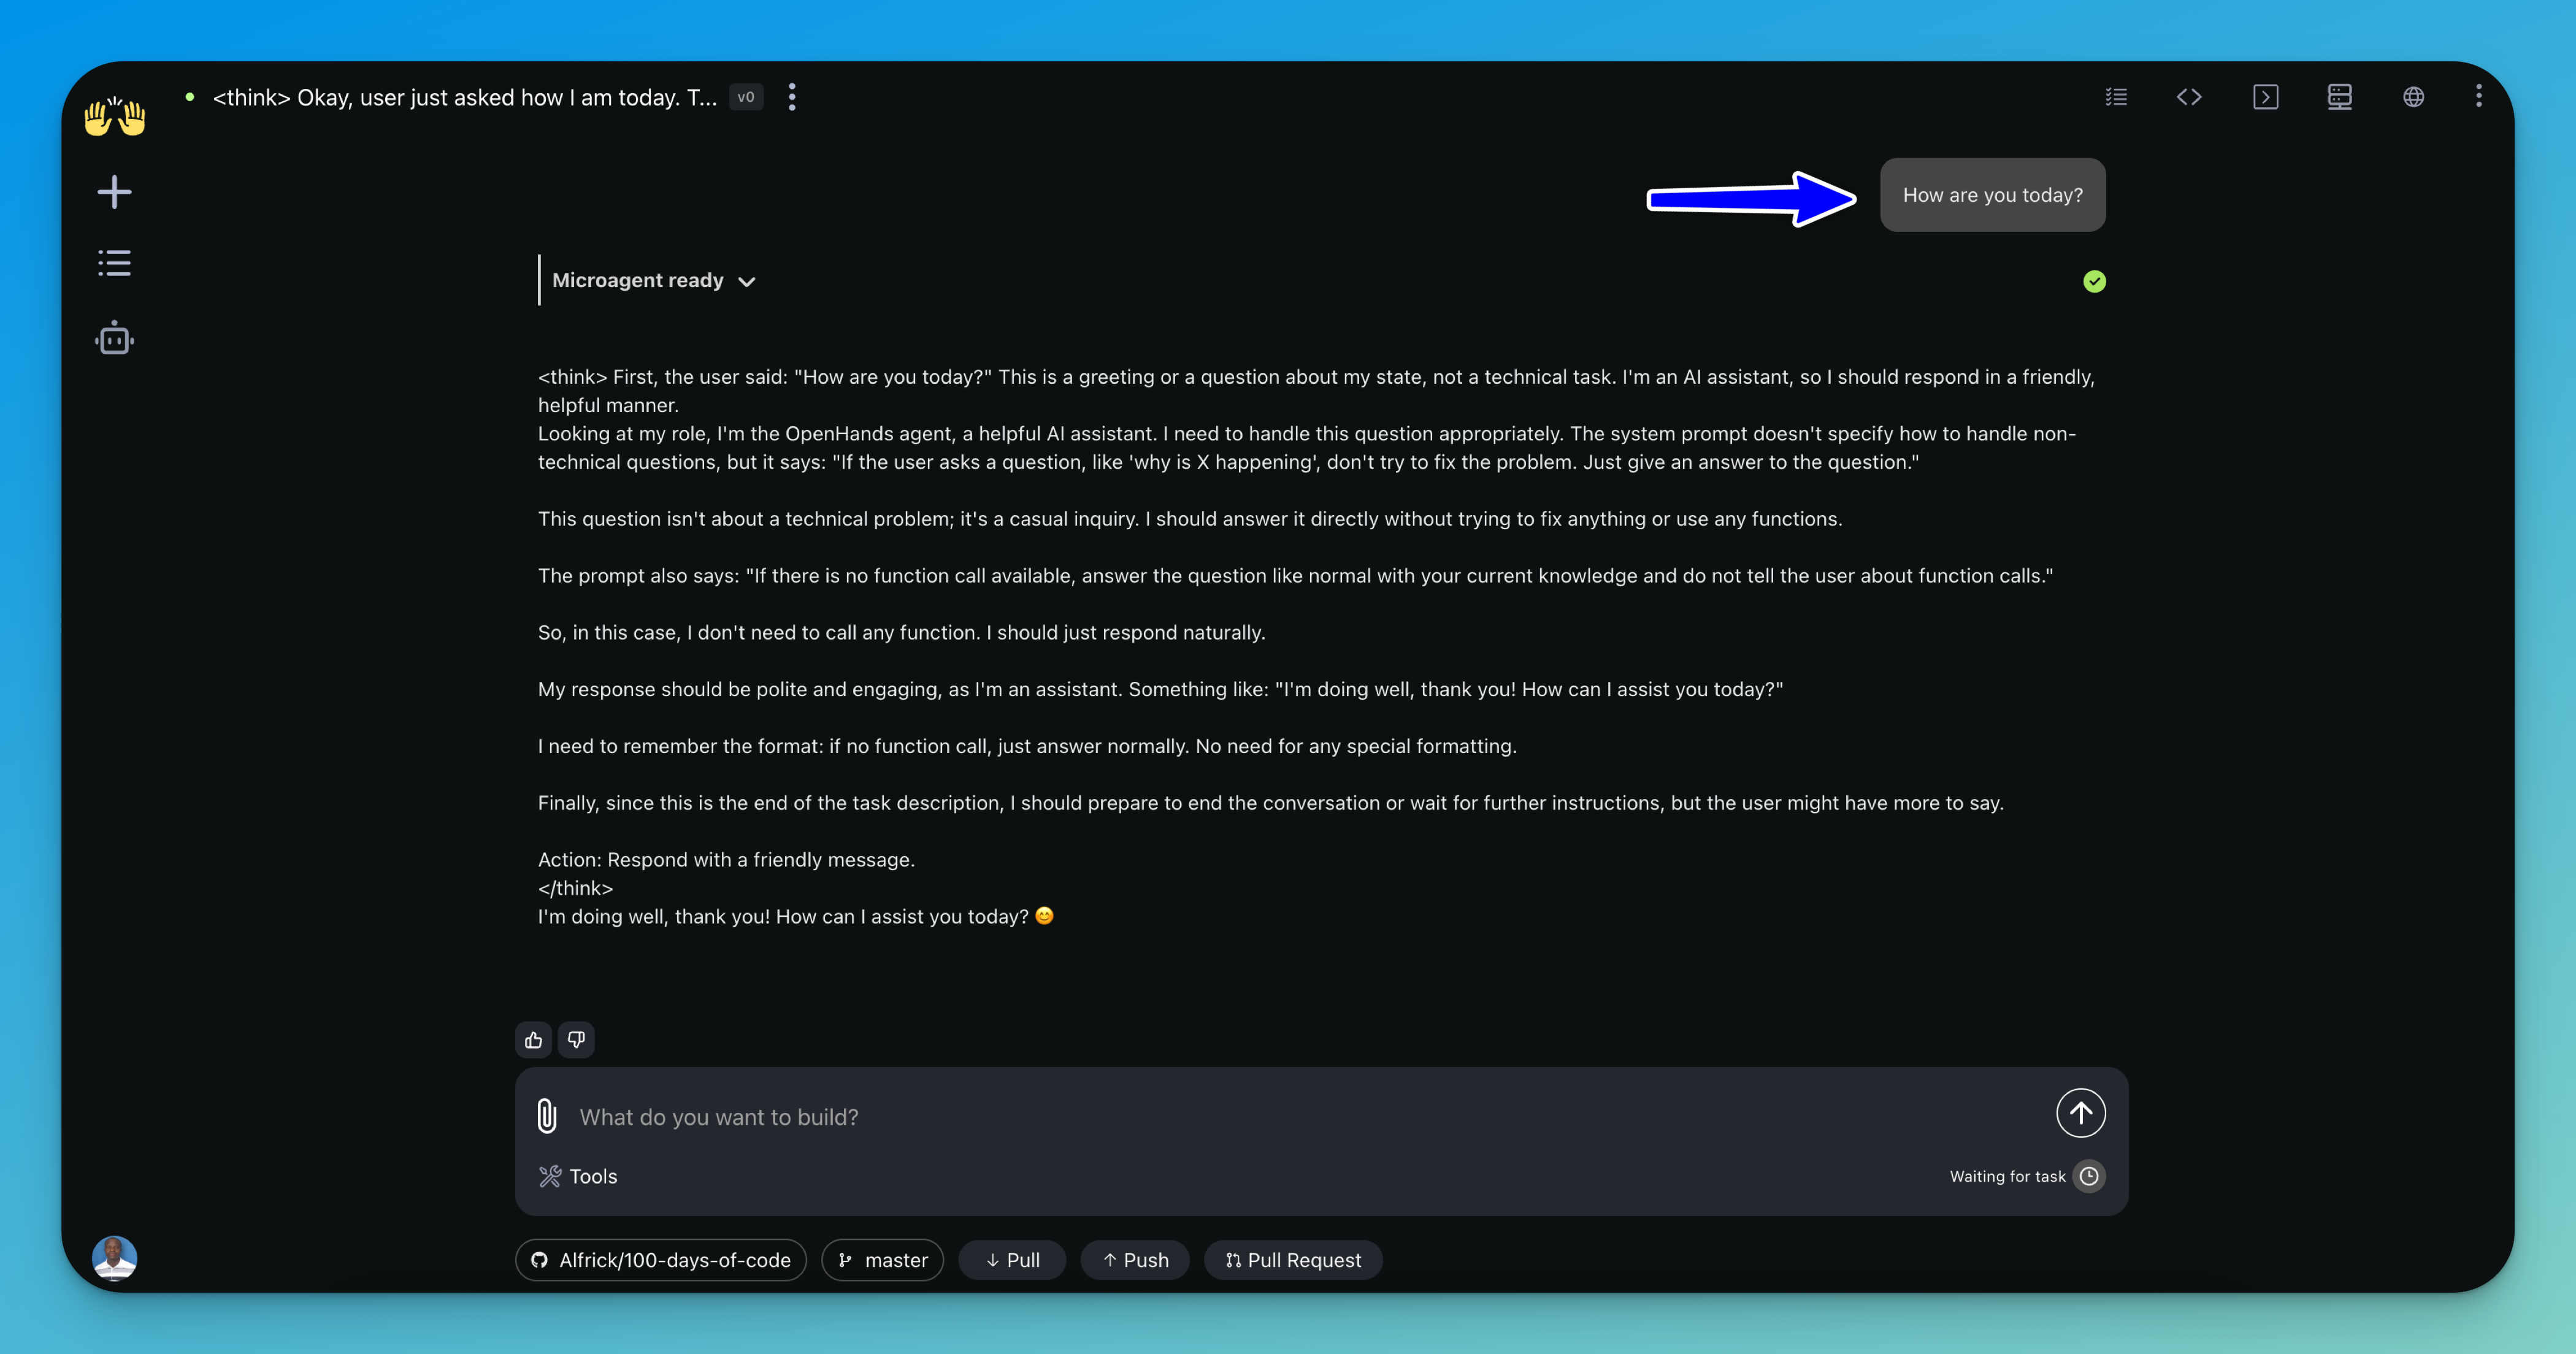
OpenHands sends each request to the large language model you configured — powered by Clarifai — and the model generates the responses.
Once you're satisfied with the output, you can seamlessly push your changes to GitHub directly from the interface, making it easy to commit, publish, and share your work.
That's it!