Collectors
Capture inputs used for making predictions in your app
Collector is an ingenious feature that allows you to capture the inputs used for making predictions. After creating a collector, which includes specifying the caller user ID and the source model, a triggering process is established.
This process ensures that whenever the stated user makes a prediction using the specified model, the inputs used in generating the predictions are automatically ingested and stored in your app.
With collectors, you can automatically pipe in data from production models, gather inputs to feed your models with real-world training data, and unlock many platform training capabilities.
The Collector feature is currently exclusively available to our Professional and Enterprise users. Learn more here.
Create via the UI
To create a collector within your application, you need to use the Clarifai’s Collectors module.
Let’s demonstrate how you can use the module to create a collector via the UI.
Install the Module
Option 1
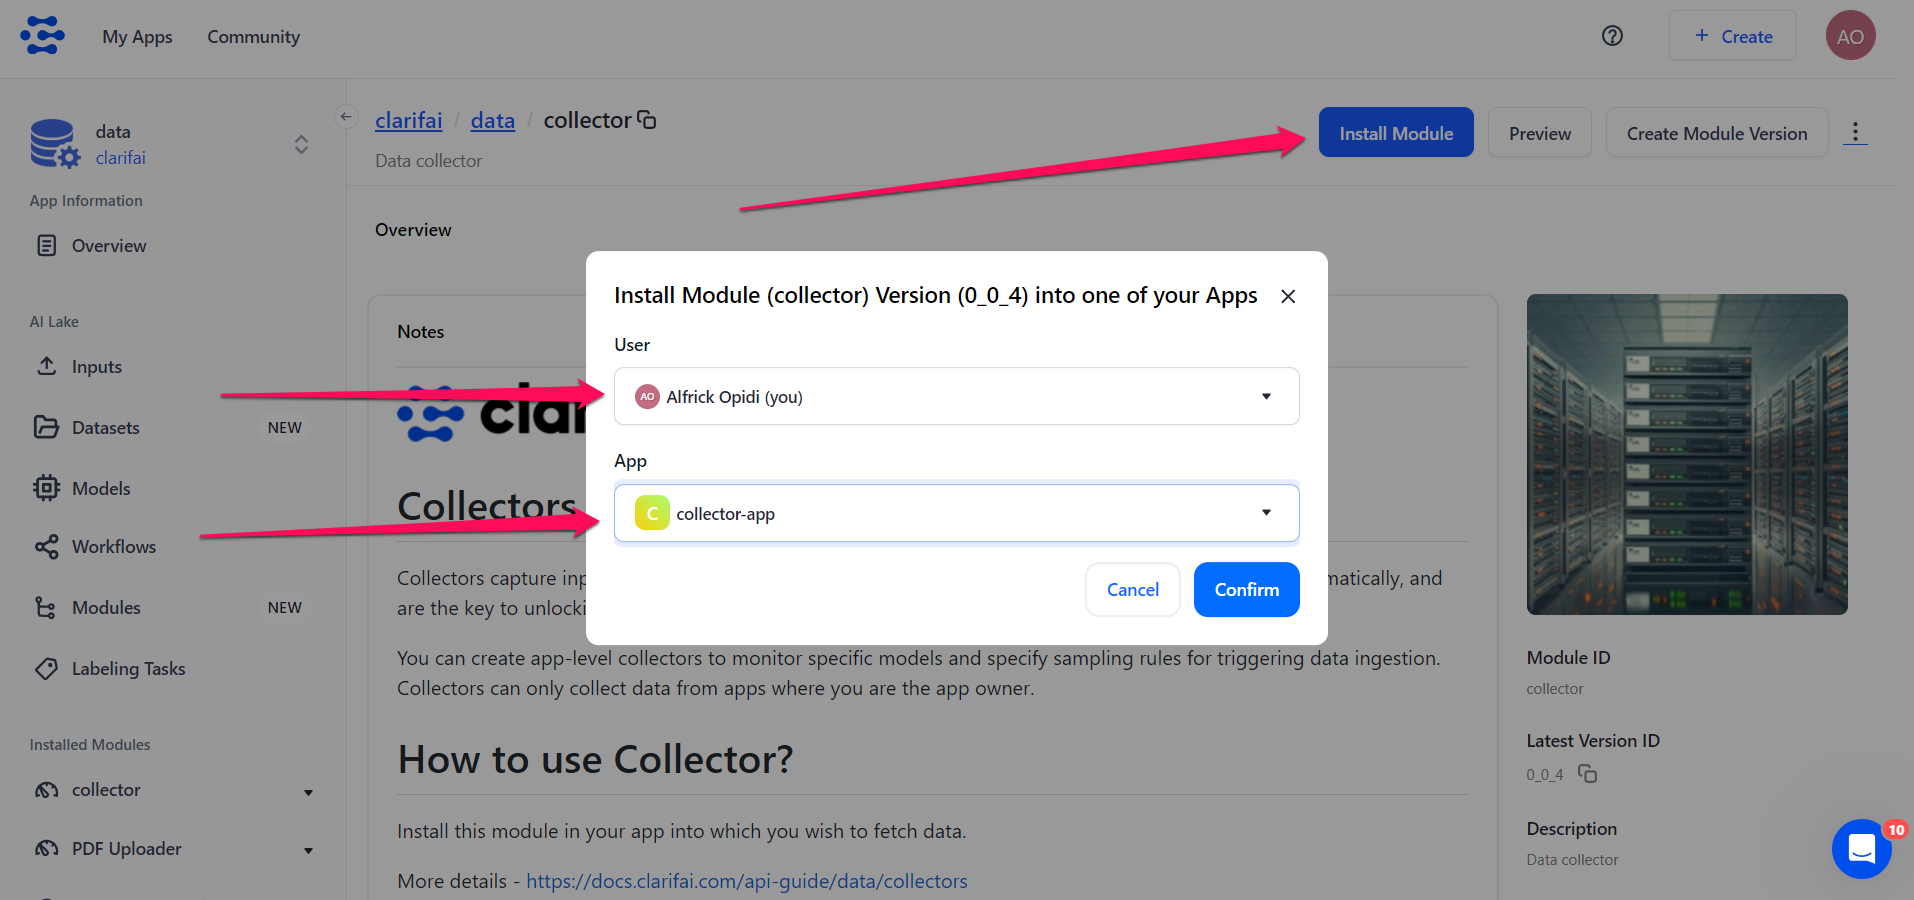
Go to the Collectors module page and click the Install Module button at the upper-right corner.
Next, on the small window that pops up, select a desired user and destination app for installing the module.
Click the Confirm button.
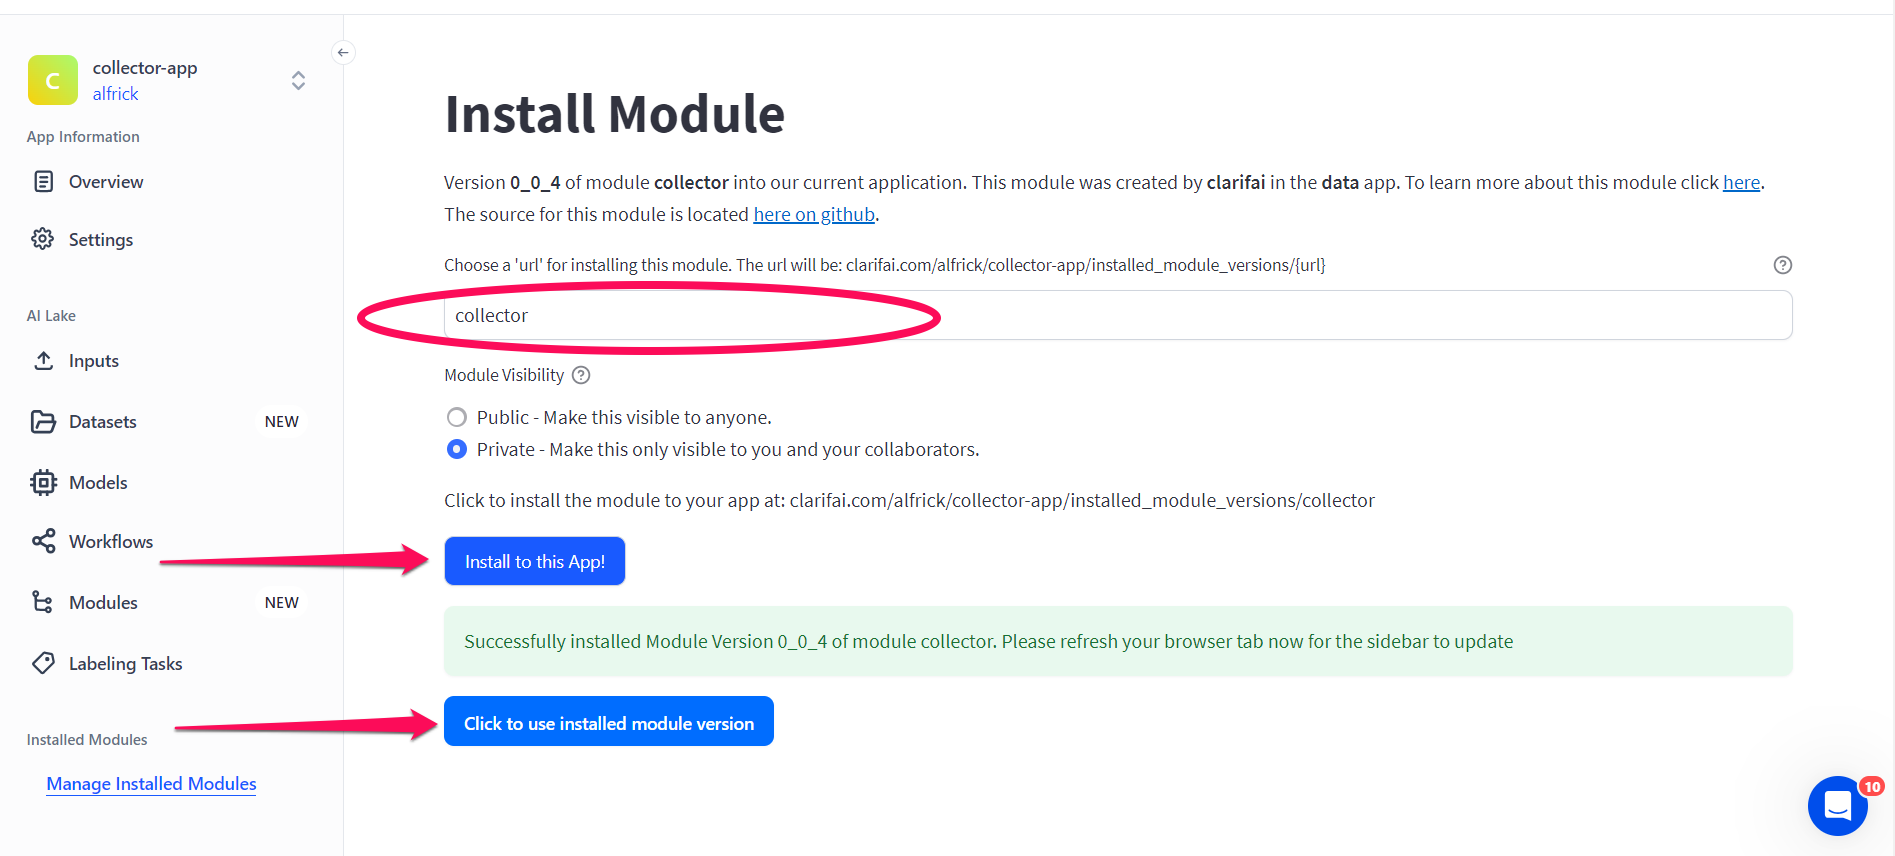
On the ensuing page, choose a destination URL for installing the module, select the module visibility, and click the Install to this App! button.
After the module has been successfully installed, click the Click to use installed module version button to start using it. You can also refresh the page for your installed module to appear on the left sidebar under the Installed Modules category.
If you click the button, you’ll be redirected to a page that requires you to authorize the module to access data on your behalf. You will see the permissions the module requires.
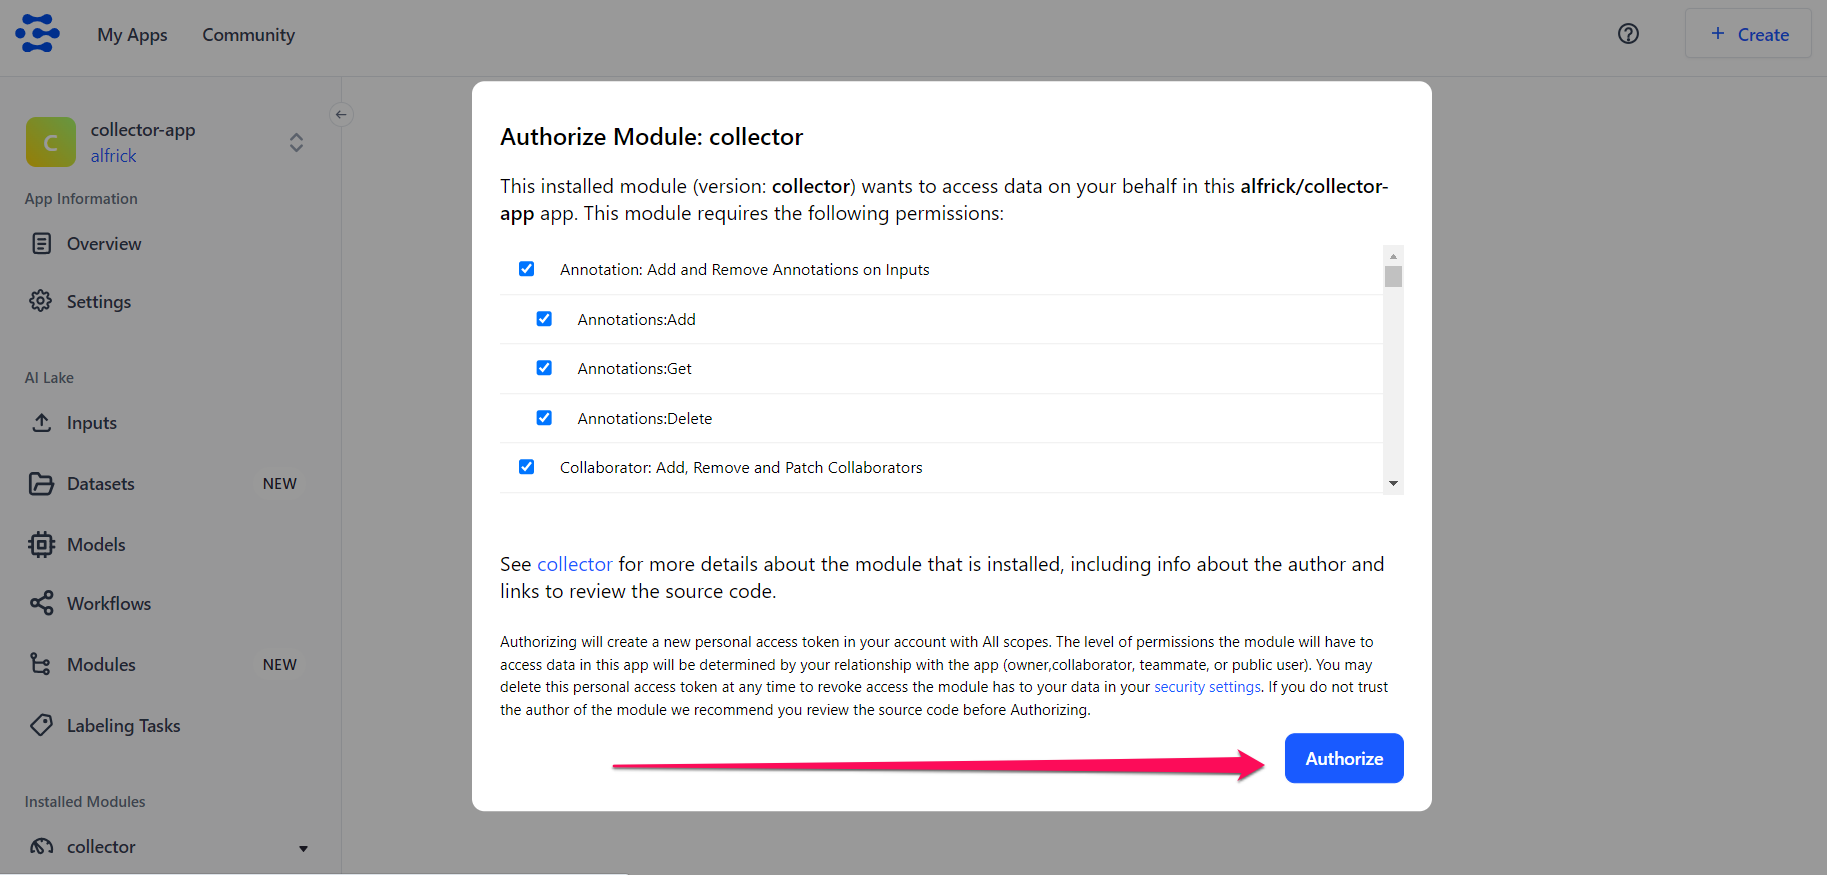
Click the Authorize button.
Option 2
Alternatively, you can use the module’s URL to install it in your app. To do so, click the Manage Installed Modules option at the bottom of the collapsible left sidebar.
Grab the URL of the Collectors module and paste it into the Module URL input field.
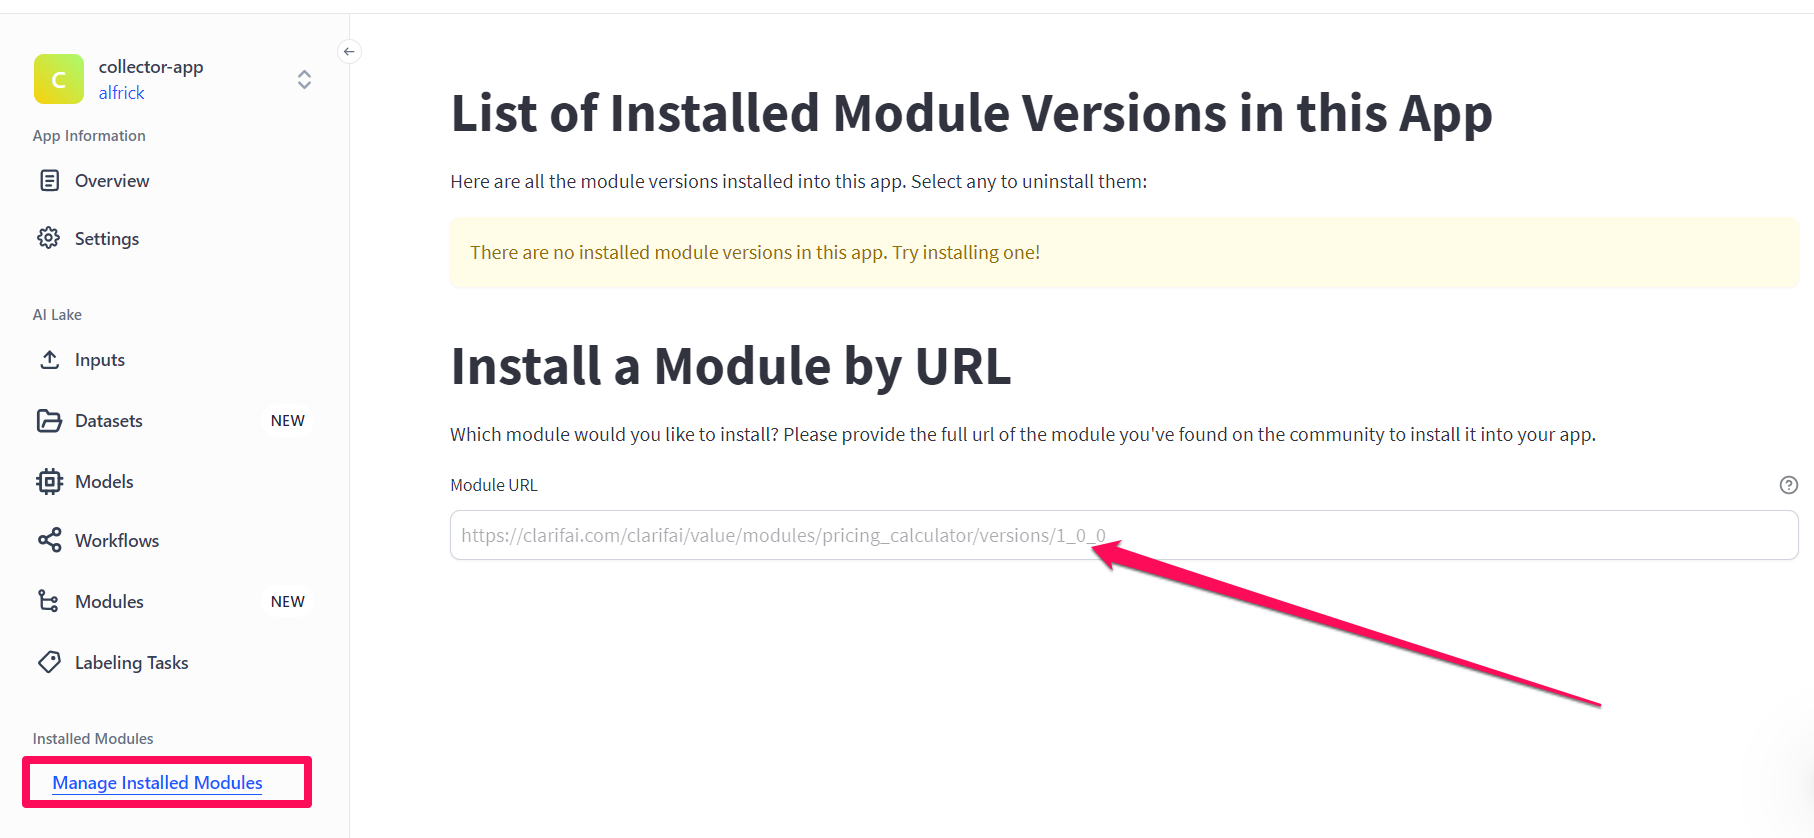
You can then follow the ensuing prompts to complete installing the module in your app.
Create Collector
After installing the module and authorizing it to access data on your behalf, you’ll be redirected to a page that allows you to create it. You can fill in the required details.
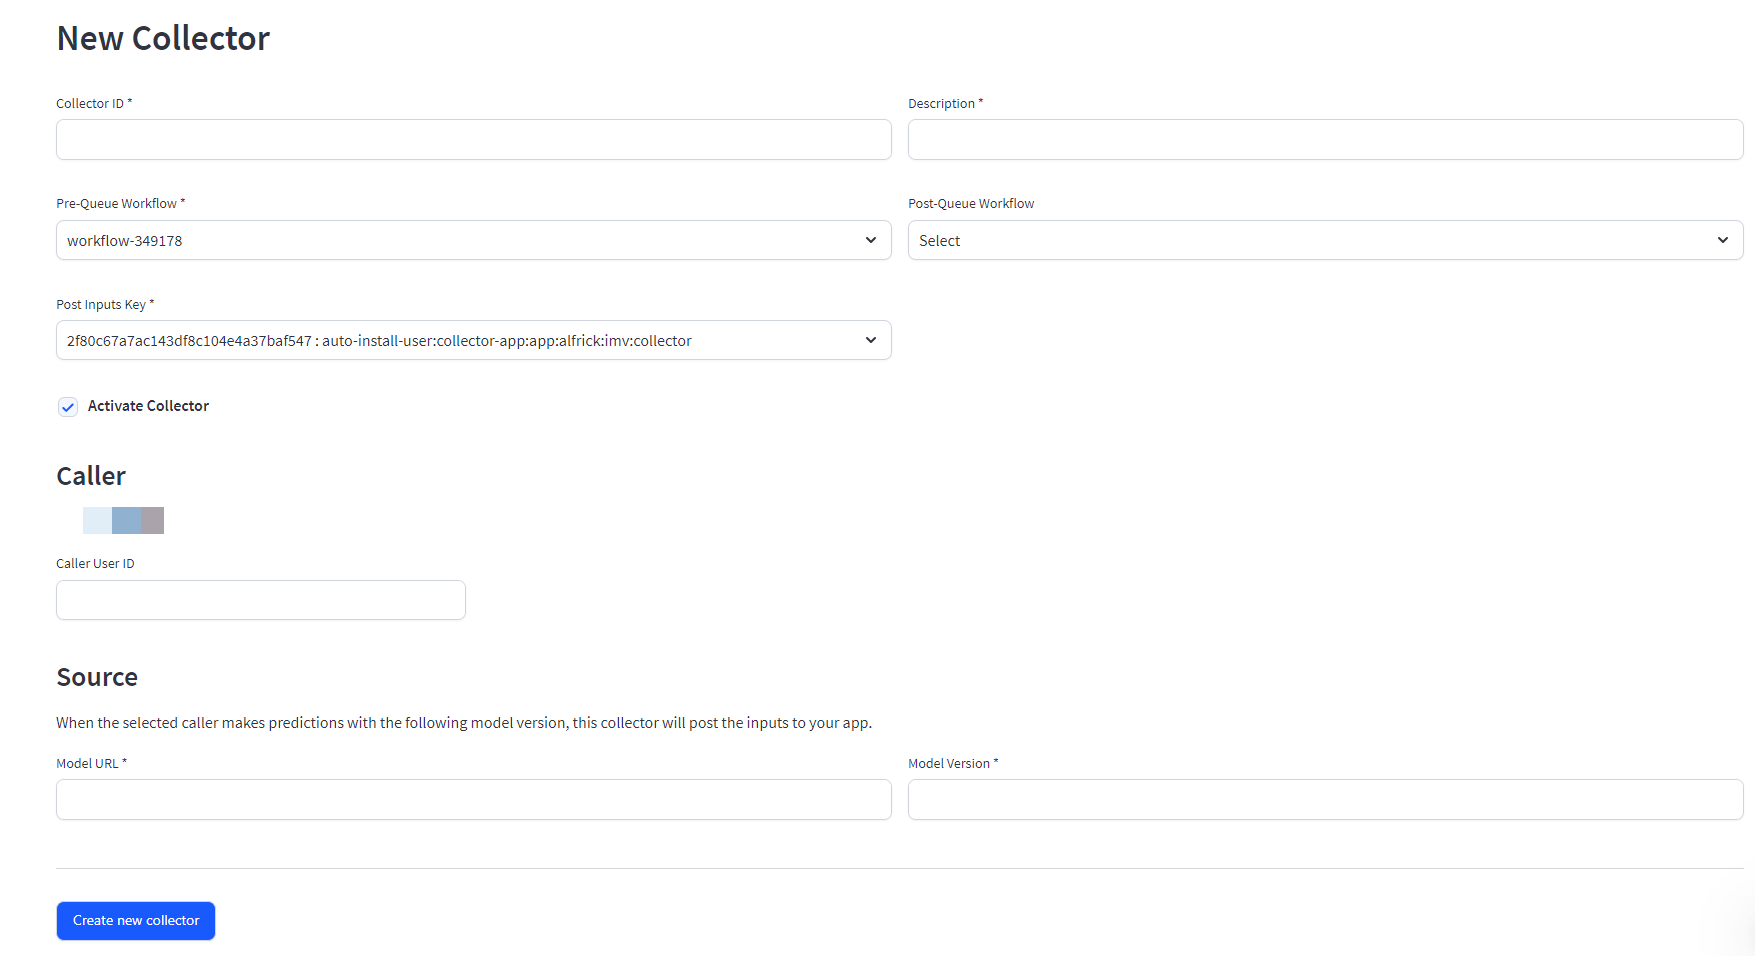
Collector ID
Give your collector a useful and descriptive name.
Description
Provide additional details about your collector.
Pre-queue Workflow
In many scenarios, you will only want to ingest a sample, or subset of a given data source into your app. Pre-queue workflows allow you to pre-process your inputs so that you can sample and filter your new data before it is ever added to your app. Pre-queue workflows allow you to specify sampling rules for triggering data ingestion.
Common pre-queue workflows are designed to:
- Randomly sample inputs
- Filter inputs by metadata
- Filter inputs with a maximum probability below a given threshold
- Filter inputs with a minimum probability above a given threshold
- Filter specific concept probabilities above a given threshold
- Undertake knowledge graph mapping from public General model concepts to a custom model
At least one (pre-queue or post-queue) workflow ID is required.
For this example, let’s create a random-sample workflow, which randomly samples the inputs to be collected in your app. Let’s set the keep_fraction parameter to 1, implying that all (100%) the inputs predicted by the specified model will be kept and added to your app.
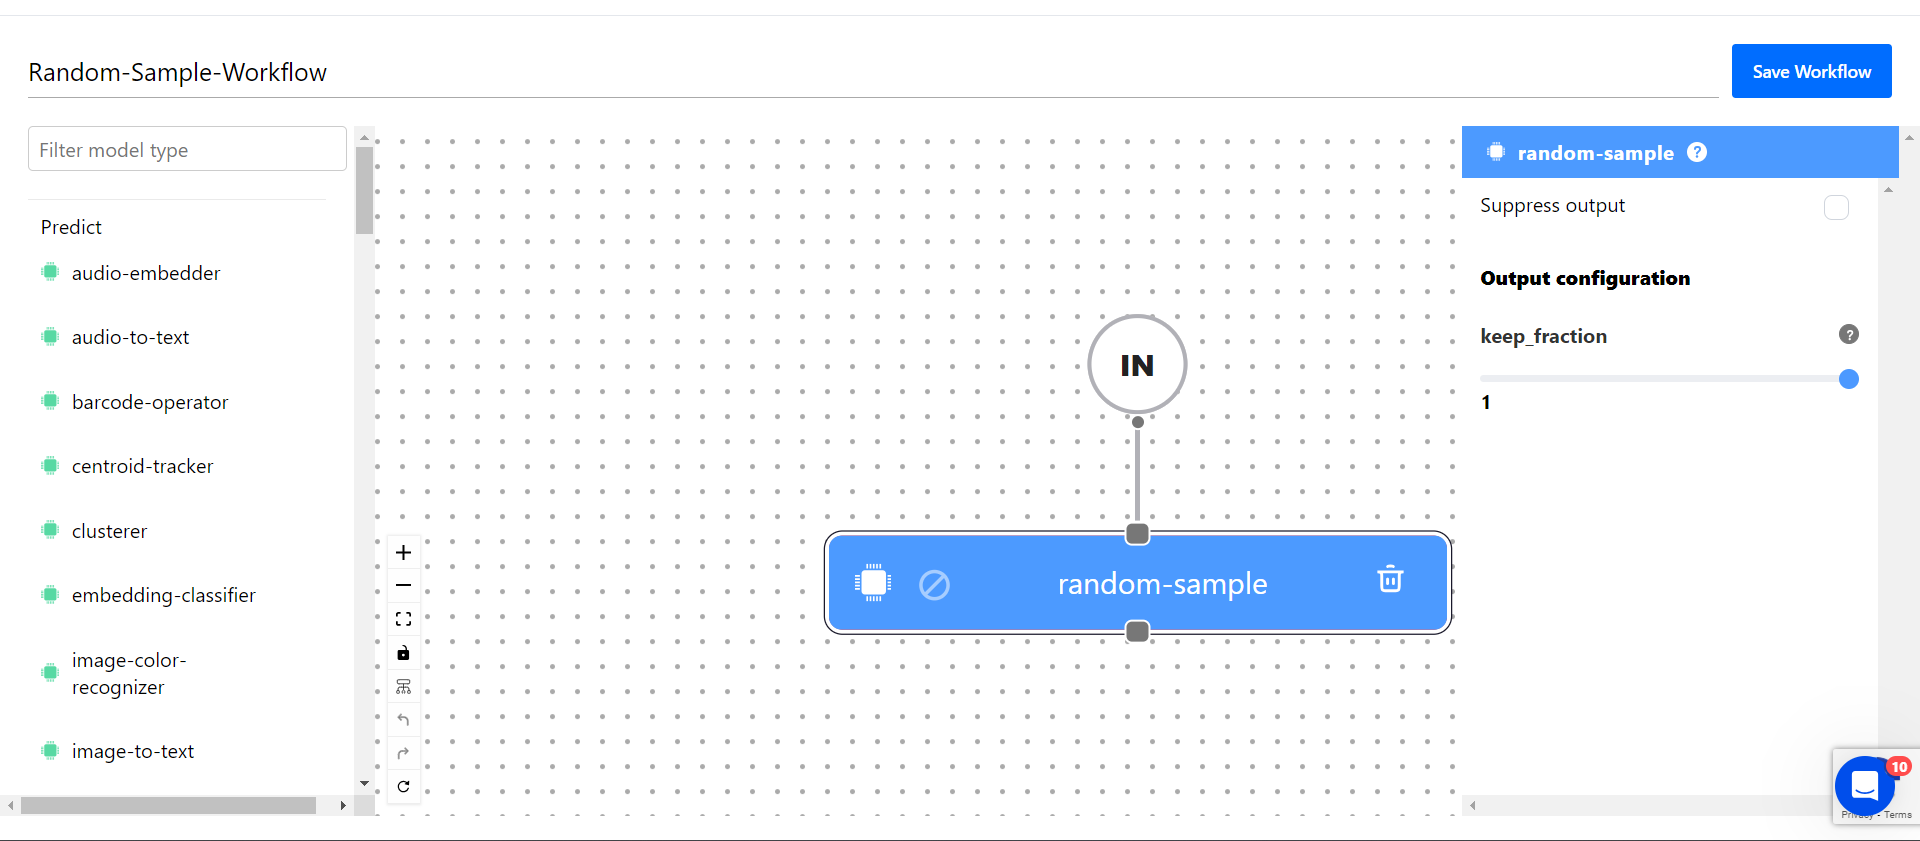
After creating the workflow in the Workflow Builder, let’s select it in the Pre-Queue Workflow field.
Post-queue Workflow
This is the workflow to run after the collector has processed the queued input. This workflow uses the original input to the model as input to the workflow so that you can run additional models as well on that input to decide whether to queue the model or not.
For this example, let’s create an image-to-text workflow, which uses the general-english-image-caption-blip model to generate English captions from images. So, the images outputted by the pre-queue workflow will be captioned by the post-queue workflow, and the captioned text stored in your app.

After creating the workflow in the Workflow Builder, let’s select it in the Post-Queue Workflow field.
If the workflow output has any field that is non-empty, then it will be passed on to POST /inputs to the destination app.
Post Inputs Key
Select the PAT key that you would like your module to use to enable inputs to be posted to your app. This key must have the PostInputs scope, since it grants the collector the authority to POST inputs to your app.
It should also have the permissions to access the source model used for making the predictions.
Activate Collector
Select the checkbox if you want to activate the collector and make it ready to be used. Otherwise, the collector will remain inactive.
Caller
Specify the ID of the caller who will be making the prediction requests. You can even provide your own user ID.
Source
Specify the source model from which you want to collect data. The collector will automatically post the inputs utilized by the caller for making predictions using the specified model into your app.
You need to specify the model URL and its version ID.
For this example, let’s specify the general-image-recognition model with its version ID as aa7f35c01e0642fda5cf400f543e7c40.
Create new Collector
Here are the details we provided for creating the new collector:
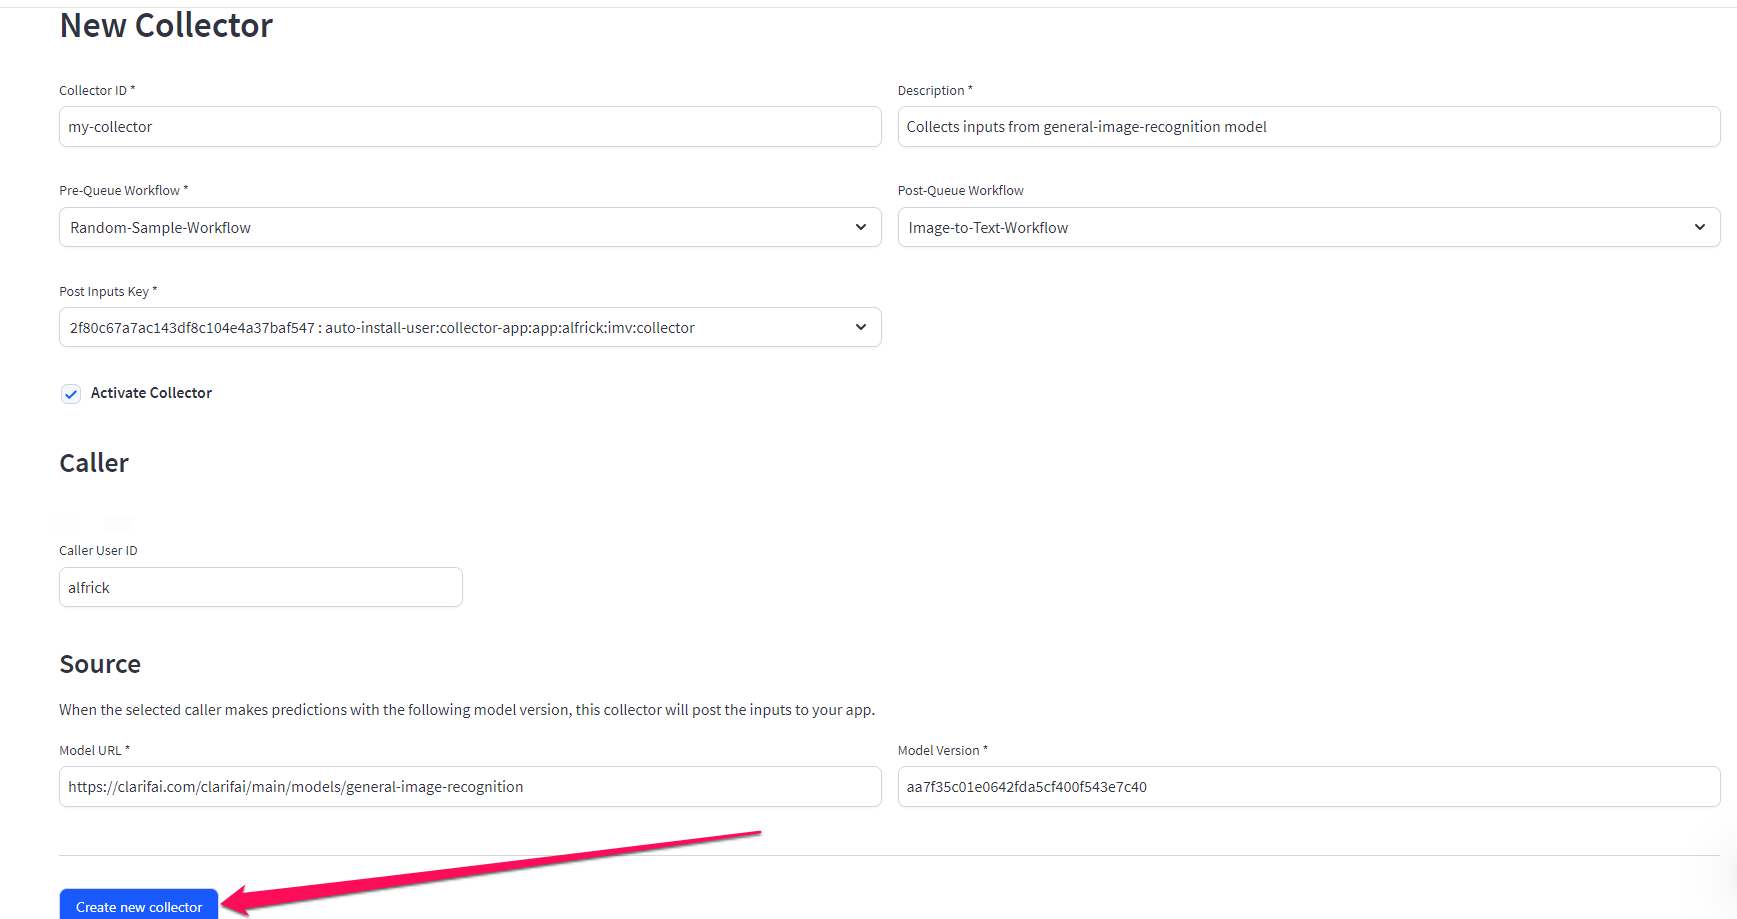
Finally, click the Create new collector button.
Manage Collectors
If you click the Show All option located under the collector module within the collapsible left sidebar, you will be directed to a subsequent page where your created collector, along with its corresponding details, will be listed for your review.
This page also allows you to effortlessly deactivate, reactivate, or delete collectors as needed.

If you click the Update option, you will be directed to a subsequent page where you can update the details of your collector.
Example
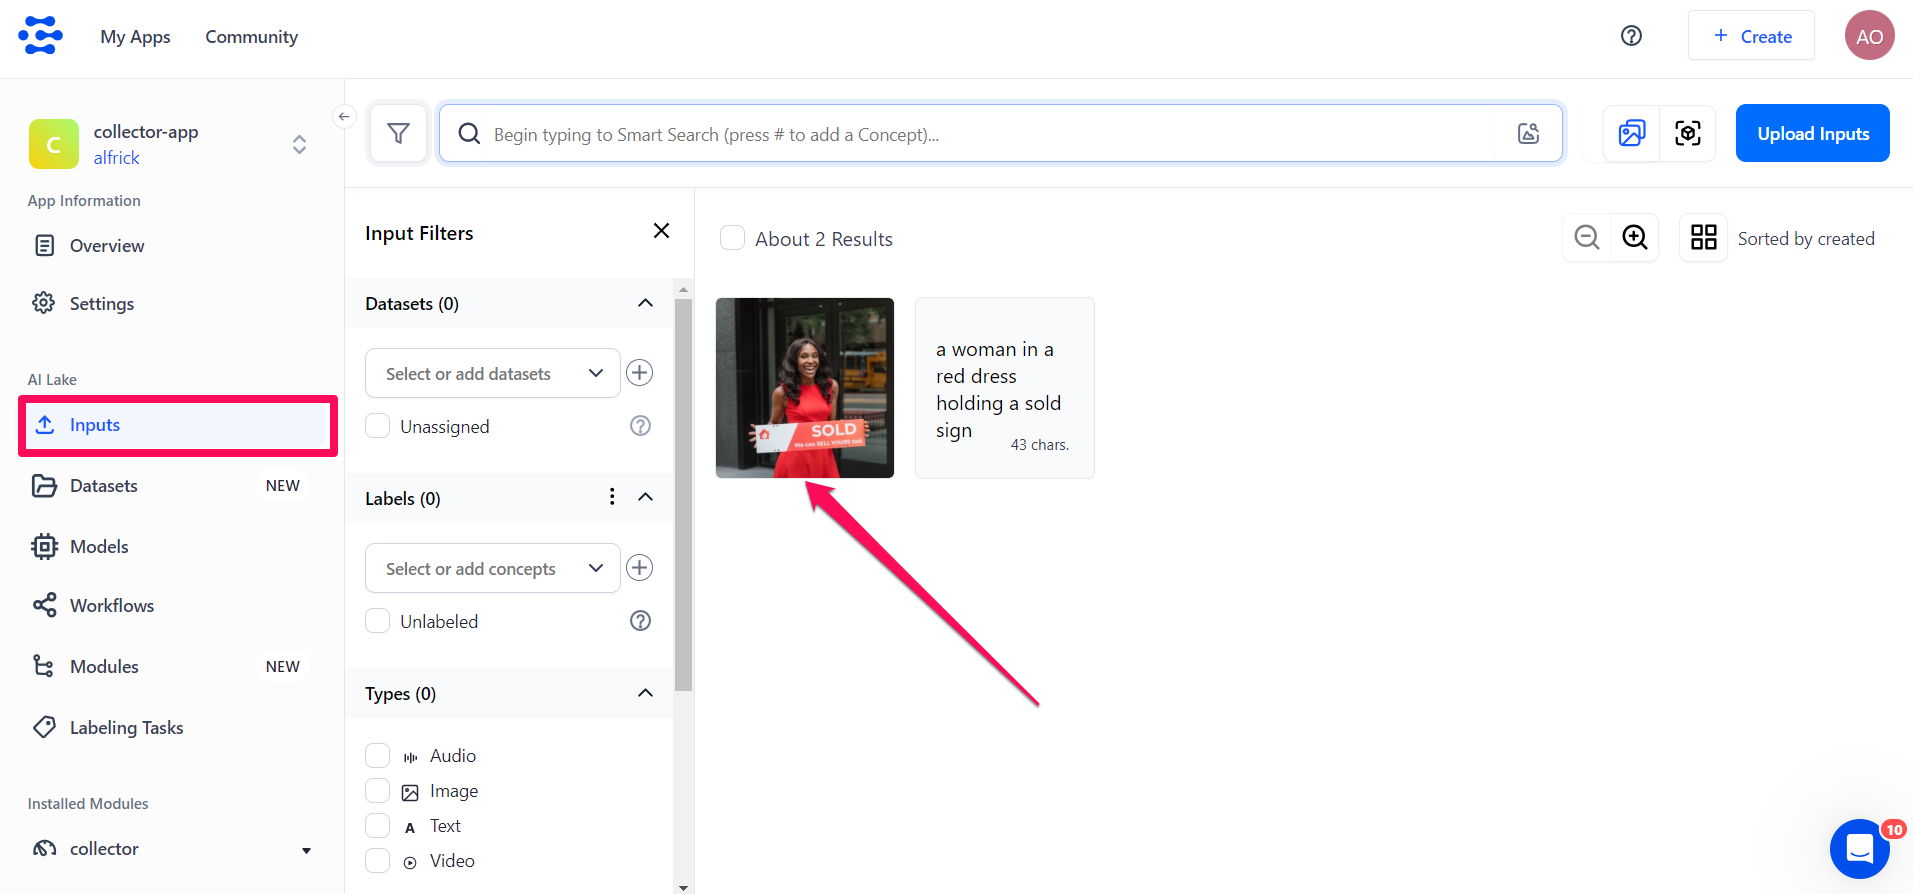
Let’s say the caller you’d specified uses this image to make a prediction on the general-image-recognition model, which you’d stated as the source model.
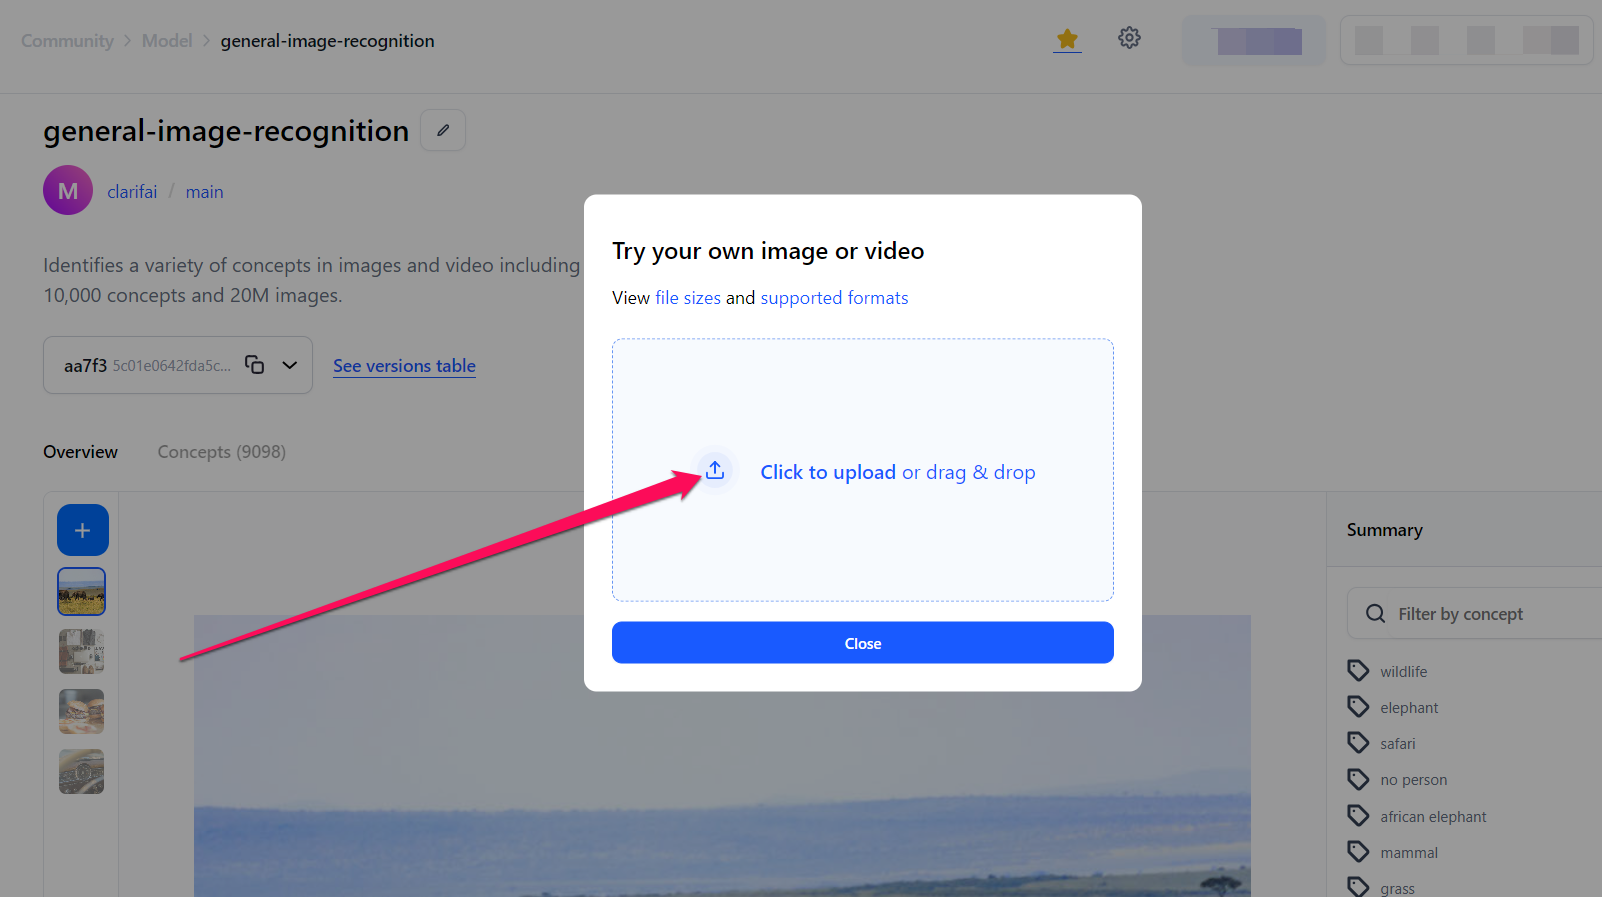
The image used for making the prediction will be automatically captured, captioned, and the generated text stored in your app — according to the rules you specified when creating the collector.
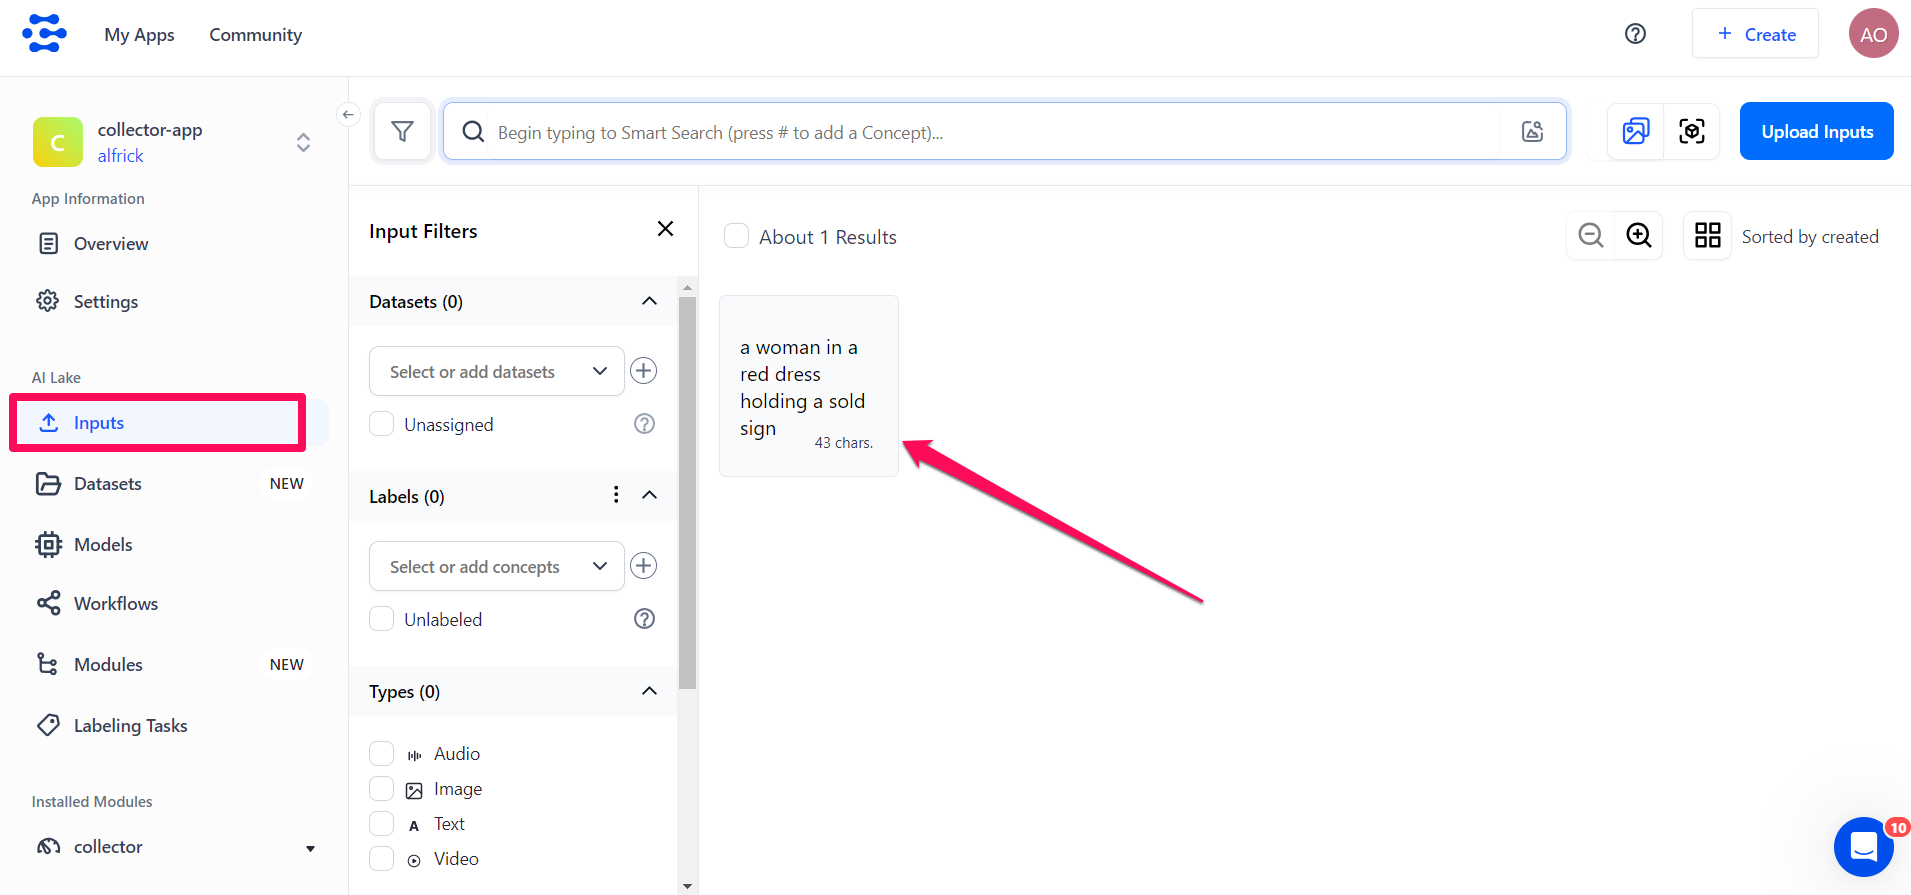
If you update the collector by deselecting the post-queue workflow, only the pre-queue workflow will remain active. As such, you'll notice that the image used for making the prediction will be captured in your app as-is.
That’s it!
Create via the API
Before using the Python SDK, Node.js SDK, or any of our gRPC clients, ensure they are properly installed on your machine. Refer to their respective installation guides for instructions on how to install and initialize them.
Collector Parameters
Let's talk about the parameters required to create a collector via the API.
Collector ID
Give your collector a useful and descriptive name.
Description
Provide additional details about your collector.
Pre-queue Workflow
In many scenarios, you will only want to ingest a sample, or subset of a given data source into your app. Pre-queue workflows allow you to pre-process your inputs so that you can sample and filter your new data before it is ever added to your app. Pre-queue workflows allow you to specify sampling rules for triggering data ingestion.
Common pre-queue workflows are designed to:
- Randomly sample inputs
- Filter inputs by metadata
- Filter inputs with a maximum probability below a given threshold
- Filter inputs with a minimum probability above a given threshold
- Filter specific concept probabilities above a given threshold
- Undertake knowledge graph mapping from public General model concepts to a custom model
At least one (pre-queue or post-queue) workflow ID is required.
Post-queue Workflow
This is the workflow to run after the collector has processed the queued input. This workflow uses the original input to the model as input to the workflow so that you can run additional models as well on that input to decide whether to queue the model or not.
Source
These are the details of the source model from which you want to collect data. The collector will automatically post the inputs utilized by the caller for making predictions using the specified model into your app.
Post Inputs Key
This is the PAT or the API key to use to enable inputs to be posted to your app. This key must have the PostInputs scope, since it grants the collector the authority to POST inputs to your app.
It should also have the permissions to access the source model used for making the predictions.
Caller User ID
This is the ID of the caller who will be making the prediction requests. You can even provide your own user ID.
Add Collector
Here is how to add a new collector to your application.
- Python (gRPC)
- JavaScript (REST)
- Node.js (gRPC)
- Java (gRPC)
- PHP (gRPC)
- cURL
###############################################################################
# In this section, we set the user authentication, app ID, and details of the
# collector we want to add. Change these strings to run your own example.
###############################################################################

USER_ID = 'YOUR_USER_ID_HERE'
# Your PAT (Personal Access Token) can be found in the Account's Security section
PAT = 'YOUR_PAT_HERE'
APP_ID = 'YOUR_APP_ID_HERE'
# Change these to add your own collector
COLLECTOR_ID = 'YOUR_COLLECTOR_ID_HERE'
COLLECTOR_DESCRIPTION = 'YOUR_COLLECTOR_DESCRIPTION_HERE'
PRE_QUEUE_WORKFLOW_ID = 'YOUR_PRE_WORKFLOW_ID_HERE'
POST_QUEUE_WORKFLOW_ID = 'YOUR_POST_WORKFLOW_ID_HERE'
MODEL_ID = 'YOUR_MODEL_ID_HERE'
MODEL_VERSION_ID = 'YOUR_MODEL_VERSION_ID_HERE'
POST_INPUTS_KEY_ID = 'YOUR_API_KEY_HERE'
CALLER_USER_ID = 'YOUR_CALLER_USER_ID_HERE'

##########################################################################
# YOU DO NOT NEED TO CHANGE ANYTHING BELOW THIS LINE TO RUN THIS EXAMPLE
##########################################################################

from clarifai_grpc.channel.clarifai_channel import ClarifaiChannel
from clarifai_grpc.grpc.api import resources_pb2, service_pb2, service_pb2_grpc
from clarifai_grpc.grpc.api.status import status_code_pb2

channel = ClarifaiChannel.get_grpc_channel()
stub = service_pb2_grpc.V2Stub(channel)

metadata = (('authorization', 'Key ' + PAT),)

userDataObject = resources_pb2.UserAppIDSet(user_id=USER_ID, app_id=APP_ID) # The userDataObject is required when using a PAT

post_collectors_response = stub.PostCollectors(
    service_pb2.PostCollectorsRequest(
        user_app_id=userDataObject,
        collectors=[
            resources_pb2.Collector(
                id=COLLECTOR_ID,
                description=COLLECTOR_DESCRIPTION,
                pre_queue_workflow_id=PRE_QUEUE_WORKFLOW_ID,
                post_queue_workflow_id=POST_QUEUE_WORKFLOW_ID,
                collector_source=resources_pb2.CollectorSource(
                    api_post_model_outputs_collector_source=resources_pb2.APIPostModelOutputsCollectorSource(
                        model_user_id=USER_ID,
                        model_app_id=APP_ID,
                        model_id=MODEL_ID,
                        model_version_id=MODEL_VERSION_ID,
                        post_inputs_key_id=POST_INPUTS_KEY_ID,
                        caller_user_id=CALLER_USER_ID
                    )
                )
            )
        ]
    ),
    metadata=metadata
)

if post_collectors_response.status.code != status_code_pb2.SUCCESS:
    print(post_collectors_response.status)
    raise Exception("Post collectors failed, status: " + post_collectors_response.status.description)
<!--index.html file-->

<script>
    ////////////////////////////////////////////////////////////////////////////////////
    // In this section, we set the user authentication, app ID, and details of the
    // collector we want to add. Change these strings to run your own example.
    ////////////////////////////////////////////////////////////////////////////////////

    const USER_ID = 'YOUR_USER_ID_HERE';
    // Your PAT (Personal Access Token) can be found in the Account's Security section
    const PAT = 'YOUR_PAT_HERE';
    const APP_ID = 'YOUR_APP_ID_HERE';
    // Change these to add your own collector
    const COLLECTOR_ID = 'YOUR_COLLECTOR_ID_HERE';
    const COLLECTOR_DESCRIPTION = 'YOUR_COLLECTOR_DESCRIPTION_HERE';
    const PRE_QUEUE_WORKFLOW_ID = 'YOUR_PRE_WORKFLOW_ID_HERE';
    const POST_QUEUE_WORKFLOW_ID = 'YOUR_POST_WORKFLOW_ID_HERE';
    const MODEL_ID = 'YOUR_MODEL_ID_HERE';
    const MODEL_VERSION_ID = 'YOUR_MODEL_VERSION_ID_HERE';
    const POST_INPUTS_KEY_ID = 'YOUR_API_KEY_HERE';
    const CALLER_USER_ID = 'YOUR_CALLER_USER_ID_HERE';

    ///////////////////////////////////////////////////////////////////////////////////
    // YOU DO NOT NEED TO CHANGE ANYTHING BELOW THIS LINE TO RUN THIS EXAMPLE
    ///////////////////////////////////////////////////////////////////////////////////

    const raw = JSON.stringify({
        "user_app_id": {
            "user_id": USER_ID,
            "app_id": APP_ID
        },
        "collectors": [
        {
            "id": COLLECTOR_ID,
            "description": COLLECTOR_DESCRIPTION,
            "pre_queue_workflow_id": PRE_QUEUE_WORKFLOW_ID,
            "post_queue_workflow_id": POST_QUEUE_WORKFLOW_ID,
            "collector_source": {
                "api_post_model_outputs_collector_source": {
                    "model_user_id": USER_ID,
                    "model_app_id": APP_ID,
                    "model_id": MODEL_ID,
                    "model_version_id": MODEL_VERSION_ID,
                    "post_inputs_key_id": POST_INPUTS_KEY_ID,
                    "caller_user_id": CALLER_USER_ID
                    }
                }
        }

        ]
    });

    const requestOptions = {
        method: 'POST',
        headers: {
            'Accept': 'application/json',
            'Authorization': 'Key ' + PAT
        },
        body: raw
    };

    fetch("https://api.clarifai.com/v2/collectors", requestOptions)
        .then(response => response.text())
        .then(result => console.log(result))
        .catch(error => console.log('error', error));

</script>
//index.js file

////////////////////////////////////////////////////////////////////////////////////
// In this section, we set the user authentication, app ID, and details of the
// collector we want to add. Change these strings to run your own example.
////////////////////////////////////////////////////////////////////////////////////

const USER_ID = 'YOUR_USER_ID_HERE';
// Your PAT (Personal Access Token) can be found in the Account's Security section
const PAT = 'YOUR_PAT_HERE';
const APP_ID = 'YOUR_APP_ID_HERE';
// Change these to add your own collector
const COLLECTOR_ID = 'YOUR_COLLECTOR_ID_HERE';
const COLLECTOR_DESCRIPTION = 'YOUR_COLLECTOR_DESCRIPTION_HERE';
const PRE_QUEUE_WORKFLOW_ID = 'YOUR_PRE_WORKFLOW_ID_HERE';
const POST_QUEUE_WORKFLOW_ID = 'YOUR_POST_WORKFLOW_ID_HERE';
const MODEL_ID = 'YOUR_MODEL_ID_HERE';
const MODEL_VERSION_ID = 'YOUR_MODEL_VERSION_ID_HERE';
const POST_INPUTS_KEY_ID = 'YOUR_API_KEY_HERE';
const CALLER_USER_ID = 'YOUR_CALLER_USER_ID_HERE';

/////////////////////////////////////////////////////////////////////////////
// YOU DO NOT NEED TO CHANGE ANYTHING BELOW THIS LINE TO RUN THIS EXAMPLE
/////////////////////////////////////////////////////////////////////////////

const { ClarifaiStub, grpc } = require("clarifai-nodejs-grpc");

const stub = ClarifaiStub.grpc();

// This will be used by every Clarifai endpoint call
const metadata = new grpc.Metadata();
metadata.set("authorization", "Key " + PAT);

stub.PostCollectors(
    {
        user_app_id: {
            "user_id": USER_ID,
            "app_id": APP_ID
        },
        collectors: [
            {
                id: COLLECTOR_ID,
                description: COLLECTOR_DESCRIPTION,
                pre_queue_workflow_id: PRE_QUEUE_WORKFLOW_ID,
                post_queue_workflow_id: POST_QUEUE_WORKFLOW_ID,
                collector_source: {
                    api_post_model_outputs_collector_source: {
                        model_user_id: USER_ID,
                        model_app_id: APP_ID,
                        model_id: MODEL_ID,
                        model_version_id: MODEL_VERSION_ID,
                        post_inputs_key_id: POST_INPUTS_KEY_ID,
                        caller_user_id: CALLER_USER_ID
                    }
                }
            }
        ]
    },
    metadata,
    (err, response) => {
        if (err) {
            throw new Error(err);
        }

        if (response.status.code !== 10000) {
            console.log(response.status);
            throw new Error("Post collectors failed, status: " + response.status.description);
        }
    }
);
package com.clarifai.example;

import com.clarifai.channel.ClarifaiChannel;
import com.clarifai.credentials.ClarifaiCallCredentials;
import com.clarifai.grpc.api.*;
import com.clarifai.grpc.api.status.*;

public class ClarifaiExample {

    ///////////////////////////////////////////////////////////////////////////////////
    // In this section, we set the user authentication, app ID, and details of the
    // collector we want to add. Change these strings to run your own example.
    ///////////////////////////////////////////////////////////////////////////////////

    static final String USER_ID = "YOUR_USER_ID_HERE";
    //Your PAT (Personal Access Token) can be found in the portal under Authentication
    static final String PAT = "YOUR_PAT_HERE";
    static final String APP_ID = "YOUR_APP_ID_HERE";
    // Change these to add your own collector
    static final String COLLECTOR_ID = "YOUR_COLLECTOR_ID_HERE";
    static final String COLLECTOR_DESCRIPTION = "YOUR_COLLECTOR_DESCRIPTION_HERE";
    static final String PRE_QUEUE_WORKFLOW_ID = "YOUR_PRE_WORKFLOW_ID_HERE";
    static final String POST_QUEUE_WORKFLOW_ID = "YOUR_POST_WORKFLOW_ID_HERE";
    static final String MODEL_ID = "YOUR_MODEL_ID_HERE";
    static final String MODEL_VERSION_ID = "YOUR_MODEL_VERSION_ID_HERE";
    static final String POST_INPUTS_KEY_ID = "YOUR_API_KEY_HERE";
    static final String CALLER_USER_ID = "YOUR_CALLER_USER_ID_HERE";

    ///////////////////////////////////////////////////////////////////////////////////
    // YOU DO NOT NEED TO CHANGE ANYTHING BELOW THIS LINE TO RUN THIS EXAMPLE
    ///////////////////////////////////////////////////////////////////////////////////

    public static void main(String[] args) {

        V2Grpc.V2BlockingStub stub = V2Grpc.newBlockingStub(ClarifaiChannel.INSTANCE.getGrpcChannel())
            .withCallCredentials(new ClarifaiCallCredentials(PAT));

        MultiCollectorResponse postCollectorsResponse = stub.postCollectors(
            PostCollectorsRequest.newBuilder()
            .setUserAppId(UserAppIDSet.newBuilder().setUserId(USER_ID).setAppId(APP_ID))
                .addCollectors(
                    Collector.newBuilder()
                        .setId(COLLECTOR_ID)
                        .setDescription(COLLECTOR_DESCRIPTION)
                        .setPreQueueWorkflowId(PRE_QUEUE_WORKFLOW_ID)
                        .setPostQueueWorkflowId(POST_QUEUE_WORKFLOW_ID)
                        .setCollectorSource(
                            CollectorSource.newBuilder()
                                .setApiPostModelOutputsCollectorSource(
                                    APIPostModelOutputsCollectorSource.newBuilder()
                                        .setModelUserId(USER_ID)
                                        .setModelAppId(APP_ID)
                                        .setModelId(MODEL_ID)
                                        .setModelVersionId(MODEL_VERSION_ID)
                                        .setPostInputsKeyId(POST_INPUTS_KEY_ID)
                                        .setCallerUserId(CALLER_USER_ID)
                                )
                        )
                )
                .build()
        );

        if (postCollectorsResponse.getStatus().getCode() != StatusCode.SUCCESS) {
            throw new RuntimeException("Post collectors failed, status: " + postCollectorsResponse.getStatus());
        }

    }
}
<?php

require __DIR__ . "/vendor/autoload.php";

////////////////////////////////////////////////////////////////////////////////////
// In this section, we set the user authentication, app ID, and details of the
// collector we want to add. Change these strings to run your own example.
/////////////////////////////////////////////////////////////////////////////////////

$USER_ID = "YOUR_USER_ID_HERE";
// Your PAT (Personal Access Token) can be found in the Account's Security section
$PAT = "YOUR_PAT_HERE";
$APP_ID = "YOUR_APP_ID_HERE";
// Change these to add your own collector
$COLLECTOR_ID = 'YOUR_COLLECTOR_ID_HERE';
$COLLECTOR_DESCRIPTION = 'YOUR_COLLECTOR_DESCRIPTION_HERE';
$PRE_QUEUE_WORKFLOW_ID = 'YOUR_PRE_WORKFLOW_ID_HERE';
$POST_QUEUE_WORKFLOW_ID = 'YOUR_POST_WORKFLOW_ID_HERE';
$MODEL_ID = 'YOUR_MODEL_ID_HERE';
$MODEL_VERSION_ID = 'YOUR_MODEL_VERSION_ID_HERE';
$POST_INPUTS_KEY_ID = 'YOUR_API_KEY_HERE';
$CALLER_USER_ID = 'YOUR_CALLER_USER_ID_HERE';

///////////////////////////////////////////////////////////////////////////////////
// YOU DO NOT NEED TO CHANGE ANYTHING BELOW THIS LINE TO RUN THIS EXAMPLE
///////////////////////////////////////////////////////////////////////////////////

use Clarifai\Api\Collector;
use Clarifai\ClarifaiClient;
use Clarifai\Api\PostCollectorsRequest;
use Clarifai\Api\CollectorSource;
use Clarifai\Api\APIPostModelOutputsCollectorSource;
use Clarifai\Api\Status\StatusCode;
use Clarifai\Api\UserAppIDSet;

$client = ClarifaiClient::grpc();

$metadata = ["Authorization" => ["Key " . $PAT]];

$userDataObject = new UserAppIDSet([
    "user_id" => $USER_ID,
    "app_id" => $APP_ID
]);

// Let's make a RPC call to the Clarifai platform. It uses the opened gRPC client channel to communicate a
// request and then wait for the response
[$response, $status] = $client->PostCollectors(
        // The request object carries the request along with the request status and other metadata related to the request itself
        new PostCollectorsRequest([
            "user_app_id" => $userDataObject,
            "collectors" => [
                new Collector([
                    "id" => $COLLECTOR_ID,
                    "description" => $COLLECTOR_DESCRIPTION,
                    "pre_queue_workflow_id" => $PRE_QUEUE_WORKFLOW_ID,
                    "post_queue_workflow_id" => $POST_QUEUE_WORKFLOW_ID,
                    "collector_source" =>
                        new CollectorSource([
                            "api_post_model_outputs_collector_source" =>
                                new APIPostModelOutputsCollectorSource([
                                    "model_user_id" => $USER_ID,
                                    "model_app_id" => $APP_ID,
                                    "model_id" => $MODEL_ID,
                                    "model_version_id" => $MODEL_VERSION_ID,
                                    "post_inputs_key_id" => $POST_INPUTS_KEY_ID,
                                    "caller_user_id" => $CALLER_USER_ID
                                ])

                        ])

                ])
            ]
        ]),
        $metadata
    )->wait();

// A response is returned and the first thing we do is check the status of it
// A successful response will have a status code of 0; otherwise, there is some error
if ($status->code !== 0) {
    throw new Exception("Error: {$status->details}");
}
// In addition to the RPC response status, there is a Clarifai API status that reports if the operation was a success or failure
// (not just that the communication was successful)
if ($response->getStatus()->getCode() != StatusCode::SUCCESS) {
    print $response->getStatus()->getDetails();
    throw new Exception("Failure response: " . $response->getStatus()->getDescription());
}

?>
curl -X POST "https://api.clarifai.com/v2/users/YOUR_USER_ID_HERE/apps/YOUR_APP_ID_HERE/collectors" \
  -H "Authorization: Key YOUR_PAT_HERE" \
  -H "Content-Type: application/json" \
  --data-raw '{
    "collectors": [
        {
            "id": "YOUR_COLLECTOR_ID_HERE",
            "description": "YOUR_COLLECTOR_DESCRIPTION_HERE",
            "pre_queue_workflow_id": "YOUR_PRE_WORKFLOW_ID_HERE",
            "post_queue_workflow_id": "YOUR_POST_WORKFLOW_ID_HERE",
            "collector_source": {
                "api_post_model_outputs_collector_source": {
                    "model_user_id": "YOUR_USER_ID_HERE",
                    "model_app_id": "YOUR_APP_ID_HERE",
                    "model_id": "YOUR_MODEL_ID_HERE",
                    "model_version_id": "YOUR_MODEL_VERSION_ID_HERE",
                    "post_inputs_key_id": "YOUR_API_KEY_HERE",
                    "caller_user_id": "CALLER_USER_ID"
                }
            }
       }
    ]
}'
Update Collector
You can update an existing collector.
- Python (gRPC)
- JavaScript (REST)
- Node.js (gRPC)
- Java (gRPC)
- PHP (gRPC)
- cURL
###############################################################################
# In this section, we set the user authentication, app ID, and details of the
# collector we want to update. Change these strings to run your own example.
###############################################################################

USER_ID = 'YOUR_USER_ID_HERE'
# Your PAT (Personal Access Token) can be found in the Account's Security section
PAT = 'YOUR_PAT_HERE'
APP_ID = 'YOUR_APP_ID_HERE'
# Change these to update your own collector
COLLECTOR_ID = 'YOUR_COLLECTOR_ID_HERE'
COLLECTOR_DESCRIPTION = 'YOUR_COLLECTOR_DESCRIPTION_HERE'
PRE_QUEUE_WORKFLOW_ID = 'YOUR_PRE_WORKFLOW_ID_HERE'
POST_QUEUE_WORKFLOW_ID = 'YOUR_POST_WORKFLOW_ID_HERE'
MODEL_ID = 'YOUR_MODEL_ID_HERE'
MODEL_VERSION_ID = 'YOUR_MODEL_VERSION_ID_HERE'
POST_INPUTS_KEY_ID = 'YOUR_KEY_ID_HERE'
CALLER_USER_ID = 'YOUR_CALLER_USER_ID_HERE'

##########################################################################
# YOU DO NOT NEED TO CHANGE ANYTHING BELOW THIS LINE TO RUN THIS EXAMPLE
##########################################################################

from clarifai_grpc.channel.clarifai_channel import ClarifaiChannel
from clarifai_grpc.grpc.api import resources_pb2, service_pb2, service_pb2_grpc
from clarifai_grpc.grpc.api.status import status_code_pb2

channel = ClarifaiChannel.get_grpc_channel()
stub = service_pb2_grpc.V2Stub(channel)

metadata = (('authorization', 'Key ' + PAT),)

userDataObject = resources_pb2.UserAppIDSet(user_id=USER_ID, app_id=APP_ID) # The userDataObject is required when using a PAT

patch_collectors_response = stub.PatchCollectors(
    service_pb2.PatchCollectorsRequest(
        user_app_id=userDataObject,
        action = 'overwrite',
        collectors=[
            resources_pb2.Collector(
                id=COLLECTOR_ID,
                description=COLLECTOR_DESCRIPTION,
                pre_queue_workflow_id=PRE_QUEUE_WORKFLOW_ID,
                post_queue_workflow_id=POST_QUEUE_WORKFLOW_ID,
                collector_source=resources_pb2.CollectorSource(
                    api_post_model_outputs_collector_source=resources_pb2.APIPostModelOutputsCollectorSource(
                        model_user_id=USER_ID,
                        model_app_id=APP_ID,
                        model_id=MODEL_ID,
                        model_version_id=MODEL_VERSION_ID,
                        post_inputs_key_id=POST_INPUTS_KEY_ID,
                        caller_user_id=CALLER_USER_ID
                    )
                )
            )
        ]
    ),
    metadata=metadata
)

if patch_collectors_response.status.code != status_code_pb2.SUCCESS:
    print(patch_collectors_response.status)
    raise Exception("Patch collectors failed, status: " + patch_collectors_response.status.description)
<!--index.html file-->

<script>
    ////////////////////////////////////////////////////////////////////////////////////
    // In this section, we set the user authentication, app ID, and details of the
    // collector we want to update. Change these strings to run your own example.
    ////////////////////////////////////////////////////////////////////////////////////

    const USER_ID = 'YOUR_USER_ID_HERE';
    // Your PAT (Personal Access Token) can be found in the Account's Security section
    const PAT = 'YOUR_PAT_HERE';
    const APP_ID = 'YOUR_APP_ID_HERE';
    // Change these to update your own collector
    const COLLECTOR_ID = 'YOUR_COLLECTOR_ID_HERE';
    const COLLECTOR_DESCRIPTION = 'YOUR_COLLECTOR_DESCRIPTION_HERE';
    const PRE_QUEUE_WORKFLOW_ID = 'YOUR_PRE_WORKFLOW_ID_HERE';
    const POST_QUEUE_WORKFLOW_ID = 'YOUR_POST_WORKFLOW_ID_HERE';
    const MODEL_ID = 'YOUR_MODEL_ID_HERE';
    const MODEL_VERSION_ID = 'YOUR_MODEL_VERSION_ID_HERE';
    const POST_INPUTS_KEY_ID = 'YOUR_API_KEY_HERE';
    const CALLER_USER_ID = 'YOUR_CALLER_USER_ID_HERE';

    ///////////////////////////////////////////////////////////////////////////////////
    // YOU DO NOT NEED TO CHANGE ANYTHING BELOW THIS LINE TO RUN THIS EXAMPLE
    ///////////////////////////////////////////////////////////////////////////////////

    const raw = JSON.stringify({
        "user_app_id": {
            "user_id": USER_ID,
            "app_id": APP_ID
        },
        "action": "overwrite",
        "collectors": [
        {
            "id": COLLECTOR_ID,
            "description": COLLECTOR_DESCRIPTION,
            "pre_queue_workflow_id": PRE_QUEUE_WORKFLOW_ID,
            "post_queue_workflow_id": POST_QUEUE_WORKFLOW_ID,
            "collector_source": {
                "api_post_model_outputs_collector_source": {
                    "model_user_id": USER_ID,
                    "model_app_id": APP_ID,
                    "model_id": MODEL_ID,
                    "model_version_id": MODEL_VERSION_ID,
                    "post_inputs_key_id": POST_INPUTS_KEY_ID,
                    "caller_user_id": CALLER_USER_ID
                    }
                }
        }

        ]
    });

    const requestOptions = {
        method: 'PATCH',
        headers: {
            'Accept': 'application/json',
            'Authorization': 'Key ' + PAT
        },
        body: raw
    };

    fetch("https://api.clarifai.com/v2/collectors", requestOptions)
        .then(response => response.text())
        .then(result => console.log(result))
        .catch(error => console.log('error', error));

</script>
//index.js file

////////////////////////////////////////////////////////////////////////////////////
// In this section, we set the user authentication, app ID, and details of the
// collector we want to update. Change these strings to run your own example.
////////////////////////////////////////////////////////////////////////////////////

const USER_ID = 'YOUR_USER_ID_HERE';
// Your PAT (Personal Access Token) can be found in the Account's Security section
const PAT = 'YOUR_PAT_HERE';
const APP_ID = 'YOUR_APP_ID_HERE';
// Change these to update your own collector
const COLLECTOR_ID = 'YOUR_COLLECTOR_ID_HERE';
const COLLECTOR_DESCRIPTION = 'YOUR_NEW_COLLECTOR_DESCRIPTION_HERE';
const PRE_QUEUE_WORKFLOW_ID = 'YOUR_NEW_PRE_WORKFLOW_ID';
const POST_QUEUE_WORKFLOW_ID = 'YOUR_NEW_POST_WORKFLOW_ID';
const MODEL_ID = 'YOUR_NEW_MODEL_ID_HERE';
const MODEL_VERSION_ID = 'YOUR_NEW_MODEL_VERSION_ID_HERE';
const POST_INPUTS_KEY_ID = 'YOUR_API_KEY_HERE';
const CALLER_USER_ID = 'YOUR_CALLER_USER_ID_HERE';

/////////////////////////////////////////////////////////////////////////////
// YOU DO NOT NEED TO CHANGE ANYTHING BELOW THIS LINE TO RUN THIS EXAMPLE
/////////////////////////////////////////////////////////////////////////////

const { ClarifaiStub, grpc } = require("clarifai-nodejs-grpc");

const stub = ClarifaiStub.grpc();

// This will be used by every Clarifai endpoint call
const metadata = new grpc.Metadata();
metadata.set("authorization", "Key " + PAT);

stub.PatchCollectors(
    {
        user_app_id: {
            "user_id": USER_ID,
            "app_id": APP_ID
        },
        action: "overwrite",
        collectors: [
            {
                id: COLLECTOR_ID,
                description: COLLECTOR_DESCRIPTION,
                pre_queue_workflow_id: PRE_QUEUE_WORKFLOW_ID,
                post_queue_workflow_id: POST_QUEUE_WORKFLOW_ID,
                collector_source: {
                    api_post_model_outputs_collector_source: {
                        model_user_id: USER_ID,
                        model_app_id: APP_ID,
                        model_id: MODEL_ID,
                        model_version_id: MODEL_VERSION_ID,
                        post_inputs_key_id: POST_INPUTS_KEY_ID,
                        caller_user_id: CALLER_USER_ID
                    }
                }
            }
        ]
    },
    metadata,
    (err, response) => {
        if (err) {
            throw new Error(err);
        }

        if (response.status.code !== 10000) {
            console.log(response.status);
            throw new Error("Patch collectors failed, status: " + response.status.description);
        }
    }
);
package com.clarifai.example;

import com.clarifai.channel.ClarifaiChannel;
import com.clarifai.credentials.ClarifaiCallCredentials;
import com.clarifai.grpc.api.*;
import com.clarifai.grpc.api.status.*;

public class ClarifaiExample {

    ///////////////////////////////////////////////////////////////////////////////////
    // In this section, we set the user authentication, app ID, and details of the
    // collector we want to update. Change these strings to run your own example.
    ///////////////////////////////////////////////////////////////////////////////////

    static final String USER_ID = "YOUR_USER_ID_HERE";
    //Your PAT (Personal Access Token) can be found in the portal under Authentication
    static final String PAT = "YOUR_PAT_HERE";
    static final String APP_ID = "YOUR_APP_ID_HERE";
    // Change these to update your own collector
    static final String COLLECTOR_ID = "YOUR_COLLECTOR_ID_HERE";
    static final String COLLECTOR_DESCRIPTION = "YOUR_NEW_COLLECTOR_DESCRIPTION_HERE";
    static final String PRE_QUEUE_WORKFLOW_ID = "YOUR_NEW_PRE_WORKFLOW_ID";
    static final String POST_QUEUE_WORKFLOW_ID = "YOUR_NEW_POST_WORKFLOW_ID";
    static final String MODEL_ID = "YOUR_NEW_MODEL_ID_HERE";
    static final String MODEL_VERSION_ID = "YOUR_NEW_MODEL_VERSION_ID_HERE";
    static final String POST_INPUTS_KEY_ID = "YOUR_API_KEY_HERE";
    static final String CALLER_USER_ID = "YOUR_CALLER_USER_ID_HERE";

    ///////////////////////////////////////////////////////////////////////////////////
    // YOU DO NOT NEED TO CHANGE ANYTHING BELOW THIS LINE TO RUN THIS EXAMPLE
    ///////////////////////////////////////////////////////////////////////////////////

    public static void main(String[] args) {

        V2Grpc.V2BlockingStub stub = V2Grpc.newBlockingStub(ClarifaiChannel.INSTANCE.getGrpcChannel())
            .withCallCredentials(new ClarifaiCallCredentials(PAT));

        MultiCollectorResponse patchCollectorsResponse = stub.patchCollectors(
            PatchCollectorsRequest.newBuilder()
            .setUserAppId(UserAppIDSet.newBuilder().setUserId(USER_ID).setAppId(APP_ID))
            .setAction("overwrite")
            .addCollectors(
                Collector.newBuilder()
                .setId(COLLECTOR_ID)
                .setDescription(COLLECTOR_DESCRIPTION)
                .setPreQueueWorkflowId(PRE_QUEUE_WORKFLOW_ID)
                .setPostQueueWorkflowId(POST_QUEUE_WORKFLOW_ID)
                .setCollectorSource(
                    CollectorSource.newBuilder()
                    .setApiPostModelOutputsCollectorSource(
                        APIPostModelOutputsCollectorSource.newBuilder()
                        .setModelUserId(USER_ID)
                        .setModelAppId(APP_ID)
                        .setModelId(MODEL_ID)
                        .setModelVersionId(MODEL_VERSION_ID)
                        .setPostInputsKeyId(POST_INPUTS_KEY_ID)
                        .setCallerUserId(CALLER_USER_ID)
                    )
                )
            )
            .build()
        );

        if (patchCollectorsResponse.getStatus().getCode() != StatusCode.SUCCESS) {
            throw new RuntimeException("Post collectors failed, status: " + patchCollectorsResponse.getStatus());
        }
    }
}
<?php

require __DIR__ . "/vendor/autoload.php";

////////////////////////////////////////////////////////////////////////////////////
// In this section, we set the user authentication, app ID, and details of the
// collector we want to update. Change these strings to run your own example.
/////////////////////////////////////////////////////////////////////////////////////

$USER_ID = "YOUR_USER_ID_HERE";
// Your PAT (Personal Access Token) can be found in the Account's Security section
$PAT = "YOUR_PAT_HERE";
$APP_ID = "YOUR_APP_ID_HERE";
// Change these to update your own collector
$COLLECTOR_ID = 'YOUR_COLLECTOR_ID_HERE';
$COLLECTOR_DESCRIPTION = 'YOUR_NEW_COLLECTOR_DESCRIPTION_HERE';
$PRE_QUEUE_WORKFLOW_ID = 'YOUR_NEW_PRE_WORKFLOW_ID';
$POST_QUEUE_WORKFLOW_ID = 'YOUR_NEW_POST_WORKFLOW_ID';
$MODEL_ID = 'YOUR_NEW_MODEL_ID_HERE';
$MODEL_VERSION_ID = 'YOUR_NEW_MODEL_VERSION_ID_HERE';
$POST_INPUTS_KEY_ID = 'YOUR_API_KEY_HERE';
$CALLER_USER_ID = 'YOUR_CALLER_USER_ID_HERE';

///////////////////////////////////////////////////////////////////////////////////
// YOU DO NOT NEED TO CHANGE ANYTHING BELOW THIS LINE TO RUN THIS EXAMPLE
///////////////////////////////////////////////////////////////////////////////////

use Clarifai\Api\Collector;
use Clarifai\ClarifaiClient;
use Clarifai\Api\PatchCollectorsRequest;
use Clarifai\Api\CollectorSource;
use Clarifai\Api\APIPostModelOutputsCollectorSource;
use Clarifai\Api\Status\StatusCode;
use Clarifai\Api\UserAppIDSet;

$client = ClarifaiClient::grpc();

$metadata = ["Authorization" => ["Key " . $PAT]];

$userDataObject = new UserAppIDSet([
    "user_id" => $USER_ID,
    "app_id" => $APP_ID
]);

// Let's make a RPC call to the Clarifai platform. It uses the opened gRPC client channel to communicate a
// request and then wait for the response
[$response, $status] = $client->PatchCollectors(
        // The request object carries the request along with the request status and other metadata related to the request itself
        new PatchCollectorsRequest([
            "user_app_id" => $userDataObject,
            "action" => "overwrite",
            "collectors" => [
                new Collector([
                    "id" => $COLLECTOR_ID,
                    "description" => $COLLECTOR_DESCRIPTION,
                    "pre_queue_workflow_id" => $PRE_QUEUE_WORKFLOW_ID,
                    "post_queue_workflow_id" => $POST_QUEUE_WORKFLOW_ID,
                    "collector_source" =>
                        new CollectorSource([
                            "api_post_model_outputs_collector_source" =>
                                new APIPostModelOutputsCollectorSource([
                                    "model_user_id" => $USER_ID,
                                    "model_app_id" => $APP_ID,
                                    "model_id" => $MODEL_ID,
                                    "model_version_id" => $MODEL_VERSION_ID,
                                    "post_inputs_key_id" => $POST_INPUTS_KEY_ID,
                                    "caller_user_id" => $CALLER_USER_ID
                                ])

                        ])

                ])
            ]
        ]),
        $metadata
    )->wait();

// A response is returned and the first thing we do is check the status of it
// A successful response will have a status code of 0; otherwise, there is some error
if ($status->code !== 0) {
    throw new Exception("Error: {$status->details}");
}
// In addition to the RPC response status, there is a Clarifai API status that reports if the operation was a success or failure
// (not just that the communication was successful)
if ($response->getStatus()->getCode() != StatusCode::SUCCESS) {
    print $response->getStatus()->getDetails();
    throw new Exception("Failure response: " . $response->getStatus()->getDescription());
}

?>
curl -X PATCH "https://api.clarifai.com/v2/users/YOUR_USER_ID_HERE/apps/YOUR_APP_ID_HERE/collectors" \
  -H "Authorization: Key YOUR_PAT_HERE" \
  -H "Content-Type: application/json" \
  --data-raw '{
    "action": "overwrite",
    "collectors": [
        {
            "id": "YOUR_COLLECTOR_ID_HERE",
            "description": "YOUR_NEW_COLLECTOR_DESCRIPTION_HERE",
            "pre_queue_workflow_id": "YOUR_NEW_PRE_WORKFLOW_ID_HERE",
            "post_queue_workflow_id": "YOUR_NEW_POST_WORKFLOW_ID_HERE",
            "collector_source": {
                "api_post_model_outputs_collector_source": {
                    "model_user_id": "YOUR_USER_ID_HERE",
                    "model_app_id": "YOUR_APP_ID_HERE",
                    "model_id": "YOUR_NEW_MODEL_ID_HERE",
                    "model_version_id": "YOUR_NEW_MODEL_VERSION_ID_HERE",
                    "post_inputs_key_id": "YOUR_API_KEY_HERE",
                    "caller_user_id": "CALLER_USER_ID_HERE"
                }
            }
       }
    ]
}'
List Collectors
You can list all the collectors in your app. Click here to learn how to control the page that gets displayed.
- Python (gRPC)
- JavaScript (REST)
- Node.js (gRPC)
- Java (gRPC)
- PHP (gRPC)
- cURL
##################################################################
# In this section, we set the user authentication and app ID.
# Change these strings to run your own example.
##################################################################

USER_ID = 'YOUR_USER_ID_HERE'
# Your PAT (Personal Access Token) can be found in the Account's Security section
PAT = 'YOUR_PAT_HERE'
APP_ID = 'YOUR_APP_ID_HERE'

##########################################################################
# YOU DO NOT NEED TO CHANGE ANYTHING BELOW THIS LINE TO RUN THIS EXAMPLE
##########################################################################

from clarifai_grpc.channel.clarifai_channel import ClarifaiChannel
from clarifai_grpc.grpc.api import resources_pb2, service_pb2, service_pb2_grpc
from clarifai_grpc.grpc.api.status import status_code_pb2

channel = ClarifaiChannel.get_grpc_channel()
stub = service_pb2_grpc.V2Stub(channel)

metadata = (('authorization', 'Key ' + PAT),)

userDataObject = resources_pb2.UserAppIDSet(user_id=USER_ID, app_id=APP_ID) # The userDataObject is required when using a PAT

list_collectors_response = stub.ListCollectors(
    service_pb2.ListCollectorsRequest(user_app_id=userDataObject),
    metadata=metadata
)

if list_collectors_response.status.code != status_code_pb2.SUCCESS:
    print(list_collectors_response.status)
    raise Exception("List collectors failed, status: " + list_collectors_response.status.description)

for collector in list_collectors_response.collectors:
    print(collector)

#print(list_collectors_response.collectors)
<!--index.html file-->

<script>
    ////////////////////////////////////////////////////////////////////////////////////
    // In this section, we set the user authentication and app ID.
    // Change these strings to run your own example.
    ////////////////////////////////////////////////////////////////////////////////////

    const USER_ID = 'YOUR_USER_ID_HERE';
    // Your PAT (Personal Access Token) can be found in the Account's Security section
    const PAT = 'YOUR_PAT_HERE';
    const APP_ID = 'YOUR_APP_ID_HERE';

    ///////////////////////////////////////////////////////////////////////////////////
    // YOU DO NOT NEED TO CHANGE ANYTHING BELOW THIS LINE TO RUN THIS EXAMPLE
    ///////////////////////////////////////////////////////////////////////////////////

    const requestOptions = {
        method: 'GET',
        headers: {
            'Accept': 'application/json',
            'Authorization': 'Key ' + PAT
        }

    };

    fetch(`https://api.clarifai.com/v2/users/${USER_ID}/apps/${APP_ID}/collectors`, requestOptions)
        .then(response => response.text())
        .then(result => console.log(result))
        .catch(error => console.log('error', error));

</script>
//index.js file

//////////////////////////////////////////////////////////////////////
// In this section, we set the user authentication and app ID.
// Change these strings to run your own example.
//////////////////////////////////////////////////////////////////////

const USER_ID = 'YOUR_USER_ID_HERE';
// Your PAT (Personal Access Token) can be found in the Account's Security section
const PAT = 'YOUR_PAT_HERE';
const APP_ID = 'YOUR_APP_ID_HERE';

/////////////////////////////////////////////////////////////////////////////
// YOU DO NOT NEED TO CHANGE ANYTHING BELOW THIS LINE TO RUN THIS EXAMPLE
/////////////////////////////////////////////////////////////////////////////

const { ClarifaiStub, grpc } = require("clarifai-nodejs-grpc");

const stub = ClarifaiStub.grpc();

// This will be used by every Clarifai endpoint call
const metadata = new grpc.Metadata();
metadata.set("authorization", "Key " + PAT);

stub.ListCollectors(
    {
        user_app_id: {
            "user_id": USER_ID,
            "app_id": APP_ID
        }
    },
    metadata,
    (err, response) => {
        if (err) {
            throw new Error(err);
        }

        if (response.status.code !== 10000) {
            console.log(response.status);
            throw new Error("List collectors failed, status: " + response.status.description);
        }

        for (const collector of response.collectors) {
            console.log(collector);
        }
    }
);
package com.clarifai.example;

import com.clarifai.channel.ClarifaiChannel;
import com.clarifai.credentials.ClarifaiCallCredentials;
import com.clarifai.grpc.api.*;
import com.clarifai.grpc.api.status.*;

public class ClarifaiExample {

    ////////////////////////////////////////////////////////////////////////
    // In this section, we set the user authentication and app ID.
    // Change these strings to run your own example.
    ///////////////////////////////////////////////////////////////////////

    static final String USER_ID = "YOUR_USER_ID_HERE";
    //Your PAT (Personal Access Token) can be found in the portal under Authentication
    static final String PAT = "YOUR_PAT_HERE";
    static final String APP_ID = "YOUR_APP_ID_HERE";

    ///////////////////////////////////////////////////////////////////////////////////
    // YOU DO NOT NEED TO CHANGE ANYTHING BELOW THIS LINE TO RUN THIS EXAMPLE
    ///////////////////////////////////////////////////////////////////////////////////

    public static void main(String[] args) {

        V2Grpc.V2BlockingStub stub = V2Grpc.newBlockingStub(ClarifaiChannel.INSTANCE.getGrpcChannel())
            .withCallCredentials(new ClarifaiCallCredentials(PAT));

        MultiCollectorResponse listCollectorsResponse = stub.listCollectors(
            ListCollectorsRequest.newBuilder()
            .setUserAppId(UserAppIDSet.newBuilder().setUserId(USER_ID).setAppId(APP_ID))
                .build()
        );

        if (listCollectorsResponse.getStatus().getCode() != StatusCode.SUCCESS) {
            throw new RuntimeException("List collectors failed, status: " + listCollectorsResponse.getStatus());
        }

        for (Collector collector : listCollectorsResponse.getCollectorsList()) {
            System.out.println(collector);
        }

    }
}
<?php

require __DIR__ . "/vendor/autoload.php";

//////////////////////////////////////////////////////////////////////
// In this section, we set the user authentication and app ID.
// Change these strings to run your own example.
//////////////////////////////////////////////////////////////////////

$USER_ID = "YOUR_USER_ID_HERE";
// Your PAT (Personal Access Token) can be found in the Account's Security section
$PAT = "YOUR_PAT_HERE";
$APP_ID = "YOUR_APP_ID_HERE";

///////////////////////////////////////////////////////////////////////////////////
// YOU DO NOT NEED TO CHANGE ANYTHING BELOW THIS LINE TO RUN THIS EXAMPLE
///////////////////////////////////////////////////////////////////////////////////

use Clarifai\ClarifaiClient;
use Clarifai\Api\ListCollectorsRequest;
use Clarifai\Api\Status\StatusCode;
use Clarifai\Api\UserAppIDSet;

$client = ClarifaiClient::grpc();

$metadata = ["Authorization" => ["Key " . $PAT]];

$userDataObject = new UserAppIDSet([
    "user_id" => $USER_ID,
    "app_id" => $APP_ID
]);

// Let's make a RPC call to the Clarifai platform. It uses the opened gRPC client channel to communicate a
// request and then wait for the response
[$response, $status] = $client->ListCollectors(
        // The request object carries the request along with the request status and other metadata related to the request itself
        new ListCollectorsRequest([
            "user_app_id" => $userDataObject
        ]),
        $metadata
    )->wait();

// A response is returned and the first thing we do is check the status of it
// A successful response will have a status code of 0; otherwise, there is some error
if ($status->code !== 0) {
    throw new Exception("Error: {$status->details}");
}
// In addition to the RPC response status, there is a Clarifai API status that reports if the operation was a success or failure
// (not just that the communication was successful)
if ($response->getStatus()->getCode() != StatusCode::SUCCESS) {
    print $response->getStatus()->getDetails();
    throw new Exception("Failure response: " . $response->getStatus()->getDescription());
}

foreach ($response->getCollectors() as $collector){
    print $collector->serializeToJsonString(). "<br>";
}

?>
curl -X GET "https://api.clarifai.com/v2/users/YOUR_USER_ID_HERE/apps/YOUR_APP_ID_HERE/collectors" \
  -H "Authorization: Key YOUR_PAT_HERE" \
  -H "Content-Type: application/json"
Get Collector
You can return the details of a certain collector.
- Python (gRPC)
- JavaScript (REST)
- Node.js (gRPC)
- Java (gRPC)
- PHP (gRPC)
- cURL
#####################################################################################
# In this section, we set the user authentication, app ID, and ID of the collector
# we want its details. Change these strings to run your own example.
#####################################################################################

USER_ID = 'YOUR_USER_ID_HERE'
# Your PAT (Personal Access Token) can be found in the Account's Security section
PAT = 'YOUR_PAT_HERE'
APP_ID = 'YOUR_APP_ID_HERE'
# Change this to get your own collector
COLLECTOR_ID = 'YOUR_COLLECTOR_ID_HERE'

##########################################################################
# YOU DO NOT NEED TO CHANGE ANYTHING BELOW THIS LINE TO RUN THIS EXAMPLE
##########################################################################

from clarifai_grpc.channel.clarifai_channel import ClarifaiChannel
from clarifai_grpc.grpc.api import resources_pb2, service_pb2, service_pb2_grpc
from clarifai_grpc.grpc.api.status import status_code_pb2

channel = ClarifaiChannel.get_grpc_channel()
stub = service_pb2_grpc.V2Stub(channel)

metadata = (('authorization', 'Key ' + PAT),)

userDataObject = resources_pb2.UserAppIDSet(user_id=USER_ID, app_id=APP_ID) # The userDataObject is required when using a PAT

get_collector_response = stub.GetCollector(
    service_pb2.GetCollectorRequest(
        user_app_id=userDataObject,
        collector_id=COLLECTOR_ID
    ),
    metadata=metadata
)

if get_collector_response.status.code != status_code_pb2.SUCCESS:
    print(get_collector_response.status)
    raise Exception("Get collector failed, status: " + get_collector_response.status.description)

print(get_collector_response.collector)
<!--index.html file-->

<script>
    //////////////////////////////////////////////////////////////////////////////////////////
    //  In this section, we set the user authentication, app ID, and ID of the collector
    //  we want its details. Change these strings to run your own example.
    /////////////////////////////////////////////////////////////////////////////////////////

    const USER_ID = 'YOUR_USER_ID_HERE';
    // Your PAT (Personal Access Token) can be found in the Account's Security section
    const PAT = 'YOUR_PAT_HERE';
    const APP_ID = 'YOUR_APP_ID_HERE';
    // Change this to get your own collector
    const COLLECTOR_ID = 'YOUR_COLLECTOR_ID_HERE';

    ///////////////////////////////////////////////////////////////////////////////////
    // YOU DO NOT NEED TO CHANGE ANYTHING BELOW THIS LINE TO RUN THIS EXAMPLE
    ///////////////////////////////////////////////////////////////////////////////////

    const requestOptions = {
        method: 'GET',
        headers: {
            'Accept': 'application/json',
            'Authorization': 'Key ' + PAT
        }

    };

    fetch(`https://api.clarifai.com/v2/users/${USER_ID}/apps/${APP_ID}/collectors/${COLLECTOR_ID}`, requestOptions)
        .then(response => response.text())
        .then(result => console.log(result))
        .catch(error => console.log('error', error));

</script>
//index.js file

//////////////////////////////////////////////////////////////////////////////////////
// In this section, we set the user authentication, app ID, and ID of the collector
// we want its details. Change these strings to run your own example.
/////////////////////////////////////////////////////////////////////////////////////

const USER_ID = 'YOUR_USER_ID_HERE';
// Your PAT (Personal Access Token) can be found in the Account's Security section
const PAT = 'YOUR_PAT_HERE';
const APP_ID = 'YOUR_APP_ID_HERE';
// Change this to get your own collector
const COLLECTOR_ID = 'YOUR_COLLECTOR_ID_HERE';

/////////////////////////////////////////////////////////////////////////////
// YOU DO NOT NEED TO CHANGE ANYTHING BELOW THIS LINE TO RUN THIS EXAMPLE
/////////////////////////////////////////////////////////////////////////////

const { ClarifaiStub, grpc } = require("clarifai-nodejs-grpc");

const stub = ClarifaiStub.grpc();

// This will be used by every Clarifai endpoint call
const metadata = new grpc.Metadata();
metadata.set("authorization", "Key " + PAT);

stub.GetCollector(
    {
        user_app_id: {
            "user_id": USER_ID,
            "app_id": APP_ID
        },
        collector_id: COLLECTOR_ID
    },
    metadata,
    (err, response) => {
        if (err) {
            throw new Error(err);
        }

        if (response.status.code !== 10000) {
            console.log(response.status);
            throw new Error("Get collector failed, status: " + response.status.description);
        }

        console.log(response.collector);
    }
);
package com.clarifai.example;

import com.clarifai.channel.ClarifaiChannel;
import com.clarifai.credentials.ClarifaiCallCredentials;
import com.clarifai.grpc.api.*;
import com.clarifai.grpc.api.status.*;

public class ClarifaiExample {

    ///////////////////////////////////////////////////////////////////////////////////////
    // In this section, we set the user authentication, app ID, and ID of the collector
    // we want its details. Change these strings to run your own example.
    //////////////////////////////////////////////////////////////////////////////////////

    static final String USER_ID = "YOUR_USER_ID_HERE";
    //Your PAT (Personal Access Token) can be found in the portal under Authentication
    static final String PAT = "YOUR_PAT_HERE";
    static final String APP_ID = "YOUR_APP_ID_HERE";
    // Change this to get your own collector
    static final String COLLECTOR_ID = "YOUR_COLLECTOR_ID_HERE";

    ///////////////////////////////////////////////////////////////////////////////////
    // YOU DO NOT NEED TO CHANGE ANYTHING BELOW THIS LINE TO RUN THIS EXAMPLE
    ///////////////////////////////////////////////////////////////////////////////////

    public static void main(String[] args) {

        V2Grpc.V2BlockingStub stub = V2Grpc.newBlockingStub(ClarifaiChannel.INSTANCE.getGrpcChannel())
            .withCallCredentials(new ClarifaiCallCredentials(PAT));

        SingleCollectorResponse getCollectorResponse = stub.getCollector(
            GetCollectorRequest.newBuilder()
                .setUserAppId(UserAppIDSet.newBuilder().setUserId(USER_ID).setAppId(APP_ID))
                .setCollectorId(COLLECTOR_ID)
                .build()
        );

        if (getCollectorResponse.getStatus().getCode() != StatusCode.SUCCESS) {
            throw new RuntimeException("Get collector failed, status: " + getCollectorResponse.getStatus());
        }

        System.out.println(getCollectorResponse.getCollector());
    }
}
<?php

require __DIR__ . "/vendor/autoload.php";

//////////////////////////////////////////////////////////////////////////////////////
// In this section, we set the user authentication, app ID, and ID of the collector
// we want its details. Change these strings to run your own example.
/////////////////////////////////////////////////////////////////////////////////////

$USER_ID = "YOUR_USER_ID_HERE";
// Your PAT (Personal Access Token) can be found in the Account's Security section
$PAT = "YOUR_PAT_HERE";
$APP_ID = "YOUR_APP_ID_HERE";
// Change this to get your own collector
$COLLECTOR_ID = 'YOUR_COLLECTOR_ID_HERE';

///////////////////////////////////////////////////////////////////////////////////
// YOU DO NOT NEED TO CHANGE ANYTHING BELOW THIS LINE TO RUN THIS EXAMPLE
///////////////////////////////////////////////////////////////////////////////////

use Clarifai\ClarifaiClient;
use Clarifai\Api\GetCollectorRequest;
use Clarifai\Api\Status\StatusCode;
use Clarifai\Api\UserAppIDSet;

$client = ClarifaiClient::grpc();

$metadata = ["Authorization" => ["Key " . $PAT]];

$userDataObject = new UserAppIDSet([
    "user_id" => $USER_ID,
    "app_id" => $APP_ID
]);

// Let's make a RPC call to the Clarifai platform. It uses the opened gRPC client channel to communicate a
// request and then wait for the response
[$response, $status] = $client->GetCollector(
        // The request object carries the request along with the request status and other metadata related to the request itself
        new GetCollectorRequest([
            "user_app_id" => $userDataObject,
            "collector_id" => $COLLECTOR_ID
        ]),
        $metadata
    )->wait();

// A response is returned and the first thing we do is check the status of it
// A successful response will have a status code of 0; otherwise, there is some error
if ($status->code !== 0) {
    throw new Exception("Error: {$status->details}");
}
// In addition to the RPC response status, there is a Clarifai API status that reports if the operation was a success or failure
// (not just that the communication was successful)
if ($response->getStatus()->getCode() != StatusCode::SUCCESS) {
    print $response->getStatus()->getDetails();
    throw new Exception("Failure response: " . $response->getStatus()->getDescription());
}

print $response->getCollector()->serializeToJsonString();

?>
curl -X GET "https://api.clarifai.com/v2/users/YOUR_USER_ID_HERE/apps/YOUR_APP_ID_HERE/collectors/YOUR_COLLECTOR_ID_HERE" \
  -H "Authorization: Key YOUR_PAT_HERE" \
  -H "Content-Type: application/json"
Delete Collector
You can delete a collector.
- Python (gRPC)
- JavaScript (REST)
- Node.js (gRPC)
- Java (gRPC)
- PHP (gRPC)
- cURL
######################################################################################
# In this section, we set the user authentication, app ID, and IDs of the collectors
# we want to delete. Change these strings to run your own example.
######################################################################################

USER_ID = 'YOUR_USER_ID_HERE'
# Your PAT (Personal Access Token) can be found in the Account's Security section
PAT = 'YOUR_PAT_HERE'
APP_ID = 'YOUR_APP_ID_HERE'
# Change these to delete your own collectors
COLLECTOR_ID_1 = 'YOUR_COLLECTOR_ID_HERE'
COLLECTOR_ID_2 = 'YOUR_COLLECTOR_ID_HERE'

##########################################################################
# YOU DO NOT NEED TO CHANGE ANYTHING BELOW THIS LINE TO RUN THIS EXAMPLE
##########################################################################

from clarifai_grpc.channel.clarifai_channel import ClarifaiChannel
from clarifai_grpc.grpc.api import resources_pb2, service_pb2, service_pb2_grpc
from clarifai_grpc.grpc.api.status import status_code_pb2

channel = ClarifaiChannel.get_grpc_channel()
stub = service_pb2_grpc.V2Stub(channel)

metadata = (('authorization', 'Key ' + PAT),)

userDataObject = resources_pb2.UserAppIDSet(user_id=USER_ID, app_id=APP_ID)

delete_collectors_response = stub.DeleteCollectors(
    service_pb2.DeleteCollectorsRequest(
        user_app_id=userDataObject,
        ids=[COLLECTOR_ID_1, COLLECTOR_ID_2],
        #delete_all=True #Uncomment to delete all your collectors
    ),
    metadata=metadata
)

if delete_collectors_response.status.code != status_code_pb2.SUCCESS:
    print(delete_collectors_response.status)
    raise Exception("Delete collectors failed, status: " + delete_collectors_response.status.description)
<!--index.html file-->

<script>
    ///////////////////////////////////////////////////////////////////////////////////////////
    // In this section, we set the user authentication, app ID, and IDs of the collectors
    // we want to delete. Change these strings to run your own example.
    //////////////////////////////////////////////////////////////////////////////////////////

    const USER_ID = 'YOUR_USER_ID_HERE';
    // Your PAT (Personal Access Token) can be found in the Account's Security section
    const PAT = 'YOUR_PAT_HERE';
    const APP_ID = 'YOUR_APP_ID_HERE';
    // Change these to delete your own collectors
    const COLLECTOR_ID_1 = 'YOUR_COLLECTOR_ID_HERE';
    const COLLECTOR_ID_2 = 'YOUR_COLLECTOR_ID_HERE';

    ///////////////////////////////////////////////////////////////////////////////////
    // YOU DO NOT NEED TO CHANGE ANYTHING BELOW THIS LINE TO RUN THIS EXAMPLE
    ///////////////////////////////////////////////////////////////////////////////////

    const raw = JSON.stringify({
        "user_app_id": {
            "user_id": USER_ID,
            "app_id": APP_ID
        },
        "ids": [COLLECTOR_ID_1, COLLECTOR_ID_2],
        //"delete_all": true // Uncomment to delete all your collectors
    });

    const requestOptions = {
        method: 'DELETE',
        headers: {
            'Accept': 'application/json',
            'Authorization': 'Key ' + PAT
        },
        body: raw
    };

    fetch("https://api.clarifai.com/v2/collectors", requestOptions)
        .then(response => response.text())
        .then(result => console.log(result))
        .catch(error => console.log('error', error));


</script>
//index.js file

///////////////////////////////////////////////////////////////////////////////////////
// In this section, we set the user authentication, app ID, and IDs of the collectors
// we want to delete. Change these strings to run your own example.
//////////////////////////////////////////////////////////////////////////////////////

const USER_ID = 'YOUR_USER_ID_HERE';
// Your PAT (Personal Access Token) can be found in the Account's Security section
const PAT = 'YOUR_PAT_HERE';
const APP_ID = 'YOUR_APP_ID_HERE';
// Change these to delete your own collectors
const COLLECTOR_ID_1 = 'YOUR_COLLECTOR_ID_HERE';
const COLLECTOR_ID_2 = 'YOUR_COLLECTOR_ID_HERE';

/////////////////////////////////////////////////////////////////////////////
// YOU DO NOT NEED TO CHANGE ANYTHING BELOW THIS LINE TO RUN THIS EXAMPLE
/////////////////////////////////////////////////////////////////////////////

const { ClarifaiStub, grpc } = require("clarifai-nodejs-grpc");

const stub = ClarifaiStub.grpc();

// This will be used by every Clarifai endpoint call
const metadata = new grpc.Metadata();
metadata.set("authorization", "Key " + PAT);

stub.DeleteCollectors(
    {
        user_app_id: {
            "user_id": USER_ID,
            "app_id": APP_ID
        },
        ids: [COLLECTOR_ID_1, COLLECTOR_ID_2],
        //delete_all: true //Uncomment to delete all your collectors
    },
    metadata,
    (err, response) => {
        if (err) {
            throw new Error(err);
        }

        if (response.status.code !== 10000) {
            console.log(response.status);
            throw new Error("Delete collectors failed, status: " + response.status.description);
        }

        console.log(response.collector);
    }
);
package com.clarifai.example;

import com.clarifai.channel.ClarifaiChannel;
import com.clarifai.credentials.ClarifaiCallCredentials;
import com.clarifai.grpc.api.*;
import com.clarifai.grpc.api.status.*;

public class ClarifaiExample {

    ////////////////////////////////////////////////////////////////////////////////////////
    // In this section, we set the user authentication, app ID, and IDs of the collectors
    // we want to delete. Change these strings to run your own example.
    ///////////////////////////////////////////////////////////////////////////////////////

    static final String USER_ID = "YOUR_USER_ID_HERE";
    //Your PAT (Personal Access Token) can be found in the portal under Authentication
    static final String PAT = "YOUR_PAT_HERE";
    static final String APP_ID = "YOUR_APP_ID_HERE";
    // Change these to delete your own collectors
    static final String COLLECTOR_ID_1 = "YOUR_COLLECTOR_ID_HERE";
    static final String COLLECTOR_ID_2 = "YOUR_COLLECTOR_ID_HERE";

    ///////////////////////////////////////////////////////////////////////////////////
    // YOU DO NOT NEED TO CHANGE ANYTHING BELOW THIS LINE TO RUN THIS EXAMPLE
    ///////////////////////////////////////////////////////////////////////////////////

    public static void main(String[] args) {

        V2Grpc.V2BlockingStub stub = V2Grpc.newBlockingStub(ClarifaiChannel.INSTANCE.getGrpcChannel())
            .withCallCredentials(new ClarifaiCallCredentials(PAT));

        BaseResponse deleteCollectorsResponse = stub.deleteCollectors(
            DeleteCollectorsRequest.newBuilder()
            .setUserAppId(UserAppIDSet.newBuilder().setUserId(USER_ID).setAppId(APP_ID))
                .addIds(COLLECTOR_ID_1)
                .addIds(COLLECTOR_ID_2)
                .build()
        );

        if (deleteCollectorsResponse.getStatus().getCode() != StatusCode.SUCCESS) {
            throw new RuntimeException("Delete collectors failed, status: " + deleteCollectorsResponse.getStatus());
        }

    }
}
<?php

require __DIR__ . "/vendor/autoload.php";

///////////////////////////////////////////////////////////////////////////////////////
// In this section, we set the user authentication, app ID, and IDs of the collectors
// we want to delete. Change these strings to run your own example.
//////////////////////////////////////////////////////////////////////////////////////

$USER_ID = "YOUR_USER_ID_HERE";
// Your PAT (Personal Access Token) can be found in the Account's Security section
$PAT = "YOUR_PAT_HERE";
$APP_ID = "YOUR_APP_ID_HERE";
// Change these to delete your own collectors
$COLLECTOR_ID_1 = 'YOUR_COLLECTOR_ID_HERE';
$COLLECTOR_ID_2 = 'YOUR_COLLECTOR_ID_HERE';

///////////////////////////////////////////////////////////////////////////////////
// YOU DO NOT NEED TO CHANGE ANYTHING BELOW THIS LINE TO RUN THIS EXAMPLE
///////////////////////////////////////////////////////////////////////////////////

use Clarifai\ClarifaiClient;
use Clarifai\Api\DeleteCollectorsRequest;
use Clarifai\Api\Status\StatusCode;
use Clarifai\Api\UserAppIDSet;

$client = ClarifaiClient::grpc();

$metadata = ["Authorization" => ["Key " . $PAT]];

$userDataObject = new UserAppIDSet([
    "user_id" => $USER_ID,
    "app_id" => $APP_ID
]);

// Let's make a RPC call to the Clarifai platform. It uses the opened gRPC client channel to communicate a
// request and then wait for the response
[$response, $status] = $client->DeleteCollectors(
        // The request object carries the request along with the request status and other metadata related to the request itself
        new DeleteCollectorsRequest([
            "user_app_id" => $userDataObject,
            "ids"=> [
                $COLLECTOR_ID_1, $COLLECTOR_ID_2
            ],
            //"delete_all" => true // Uncomment to delete all your collectors
        ]),
        $metadata
    )->wait();

// A response is returned and the first thing we do is check the status of it
// A successful response will have a status code of 0; otherwise, there is some error
if ($status->code !== 0) {
    throw new Exception("Error: {$status->details}");
}
// In addition to the RPC response status, there is a Clarifai API status that reports if the operation was a success or failure
// (not just that the communication was successful)
if ($response->getStatus()->getCode() != StatusCode::SUCCESS) {
    print $response->getStatus()->getDetails();
    throw new Exception("Failure response: " . $response->getStatus()->getDescription());
}

?>
curl -X DELETE "https://api.clarifai.com/v2/users/YOUR_USER_ID_HERE/apps/YOUR_APP_ID_HERE/collectors" \
  -H "Authorization: Key YOUR_PAT_HERE" \
  -H "Content-Type: application/json" \
  --data-raw '{
    "ids": ["YOUR_COLLECTOR_ID_HERE", "YOUR_COLLECTOR_ID_HERE"]
}'