Create Workflows
Create computational graphs that include one or more models
You can build workflows using any Clarifai models or custom models you've created in your app. Outputs from one model can serve as inputs to another — provided the receiving model supports the input type.
The input and output types supported by your custom workflows depend on the capabilities of the individual models used to construct them.
This model-linking approach enables you to form a graph of interconnected models, allowing you to build sophisticated AI solutions tailored to specific use cases.
Supported Input and Output Types
Different models support different input and output formats. Here are some common examples:
- Inputs — Concepts, embeddings, images, videos, and regions.
- Outputs — Concepts, clusters, and regions.
Create via the UI
Let’s demonstrate how to create workflows with a simple example that first extracts text from an image and then translates the extracted text to Spanish.
We'll connect the following two Clarifai models to achieve our objective:
- The ocr-scene-english-paddleocr model, which detects and recognizes English texts in images;
- The text-translation-english-spanish model translates texts from English to Spanish.
We'll specify the IDs of the models and their versions — since a model can have several versions.
You can add up to 20 models to a single workflow.
Step 1: Create Application
Let's begin by creating an application that will act as the container for all the related models and workflows for this particular project.
Click here to learn how to create an application on the Clarifai platform.
When creating the application, select the Text/Document option as the primary input type.
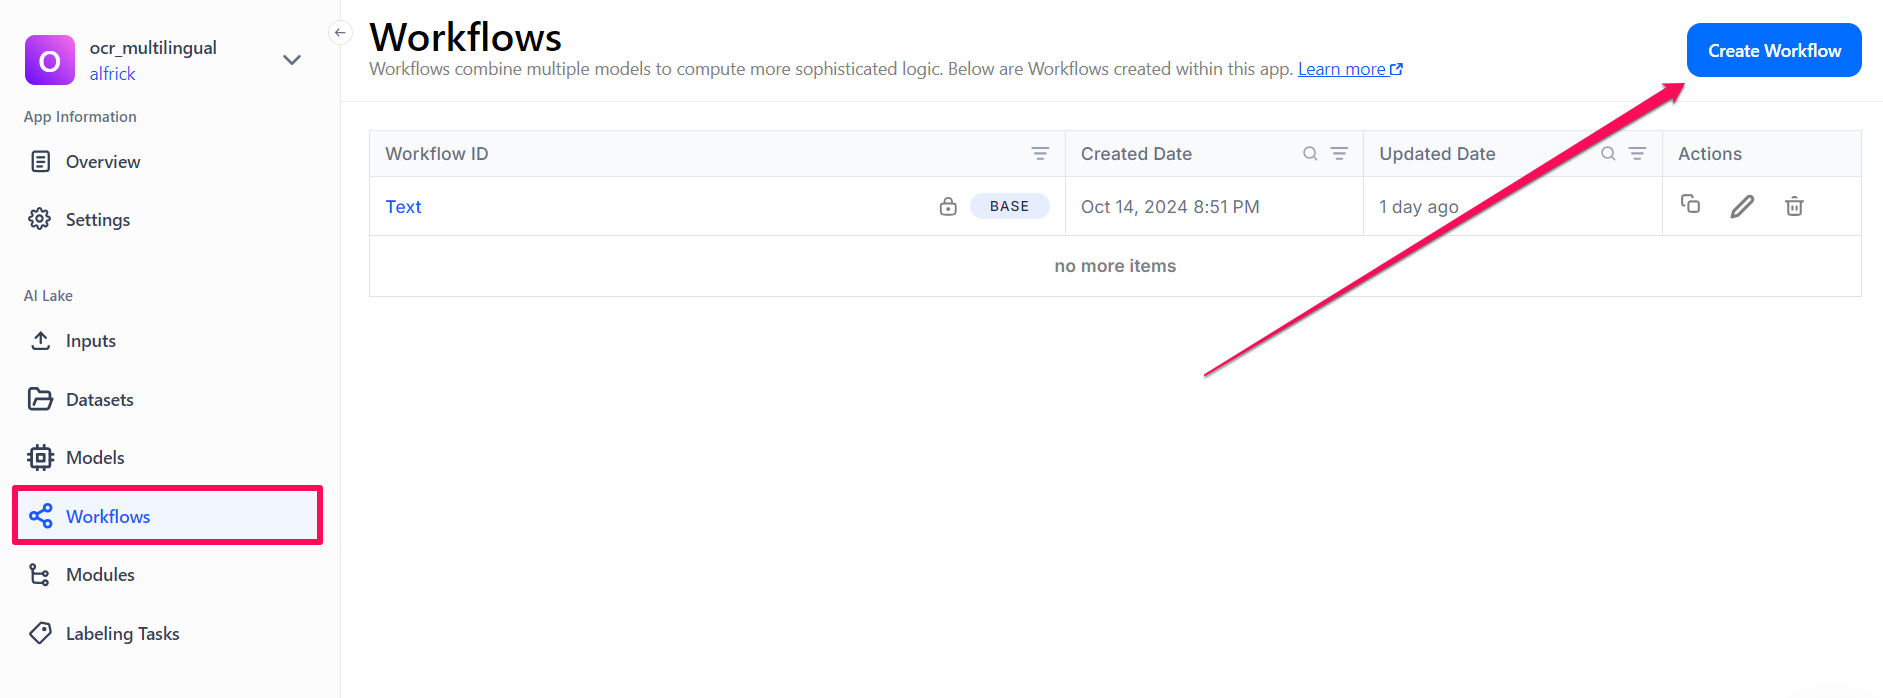
Step 2: Create a New Workflow
To create a new workflow, select the Workflows option in the collapsible left sidebar. Next, click the Create Workflow button in the upper-right corner of the page.
Step 3: Create Your Nodes
You'll be redirected to a simple, no-code, drag-and-drop interface that allows you to connect your models together. You'll need to connect the input nodes in your workflow. You can link your nodes to any nodes that precede them in the visual graph.
Name Your Workflow
Let's start by clicking the input field in the upper section of the page and providing a name for the custom workflow.
Search for First Node
Next, in the left sidebar, search for the optical-character-recognizer node. This allows you to configure a model that enables the extraction of texts from images, such as scans of printed pages or photos of street signs.
After finding the node, drag and drop it on the empty workspace pane and connect it to the IN element.
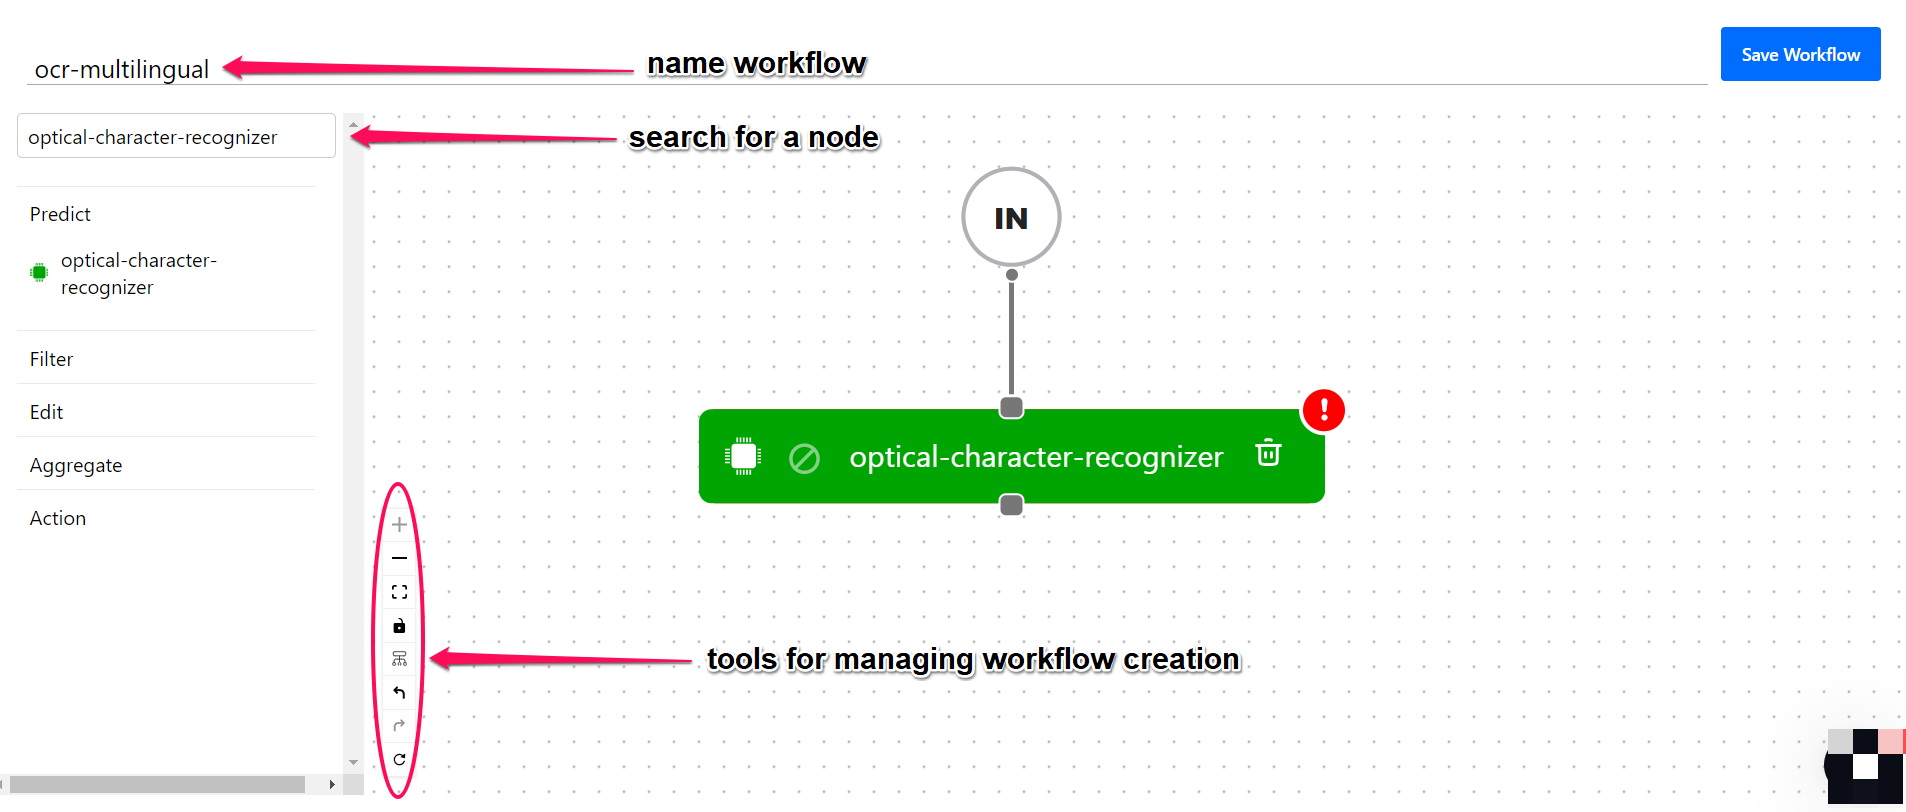
You can use the tools on the left side of the workspace pane to manage the workflow creation process. These tools enable you to zoom in and out, fit the view, arrange the workflow, reset the workspace, and perform other actions to help you efficiently design and organize your workflow.
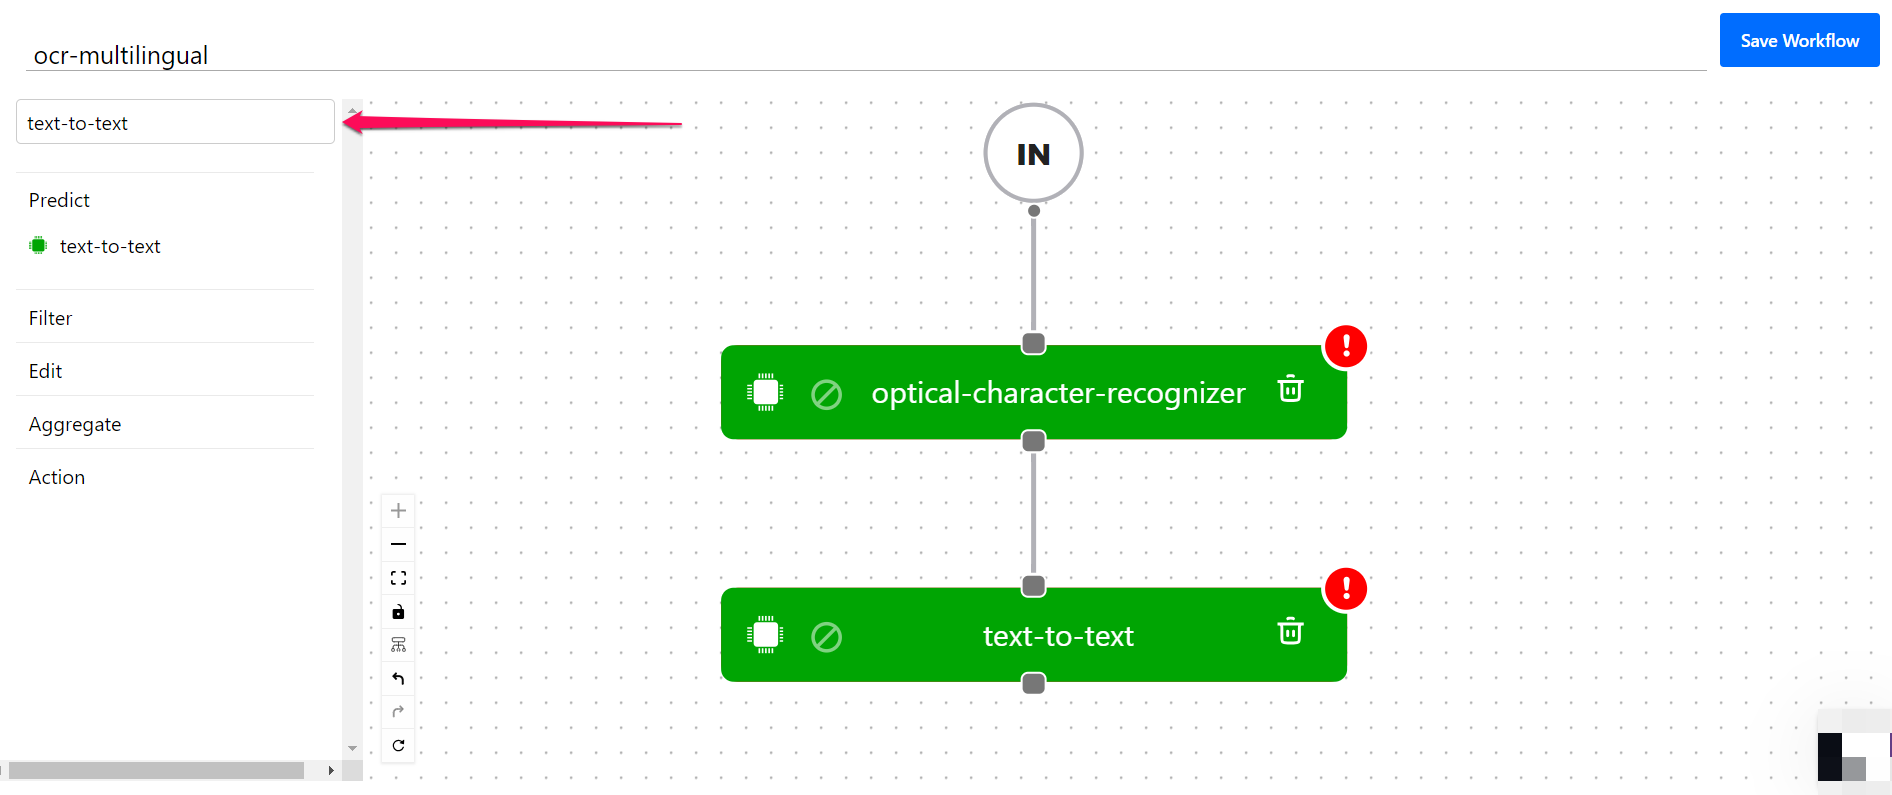
Search for the Second Node
Next, search for the text-to-text node. This allows you to configure a model that enables the transformation of one kind of text into another.
After finding the second node, drag and drop it on the workspace and draw a line that connects it to the first node. This shows the flow of information from one node to another.
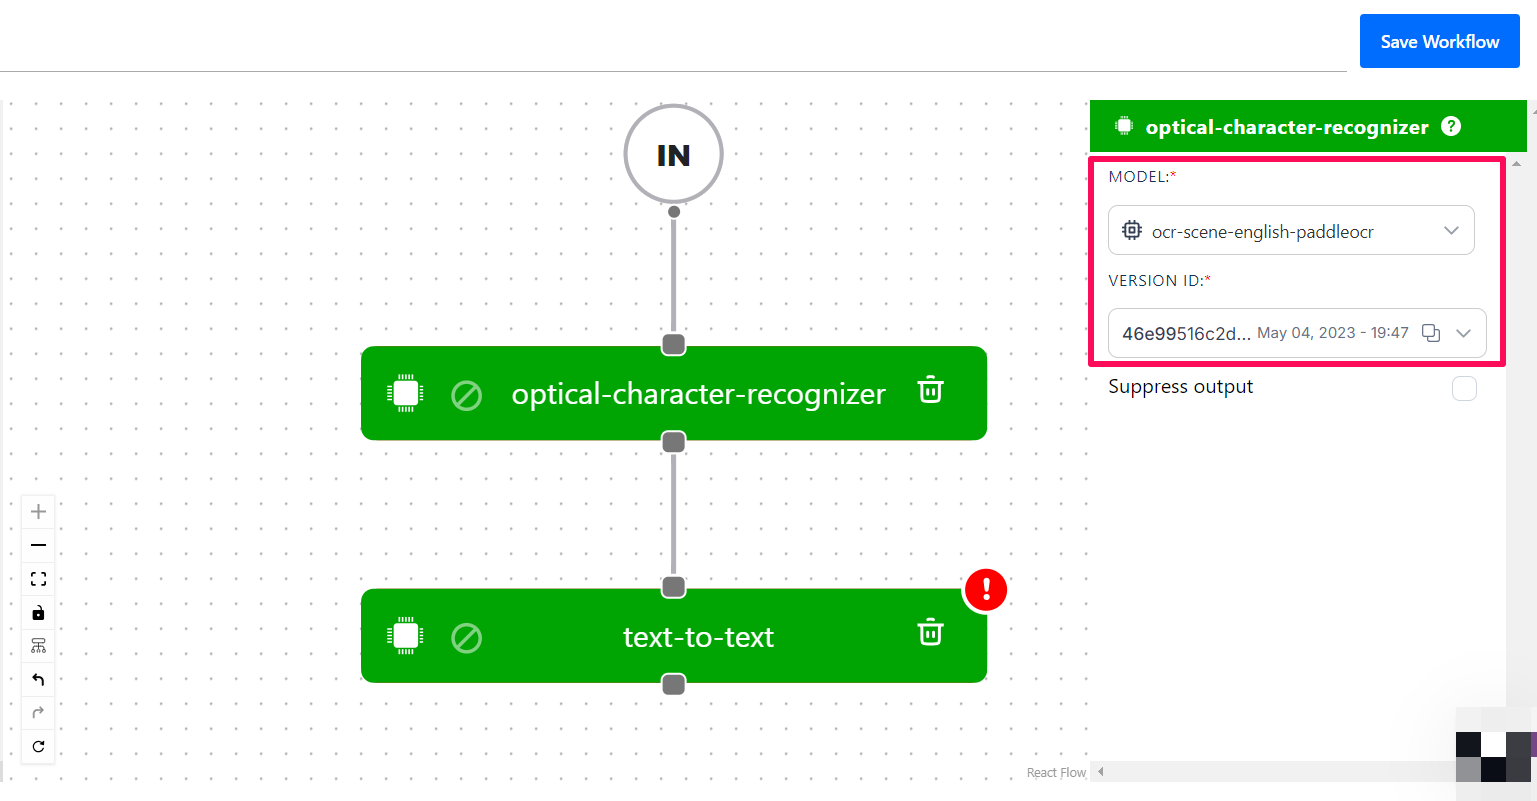
Step 4: Search for Models
Click the optical-character-recognizer node. And on the search box that appears on the right side of the page, specify the ocr-scene-english-paddleocr model as the one to use for optical character recognition. Also, select the version of the model you want to use.
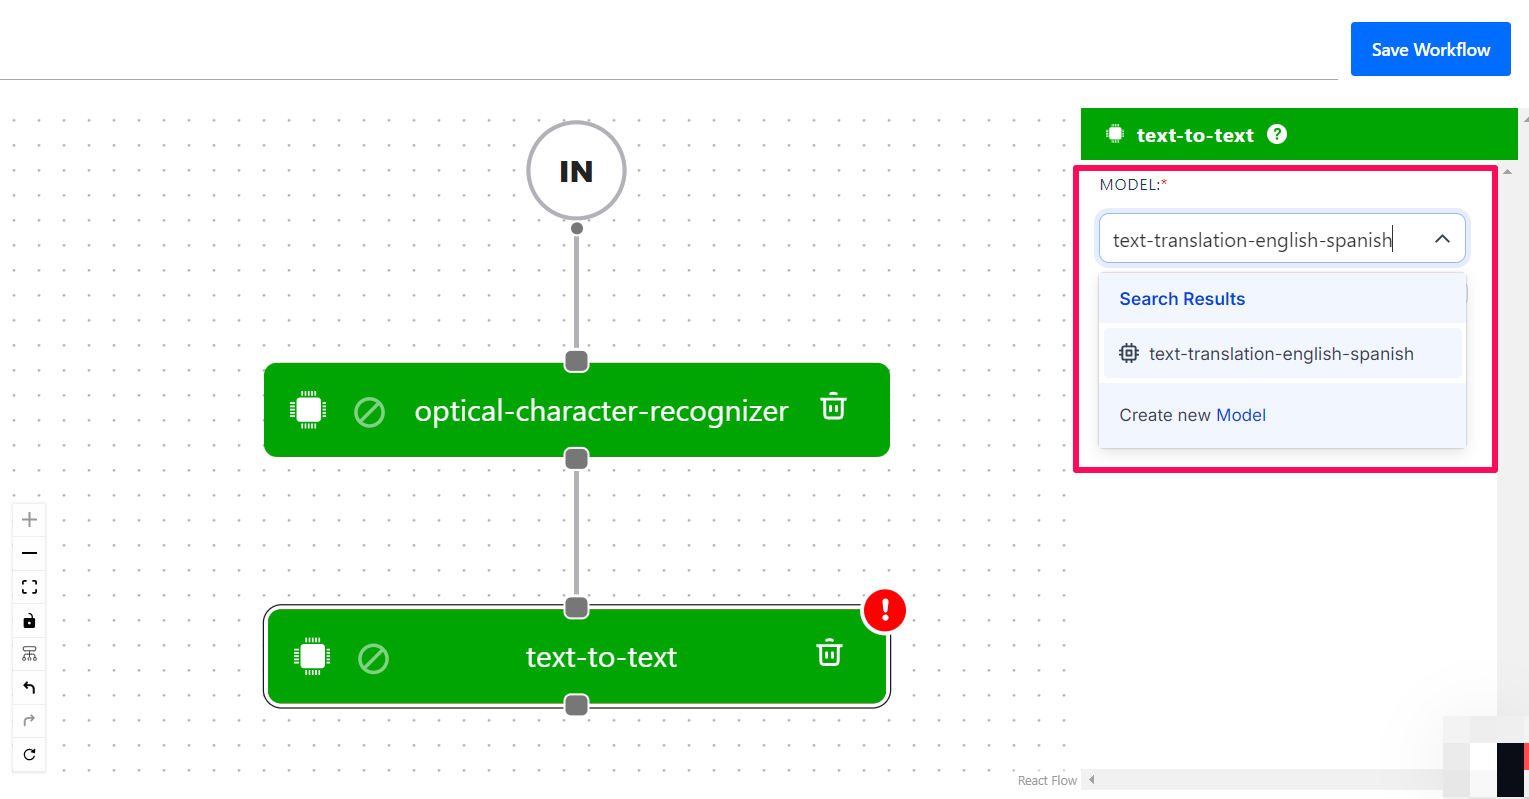
Similarly, click the text-to-text node and specify the text-translation-english-spanish model as the one to use for translating the extracted text from English to Spanish. Also, select its version.
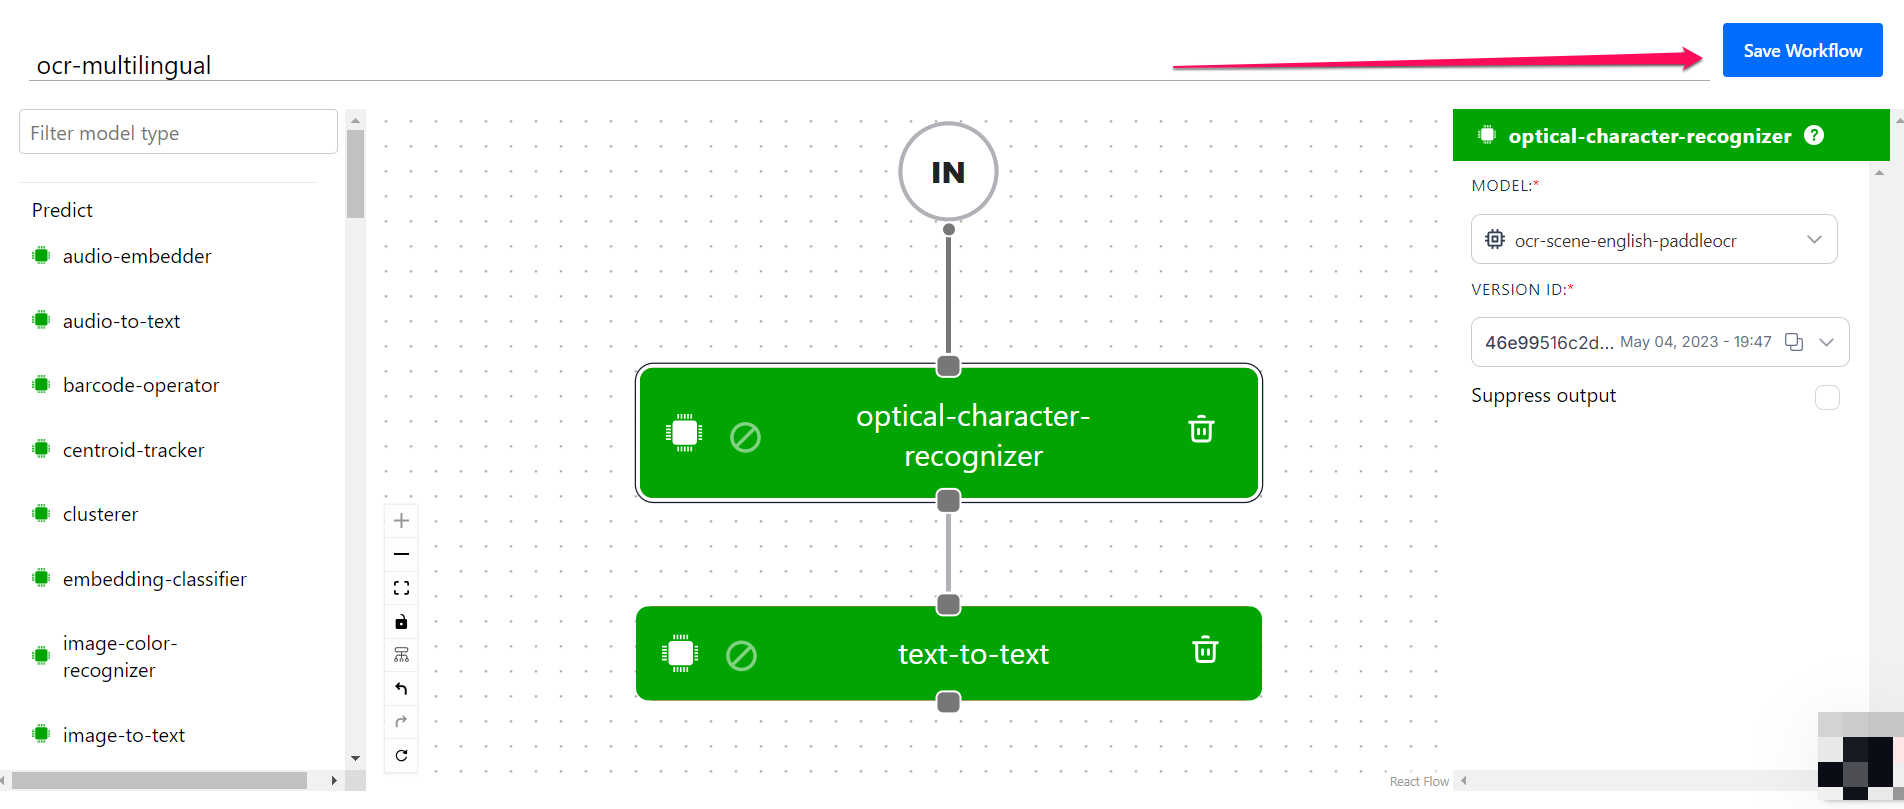
Step 5: Save Workflow
Finally, click the Save Workflow button to save the workflow. This will save the state of your workflow. Now, you are ready to predict using your brand-new workflow.
Create via the API
Before using the Python SDK, Node.js SDK, or any of our gRPC clients, ensure they are properly installed on your machine. Refer to their respective installation guides for instructions on how to install and initialize them.
Create Workflow
In this example, we'll create a simple custom workflow that first extracts text from an image and then translates the extracted text to Spanish.
We'll connect the following two models to achieve our objective:
- The ocr-scene-english-paddleocr model, which detects and recognizes English texts in images;
- The text-translation-english-spanish model, which translates texts from English to Spanish.
We'll specify the IDs of the models and their versions — since a model can have several versions.
- Python (gRPC)
- JavaScript (REST)
- Node.js (gRPC)
- Java (gRPC)
- PHP (gRPC)
- cURL
########################################################################################
# In this section, we set the user authentication, app ID, and the details of the new
# custom workflow we want to create. Change these strings to run your own example.
########################################################################################

USER_ID = 'YOUR_USER_ID_HERE'
# Your PAT (Personal Access Token) can be found in the Account's Security section
PAT = 'YOUR_PAT_HERE'
APP_ID = 'YOUR_APP_ID_HERE'
# Change these to create your own custom workflow
WORKFLOW_ID = 'my-custom-workflow'
NODE_ID_1 = 'optical-character-recognizer'
MODEL_ID_1 = 'ocr-scene-english-paddleocr'
MODEL_VERSION_ID_1 = '40dbb2c9cde44a27af226782e7157006'

NODE_ID_2 = 'text-to-text'
MODEL_ID_2 = 'text-translation-english-spanish'
MODEL_VERSION_ID_2 = '643f30558de34013aff72b0e21f244f5'

##########################################################################
# YOU DO NOT NEED TO CHANGE ANYTHING BELOW THIS LINE TO RUN THIS EXAMPLE
##########################################################################

from clarifai_grpc.channel.clarifai_channel import ClarifaiChannel
from clarifai_grpc.grpc.api import resources_pb2, service_pb2, service_pb2_grpc
from clarifai_grpc.grpc.api.status import status_code_pb2

channel = ClarifaiChannel.get_grpc_channel()
stub = service_pb2_grpc.V2Stub(channel)

metadata = (('authorization', 'Key ' + PAT),)

userDataObject = resources_pb2.UserAppIDSet(user_id=USER_ID, app_id=APP_ID) # The userDataObject is required when using a PAT

post_workflows_response = stub.PostWorkflows(
    service_pb2.PostWorkflowsRequest(
      user_app_id=userDataObject,
      workflows=[
        resources_pb2.Workflow(
          id=WORKFLOW_ID,
          nodes=[
            resources_pb2.WorkflowNode(
              id=NODE_ID_1,
              model=resources_pb2.Model(
                id=MODEL_ID_1,
                model_version=resources_pb2.ModelVersion(
                  id=MODEL_VERSION_ID_1
                )
              )
            ),
            resources_pb2.WorkflowNode(
              id=NODE_ID_2,
              model=resources_pb2.Model(
                id=MODEL_ID_2,
                model_version=resources_pb2.ModelVersion(
                  id=MODEL_VERSION_ID_2
                )
              ),
              node_inputs=[
                resources_pb2.NodeInput(node_id=NODE_ID_1)
                ]
            ),
          ]
        )
      ]
    ),
    metadata=metadata
)

if post_workflows_response.status.code != status_code_pb2.SUCCESS:
    print(post_workflows_response.status)
    raise Exception("Post workflows failed, status: " + post_workflows_response.status.description)
<!--index.html file-->

<script>
    //////////////////////////////////////////////////////////////////////////////////////////
    // In this section, we set the user authentication, app ID, and the details of the new
    // custom workflow we want to create. Change these strings to run your own example.
    /////////////////////////////////////////////////////////////////////////////////////////

    const USER_ID = 'YOUR_USER_ID_HERE';
    // Your PAT (Personal Access Token) can be found in the Account's Security section
    const PAT = 'YOUR_PAT_HERE';
    const APP_ID = 'YOUR_APP_ID_HERE';
    // Change these to create your own custom workflow
    const WORKFLOW_ID = 'my-custom-workflow';
    const NODE_ID_1 = 'optical-character-recognizer';
    const MODEL_ID_1 = 'ocr-scene-english-paddleocr';
    const MODEL_VERSION_ID_1 = '40dbb2c9cde44a27af226782e7157006';

    const NODE_ID_2 = 'text-to-text';
    const MODEL_ID_2 = 'text-translation-english-spanish';
    const MODEL_VERSION_ID_2 = '643f30558de34013aff72b0e21f244f5';

    ///////////////////////////////////////////////////////////////////////////////////
    // YOU DO NOT NEED TO CHANGE ANYTHING BELOW THIS LINE TO RUN THIS EXAMPLE
    ///////////////////////////////////////////////////////////////////////////////////

    const raw = JSON.stringify({
        "user_app_id": {
            "user_id": USER_ID,
            "app_id": APP_ID
        },
        "workflows": [{
            "id": WORKFLOW_ID,
            "nodes": [
                {
                    "id": NODE_ID_1,
                    "model": {
                        "id": MODEL_ID_1,
                        "model_version": {
                            "id": MODEL_VERSION_ID_1
                        }
                    }
                },
                {
                    "id": NODE_ID_2,
                    "model": {
                        "id": MODEL_ID_2,
                        "model_version": {
                            "id": MODEL_VERSION_ID_2
                        }
                    },
                        "node_inputs": [
                            {
                                "node_id": NODE_ID_1
                            }
                        ]
                }
            ]
        }]
    });

    const requestOptions = {
        method: 'POST',
        headers: {
            'Accept': 'application/json',
            'Authorization': 'Key ' + PAT
        },
        body: raw
    };

    fetch(`https://api.clarifai.com/v2/workflows`, requestOptions)
        .then(response => response.text())
        .then(result => console.log(result))
        .catch(error => console.log('error', error));

</script>
//index.js file

//////////////////////////////////////////////////////////////////////////////////////////
// In this section, we set the user authentication, app ID, and the details of the new
// custom workflow we want to create. Change these strings to run your own example.
/////////////////////////////////////////////////////////////////////////////////////////

const USER_ID = 'YOUR_USER_ID_HERE';
// Your PAT (Personal Access Token) can be found in the Account's Security section
const PAT = 'YOUR_PAT_HERE';
const APP_ID = 'YOUR_APP_ID_HERE';
// Change these to create your own custom workflow
const WORKFLOW_ID = 'my-custom-workflow';
const NODE_ID_1 = 'optical-character-recognizer';
const MODEL_ID_1 = 'ocr-scene-english-paddleocr';
const MODEL_VERSION_ID_1 = '40dbb2c9cde44a27af226782e7157006';

const NODE_ID_2 = 'text-to-text';
const MODEL_ID_2 = 'text-translation-english-spanish';
const MODEL_VERSION_ID_2 = '643f30558de34013aff72b0e21f244f5';

/////////////////////////////////////////////////////////////////////////////
// YOU DO NOT NEED TO CHANGE ANYTHING BELOW THIS LINE TO RUN THIS EXAMPLE
/////////////////////////////////////////////////////////////////////////////

const { ClarifaiStub, grpc } = require("clarifai-nodejs-grpc");

const stub = ClarifaiStub.grpc();

// This will be used by every Clarifai endpoint call
const metadata = new grpc.Metadata();
metadata.set("authorization", "Key " + PAT);

stub.PostWorkflows(
    {
        user_app_id: {
            "user_id": USER_ID,
            "app_id": APP_ID
        },
        workflows: [
            {
                id: WORKFLOW_ID,
                nodes: [
                    {
                        id: NODE_ID_1,
                        model: {
                            id: MODEL_ID_1,
                            model_version: {
                                id: MODEL_VERSION_ID_1
                            }
                        }
                    },
                    {
                        id: NODE_ID_2,
                        model: {
                            id: MODEL_ID_2,
                            model_version: {
                                id: MODEL_VERSION_ID_2
                            }
                        },
                        node_inputs: [
                            {
                                node_id: NODE_ID_1
                            }
                        ]
                    }
                ]
            }
        ]
    },
    metadata,
    (err, response) => {
        if (err) {
            throw new Error(err);
        }

        if (response.status.code !== 10000) {
            throw new Error("Post workflows failed, status: " + response.status.description);
        }
    }
);
package com.clarifai.example;

import com.clarifai.channel.ClarifaiChannel;
import com.clarifai.credentials.ClarifaiCallCredentials;
import com.clarifai.grpc.api.*;
import com.clarifai.grpc.api.status.StatusCode;

public class ClarifaiExample {

    //////////////////////////////////////////////////////////////////////////////////////////
    // In this section, we set the user authentication, app ID, and the details of the new
    // custom workflow we want to create. Change these strings to run your own example.
    /////////////////////////////////////////////////////////////////////////////////////////

    static final String USER_ID = "YOUR_USER_ID_HERE";
    //Your PAT (Personal Access Token) can be found in the portal under Authentication
    static final String PAT = "YOUR_PAT_HERE";
    static final String APP_ID = "YOUR_APP_ID_HERE";
    // Change these to create your own custom workflow
    static final String WORKFLOW_ID = "my-custom-workflow";
    static final String NODE_ID_1 = "optical-character-recognizer";
    static final String MODEL_ID_1 = "ocr-scene-english-paddleocr";
    static final String MODEL_VERSION_ID_1 = "40dbb2c9cde44a27af226782e7157006";

    static final String NODE_ID_2 = "text-to-text";
    static final String MODEL_ID_2 = "text-translation-english-spanish";
    static final String MODEL_VERSION_ID_2 = "643f30558de34013aff72b0e21f244f5";

    ///////////////////////////////////////////////////////////////////////////////////
    // YOU DO NOT NEED TO CHANGE ANYTHING BELOW THIS LINE TO RUN THIS EXAMPLE
    ///////////////////////////////////////////////////////////////////////////////////

    public static void main(String[] args) {

        V2Grpc.V2BlockingStub stub = V2Grpc.newBlockingStub(ClarifaiChannel.INSTANCE.getGrpcChannel())
            .withCallCredentials(new ClarifaiCallCredentials(PAT));

        MultiWorkflowResponse postWorkflowsResponse = stub.postWorkflows(
            PostWorkflowsRequest.newBuilder()
            .setUserAppId(UserAppIDSet.newBuilder().setUserId(USER_ID).setAppId(APP_ID))
            .addWorkflows(
                Workflow.newBuilder()
                .setId(WORKFLOW_ID)
                .addNodes(
                    WorkflowNode.newBuilder()
                    .setId(NODE_ID_1)
                    .setModel(
                        Model.newBuilder()
                        .setId(MODEL_ID_1)
                        .setModelVersion(ModelVersion.newBuilder().setId(MODEL_VERSION_ID_1))
                    )
                )
                .addNodes(
                    WorkflowNode.newBuilder()
                    .setId(NODE_ID_2)
                    .setModel(
                        Model.newBuilder()
                        .setId(MODEL_ID_2)
                        .setModelVersion(ModelVersion.newBuilder().setId(MODEL_VERSION_ID_2))
                    )
                    .addNodeInputs(NodeInput.newBuilder().setNodeId(NODE_ID_1))
                )
            ).build()
        );

        if (postWorkflowsResponse.getStatus().getCode() != StatusCode.SUCCESS) {
            throw new RuntimeException("Post workflows failed, status: " + postWorkflowsResponse.getStatus());
        }

    }

}
<?php

require __DIR__ . "/vendor/autoload.php";

//////////////////////////////////////////////////////////////////////////////////////////
// In this section, we set the user authentication, app ID, and the details of the new
// custom workflow we want to create. Change these strings to run your own example.
/////////////////////////////////////////////////////////////////////////////////////////

$USER_ID = "YOUR_USER_ID_HERE";
// Your PAT (Personal Access Token) can be found in the Account's Security section
$PAT = "YOUR_PAT_HERE";
$APP_ID = "YOUR_APP_ID_HERE";
// Change these to create your own custom workflow
$WORKFLOW_ID = "my-custom-workflow";
$NODE_ID_1 = "optical-character-recognizer";
$MODEL_ID_1 = "ocr-scene-english-paddleocr";
$MODEL_VERSION_ID_1 = "40dbb2c9cde44a27af226782e7157006";

$NODE_ID_2 = "text-to-text";
$MODEL_ID_2 = "text-translation-english-spanish";
$MODEL_VERSION_ID_2 = "643f30558de34013aff72b0e21f244f5";

///////////////////////////////////////////////////////////////////////////////////
// YOU DO NOT NEED TO CHANGE ANYTHING BELOW THIS LINE TO RUN THIS EXAMPLE
///////////////////////////////////////////////////////////////////////////////////

use Clarifai\ClarifaiClient;
use Clarifai\Api\PostWorkflowsRequest;
use Clarifai\Api\Workflow;
use Clarifai\Api\WorkflowNode;
use Clarifai\Api\NodeInput;
use Clarifai\Api\Model;
use Clarifai\Api\ModelVersion;
use Clarifai\Api\Status\StatusCode;
use Clarifai\Api\UserAppIDSet;

$client = ClarifaiClient::grpc();

$metadata = ["Authorization" => ["Key " . $PAT]];

$userDataObject = new UserAppIDSet([
    "user_id" => $USER_ID,
    "app_id" => $APP_ID
]);

// Let's make a RPC call to the Clarifai platform. It uses the opened gRPC client channel to communicate a
// request and then wait for the response
[$response, $status] = $client->PostWorkflows(
        // The request object carries the request along with the request status and other metadata related to the request itself
        new PostWorkflowsRequest([
            "user_app_id" => $userDataObject,
            "workflows" => [
                new Workflow([
                    "id"=> $WORKFLOW_ID,
                    "nodes" => [
                        new WorkflowNode([
                            "id" => $NODE_ID_1,
                            "model" => new Model([
                                "id" => $MODEL_ID_1,
                                "model_version" => new ModelVersion([
                                    "id" => $MODEL_VERSION_ID_1
                                ])
                            ])

                        ]),
                        new WorkflowNode([
                            "id" => $NODE_ID_2,
                            "model"=> new Model([
                                "id" => $MODEL_ID_2,
                                "model_version" => new ModelVersion([
                                    "id" => $MODEL_VERSION_ID_2
                                ])
                            ]),
                            "node_inputs" => [
                                new NodeInput([
                                    "node_id"=> $NODE_ID_1
                                ])
                            ]
                        ])
                    ]
                ])
            ]
        ]),
        $metadata
    )->wait();

// A response is returned and the first thing we do is check the status of it
// A successful response will have a status code of 0; otherwise, there is some error
if ($status->code !== 0) {
    throw new Exception("Error: {$status->details}");
}
// In addition to the RPC response status, there is a Clarifai API status that reports if the operation was a success or failure
// (not just that the communication was successful)
if ($response->getStatus()->getCode() != StatusCode::SUCCESS) {
    print $response->getStatus()->getDetails();
    throw new Exception("Failure response: " . $response->getStatus()->getDescription());
}

?>
curl -X POST "https://api.clarifai.com/v2/users/YOUR_USER_ID_HERE/apps/YOUR_APP_ID_HERE/workflows" \
    -H "Content-Type: application/json" \
    -H "Authorization: Key YOUR_PAT_HERE" \
    --data-raw '{
      "workflows": [{
        "id": "my-custom-workflow",
        "nodes": [
          {
            "id": "optical-character-recognizer",
            "model": {
              "id": "ocr-scene-english-paddleocr",
              "model_version": {
                "id": "40dbb2c9cde44a27af226782e7157006"
              }
            }
          },
          {
            "id": "text-to-text",
            "model": {
              "id": "text-translation-english-spanish",
              "model_version": {
                "id": "643f30558de34013aff72b0e21f244f5"
              }
            },
              "node_inputs": [
                {
                  "node_id": "optical-character-recognizer"
                }
              ]
          }
        ]
      }]
    }'
Predict With Workflow
After creating the workflow, let's now use it to extract texts from this image and translate them into Spanish.
The response will contain the predictions each model in the workflow returns for the input.
- Python (gRPC)
- JavaScript (REST)
- Node.js (gRPC)
- Java (gRPC)
- PHP (gRPC)
- cURL
#############################################################################
# In this section, we set the user authentication, app ID, workflow ID, and
# image URL. Change these strings to run your own example.
##############################################################################

USER_ID = 'YOUR_USER_ID_HERE'
# Your PAT (Personal Access Token) can be found in the Account's Security section
PAT = 'YOUR_PAT_HERE'
APP_ID = 'YOUR_APP_ID_HERE'
# Change these to make your own predictions
WORKFLOW_ID = 'my-custom-workflow'
IMAGE_URL = 'https://samples.clarifai.com/featured-models/ocr-woman-holding-sold-sign.jpg'

##########################################################################
# YOU DO NOT NEED TO CHANGE ANYTHING BELOW THIS LINE TO RUN THIS EXAMPLE
##########################################################################

from clarifai_grpc.channel.clarifai_channel import ClarifaiChannel
from clarifai_grpc.grpc.api import resources_pb2, service_pb2, service_pb2_grpc
from clarifai_grpc.grpc.api.status import status_code_pb2

channel = ClarifaiChannel.get_grpc_channel()
stub = service_pb2_grpc.V2Stub(channel)

metadata = (('authorization', 'Key ' + PAT),)

userDataObject = resources_pb2.UserAppIDSet(user_id=USER_ID, app_id=APP_ID) # The userDataObject is required when using a PAT

post_workflow_results_response = stub.PostWorkflowResults(
    service_pb2.PostWorkflowResultsRequest(
        user_app_id=userDataObject,
        workflow_id=WORKFLOW_ID,
        inputs=[
            resources_pb2.Input(
                data=resources_pb2.Data(
                    image=resources_pb2.Image(
                        url=IMAGE_URL
                    )
                )
            )
        ]
    ),
    metadata=metadata
)
if post_workflow_results_response.status.code != status_code_pb2.SUCCESS:
    print(post_workflow_results_response.status)
    raise Exception("Post workflow results failed, status: " + post_workflow_results_response.status.description)

# We'll get one WorkflowResult for each input we used above. Because of one input, we have here one WorkflowResult
results = post_workflow_results_response.results[0]

# Each model we have in the workflow will produce its output
for output in results.outputs:
    model = output.model
    print("Output for the model: `%s`" % model.id)
    i = 0
    while(i < len(output.data.regions)):
        print(output.data.regions[i].data.text.raw)
        i += 1
<!--index.html file-->

<script>
  ///////////////////////////////////////////////////////////////////////////////////
  // In this section, we set the user authentication, app ID, workflow ID, and
  // image URL. Change these strings to run your own example.
  ///////////////////////////////////////////////////////////////////////////////////

  const USER_ID = "YOUR_USER_ID_HERE";
  // Your PAT (Personal Access Token) can be found in the Account's Security section
  const PAT = "YOUR_PAT_HERE";
  const APP_ID = "YOUR_APP_ID_HERE";
  // Change these to make your own predictions
  const WORKFLOW_ID = "my-custom-workflow";
  const IMAGE_URL = "https://samples.clarifai.com/featured-models/ocr-woman-holding-sold-sign.jpg";

  ///////////////////////////////////////////////////////////////////////////////////
  // YOU DO NOT NEED TO CHANGE ANYTHING BELOW THIS LINE TO RUN THIS EXAMPLE
  ///////////////////////////////////////////////////////////////////////////////////

  const raw = JSON.stringify({
    "user_app_id": {
      "user_id": USER_ID,
      "app_id": APP_ID
    },
    "inputs": [
      {
        "data": {
          "image": {
            "url": IMAGE_URL
          }
        }
      }
    ]
  });

  const requestOptions = {
    method: 'POST',
    headers: {
      'Accept': 'application/json',
      'Authorization': 'Key ' + PAT
    },
    body: raw
  };

  fetch(`https://api.clarifai.com/v2/workflows/${WORKFLOW_ID}/results`, requestOptions)
    .then(response => response.text())
    .then(result => console.log(result))
    .catch(error => console.log('error', error));
</script>
//index.js file

///////////////////////////////////////////////////////////////////////////////////
// In this section, we set the user authentication, app ID, workflow ID, and
// image URL. Change these strings to run your own example.
///////////////////////////////////////////////////////////////////////////////////

const USER_ID = "YOUR_USER_ID_HERE";
// Your PAT (Personal Access Token) can be found in the Account's Security section
const PAT = "YOUR_PAT_HERE";
const APP_ID = "YOUR_APP_ID_HERE";
// Change these to make your own predictions
const WORKFLOW_ID = "my-custom-workflow";
const IMAGE_URL = "https://samples.clarifai.com/featured-models/ocr-woman-holding-sold-sign.jpg";

/////////////////////////////////////////////////////////////////////////////
// YOU DO NOT NEED TO CHANGE ANYTHING BELOW THIS LINE TO RUN THIS EXAMPLE
/////////////////////////////////////////////////////////////////////////////

const { ClarifaiStub, grpc } = require("clarifai-nodejs-grpc");

const stub = ClarifaiStub.grpc();

// This will be used by every Clarifai endpoint call
const metadata = new grpc.Metadata();
metadata.set("authorization", "Key " + PAT);

stub.PostWorkflowResults(
  {
    user_app_id: {
      "user_id": USER_ID,
      "app_id": APP_ID,
    },
    workflow_id: WORKFLOW_ID,
    inputs: [{ data: { image: { url: IMAGE_URL } } }],
  },
  metadata,
  (err, response) => {
    if (err) {
      throw new Error(err);
    }

    if (response.status.code !== 10000) {
      throw new Error(
        "Post workflow results failed, status: " + response.status.description
      );
    }

    // We'll get one WorkflowResult for each input we used above. Because of one input, we have here
    // one WorkflowResult
    const results = response.results[0];

    // Each model we have in the workflow will produce its output.
    for (const output of results.outputs) {
      const model = output.model;
      console.log("Output for the model: `" + model.id + "`");
      let i = 0;
      while(i < output.data.regions.length){
        console.log(output.data.regions[i].data.text.raw);
        i += 1;
      }
    }
  }
);
package com.clarifai.example;

import com.clarifai.channel.ClarifaiChannel;
import com.clarifai.credentials.ClarifaiCallCredentials;
import com.clarifai.grpc.api.*;
import com.clarifai.grpc.api.status.StatusCode;

public class ClarifaiExample {

    ///////////////////////////////////////////////////////////////////////////////////
    // In this section, we set the user authentication, app ID, workflow ID, and
    // image URL. Change these strings to run your own example.
    ///////////////////////////////////////////////////////////////////////////////////

    static final String USER_ID = "YOUR_USER_ID_HERE";
    //Your PAT (Personal Access Token) can be found in the portal under Authentication
    static final String PAT = "YOUR_PAT_HERE";
    static final String APP_ID = "YOUR_APP_ID_HERE";
    // Change these to make your own predictions
    static final String WORKFLOW_ID = "my-custom-workflow";
    static final String IMAGE_URL = "https://samples.clarifai.com/featured-models/ocr-woman-holding-sold-sign.jpg";

    ///////////////////////////////////////////////////////////////////////////////////
    // YOU DO NOT NEED TO CHANGE ANYTHING BELOW THIS LINE TO RUN THIS EXAMPLE
    ///////////////////////////////////////////////////////////////////////////////////

    public static void main(String[] args) {

        V2Grpc.V2BlockingStub stub = V2Grpc.newBlockingStub(ClarifaiChannel.INSTANCE.getGrpcChannel())
            .withCallCredentials(new ClarifaiCallCredentials(PAT));

        PostWorkflowResultsResponse postWorkflowResultsResponse = stub.postWorkflowResults(
            PostWorkflowResultsRequest.newBuilder()
            .setUserAppId(UserAppIDSet.newBuilder().setUserId(USER_ID).setAppId(APP_ID))
            .setWorkflowId(WORKFLOW_ID)
            .addInputs(
                Input.newBuilder().setData(
                    Data.newBuilder().setImage(
                        Image.newBuilder().setUrl(IMAGE_URL)
                    )
                )
            )
            .build()
        );

        if (postWorkflowResultsResponse.getStatus().getCode() != StatusCode.SUCCESS) {
            throw new RuntimeException("Post workflow results failed, status: " + postWorkflowResultsResponse.getStatus());
        }

        // We'll get one WorkflowResult for each input we used above. Because of one input, we have here
        // one WorkflowResult
        WorkflowResult results = postWorkflowResultsResponse.getResults(0);

        // Each model we have in the workflow will produce its output
        for (Output output: results.getOutputsList()) {
            Model model = output.getModel();
            System.out.println("Output for the model: `" + model.getId() + "`");
            int i = 0;
            while(i < output.getData().getRegionsCount()) {
            	String modelOutput = output.getData().getRegionsList().get(i).getData().getText().getRaw();
            	System.out.println(modelOutput);
                i += 1;
            }
        }

    }

}
<?php

require __DIR__ . '/vendor/autoload.php';

/////////////////////////////////////////////////////////////////////////////////
// In this section, we set the user authentication, app ID, workflow ID, and
// image URL. Change these strings to run your own example.
/////////////////////////////////////////////////////////////////////////////////

$USER_ID = 'YOUR_USER_ID_HERE';
// Your PAT (Personal Access Token) can be found in the Account's Security section
$PAT = 'YOUR_PAT_HERE';
$APP_ID = 'YOUR_APP_ID_HERE';
// Change these to make your own predictions
$WORKFLOW_ID = 'my-custom-workflow';
$IMAGE_URL = 'https://samples.clarifai.com/featured-models/ocr-woman-holding-sold-sign.jpg';

///////////////////////////////////////////////////////////////////////////////////
// YOU DO NOT NEED TO CHANGE ANYTHING BELOW THIS LINE TO RUN THIS EXAMPLE
///////////////////////////////////////////////////////////////////////////////////

use Clarifai\ClarifaiClient;
use Clarifai\Api\Data;
use Clarifai\Api\Image;
use Clarifai\Api\Input;
use Clarifai\Api\PostWorkflowResultsRequest;
use Clarifai\Api\Status\StatusCode;
use Clarifai\Api\UserAppIDSet;

$client = ClarifaiClient::grpc();

$metadata = ['Authorization' => ['Key ' . $PAT ]];

$userDataObject = new UserAppIDSet([
    'user_id' => $USER_ID,
    'app_id' => $APP_ID
]);

// Let's make a RPC call to the Clarifai platform. It uses the opened gRPC client channel to communicate a
// request and then wait for the response
[$response, $status] = $client->PostWorkflowResults(
    // The request object carries the request along with the request status and other metadata related to the request itself
    new PostWorkflowResultsRequest([
        'user_app_id' => $userDataObject,
        'workflow_id' => $WORKFLOW_ID,
        'inputs' => [
            new Input([ // The Input object wraps the Data object in order to meet the API specification
                'data' => new Data([ // The Data object is constructed around the Image object. It offers a container that has additional image independent
                                    // metadata. In this particular use case, no other metadata is needed to be specified
                    'image' => new Image([ // In the Clarifai platform, an image is defined by a special Image object
                        'url' => $IMAGE_URL
                    ])
                ])
            ])
        ]
    ]),
    $metadata
)->wait();

// A response is returned and the first thing we do is check the status of it
// A successful response will have a status code of 0; otherwise, there is some error
if ($status->code !== 0) {
    throw new Exception("Error: {$status->details}");
}
// In addition to the RPC response status, there is a Clarifai API status that reports if the operation was a success or failure
// (not just that the communication was successful)
if ($response->getStatus()->getCode() != StatusCode::SUCCESS) {
    throw new Exception("Failure response: " . $response->getStatus()->getDescription() . " " .
        $response->getStatus()->getDetails());
}

// We'll get one WorkflowResult for each input we used above. Because of one input, we have here one WorkflowResult
$results = $response->getResults()[0];

// Each model we have in the workflow will produce its output
foreach ($results->getOutputs() as $output) {
    $model = $output->getModel();
    echo "Output for the model: '" . $model->getId() . "'" . "`<br>";
    $i = 0;
    while ($i < count($output->getData()->getRegions())) {
        echo $output->getData()->getRegions()[$i]->getData()->getText()->getRaw() . "`<br>";
        $i++;
    }
}

?>
curl -X POST "https://api.clarifai.com/v2/users/YOUR_USER_ID_HERE/apps/YOUR_APP_ID_HERE/workflows/YOUR_WORKFLOW_ID_HERE/results" \
  -H "authorization: Key YOUR_PAT_HERE" \
  -H "content-type: application/json" \
  -d '{
    "inputs": [
        {
          "data": {
            "image": {
              "url": "https://samples.clarifai.com/featured-models/ocr-woman-holding-sold-sign.jpg"
          }
        }
      }
    ]
}'
Text Output Example
Output for the model: `ocr-scene-english-paddleocr`
SOLD
We can SELL YOURS too!
Output for the model: `text-translation-english-spanish`
VENDIDO
¡Nosotros también podemos venderla!
Create With Multiple Connected Nodes
The following is an example of how to build a workflow with multiple connected nodes.
- Python (gRPC)
- JavaScript (REST)
- Node.js (gRPC)
- Java (gRPC)
- PHP (gRPC)
- cURL
###################################################################################
# In this section, we set the user authentication, app ID, and the details of the
# workflow we want to build. Change these strings to run your own example.
##################################################################################

USER_ID = 'YOUR_USER_ID_HERE'
# Your PAT (Personal Access Token) can be found in the Account's Security section
PAT = 'YOUR_PAT_HERE'
APP_ID = 'YOUR_APP_ID_HERE'
# Change these to build your own workflow with multiple connected nodes
# Note that we've also added as comments the values of most of these variables against their names in the code below

WORKFLOW_ID = 'auto-annotation-workflow-id'
NODE_ID_1 = 'general-embed'
MODEL_ID_1 = 'bbb5f41425b8468d9b7a554ff10f8581'
MODEL_VERSION_ID_1 = 'bb186755eda04f9cbb6fe32e816be104'

NODE_ID_2 = 'general-concept'
MODEL_ID_2 = 'aaa03c23b3724a16a56b629203edc62c'
MODEL_VERSION_ID_2 = 'aa7f35c01e0642fda5cf400f543e7c40'

NODE_ID_3 = 'general-cluster'
MODEL_ID_3 = 'cccbe437d6e54e2bb911c6aa292fb072'
MODEL_VERSION_ID_3 = 'cc2074cff6dc4c02b6f4e1b8606dcb54'

NODE_ID_4 = 'mapper'
SYNONYM_MODEL_ID = 'YOUR_SYNONYM_MODEL_ID'
SYNONYM_MODEL_VERSION_ID = 'YOUR_SYNONYM_MODEL_VERSION_ID'

NODE_ID_5 = 'greater-than'
GREATER_THAN_MODEL_ID = 'YOUR_GREATER_THAN_MODEL_ID'
GREATER_THAN_MODEL_VERSION_ID = 'YOUR_GREATER_THAN_MODEL_VERSION_ID'

NODE_ID_6 = 'less-than'
LESS_THAN_MODEL_ID = 'YOUR_LESS_THAN_MODEL_ID'
LESS_THAN_MODEL_VERSION_ID = 'YOUR_LESS_THAN_MODEL_VERSION_ID'


##########################################################################
# YOU DO NOT NEED TO CHANGE ANYTHING BELOW THIS LINE TO RUN THIS EXAMPLE
##########################################################################

from clarifai_grpc.channel.clarifai_channel import ClarifaiChannel
from clarifai_grpc.grpc.api import resources_pb2, service_pb2, service_pb2_grpc
from clarifai_grpc.grpc.api.status import status_code_pb2

channel = ClarifaiChannel.get_grpc_channel()
stub = service_pb2_grpc.V2Stub(channel)

metadata = (('authorization', 'Key ' + PAT),)

userDataObject = resources_pb2.UserAppIDSet(user_id=USER_ID, app_id=APP_ID) # The userDataObject is required when using a PAT

post_workflows_response = stub.PostWorkflows(
    service_pb2.PostWorkflowsRequest(
        user_app_id=userDataObject,
        workflows=[
            resources_pb2.Workflow(
                id=WORKFLOW_ID, # auto-annotation-workflow-id
                nodes=[
                    resources_pb2.WorkflowNode(
                        id=NODE_ID_1, # general-embed
                        model=resources_pb2.Model(
                            id=MODEL_ID_1, # bbb5f41425b8468d9b7a554ff10f8581
                            model_version=resources_pb2.ModelVersion(
                                id=MODEL_VERSION_ID_1 # bb186755eda04f9cbb6fe32e816be104
                            )
                        )
                    ),
                    resources_pb2.WorkflowNode(
                        id=NODE_ID_2, # general-concept
                        model=resources_pb2.Model(
                            id=MODEL_ID_2, # aaa03c23b3724a16a56b629203edc62c
                            model_version=resources_pb2.ModelVersion(
                                id=MODEL_VERSION_ID_2 # aa7f35c01e0642fda5cf400f543e7c40
                            )
                        )
                    ),
                    resources_pb2.WorkflowNode(
                        id=NODE_ID_3, # general-cluster
                        model=resources_pb2.Model(
                            id=MODEL_ID_3, # cccbe437d6e54e2bb911c6aa292fb072
                            model_version=resources_pb2.ModelVersion(
                                id=MODEL_VERSION_ID_3 # cc2074cff6dc4c02b6f4e1b8606dcb54
                            )
                        ),
                        node_inputs=[
                            resources_pb2.NodeInput(node_id=NODE_ID_1) # general-embed
                        ]
                    ),
                    resources_pb2.WorkflowNode(
                        id=NODE_ID_4, # mapper
                        model=resources_pb2.Model(
                            id=SYNONYM_MODEL_ID,
                            model_version=resources_pb2.ModelVersion(
                                id=SYNONYM_MODEL_VERSION_ID
                            )
                        ),
                        node_inputs=[
                            resources_pb2.NodeInput(node_id=NODE_ID_2) # general-concept
                        ]
                    ),
                    resources_pb2.WorkflowNode(
                        id=NODE_ID_5, # greater-than
                        model=resources_pb2.Model(
                            id=GREATER_THAN_MODEL_ID,
                            model_version=resources_pb2.ModelVersion(
                                id=GREATER_THAN_MODEL_VERSION_ID
                            )
                        ),
                        node_inputs=[
                            resources_pb2.NodeInput(node_id=NODE_ID_4) # mapper
                        ]
                    ),
                    resources_pb2.WorkflowNode(
                        id=NODE_ID_6, # less-than
                        model=resources_pb2.Model(
                            id=LESS_THAN_MODEL_ID,
                            model_version=resources_pb2.ModelVersion(
                                id=LESS_THAN_MODEL_VERSION_ID
                            )
                        ),
                        node_inputs=[
                            resources_pb2.NodeInput(node_id=NODE_ID_4) # mapper
                        ]
                    ),
                ]
            )
        ]
    ),
    metadata=metadata
)

if post_workflows_response.status.code != status_code_pb2.SUCCESS:
    print(post_workflows_response.status)
    raise Exception("Post workflows failed, status: " + post_workflows_response.status.description)
<!--index.html file-->

<script>
    //////////////////////////////////////////////////////////////////////////////////////
    // In this section, we set the user authentication, app ID, and the details of the
    // workflow we want to build. Change these strings to run your own example.
    /////////////////////////////////////////////////////////////////////////////////////

    const USER_ID = 'YOUR_USER_ID_HERE';
    // Your PAT (Personal Access Token) can be found in the Account's Security section
    const PAT = 'YOUR_PAT_HERE';
    const APP_ID = 'YOUR_APP_ID_HERE';
    // Change these to build your own workflow with multiple connected nodes

    const WORKFLOW_ID = 'auto-annotation-workflow-id';
    const NODE_ID_1 = 'general-embed';
    const GENERAL_EMBED_MODEL_ID = 'YOUR_GENERAL_EMBED_MODEL_ID';
    const GENERAL_EMBED_MODEL_VERSION_ID = 'YOUR_GENERAL_EMBED_MODEL_VERSION_ID';

    const NODE_ID_2 = 'general-concept';
    const GENERAL_CONCEPT_MODEL_ID = 'YOUR_GENERAL_CONCEPT_MODEL_ID';
    const GENERAL_CONCEPT_MODEL_VERSION_ID = 'YOUR_GENERAL_CONCEPT_MODEL_VERSION_ID';

    const NODE_ID_3 = 'general-cluster';
    const GENERAL_CLUSTER_MODEL_ID = 'YOUR_GENERAL_CLUSTER_MODEL_ID';
    const GENERAL_CLUSTER_MODEL_VERSION_ID = 'YOUR_GENERAL_CLUSTER_MODEL_VERSION_ID';

    const NODE_ID_4 = 'mapper';
    const SYNONYM_MODEL_ID = 'synonym-model-id';
    const MAPPER_MODEL_VERSION_ID = 'YOUR_MAPPER_MODEL_VERSION_ID';

    const NODE_ID_5 = 'greater-than';
    const GREATER_THAN_MODEL_ID = 'YOUR_GREATER_THAN_MODEL_ID';
    const GREATER_THAN_MODEL_VERSION_ID = 'YOUR_GREATER_THAN_MODEL_VERSION_ID';

    const NODE_ID_6 = 'less-than';
    const LESS_THAN_MODEL_ID = 'YOUR_LESS_THAN_MODEL_ID';
    const LESS_THAN_MODEL_VERSION_ID = 'YOUR_LESS_THAN_MODEL_VERSION_ID';

    ///////////////////////////////////////////////////////////////////////////////////
    // YOU DO NOT NEED TO CHANGE ANYTHING BELOW THIS LINE TO RUN THIS EXAMPLE
    ///////////////////////////////////////////////////////////////////////////////////

    const raw = JSON.stringify({
        "user_app_id": {
            "user_id": USER_ID,
            "app_id": APP_ID
        },
        "workflows": [
            {
                "id": WORKFLOW_ID,
                "nodes": [
                    {
                        "id": NODE_ID_1,
                        "model": {
                            "id": GENERAL_EMBED_MODEL_ID,
                            "model_version": {
                                "id": GENERAL_EMBED_MODEL_VERSION_ID
                            }
                        }
                    },
                    {
                        "id": NODE_ID_2,
                        "model": {
                            "id": GENERAL_CONCEPT_MODEL_ID,
                            "model_version": {
                                "id": GENERAL_CONCEPT_MODEL_VERSION_ID
                            }
                        }
                    },
                    {
                        "id": NODE_ID_3,
                        "model": {
                            "id": GENERAL_CLUSTER_MODEL_ID,
                            "model_version": {
                                "id": GENERAL_CLUSTER_MODEL_VERSION_ID
                            }
                        }
                    },
                    {
                        "id": NODE_ID_4,
                        "model": {
                            "id": SYNONYM_MODEL_ID,
                            "model_version": {
                                "id": MAPPER_MODEL_VERSION_ID
                            }
                        },
                        "node_inputs": [
                            {
                                "node_id": NODE_ID_2  // general-concept
                            }
                        ]
                    },
                    {
                        "id": NODE_ID_5,
                        "model": {
                            "id": GREATER_THAN_MODEL_ID,
                            "model_version": {
                                "id": GREATER_THAN_MODEL_VERSION_ID
                            }
                        },
                        "node_inputs": [
                            {
                                "node_id": NODE_ID_4 // mapper
                            }
                        ]
                    },
                    {
                        "id": NODE_ID_6,
                        "model": {
                            "id": LESS_THAN_MODEL_ID,
                            "model_version": {
                                "id": LESS_THAN_MODEL_VERSION_ID
                            }
                        },
                        "node_inputs": [
                            {
                                "node_id": NODE_ID_4 // mapper
                            }
                        ]
                    }
                ]
            }
        ]
    });

    const requestOptions = {
        method: 'POST',
        headers: {
            'Accept': 'application/json',
            'Authorization': 'Key ' + PAT
        },
        body: raw
    };

    fetch(`https://api.clarifai.com/v2/workflows`, requestOptions)
        .then(response => response.text())
        .then(result => console.log(result))
        .catch(error => console.log('error', error));

</script>
//index.js file

//////////////////////////////////////////////////////////////////////////////////////
// In this section, we set the user authentication, app ID, and the details of the
// workflow we want to build. Change these strings to run your own example.
/////////////////////////////////////////////////////////////////////////////////////

const USER_ID = 'YOUR_USER_ID_HERE';
// Your PAT (Personal Access Token) can be found in the Account's Security section
const PAT = 'YOUR_PAT_HERE';
const APP_ID = 'YOUR_APP_ID_HERE';
// Change these to build your own workflow with multiple connected nodes

const WORKFLOW_ID = 'auto-annotation-workflow-id';
const NODE_ID_1 = 'general-embed';
const GENERAL_EMBED_MODEL_ID = 'bbb5f41425b8468d9b7a554ff10f8581';
const GENERAL_EMBED_MODEL_VERSION_ID = 'bb186755eda04f9cbb6fe32e816be104';

const NODE_ID_2 = 'general-concept';
const GENERAL_CONCEPT_MODEL_ID = 'aaa03c23b3724a16a56b629203edc62c';
const GENERAL_CONCEPT_MODEL_VERSION_ID = 'aa7f35c01e0642fda5cf400f543e7c40';

const NODE_ID_3 = 'general-cluster';
const GENERAL_CLUSTER_MODEL_ID = 'cccbe437d6e54e2bb911c6aa292fb072';
const GENERAL_CLUSTER_MODEL_VERSION_ID = 'cc2074cff6dc4c02b6f4e1b8606dcb54';

const NODE_ID_4 = 'mapper';
const SYNONYM_MODEL_ID = 'synonym-model-id';
const SYNONYM_MODEL_VERSION_ID = 'YOUR_SYNONYM_MODEL_VERSION_ID';

const NODE_ID_5 = 'greater-than';
const GREATER_THAN_MODEL_ID = 'greater-than-model-id';
const GREATER_THAN_MODEL_VERSION_ID = 'YOUR_GREATER_THAN_MODEL_VERSION_ID';

const NODE_ID_6 = 'less-than';
const LESS_THAN_MODEL_ID = 'less-than-model-id';
const LESS_THAN_MODEL_VERSION_ID = 'YOUR_LESS_THAN_MODEL_VERSION_ID';

/////////////////////////////////////////////////////////////////////////////
// YOU DO NOT NEED TO CHANGE ANYTHING BELOW THIS LINE TO RUN THIS EXAMPLE
/////////////////////////////////////////////////////////////////////////////

const { ClarifaiStub, grpc } = require("clarifai-nodejs-grpc");

const stub = ClarifaiStub.grpc();

// This will be used by every Clarifai endpoint call
const metadata = new grpc.Metadata();
metadata.set("authorization", "Key " + PAT);

stub.PostWorkflows(
    {
        user_app_id: {
            "user_id": USER_ID,
            "app_id": APP_ID
        },
        workflows: [
            {
                id: WORKFLOW_ID,
                nodes: [
                    {
                        id: NODE_ID_1,
                        model: {
                            id: GENERAL_EMBED_MODEL_ID,
                            model_version: {
                                id: GENERAL_EMBED_MODEL_VERSION_ID
                            }
                        }
                    },
                    {
                        id: NODE_ID_2,
                        model: {
                            id: GENERAL_CONCEPT_MODEL_ID,
                            model_version: {
                                id: GENERAL_CONCEPT_MODEL_VERSION_ID
                            }
                        }
                    },
                    {
                        id: NODE_ID_3,
                        model: {
                            id: GENERAL_CLUSTER_MODEL_ID,
                            model_version: {
                                id: GENERAL_CLUSTER_MODEL_VERSION_ID
                            }
                        }
                    },
                    {
                        id: NODE_ID_4,
                        model: {
                            id: SYNONYM_MODEL_ID,
                            model_version: {
                                id: SYNONYM_MODEL_VERSION_ID
                            }
                        },
                        node_inputs: [
                            {
                                node_id: NODE_ID_2 // general-concept
                            }
                        ]
                    },
                    {
                        id: NODE_ID_5,
                        model: {
                            id: GREATER_THAN_MODEL_ID,
                            model_version: {
                                id: GREATER_THAN_MODEL_VERSION_ID
                            }
                        },
                        node_inputs: [
                            {
                                node_id: NODE_ID_4 // mapper
                            }
                        ]
                    },
                    {
                        id: NODE_ID_6,
                        model: {
                            id: LESS_THAN_MODEL_ID,
                            model_version: {
                                id: LESS_THAN_MODEL_VERSION_ID
                            }
                        },
                        node_inputs: [
                            {
                                node_id: NODE_ID_4 // mapper
                            }
                        ]
                    }
                ]
            }
        ]
    },
    metadata,
    (err, response) => {
        if (err) {
            throw new Error(err);
        }

        if (response.status.code !== 10000) {
            console.log(response.status);
            throw new Error("Post workflows failed, status: " + response.status.description);
        }
    }
);
package com.clarifai.example;

import com.clarifai.channel.ClarifaiChannel;
import com.clarifai.credentials.ClarifaiCallCredentials;
import com.clarifai.grpc.api.*;
import com.clarifai.grpc.api.status.StatusCode;

public class ClarifaiExample {

    //////////////////////////////////////////////////////////////////////////////////////
    // In this section, we set the user authentication, app ID, and the details of the
    // workflow we want to build. Change these strings to run your own example.
    /////////////////////////////////////////////////////////////////////////////////////

    static final String USER_ID = "YOUR_USER_ID_HERE";
    //Your PAT (Personal Access Token) can be found in the portal under Authentication
    static final String PAT = "YOUR_PAT_HERE";
    static final String APP_ID = "YOUR_APP_ID_HERE";
    // Change these to build your own workflow with multiple connected nodes

    static final String WORKFLOW_ID = "auto-annotation-workflow-id";
    static final String NODE_ID_1 = "general-embed";
    static final String GENERAL_EMBED_MODEL_ID = "bbb5f41425b8468d9b7a554ff10f8581";
    static final String GENERAL_EMBED_MODEL_VERSION_ID = "bb186755eda04f9cbb6fe32e816be104";

    static final String NODE_ID_2 = "general-concept";
    static final String GENERAL_CONCEPT_MODEL_ID = "aaa03c23b3724a16a56b629203edc62c";
    static final String GENERAL_CONCEPT_MODEL_VERSION_ID = "aa7f35c01e0642fda5cf400f543e7c40";

    static final String NODE_ID_3 = "general-cluster";
    static final String GENERAL_CLUSTER_MODEL_ID = "cccbe437d6e54e2bb911c6aa292fb072";
    static final String GENERAL_CLUSTER_MODEL_VERSION_ID = "cc2074cff6dc4c02b6f4e1b8606dcb54";

    static final String NODE_ID_4 = "mapper";
    static final String SYNONYM_MODEL_ID = "synonym-model-id";
    static final String SYNONYM_MODEL_VERSION_ID = "YOUR_SYNONYM_MODEL_VERSION_ID";

    static final String NODE_ID_5 = "greater-than";
    static final String GREATER_THAN_MODEL_ID = "greater-than-model-id";
    static final String GREATER_THAN_MODEL_VERSION_ID = "YOUR_GREATER_THAN_MODEL_VERSION_ID";

    static final String NODE_ID_6 = "less-than";
    static final String LESS_THAN_MODEL_ID = "less-than-model-id";
    static final String LESS_THAN_MODEL_VERSION_ID = "YOUR_LESS_THAN_MODEL_VERSION_ID";

    ///////////////////////////////////////////////////////////////////////////////////
    // YOU DO NOT NEED TO CHANGE ANYTHING BELOW THIS LINE TO RUN THIS EXAMPLE
    ///////////////////////////////////////////////////////////////////////////////////

    public static void main(String[] args) {

        V2Grpc.V2BlockingStub stub = V2Grpc.newBlockingStub(ClarifaiChannel.INSTANCE.getGrpcChannel())
            .withCallCredentials(new ClarifaiCallCredentials(PAT));

        MultiWorkflowResponse postWorkflowsResponse = stub.postWorkflows(
            PostWorkflowsRequest.newBuilder()
            .setUserAppId(UserAppIDSet.newBuilder().setUserId(USER_ID).setAppId(APP_ID))
            .addWorkflows(
                Workflow.newBuilder()
                .setId(WORKFLOW_ID)
                .addNodes(
                    WorkflowNode.newBuilder()
                    .setId(NODE_ID_1)
                    .setModel(
                        Model.newBuilder()
                        .setId(GENERAL_EMBED_MODEL_ID)
                        .setModelVersion(
                            ModelVersion.newBuilder()
                            .setId(GENERAL_EMBED_MODEL_VERSION_ID)
                        )
                    )
                )
                .addNodes(
                    WorkflowNode.newBuilder()
                    .setId(NODE_ID_2)
                    .setModel(
                        Model.newBuilder()
                        .setId(GENERAL_CONCEPT_MODEL_ID)
                        .setModelVersion(
                            ModelVersion.newBuilder()
                            .setId(GENERAL_CONCEPT_MODEL_VERSION_ID)
                        )
                    )
                )
                .addNodes(
                    WorkflowNode.newBuilder()
                    .setId(NODE_ID_3)
                    .setModel(
                        Model.newBuilder()
                        .setId(GENERAL_CLUSTER_MODEL_ID)
                        .setModelVersion(
                            ModelVersion.newBuilder()
                            .setId(GENERAL_CLUSTER_MODEL_VERSION_ID)
                        )
                    )
                )
                .addNodes(
                    WorkflowNode.newBuilder()
                    .setId(NODE_ID_4)
                    .setModel(
                        Model.newBuilder()
                        .setId(SYNONYM_MODEL_ID)
                        .setModelVersion(
                            ModelVersion.newBuilder()
                            .setId(SYNONYM_MODEL_VERSION_ID)
                        )
                    )
                    .addNodeInputs(NodeInput.newBuilder().setNodeId(NODE_ID_2))
                )
                .addNodes(
                    WorkflowNode.newBuilder()
                    .setId(NODE_ID_5)
                    .setModel(
                        Model.newBuilder()
                        .setId(GREATER_THAN_MODEL_ID)
                        .setModelVersion(
                            ModelVersion.newBuilder()
                            .setId(GREATER_THAN_MODEL_VERSION_ID)
                        )
                    )
                    .addNodeInputs(NodeInput.newBuilder().setNodeId(NODE_ID_4))
                )
                .addNodes(
                    WorkflowNode.newBuilder()
                    .setId(NODE_ID_6)
                    .setModel(
                        Model.newBuilder()
                        .setId(LESS_THAN_MODEL_ID)
                        .setModelVersion(
                            ModelVersion.newBuilder()
                            .setId(LESS_THAN_MODEL_VERSION_ID)
                        )
                    )
                    .addNodeInputs(NodeInput.newBuilder().setNodeId(NODE_ID_4))
                )
            )
            .build()
        );

        if (postWorkflowsResponse.getStatus().getCode() != StatusCode.SUCCESS) {
            throw new RuntimeException("Post workflows failed, status: " + postWorkflowsResponse.getStatus());
        }

    }

}
<?php

require __DIR__ . "/vendor/autoload.php";

//////////////////////////////////////////////////////////////////////////////////////////
// In this section, we set the user authentication, app ID, and the details of the
// workflow we want to build. Change these strings to run your own example.
/////////////////////////////////////////////////////////////////////////////////////////

$USER_ID = "YOUR_USER_ID_HERE";
// Your PAT (Personal Access Token) can be found in the Account's Security section
$PAT = "YOUR_PAT_HERE";
$APP_ID = "YOUR_APP_ID_HERE";
# Change these to build your own workflow with multiple connected nodes
# Note that we've also added as comments the values of most of these variables against their names in the code below

$WORKFLOW_ID = "auto-annotation-workflow-id";
$NODE_ID_1 = "general-embed";
$MODEL_ID_1 = "bbb5f41425b8468d9b7a554ff10f8581";
$MODEL_VERSION_ID_1 = "bb186755eda04f9cbb6fe32e816be104";

$NODE_ID_2 = "general-concept";
$MODEL_ID_2 = "aaa03c23b3724a16a56b629203edc62c";
$MODEL_VERSION_ID_2 = "aa7f35c01e0642fda5cf400f543e7c40";

$NODE_ID_3 = "general-cluster";
$MODEL_ID_3 = "cccbe437d6e54e2bb911c6aa292fb072";
$MODEL_VERSION_ID_3 = "cc2074cff6dc4c02b6f4e1b8606dcb54";

$NODE_ID_4 = "mapper";
$SYNONYM_MODEL_ID = "YOUR_SYNONYM_MODEL_ID";
$SYNONYM_MODEL_VERSION_ID = "YOUR_SYNONYM_MODEL_VERSION_ID";

$NODE_ID_5 = "greater-than";
$GREATER_THAN_MODEL_ID = "YOUR_GREATER_THAN_MODEL_ID";
$GREATER_THAN_MODEL_VERSION_ID = "YOUR_GREATER_THAN_MODEL_VERSION_ID";

$NODE_ID_6 = "less-than";
$LESS_THAN_MODEL_ID = "YOUR_LESS_THAN_MODEL_ID";
$LESS_THAN_MODEL_VERSION_ID = "YOUR_LESS_THAN_MODEL_VERSION_ID";

///////////////////////////////////////////////////////////////////////////////////
// YOU DO NOT NEED TO CHANGE ANYTHING BELOW THIS LINE TO RUN THIS EXAMPLE
///////////////////////////////////////////////////////////////////////////////////

use Clarifai\ClarifaiClient;
use Clarifai\Api\PostWorkflowsRequest;
use Clarifai\Api\Workflow;
use Clarifai\Api\WorkflowNode;
use Clarifai\Api\NodeInput;
use Clarifai\Api\Model;
use Clarifai\Api\ModelVersion;
use Clarifai\Api\Status\StatusCode;
use Clarifai\Api\UserAppIDSet;

$client = ClarifaiClient::grpc();

$metadata = ["Authorization" => ["Key " . $PAT]];

$userDataObject = new UserAppIDSet([
    "user_id" => $USER_ID,
    "app_id" => $APP_ID
]);

// Let's make a RPC call to the Clarifai platform. It uses the opened gRPC client channel to communicate a
// request and then wait for the response
[$response, $status] = $client->PostWorkflows(
    // The request object carries the request along with the request status and other metadata related to the request itself
    new PostWorkflowsRequest([
        "user_app_id" => $userDataObject,
        "workflows" => [
            new Workflow([
                "id" => $WORKFLOW_ID, // auto-annotation-workflow-id
                "nodes" => [
                    new WorkflowNode([
                        "id" => $NODE_ID_1, // general-embed
                        "model" => new Model([
                            "id" => $MODEL_ID_1, // bbb5f41425b8468d9b7a554ff10f8581
                            "model_version" => new ModelVersion([
                                "id" => $MODEL_VERSION_ID_1 // bb186755eda04f9cbb6fe32e816be104
                            ])
                        ])

                    ]),
                    new WorkflowNode([
                        "id" => $NODE_ID_2, // general-concept
                        "model" => new Model([
                            "id" => $MODEL_ID_2, // aaa03c23b3724a16a56b629203edc62c
                            "model_version" => new ModelVersion([
                                "id" => $MODEL_VERSION_ID_2 // aa7f35c01e0642fda5cf400f543e7c40
                            ])
                        ])
                    ]),
                    new WorkflowNode([
                        "id" => $NODE_ID_3, // general-cluster
                        "model" => new Model([
                            "id" => $MODEL_ID_3, // cccbe437d6e54e2bb911c6aa292fb072
                            "model_version" => new ModelVersion([
                                "id" => $MODEL_VERSION_ID_3 // cc2074cff6dc4c02b6f4e1b8606dcb54
                            ])
                        ]),
                        "node_inputs" => [
                            new NodeInput([
                                "node_id" => $NODE_ID_1 // general-embed
                            ])
                        ]
                    ]),
                    new WorkflowNode([
                        "id" => $NODE_ID_4, // mapper
                        "model" => new Model([
                            "id" => $SYNONYM_MODEL_ID,
                            "model_version" => new ModelVersion([
                                "id" => $SYNONYM_MODEL_VERSION_ID
                            ])
                        ]),
                        "node_inputs" => [
                            new NodeInput([
                                "node_id" => $NODE_ID_2 // general-concept
                            ])
                        ]
                    ]),
                    new WorkflowNode([
                        "id" => $NODE_ID_5, // greater-than
                        "model" => new Model([
                            "id" => $GREATER_THAN_MODEL_ID,
                            "model_version" => new ModelVersion([
                                "id" => $GREATER_THAN_MODEL_VERSION_ID
                            ])
                        ]),
                        "node_inputs" => [
                            new NodeInput([
                                "node_id" => $NODE_ID_4 // mapper
                            ])
                        ]
                    ]),
                    new WorkflowNode([
                        "id" => $NODE_ID_6, // less-than
                        "model" => new Model([
                            "id" => $LESS_THAN_MODEL_ID,
                            "model_version" => new ModelVersion([
                                "id" => $LESS_THAN_MODEL_VERSION_ID
                            ])
                        ]),
                        "node_inputs" => [
                            new NodeInput([
                                "node_id" => $NODE_ID_4 // mapper
                            ])
                        ]
                    ])
                ]
            ])
        ]
    ]),
    $metadata
)->wait();

// A response is returned and the first thing we do is check the status of it
// A successful response will have a status code of 0; otherwise, there is some error
if ($status->code !== 0) {
    throw new Exception("Error: {$status->details}");
}
// In addition to the RPC response status, there is a Clarifai API status that reports if the operation was a success or failure
// (not just that the communication was successful)
if ($response->getStatus()->getCode() != StatusCode::SUCCESS) {
    print $response->getStatus()->getDetails();
    throw new Exception("Failure response: " . $response->getStatus()->getDescription());
}

?>
curl -X POST "https://api.clarifai.com/v2/users/YOUR_USER_ID_HERE/apps/YOUR_APP_ID_HERE/workflows" \
    -H "Authorization: Key YOUR_PAT_HERE" \
    -H "Content-Type: application/json" \
    --data-raw '{
        "workflows": [
            {
                "id": "auto-annotation-workflow-id",
                "nodes": [
                    {
                        "id": "general-embed",
                        "model": {
                            "id": "YOUR_GENERAL_EMBED_MODEL_ID_HERE",
                            "model_version": {
                                "id": "YOUR_GENERAL_EMBED_MODEL_VERSION_ID_HERE"
                            }
                        }
                    },
                    {
                        "id": "general-concept",
                        "model": {
                            "id": "YOUR_GENERAL_CONCEPT_MODEL_ID_HERE",
                            "model_version": {
                                "id": "YOUR_GENERAL_CONCEPT_MODEL_VERSION_ID_HERE"
                            }
                        }
                    },
                    {
                        "id": "general-cluster",
                        "model": {
                            "id": "YOUR_GENERAL_CLUSTER_MODEL_ID_HERE",
                            "model_version": {
                                "id": "YOUR_GENERAL_CLUSTER_MODEL_VERSION_ID_HERE"
                            }
                        }
                    },
                    {
                        "id": "mapper",
                        "model": {
                            "id": "synonym-model-id",
                            "model_version": {
                                "id": "YOUR_MAPPER_MODEL_VERSION_ID_HERE"
                            }
                        },
                        "node_inputs": [
                            {
                                "node_id": "general-concept"
                            }
                        ]
                    },
                    {
                        "id": "greater-than",
                        "model": {
                            "id": "greater-than-model-id",
                            "model_version": {
                                "id": "YOUR_GREATER_THAN_MODEL_VERSION_ID_HERE"
                            }
                        },
                        "node_inputs": [
                            {
                                "node_id": "mapper"
                            }
                        ]
                    },
                    {
                        "id": "less-than",
                        "model": {
                            "id": "less-than-model-id",
                            "model_version": {
                                "id": "YOUR_LESS_THAN_MODEL_VERSION_ID_HERE"
                            }
                        },
                        "node_inputs": [
                            {
                                "node_id": "mapper"
                            }
                        ]
                    }
                ]
            }
        ]
    }'
Suppress Output From Nodes
It is possible to turn the outputs from given nodes in your workflow on and off with the suppress_output endpoint. This can be helpful when you want to hide outputs for expensive return values like image crops or embedding.
By default, this endpoint will be set to false, meaning that we do not suppress any model's output.
- Python (gRPC)
- JavaScript (REST)
- Node.js (gRPC)
- Java (gRPC)
- PHP (gRPC)
- cURL
###################################################################################
# In this section, we set the user authentication, app ID, and the details of the
# nodes to suppress their outputs. Change these strings to run your own example.
##################################################################################

USER_ID = 'YOUR_USER_ID_HERE'
# Your PAT (Personal Access Token) can be found in the Account's Security section
PAT = 'YOUR_PAT_HERE'
APP_ID = 'YOUR_APP_ID_HERE'
# Change these to suppress the outputs of your own nodes
WORKFLOW_ID = 'predict-cluster-only'
NODE_ID_1 = 'general-embed'
MODEL_ID_1 = 'bbb5f41425b8468d9b7a554ff10f8581'
MODEL_VERSION_ID_1 = 'bb186755eda04f9cbb6fe32e816be104'

NODE_ID_2 = 'general-cluster'
MODEL_ID_2 = 'cccbe437d6e54e2bb911c6aa292fb072'
MODEL_VERSION_ID_2 = 'cc2074cff6dc4c02b6f4e1b8606dcb54'

##########################################################################
# YOU DO NOT NEED TO CHANGE ANYTHING BELOW THIS LINE TO RUN THIS EXAMPLE
##########################################################################

from clarifai_grpc.channel.clarifai_channel import ClarifaiChannel
from clarifai_grpc.grpc.api import resources_pb2, service_pb2, service_pb2_grpc
from clarifai_grpc.grpc.api.status import status_code_pb2

channel = ClarifaiChannel.get_grpc_channel()
stub = service_pb2_grpc.V2Stub(channel)

metadata = (('authorization', 'Key ' + PAT),)

userDataObject = resources_pb2.UserAppIDSet(user_id=USER_ID, app_id=APP_ID) # The userDataObject is required when using a PAT

post_workflows_response = stub.PostWorkflows(
    service_pb2.PostWorkflowsRequest(
        user_app_id=userDataObject,
        workflows=[
            resources_pb2.Workflow(
                id=WORKFLOW_ID,
                nodes=[
                    resources_pb2.WorkflowNode(
                        id=NODE_ID_1,
                        model=resources_pb2.Model(
                            id=MODEL_ID_1,
                            model_version=resources_pb2.ModelVersion(
                                id=MODEL_VERSION_ID_1
                            )
                        ),
                        suppress_output = True
                    ),
                    resources_pb2.WorkflowNode(
                        id=NODE_ID_2,
                        model=resources_pb2.Model(
                            id=MODEL_ID_2,
                            model_version=resources_pb2.ModelVersion(
                                id=MODEL_VERSION_ID_2
                            )
                        ),
                        node_inputs=[
                            resources_pb2.NodeInput(node_id=NODE_ID_1)
                        ]
                    ),
                ]
            )
        ]
    ),
    metadata=metadata
)


if post_workflows_response.status.code != status_code_pb2.SUCCESS:
    print(post_workflows_response.status)
    raise Exception("Post workflows failed, status: " + post_workflows_response.status.description)
<!--index.html file-->

<script>
    //////////////////////////////////////////////////////////////////////////////////////
    // In this section, we set the user authentication, app ID, and the details of the
    // nodes to suppress their outputs. Change these strings to run your own example.
    /////////////////////////////////////////////////////////////////////////////////////

    const USER_ID = 'YOUR_USER_ID_HERE';
    // Your PAT (Personal Access Token) can be found in the Account's Security section
    const PAT = 'YOUR_PAT_HERE';
    const APP_ID = 'YOUR_APP_ID_HERE';
    // Change these to suppress the outputs of your own nodes
    const WORKFLOW_ID = 'predict-cluster-only';
    const NODE_ID_1 = 'general-embed';
    const MODEL_ID_1 = 'bbb5f41425b8468d9b7a554ff10f8581';
    const MODEL_VERSION_ID_1 = 'bb186755eda04f9cbb6fe32e816be104';

    const NODE_ID_2 = 'general-cluster';
    const MODEL_ID_2 = 'cccbe437d6e54e2bb911c6aa292fb072';
    const MODEL_VERSION_ID_2 = 'cc2074cff6dc4c02b6f4e1b8606dcb54';

    ///////////////////////////////////////////////////////////////////////////////////
    // YOU DO NOT NEED TO CHANGE ANYTHING BELOW THIS LINE TO RUN THIS EXAMPLE
    ///////////////////////////////////////////////////////////////////////////////////

    const raw = JSON.stringify({
        "user_app_id": {
            "user_id": USER_ID,
            "app_id": APP_ID
        },
        "workflows": [
            {
                "id": WORKFLOW_ID,
                "nodes": [
                    {
                        "id": NODE_ID_1,
                        "model": {
                            "id": MODEL_ID_1,
                            "model_version": {
                                "id": MODEL_VERSION_ID_1
                            }
                        },
                        "suppress_output": true
                    },
                    {
                        "id": NODE_ID_2,
                        "node_inputs": [
                            {
                                "node_id": NODE_ID_1
                            }
                        ],
                        "model": {
                            "id": MODEL_ID_2,
                            "model_version": {
                                "id": MODEL_VERSION_ID_2
                            }
                        }
                    }
                ]
            }
        ]
    });

    const requestOptions = {
        method: 'POST',
        headers: {
            'Accept': 'application/json',
            'Authorization': 'Key ' + PAT
        },
        body: raw
    };

    fetch(`https://api.clarifai.com/v2/workflows`, requestOptions)
        .then(response => response.text())
        .then(result => console.log(result))
        .catch(error => console.log('error', error));

</script>
//index.js file

//////////////////////////////////////////////////////////////////////////////////////
// In this section, we set the user authentication, app ID, and the details of the
// nodes to suppress their outputs. Change these strings to run your own example.
/////////////////////////////////////////////////////////////////////////////////////

const USER_ID = 'YOUR_USER_ID_HERE';
// Your PAT (Personal Access Token) can be found in the Account's Security section
const PAT = 'YOUR_PAT_HERE';
const APP_ID = 'YOUR_APP_ID_HERE';
// Change these to suppress the outputs of your own nodes
const WORKFLOW_ID = 'predict-cluster-only';
const NODE_ID_1 = 'general-embed';
const MODEL_ID_1 = 'bbb5f41425b8468d9b7a554ff10f8581';
const MODEL_VERSION_ID_1 = 'bb186755eda04f9cbb6fe32e816be104';

const NODE_ID_2 = 'general-cluster';
const MODEL_ID_2 = 'cccbe437d6e54e2bb911c6aa292fb072';
const MODEL_VERSION_ID_2 = 'cc2074cff6dc4c02b6f4e1b8606dcb54';

const NODE_ID_3 = 'mapper';

/////////////////////////////////////////////////////////////////////////////
// YOU DO NOT NEED TO CHANGE ANYTHING BELOW THIS LINE TO RUN THIS EXAMPLE
/////////////////////////////////////////////////////////////////////////////

const { ClarifaiStub, grpc } = require("clarifai-nodejs-grpc");

const stub = ClarifaiStub.grpc();

// This will be used by every Clarifai endpoint call
const metadata = new grpc.Metadata();
metadata.set("authorization", "Key " + PAT);

stub.PostWorkflows(
    {
        user_app_id: {
            "user_id": USER_ID,
            "app_id": APP_ID
        },
        workflows: [
            {
                id: WORKFLOW_ID,
                nodes: [
                    {
                        id: NODE_ID_1,
                        model: {
                            id: MODEL_ID_1,
                            model_version: {
                                id: MODEL_VERSION_ID_1
                            }
                        },
                        suppress_output: true
                    },
                    {
                        id: NODE_ID_2,
                        model: {
                            id: MODEL_ID_2,
                            model_version: {
                                id: MODEL_VERSION_ID_2
                            }
                        },
                        node_inputs: [
                            {
                                node_id: NODE_ID_3
                            }
                        ]
                    },
                ]
            }
        ]
    },
    metadata,
    (err, response) => {
        if (err) {
            throw new Error(err);
        }

        if (response.status.code !== 10000) {
            console.log(response.status);
            throw new Error("Post workflows failed, status: " + response.status.description);
        }
    }
);
package com.clarifai.example;

import com.clarifai.channel.ClarifaiChannel;
import com.clarifai.credentials.ClarifaiCallCredentials;
import com.clarifai.grpc.api.*;
import com.clarifai.grpc.api.status.StatusCode;

public class ClarifaiExample {

    //////////////////////////////////////////////////////////////////////////////////////
    // In this section, we set the user authentication, app ID, and the details of the
    // nodes to suppress their outputs. Change these strings to run your own example.
    /////////////////////////////////////////////////////////////////////////////////////

    static final String USER_ID = "YOUR_USER_ID_HERE";
    //Your PAT (Personal Access Token) can be found in the portal under Authentication
    static final String PAT = "YOUR_PAT_HERE";
    static final String APP_ID = "YOUR_APP_ID_HERE";
    // Change these to suppress the outputs of your own nodes
    static final String WORKFLOW_ID = "auto-annotation-workflow-id";
    static final String NODE_ID_1 = "general-embed";
    static final String MODEL_ID_1 = "bbb5f41425b8468d9b7a554ff10f8581";
    static final String MODEL_VERSION_ID_1 = "bb186755eda04f9cbb6fe32e816be104";

    static final String NODE_ID_2 = "general-cluster";
    static final String MODEL_ID_2 = "cccbe437d6e54e2bb911c6aa292fb072";
    static final String MODEL_VERSION_ID_2 = "cc2074cff6dc4c02b6f4e1b8606dcb54";

    static final String NODE_ID_3 = "general-cluster";

    ///////////////////////////////////////////////////////////////////////////////////
    // YOU DO NOT NEED TO CHANGE ANYTHING BELOW THIS LINE TO RUN THIS EXAMPLE
    ///////////////////////////////////////////////////////////////////////////////////

    public static void main(String[] args) {

        V2Grpc.V2BlockingStub stub = V2Grpc.newBlockingStub(ClarifaiChannel.INSTANCE.getGrpcChannel())
            .withCallCredentials(new ClarifaiCallCredentials(PAT));

        MultiWorkflowResponse postWorkflowsResponse = stub.postWorkflows(
            PostWorkflowsRequest.newBuilder()
            .setUserAppId(UserAppIDSet.newBuilder().setUserId(USER_ID).setAppId(APP_ID))
            .addWorkflows(
                Workflow.newBuilder()
                .setId(WORKFLOW_ID)
                .addNodes(
                    WorkflowNode.newBuilder()
                    .setId(NODE_ID_1)
                    .setModel(
                        Model.newBuilder()
                        .setId(MODEL_ID_1)
                        .setModelVersion(
                            ModelVersion.newBuilder()
                            .setId(MODEL_VERSION_ID_1)
                        )
                    )
                )
                .addNodes(
                    WorkflowNode.newBuilder()
                    .setId(NODE_ID_2)
                    .setModel(
                        Model.newBuilder()
                        .setId(MODEL_ID_2)
                        .setModelVersion(
                            ModelVersion.newBuilder()
                            .setId(MODEL_VERSION_ID_2)
                        )
                    )
                    .addNodeInputs(NodeInput.newBuilder().setNodeId(NODE_ID_3))
                )
            )
            .build()
        );

        if (postWorkflowsResponse.getStatus().getCode() != StatusCode.SUCCESS) {
            throw new RuntimeException("Post workflows failed, status: " + postWorkflowsResponse.getStatus());
        }

    }

}
<?php

require __DIR__ . "/vendor/autoload.php";

//////////////////////////////////////////////////////////////////////////////////////////
// In this section, we set the user authentication, app ID, and the details of the
// nodes to suppress their outputs. Change these strings to run your own example.
/////////////////////////////////////////////////////////////////////////////////////////

$USER_ID = "YOUR_USER_ID_HERE";
// Your PAT (Personal Access Token) can be found in the Account's Security section
$PAT = "YOUR_PAT_HERE";
$APP_ID = "YOUR_APP_ID_HERE";
// Change these to suppress the outputs of your own nodes
$WORKFLOW_ID = "predict-cluster-only";
$NODE_ID_1 = "general-embed";
$MODEL_ID_1 = "bbb5f41425b8468d9b7a554ff10f8581";
$MODEL_VERSION_ID_1 = "bb186755eda04f9cbb6fe32e816be104";

$NODE_ID_2 = "general-cluster";
$MODEL_ID_2 = "cccbe437d6e54e2bb911c6aa292fb072";
$MODEL_VERSION_ID_2 = "cc2074cff6dc4c02b6f4e1b8606dcb54";

///////////////////////////////////////////////////////////////////////////////////
// YOU DO NOT NEED TO CHANGE ANYTHING BELOW THIS LINE TO RUN THIS EXAMPLE
///////////////////////////////////////////////////////////////////////////////////

use Clarifai\ClarifaiClient;
use Clarifai\Api\PostWorkflowsRequest;
use Clarifai\Api\Workflow;
use Clarifai\Api\WorkflowNode;
use Clarifai\Api\NodeInput;
use Clarifai\Api\Model;
use Clarifai\Api\ModelVersion;
use Clarifai\Api\Status\StatusCode;
use Clarifai\Api\UserAppIDSet;

$client = ClarifaiClient::grpc();

$metadata = ["Authorization" => ["Key " . $PAT]];

$userDataObject = new UserAppIDSet([
    "user_id" => $USER_ID,
    "app_id" => $APP_ID
]);

// Let's make a RPC call to the Clarifai platform. It uses the opened gRPC client channel to communicate a
// request and then wait for the response
[$response, $status] = $client->PostWorkflows(
    // The request object carries the request along with the request status and other metadata related to the request itself
    new PostWorkflowsRequest([
        "user_app_id" => $userDataObject,
        "workflows" => [
            new Workflow([
                "id" => $WORKFLOW_ID,
                "nodes" => [
                    new WorkflowNode([
                        "id" => $NODE_ID_1,
                        "model" => new Model([
                            "id" => $MODEL_ID_1,
                            "model_version" => new ModelVersion([
                                "id" => $MODEL_VERSION_ID_1
                            ])
                        ]),

                        "suppress_output" => true

                    ]),
                    new WorkflowNode([
                        "id" => $NODE_ID_2,
                        "model" => new Model([
                            "id" => $MODEL_ID_2,
                            "model_version" => new ModelVersion([
                                "id" => $MODEL_VERSION_ID_2
                            ])
                        ]),
                        "node_inputs" => [
                            new NodeInput([
                                "node_id" => $NODE_ID_1
                            ])
                        ]
                    ])
                ]
            ])
        ]
    ]),
    $metadata
)->wait();

// A response is returned and the first thing we do is check the status of it
// A successful response will have a status code of 0; otherwise, there is some error
if ($status->code !== 0) {
    throw new Exception("Error: {$status->details}");
}
// In addition to the RPC response status, there is a Clarifai API status that reports if the operation was a success or failure
// (not just that the communication was successful)
if ($response->getStatus()->getCode() != StatusCode::SUCCESS) {
    print $response->getStatus()->getDetails();
    throw new Exception("Failure response: " . $response->getStatus()->getDescription());
}

?>
curl -X POST "https://api.clarifai.com/v2/users/YOUR_USER_ID_HERE/apps/YOUR_APP_ID_HERE/workflows" \
    -H "Authorization: Key YOUR_PAT_HERE" \
    -H "Content-Type: application/json" \
    --data-raw '{
		"workflows": [
			{
			  "id": "predict-cluster-only",
			  "nodes": [
				{
				  "id": "general-embed",
				  "model": {
					"id": "bbb5f41425b8468d9b7a554ff10f8581",
					"model_version": {
					  "id": "bb186755eda04f9cbb6fe32e816be104"
					}
				  },
				  "suppress_output": true
				},
				{
				  "id": "general-cluster",
				  "node_inputs": [
					{
					  "node_id": "general-embed"
					}
				  ],
				  "model": {
					"id": "cccbe437d6e54e2bb911c6aa292fb072",
					"model_version": {
					  "id": "cc2074cff6dc4c02b6f4e1b8606dcb54"
					}
				  }
				}
			  ]
			}
		]
	}'
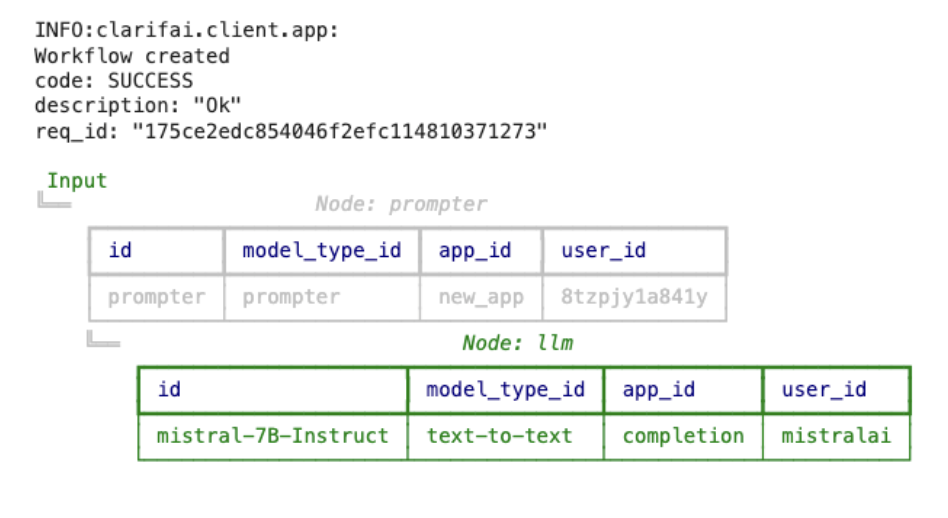
Create Using YAML File
Note that when creating a workflow using the Python SDK, you need to provide its YAML specification.
- Python SDK
from clarifai.client.user import User

# Your PAT (Personal Access Token) can be found in the Account's Security section
# Specify the correct user_id/app_id pairings
# Since you're making inferences outside your app's scope
USER_ID = "user_id"
APP_ID = "app_id"

app = User(user_id=USER_ID, pat="YOUR_PAT").create_app(
    app_id=APP_ID, base_workflow="Empty"
)


# create a yaml file specifying the workflow structure
# eg:
"""configs/prompter_llm.yml
workflow:
  id: wf-prompter-llm
  nodes:
    - id: prompter
      model:
          model_id: prompter
          model_type_id: prompter
          description: 'Prompter Model'
          output_info:
            params:
              prompt_template: 'Classify sentiment between postive and negative for the text {data.text.raw}'

    - id: llm
      model:
          user_id: mistralai
          model_id: mistral-7B-Instruct
          app_id: completion

      node_inputs:
        - node_id: prompter

"""

# create the workflow
prompter_llm_workflow = app.create_workflow(config_filepath="configs/prompter_llm.yml")
Output