Local Runners
Run and test models locally, while exposing them through Clarifai’s enterprise‑grade API
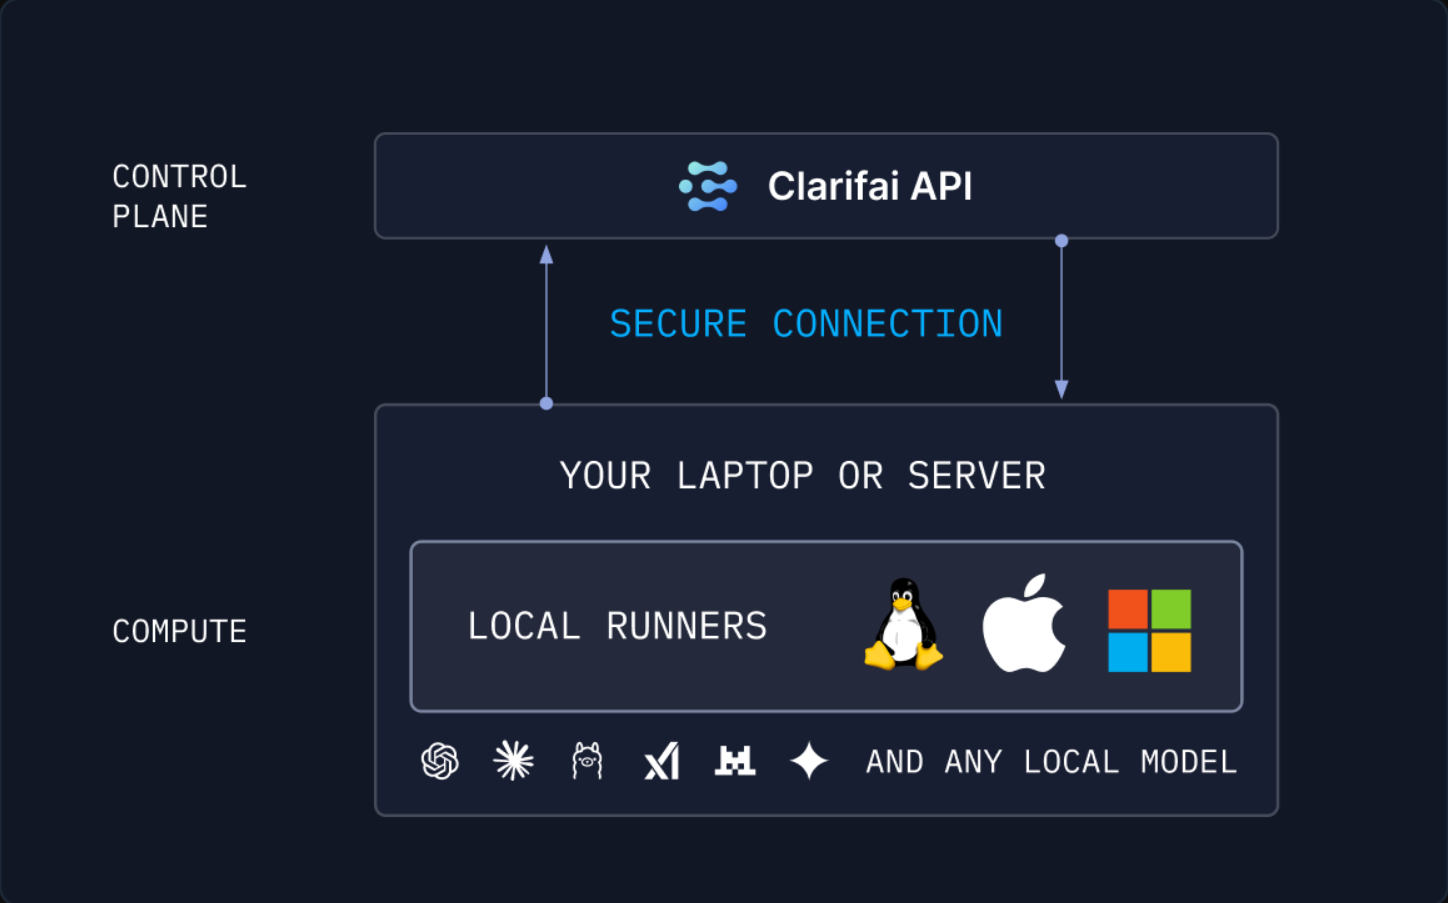
Local Runners are a powerful feature that let you securely expose your locally running models or servers via a public URL, allowing you to quickly develop, test, and share any models running on your own hardware.
Instead of running solely in the cloud, you can run your models anywhere that supports Python and has an internet connection — whether it's your workstation or on-premise server.
With Local Runners, you can connect your own models to Clarifai's compute plane. This seamless integration enables you to leverage the Clarifai cloud API, workflows, and other platform capabilities with your custom models.
Your model can securely receive and process requests from anywhere, just as it would in a production cloud deployment.
Note: A runner is the actual running instance of your model
Prerequisites
Sign Up or Log In
Log in to your existing Clarifai account or sign up for a new one. Next, retrieve the following credentials required for setup:
-
User ID – In the collapsible left sidebar, select Settings and choose Account from the dropdown list. Then, locate your user ID.
-
Personal Access Token (PAT) – From the same Settings option, choose Secrets to generate or copy your PAT. This token is used to authenticate your connection with the Clarifai platform.
Install Clarifai CLI
Install the latest version of the Clarifai CLI tool. It includes built-in support for Local Runners.
- Bash
pip install --upgrade clarifai
Note: You'll need Python 3.11 or 3.12 installed to successfully run the Local Runners.
Quick Start
Once you've completed the prerequisites above, run the following commands and follow the prompts in your terminal to quickly get started with Local Runners.
Log in to Clarifai
Connect your environment to the Clarifai platform and create a context profile.
- CLI
clarifai login
Set up a Model
Generate a sample toy model with the necessary files.
- CLI
clarifai model init
Serve Your Model Locally
Start the model using clarifai model serve. The CLI will guide you through creating any required platform resources (compute clusters, nodepools, and deployments) — described below.
- CLI
clarifai model serve
Note: The
local-runnercommand is still supported as an alias forserve.
Once your runner launches successfully, your model will be running and accessible via a public URL. You can then open a new terminal, copy the sample code provided in the output, and test your model!
Use Cases for Local Runners
-
Streamlined model development — Local Runners make it easy to build and test new models directly within your local environment. You can spin up a runner on your machine, route API calls through our public cloud endpoint, and watch requests hit your model in real time. This allows you to debug, set breakpoints, return results, and validate outputs.
-
Leverage your own compute resources — If you have powerful hardware, you can take advantage of that local compute without relying on Clarifai's autoscaling infrastructure. Your model remains accessible through our API with full authentication, even though it runs locally.
-
Locally connect agents — Because Local Runners execute on your chosen hardware, they can interact with local file systems, make OS-level calls, or access private data stores. With our MCP (Model Context Protocol) model type, you can give your cloud-hosted agents or any MCP-enabled clients authenticated access to your locally controlled information, regardless of their deployment location.
-
Run models anywhere — Whether on a local development machine, an on-premises server, or a private cloud cluster, Local Runners seamlessly connect your models to our platform. This enables you to keep sensitive data and custom-built models securely within your own environment.
Step 1: Build a Model
Start by building the model you want to run using Local Runners.
You can either create a custom model from scratch or leverage pre-trained models from external sources like Hugging Face.
If you're building your own model, follow our comprehensive step-by-step guide to get started.
You can also explore our examples repository to see models built for compatibility with the Clarifai platform.
You can automatically generate a default model by running the clarifai model init command in the terminal from your current directory. After the model's files are created, you can modify them as needed or go with the default options.
Step 2: Create a Context (Optional)
Running the local development runner relies on certain variables defined in your current context. The context refers to the active environment settings that determine how your commands interact with the Clarifai platform.
Note: You can create this context using the provided default values when you run
clarifai loginandlocal-runnercommands.
Any configurations you create locally — such as the computer cluster and app — will also be created on the Clarifai platform, making them reusable whenever you test your model with the local development runner.
Click here to learn how to create and manage various aspects of your Clarifai context, including switching contexts and editing your configuration information.
These are the variables required to create a runner:
| Variable | Description |
|---|---|
| CLARIFAI_PAT | Personal Access Token (PAT) for authentication |
CLARIFAI_USER_ID (user_id) | User ID of the account owning the model |
CLARIFAI_APP_ID (app_id) | App ID containing the model |
CLARIFAI_MODEL_ID (model_id) | The model ID for the model to be run locally |
CLARIFAI_COMPUTE_CLUSTER_ID (compute_cluster_id) | Compute cluster where the Local Runner will reside. Note that the user_id of the compute cluster must match the user_id of the model. |
CLARIFAI_NODEPOOL_ID (nodepool_id) | Nodepool within the compute cluster |
CLARIFAI_DEPLOYMENT (deployment_id) | Deployment for a model into the cluster and nodepool |
CLARIFAI_RUNNER_ID (runner_id) | Auto-generated unique runner ID, created by the API and stored in the context |
The Clarifai CLI follows a defined order of precedence when launching Local Runners. If a value is set as an environment variable in your terminal, it takes priority and is used first. If no corresponding environment variable is found, the CLI automatically falls back to the value defined in the active context.
For example, you can override the model ID by setting it as an environment variable before starting the Local Runner:
export CLARIFAI_MODEL_ID=new-model-id
In this case, the CLARIFAI_MODEL_ID from your terminal session will take precedence over the one stored in your active context.
Step 3: Run Your Model
To run your model with the local development runner, navigate to the directory where your custom model is located.
Then, follow these steps.
Log in to Clarifai
Run the following command to log in to the Clarifai platform and establish a connection.
- CLI
clarifai login
After running the login command, you'll be prompted to enter the following details to authenticate your connection:
- CLI
context name (default: "default"):
user id:
personal access token value (default: "ENVVAR" to get our env var rather than config):
- Context name — You can provide a custom name for your Clarifai configuration context, or simply press Enter to use the default name, "default". This helps you manage different configurations if needed.
- User ID — Enter your Clarifai user ID.
- PAT — Enter your Clarifai PAT. Note that if you press Enter, and you have set the
CLARIFAI_PATenvironment variable, it will use that token automatically.
Serve Your Model
Start the model using clarifai model serve (or the alias local-runner):
- CLI
clarifai model serve
Or with a specific model path:
- CLI
clarifai model serve [OPTIONS] [MODEL_PATH]
Note:
MODEL_PATHis an optional path to the model directory. If omitted, the current directory is used by default.
| Option | Default | Description |
|---|---|---|
--mode | none | none (current env), env (auto-creates a virtualenv), container (Docker) |
--grpc | off | Standalone gRPC server — no Clarifai login required |
--port | 8000 | Server port (with --grpc) |
--concurrency | 32 | Max concurrent requests (equivalent to --pool_size) |
--keep-image | off | Keep Docker image after exit (container mode only) |
--health-check-port | auto | Port for the health check HTTP server |
--disable-health-check | off | Disable the health check server entirely |
--auto-find-health-check-port | off | Automatically find an available port if the default is in use |
-v, --verbose | off | Show detailed logs (useful for debugging toolkit servers like Ollama) |
Standalone gRPC Mode
For offline development without a Clarifai account, use --grpc to start a standalone gRPC server:
- CLI
# Start standalone gRPC server (no login required)
clarifai model serve ./my-model --grpc

# Custom port
clarifai model serve ./my-model --grpc --port 9000
This is useful for quick local testing and debugging without needing an internet connection or Clarifai credentials.
Virtual Environment Mode
Use --mode env to automatically create a virtualenv with the model's dependencies:
- CLI
clarifai model serve ./my-model --mode env
This isolates the model's packages from your system Python, preventing dependency conflicts.
If the runner doesn't detect the necessary context configurations in your environment, it will prompt you to create them using default values.
This ensures that all essential components required for Local Runners are properly set up or included in your configuration context, including:
- A compute cluster and nodepool configured for Local Runners.
Note: This cluster is created exclusively for Local Runners. It is not designed to support other tasks and lacks features like autoscaling to handle variable traffic demands, among other cloud-specific capabilities. You also cannot use other types of clusters for Local Runners — only the special cluster created for this purpose is supported.
-
An app with a model and model version representing the local runner.
-
A deployment that places the model version into the designated nodepool.
Example Output
clarifai model local-runner
[INFO] 13:32:33.062920 > Checking local runner requirements... |  thread=8800297152
[INFO] 13:32:33.085516 Checking 1 dependencies... |  thread=8800297152
[INFO] 13:32:33.085856 ✅ All 1 dependencies are installed! |  thread=8800297152
[INFO] 13:32:33.086091 > Verifying local runner setup... |  thread=8800297152
[INFO] 13:32:33.086140 Current context: default |  thread=8800297152
[INFO] 13:32:33.086179 Current user_id: alfrick |  thread=8800297152
[INFO] 13:32:33.086210 Current PAT: d6570**** |  thread=8800297152
[INFO] 13:32:33.088226 Current compute_cluster_id: local-runner-compute-cluster |  thread=8800297152
[WARNING] 13:32:34.747258 Failed to get compute cluster with ID 'local-runner-compute-cluster':
code: CONN_DOES_NOT_EXIST
description: "Resource does not exist"
details: "ComputeCluster with ID \'local-runner-compute-cluster\' not found. Check your request fields."
req_id: "sdk-python-11.8.2-941866be231e4602865a64d15e01fa55"
 |  thread=8800297152
Compute cluster not found. Do you want to create a new compute cluster alfrick/local-runner-compute-cluster? (y/n): y
[INFO] 13:32:39.352840 Compute Cluster with ID 'local-runner-compute-cluster' is created:
code: SUCCESS
description: "Ok"
req_id: "sdk-python-11.8.2-eae3c965f0cd4cd394ad2590b47a68ab"
 |  thread=8800297152
[INFO] 13:32:39.364816 Current nodepool_id: local-runner-nodepool |  thread=8800297152
[WARNING] 13:32:42.674651 Failed to get nodepool with ID 'local-runner-nodepool':
code: CONN_DOES_NOT_EXIST
description: "Resource does not exist"
details: "Nodepool not found. Check your request fields."
req_id: "sdk-python-11.8.2-436a10af775346878416c84dd6854254"
 |  thread=8800297152
Nodepool not found. Do you want to create a new nodepool alfrick/local-runner-compute-cluster/local-runner-nodepool? (y/n): y
[INFO] 13:32:45.824647 Nodepool with ID 'local-runner-nodepool' is created:
code: SUCCESS
description: "Ok"
req_id: "sdk-python-11.8.2-0e520dbecfcd42d58fd78b2494c48aa8"
 |  thread=8800297152
[INFO] 13:32:45.836876 Current app_id: local-runner-app |  thread=8800297152
[INFO] 13:32:46.896228 Current model_id: local-runner-model |  thread=8800297152
[WARNING] 13:32:52.596471 Attempting to patch latest version: 9d38bb9398944de4bdef699835f17ec9 |  thread=8800297152
[INFO] 13:32:55.120866 Successfully patched version 9d38bb9398944de4bdef699835f17ec9 |  thread=8800297152
[INFO] 13:32:55.124102 Current model version 9d38bb9398944de4bdef699835f17ec9 |  thread=8800297152
[WARNING] 13:32:56.851018 Failed to get runner with ID 'b3632320627341fb9ea1132d5b77b26f':
code: CONN_DOES_NOT_EXIST
description: "Resource does not exist"
details: "Runner not found. Check your request fields."
req_id: "sdk-python-11.8.2-0988ef3bd3144e0196cff79062621406"
 |  thread=8800297152
[INFO] 13:32:56.851708 Creating the local runner tying this 'alfrick/local-runner-app/models/local-runner-model' model (version: 9d38bb9398944de4bdef699835f17ec9) to the 'alfrick/local-runner-compute-cluster/local-runner-nodepool' nodepool. |  thread=8800297152
[INFO] 13:32:57.321664 Runner with ID 'f3c46913186449ba99dedd38123d47a3' is created:
code: SUCCESS
description: "Ok"
req_id: "sdk-python-11.8.2-8ec4cb69afdb402cb173e50251420347"
 |  thread=8800297152
[INFO] 13:32:57.331723 Current runner_id: f3c46913186449ba99dedd38123d47a3 |  thread=8800297152
[WARNING] 13:32:57.624714 Failed to get deployment with ID local-runner-deployment:
code: CONN_DOES_NOT_EXIST
description: "Resource does not exist"
details: "Deployment with ID \'local-runner-deployment\' not found. Check your request fields."
req_id: "sdk-python-11.8.2-93d203f6c0c944e5a844967a7f6f3c9b"
 |  thread=8800297152
Deployment not found. Do you want to create a new deployment alfrick/local-runner-compute-cluster/local-runner-nodepool/local-runner-deployment? (y/n): y
[INFO] 13:33:00.896305 Deployment with ID 'local-runner-deployment' is created:
code: SUCCESS
description: "Ok"
req_id: "sdk-python-11.8.2-68917fcd0d3c403db684a06a417d804e"
 |  thread=8800297152
[INFO] 13:33:00.904547 Current deployment_id: local-runner-deployment |  thread=8800297152
[INFO] 13:33:00.907140 Current model section of config.yaml: {'id': 'my-uploaded-model', 'user_id': 'alfrick', 'app_id': 'models1', 'model_type_id': 'text-to-text'} |  thread=8800297152
Do you want to backup config.yaml to config.yaml.bk then update the config.yaml with the new model information? (y/n): y
[INFO] 13:33:03.816163 Checking 1 dependencies... |  thread=8800297152
[INFO] 13:33:03.816702 ✅ All 1 dependencies are installed! |  thread=8800297152
[INFO] 13:33:03.816783 ✅ Starting local runner... |  thread=8800297152
[INFO] 13:33:03.816865 No secrets path configured, running without secrets |  thread=8800297152
[INFO] 13:33:05.775735 ModelServer initialized successfully |  thread=8800297152
Exception in thread Thread-1 (serve_health):
Traceback (most recent call last):
  File "/opt/homebrew/Cellar/python@3.12/3.12.11/Frameworks/Python.framework/Versions/3.12/lib/python3.12/threading.py", line 1075, in _bootstrap_inner
    self.run()
  File "/opt/homebrew/Cellar/python@3.12/3.12.11/Frameworks/Python.framework/Versions/3.12/lib/python3.12/threading.py", line 1012, in run
    self._target(*self._args, **self._kwargs)
  File "/Users/macbookpro/Desktop/code/venv/lib/python3.12/site-packages/clarifai_protocol/utils/health.py", line 67, in serve_health
  File "/opt/homebrew/Cellar/python@3.12/3.12.11/Frameworks/Python.framework/Versions/3.12/lib/python3.12/socketserver.py", line 457, in __init__
    self.server_bind()
  File "/opt/homebrew/Cellar/python@3.12/3.12.11/Frameworks/Python.framework/Versions/3.12/lib/python3.12/http/server.py", line 136, in server_bind
    socketserver.TCPServer.server_bind(self)
  File "/opt/homebrew/Cellar/python@3.12/3.12.11/Frameworks/Python.framework/Versions/3.12/lib/python3.12/socketserver.py", line 478, in server_bind
    self.socket.bind(self.server_address)
OSError: [Errno 48] Address already in use
[INFO] 13:33:05.827501 ✅ Your model is running locally and is ready for requests from the API...
 |  thread=8800297152
[INFO] 13:33:05.827575 > Code Snippet: To call your model via the API, use this code snippet:
# Clarifai Model Client Script
# Set the environment variables `CLARIFAI_DEPLOYMENT_ID` and `CLARIFAI_PAT` to run this script.
# Example usage:
import os

from clarifai.client import Model
from clarifai.runners.utils import data_types

model = Model(
    "https://clarifai.com/alfrick/local-runner-app/models/local-runner-model",
    deployment_id='local-runner-deployment',  # Only needed for dedicated deployed models
    base_url="https://api.clarifai.com",
)

# Example model prediction from different model methods:

response = model.predict(
    text1="What is the future of AI?",
)
print(response)

response = model.generate(
    text1="What is the future of AI?",
)
for res in response:
    print(res)

response = model.stream(
    input_iterator=iter(['What is the future of AI?']),
)
 |  thread=8800297152
[INFO] 13:33:05.827661 > Playground:   To chat with your model, visit: https://clarifai.com/playground?model=local-runner-model__9d38bb9398944de4bdef699835f17ec9&user_id=alfrick&app_id=local-runner-app
 |  thread=8800297152
[INFO] 13:33:05.827704 > API URL:      To call your model via the API, use this model URL: https://clarifai.com/alfrick/local-runner-app/models/local-runner-model
 |  thread=8800297152
[INFO] 13:33:05.827724 Press CTRL+C to stop the runner.
 |  thread=8800297152
[INFO] 13:33:05.827758 Starting 32 threads... |  thread=8800297152
Note: If the
config.yamlfile does not contain model information that matches theuser_id,app_id, andmodel_iddefined in your current context, it will be automatically updated to include the new model details. This ensures that the model started by the local development runner is the same one you intend to call via the API. If needed, you can back up the existingconfig.yamlfile asconfig.yaml.bk.
Note: The
model_type_idis loaded from theconfig.yamlfile, rather than from the context, ensuring consistency between the model configuration and the actual model.
Step 4: Test Your Runner
When the local development runner starts in your terminal, it automatically generates an example client code snippet based on the model's signature.
You can run this snippet in a separate terminal (within the same directory) to receive the model’s response output.
Example Code Snippet
# Clarifai Model Client Script
# Set the environment variables `CLARIFAI_DEPLOYMENT_ID` and `CLARIFAI_PAT` to run this script.
# Example usage:
import os

from clarifai.client import Model
from clarifai.runners.utils import data_types

model = Model(
    "https://clarifai.com/<user-id>/local-runner-app/models/local-runner-model",
    deployment_id='local-runner-deployment',  # Only needed for dedicated deployed models
    base_url="https://api.clarifai.com",
)

# Example model prediction from different model methods:

response = model.predict(
    text1="What is the future of AI?",
)
print(response)

response = model.generate(
    text1="What is the future of AI?",
)
for res in response:
    print(res)

response = model.stream(
    input_iterator=iter(['What is the future of AI?']),
)
The terminal also displays a link to the AI Playground, which you can copy and use to interact with the model directly.
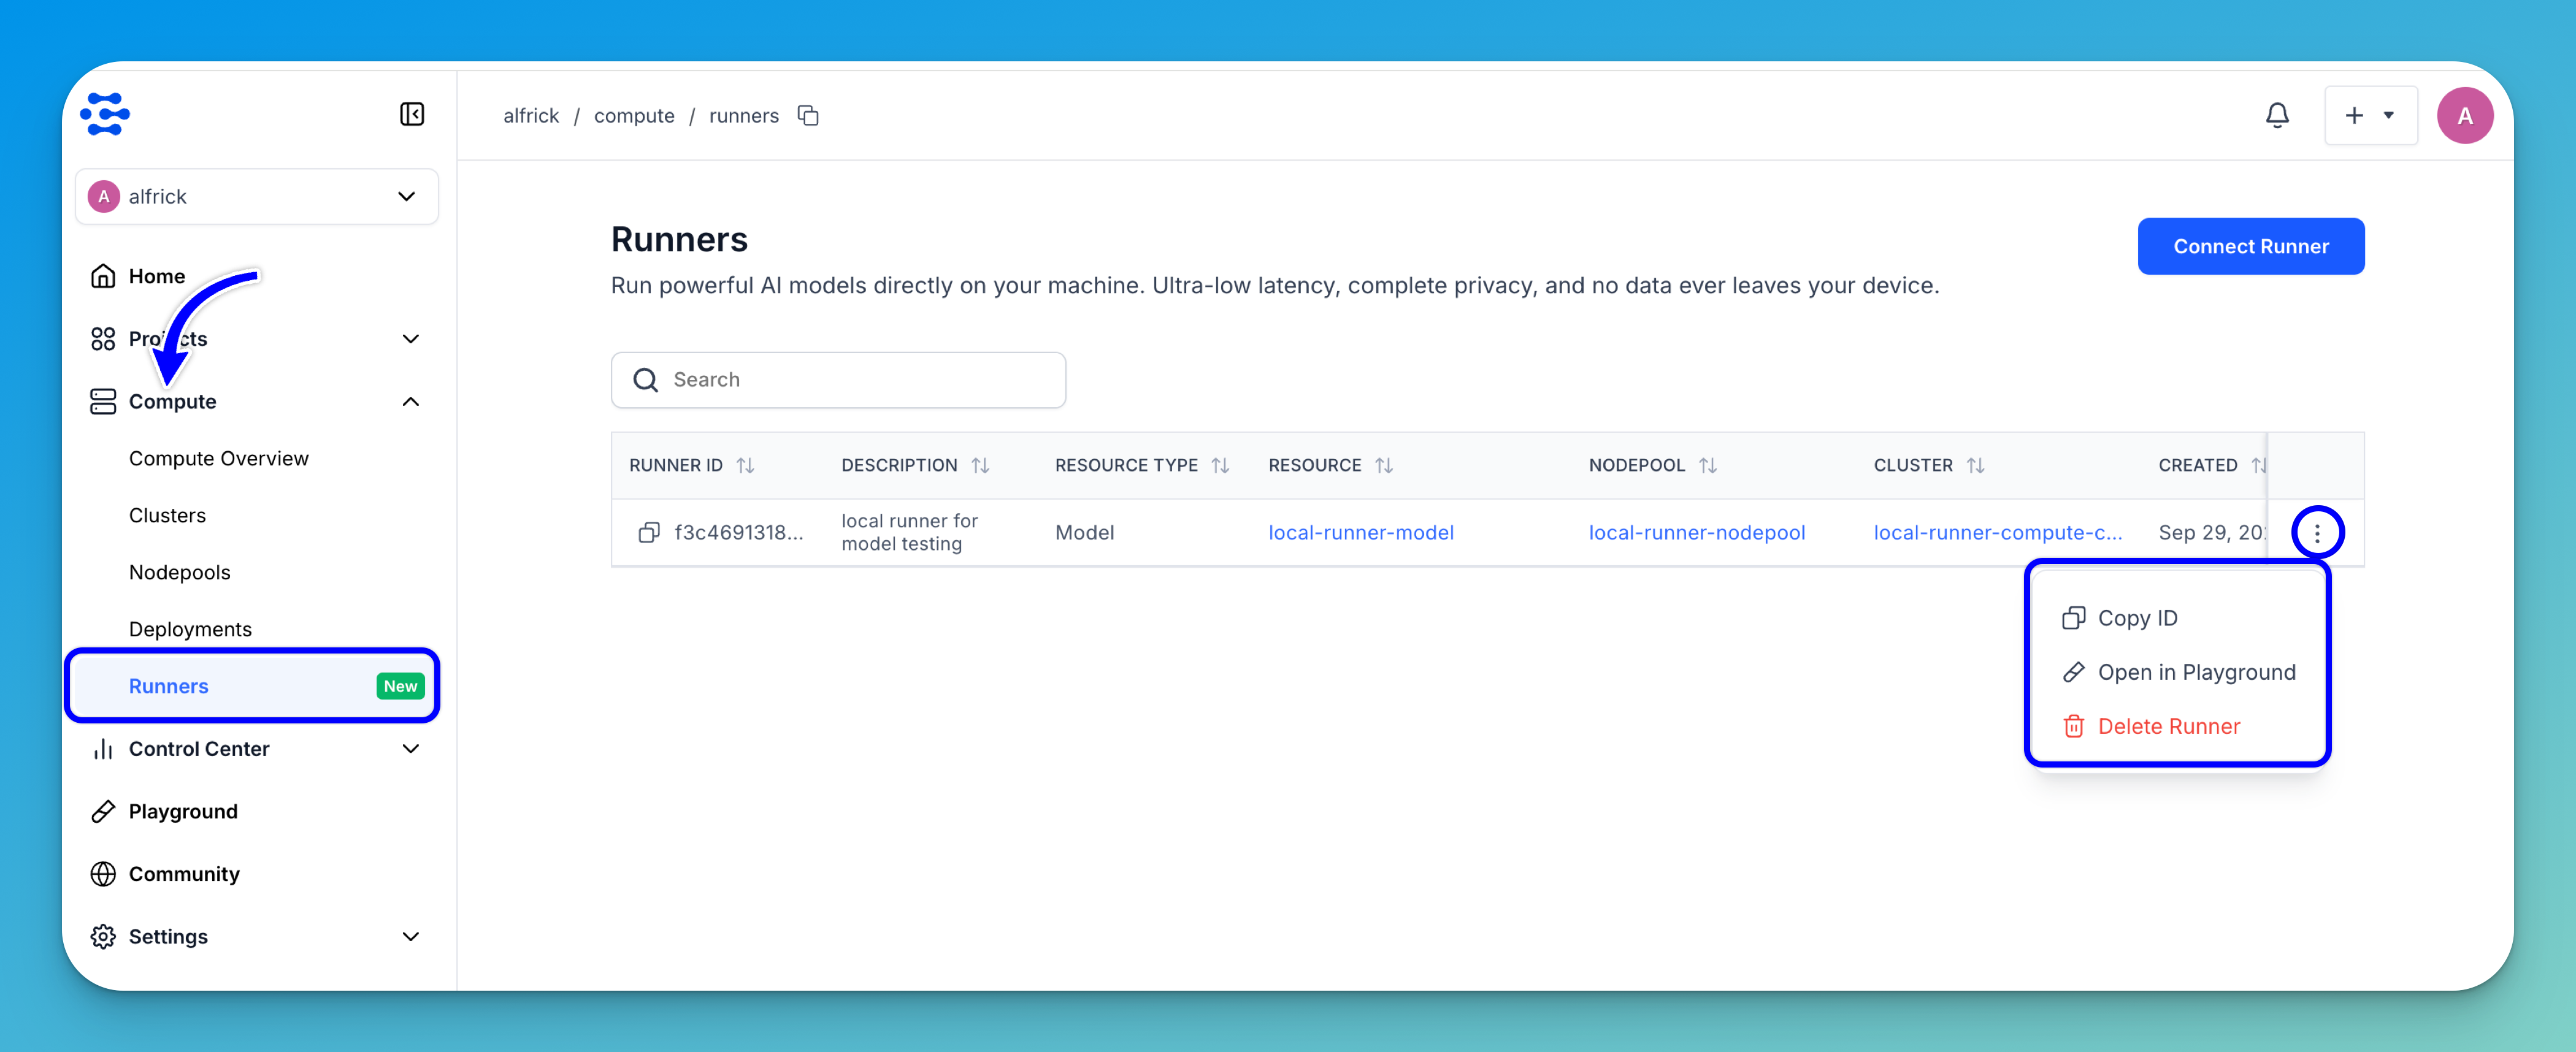
Alternatively, while the runner is active in your terminal, you can open the Runners dashboard on the Clarifai platform, find your runner in the table, click the three-dot menu, and select Open in Playground to chat with the model.
When you’re done testing, simply close the terminal running the local development runner to shut it down.