Visual Classifier
Train an image classification model using a pipeline template
Input: Images and videos
Output: Concepts
A visual classifier is a deep fine-tuned model that categorizes images and video frames into a set of predefined concepts. It answers the question "What is in this image?" or "Who is in this image?"
For example, it can be used to categorize images into concepts such as "cat", "dog", or "vehicle".
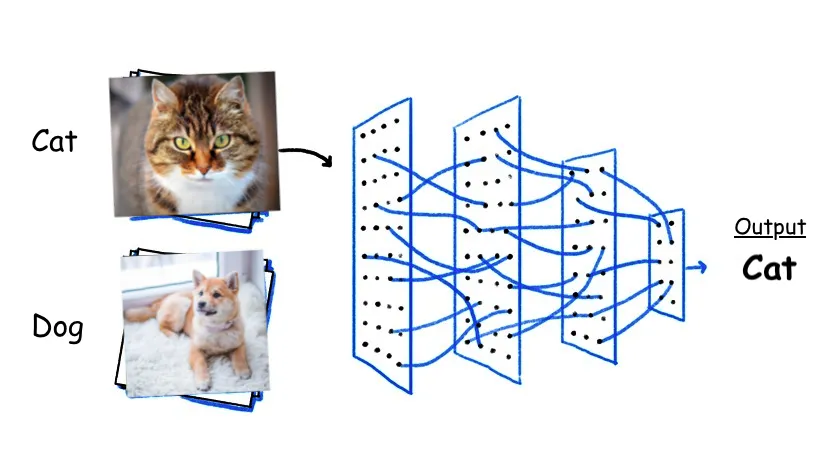
Use a visual classifier when you have a labeled dataset and want a custom model fine-tuned on your own classes.
Visual classifiers are optimized for classification tasks. If you need to locate where objects appear in an image, consider a Visual Detector instead.
You can train a visual classifier two ways:
- Via the CLI — Scriptable and reproducible. Recommended for engineering workflows. Train an end-to-end model in three commands.
- Via the UI — Click-through training from the Clarifai web app. Recommended for quick experiments without writing code.
Via the CLI
Prerequisites
Install the Clarifai CLI and authenticate:
- CLI
pip install --upgrade clarifai
clarifai login
clarifai login auto-detects your user ID and saves your Personal Access Token (PAT) locally.
Train a Classifier (Quick Demo)
The fastest way to see a working classifier end-to-end is the classifier-pipeline-resnet-quick-start template. It uses a Clarifai-hosted Food-101 subset as the training dataset, with sensible defaults for every hyperparameter — so no dataset setup or --set flags are required.
- CLI
clarifai pipeline init --template classifier-pipeline-resnet-quick-start
cd classifier-pipeline-resnet-quick-start
clarifai pipeline upload
clarifai pipeline run --instance=g6e.xlarge
That's it. --instance=g6e.xlarge auto-provisions a compute cluster and nodepool — no separate setup required. The pipeline trains a ResNet-50 image classifier on the public dataset and registers the trained model in your Clarifai model registry.
Train on Your Own Data
When you want to train a classifier on your own concepts, use the classifier-pipeline-resnet template with --set flags pointing at your uploaded dataset:
- CLI
clarifai pipeline init --template classifier-pipeline-resnet \
  --set dataset_id=your_dataset_id \
  --set dataset_version_id=your_dataset_version_id \
  --set concepts='["class1","class2","..."]'
cd classifier-pipeline-resnet
clarifai pipeline upload
clarifai pipeline run --instance=g6e.xlarge
Where:
| Parameter | Description |
|---|---|
--set dataset_id | The ID of the dataset to train on |
--set dataset_version_id | The specific version of the dataset |
--set concepts | A JSON array of the concept labels |
To upload a dataset first, see the Datasets documentation. For all other init-time overrides (hyperparameters, base model, etc.), see the Pipeline Templates reference.
Monitor and Use the Trained Model
- Monitor the run — see Manage Pipeline Runs.
- Deploy and run inference on the trained model — see Inference.
- Author a custom pipeline from scratch in Python — see the Pipeline DSL reference.
Via the UI
Let’s walk through how to create and train a visual classifier model using the UI.
Step 1: Create an App
Create an application to store and manage your model and its associated resources (such as datasets, pipelines, and deployments). You can follow this guide to set one up.
Note: When creating the application, select the default Image/Video option as the primary input type.
Step 2: Prepare Training Data
Preparing your data is a critical step in training a model. High-quality, well-structured data helps your model learn effectively, generalize to new inputs, and produce reliable predictions.
Make sure your dataset is:
- Clean and accurate — free from labeling errors
- Diverse — covers different variations of your target classes
- Sufficient in size — enough examples for the model to learn meaningful patterns
Tip: You can organize your dataset using any spreadsheet tool. Download a CSV template to get started.
For this example, we’ll use the Beans Dataset from Hugging Face, which contains images of healthy and diseased bean leaves.
Based on the selected dataset, we will train a model to classify leaf images into three categories: Angular Leaf Spot, Bean Rust, or Healthy.
Step 3: Add and Annotate Inputs
To add inputs to your app, open the collapsible left sidebar and select the Inputs option.
Click the Upload Inputs button in the upper-right corner, then use the uploader pop-up to select and upload your data.
As you upload, assign each input category to a dataset and label them with their appropriate concepts. Ensure that all labeled inputs are added to the same dataset.
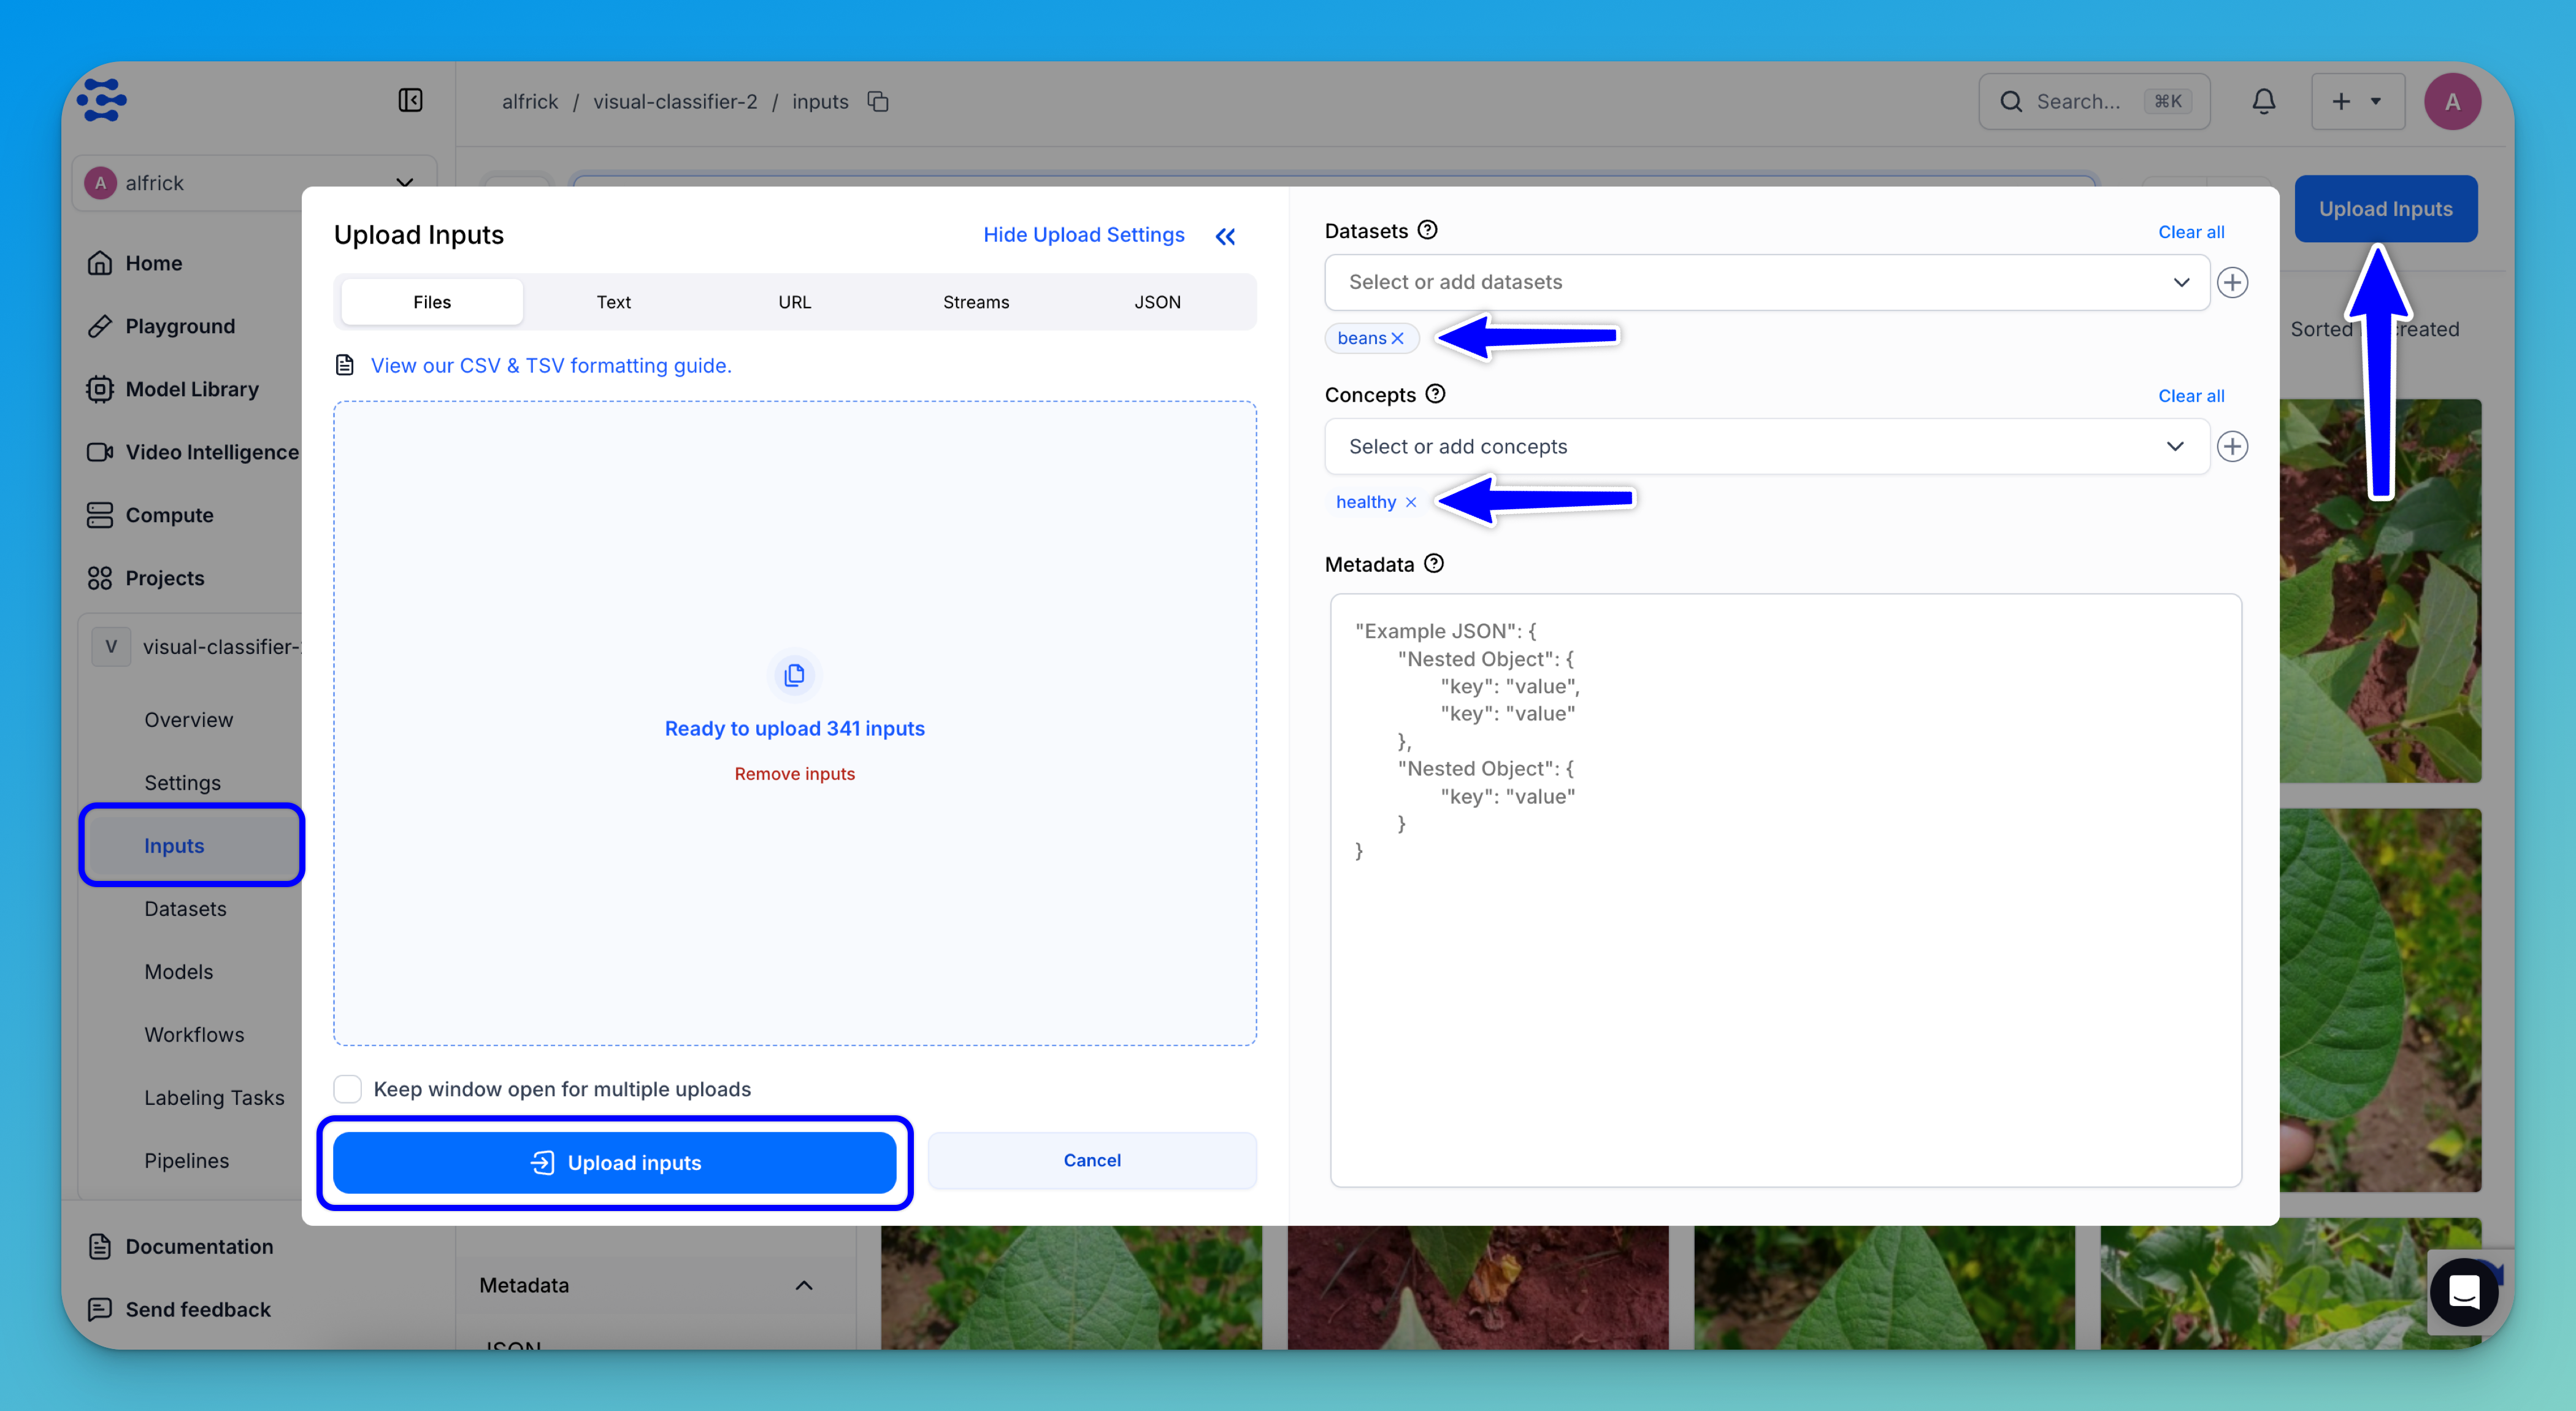
Once done, click the Upload Inputs button to add the annotated images to your app.
Note: For this tutorial, upload the three image categories to the same dataset, labeling each with its corresponding concept:
Angular Leaf SpotBean RustHealthy
After uploading all the inputs, refresh your dataset and create a new version to reflect the changes.
Step 4: Create a Cluster and Nodepool
To run and train your model, you’ll need to set up a cluster and nodepool with the appropriate compute resources.
Start by creating a cluster that supports GPU-enabled workloads, as GPUs are required for efficient training and inference of vision models.
Next, create a nodepool within the cluster and select a GPU-backed instance that matches your performance and budget needs.
Note: GPU support is essential for this tutorial. Ensure that the selected nodepool is configured with a compatible GPU instance to avoid performance issues or failed training runs.
Step 5: Choose a Training Template
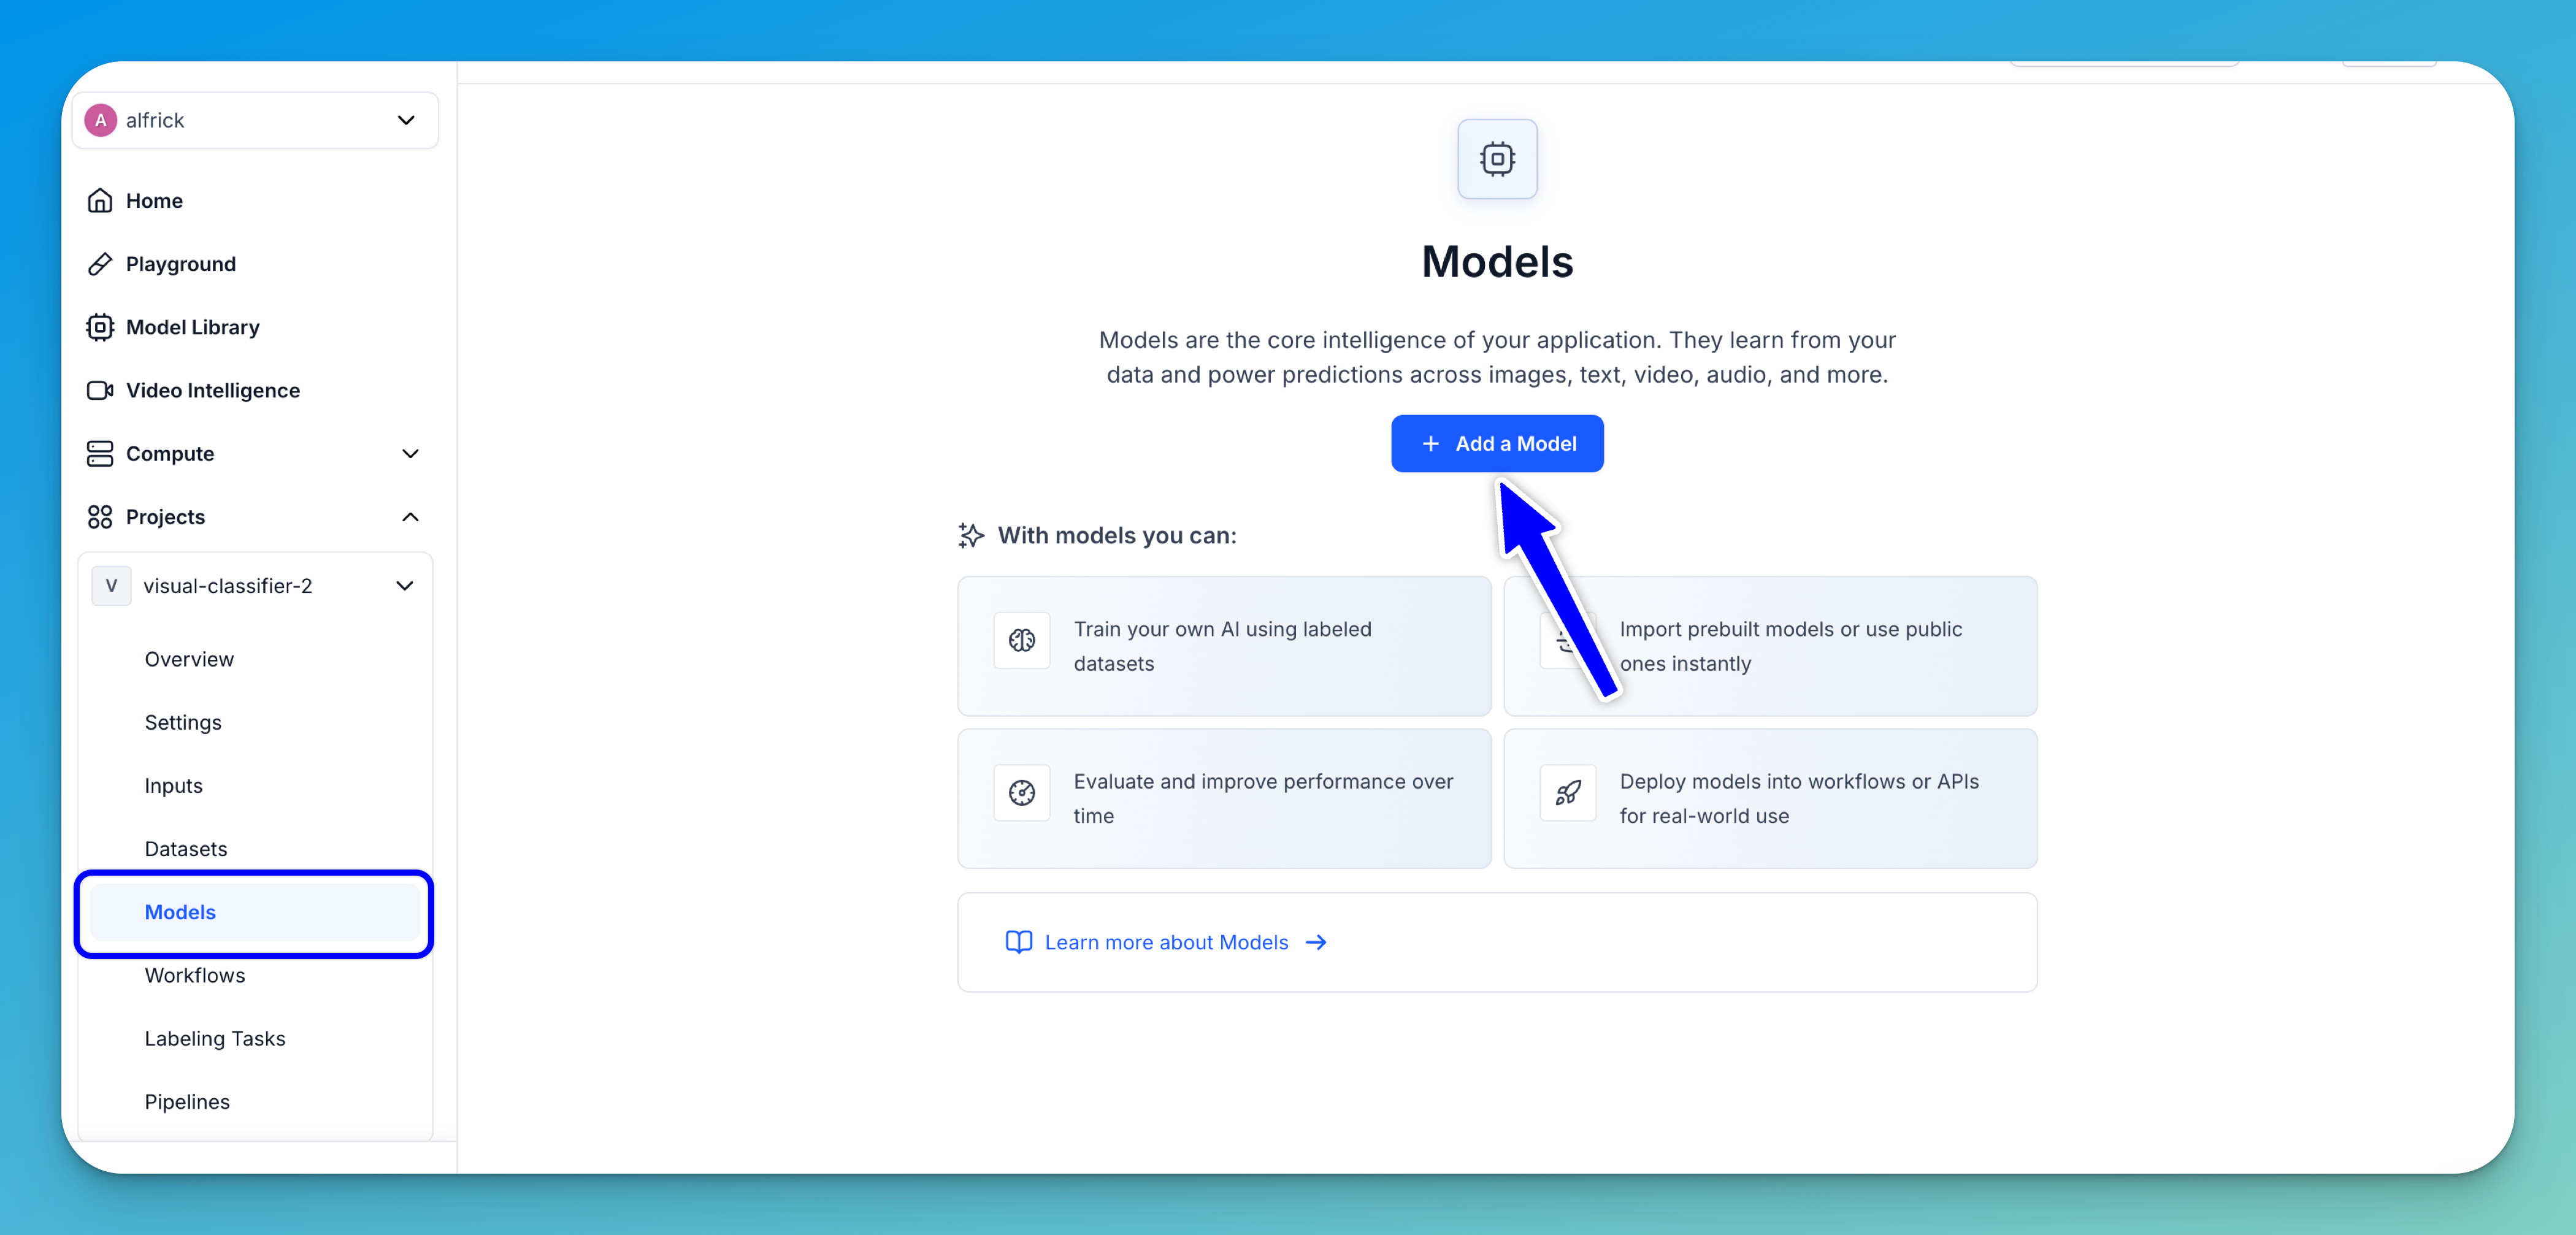
Select the Models option in your app’s collapsible left sidebar. On the ensuing page for listing models, click the Add a Model button.
In the window that pops up, select the Train a Model option.
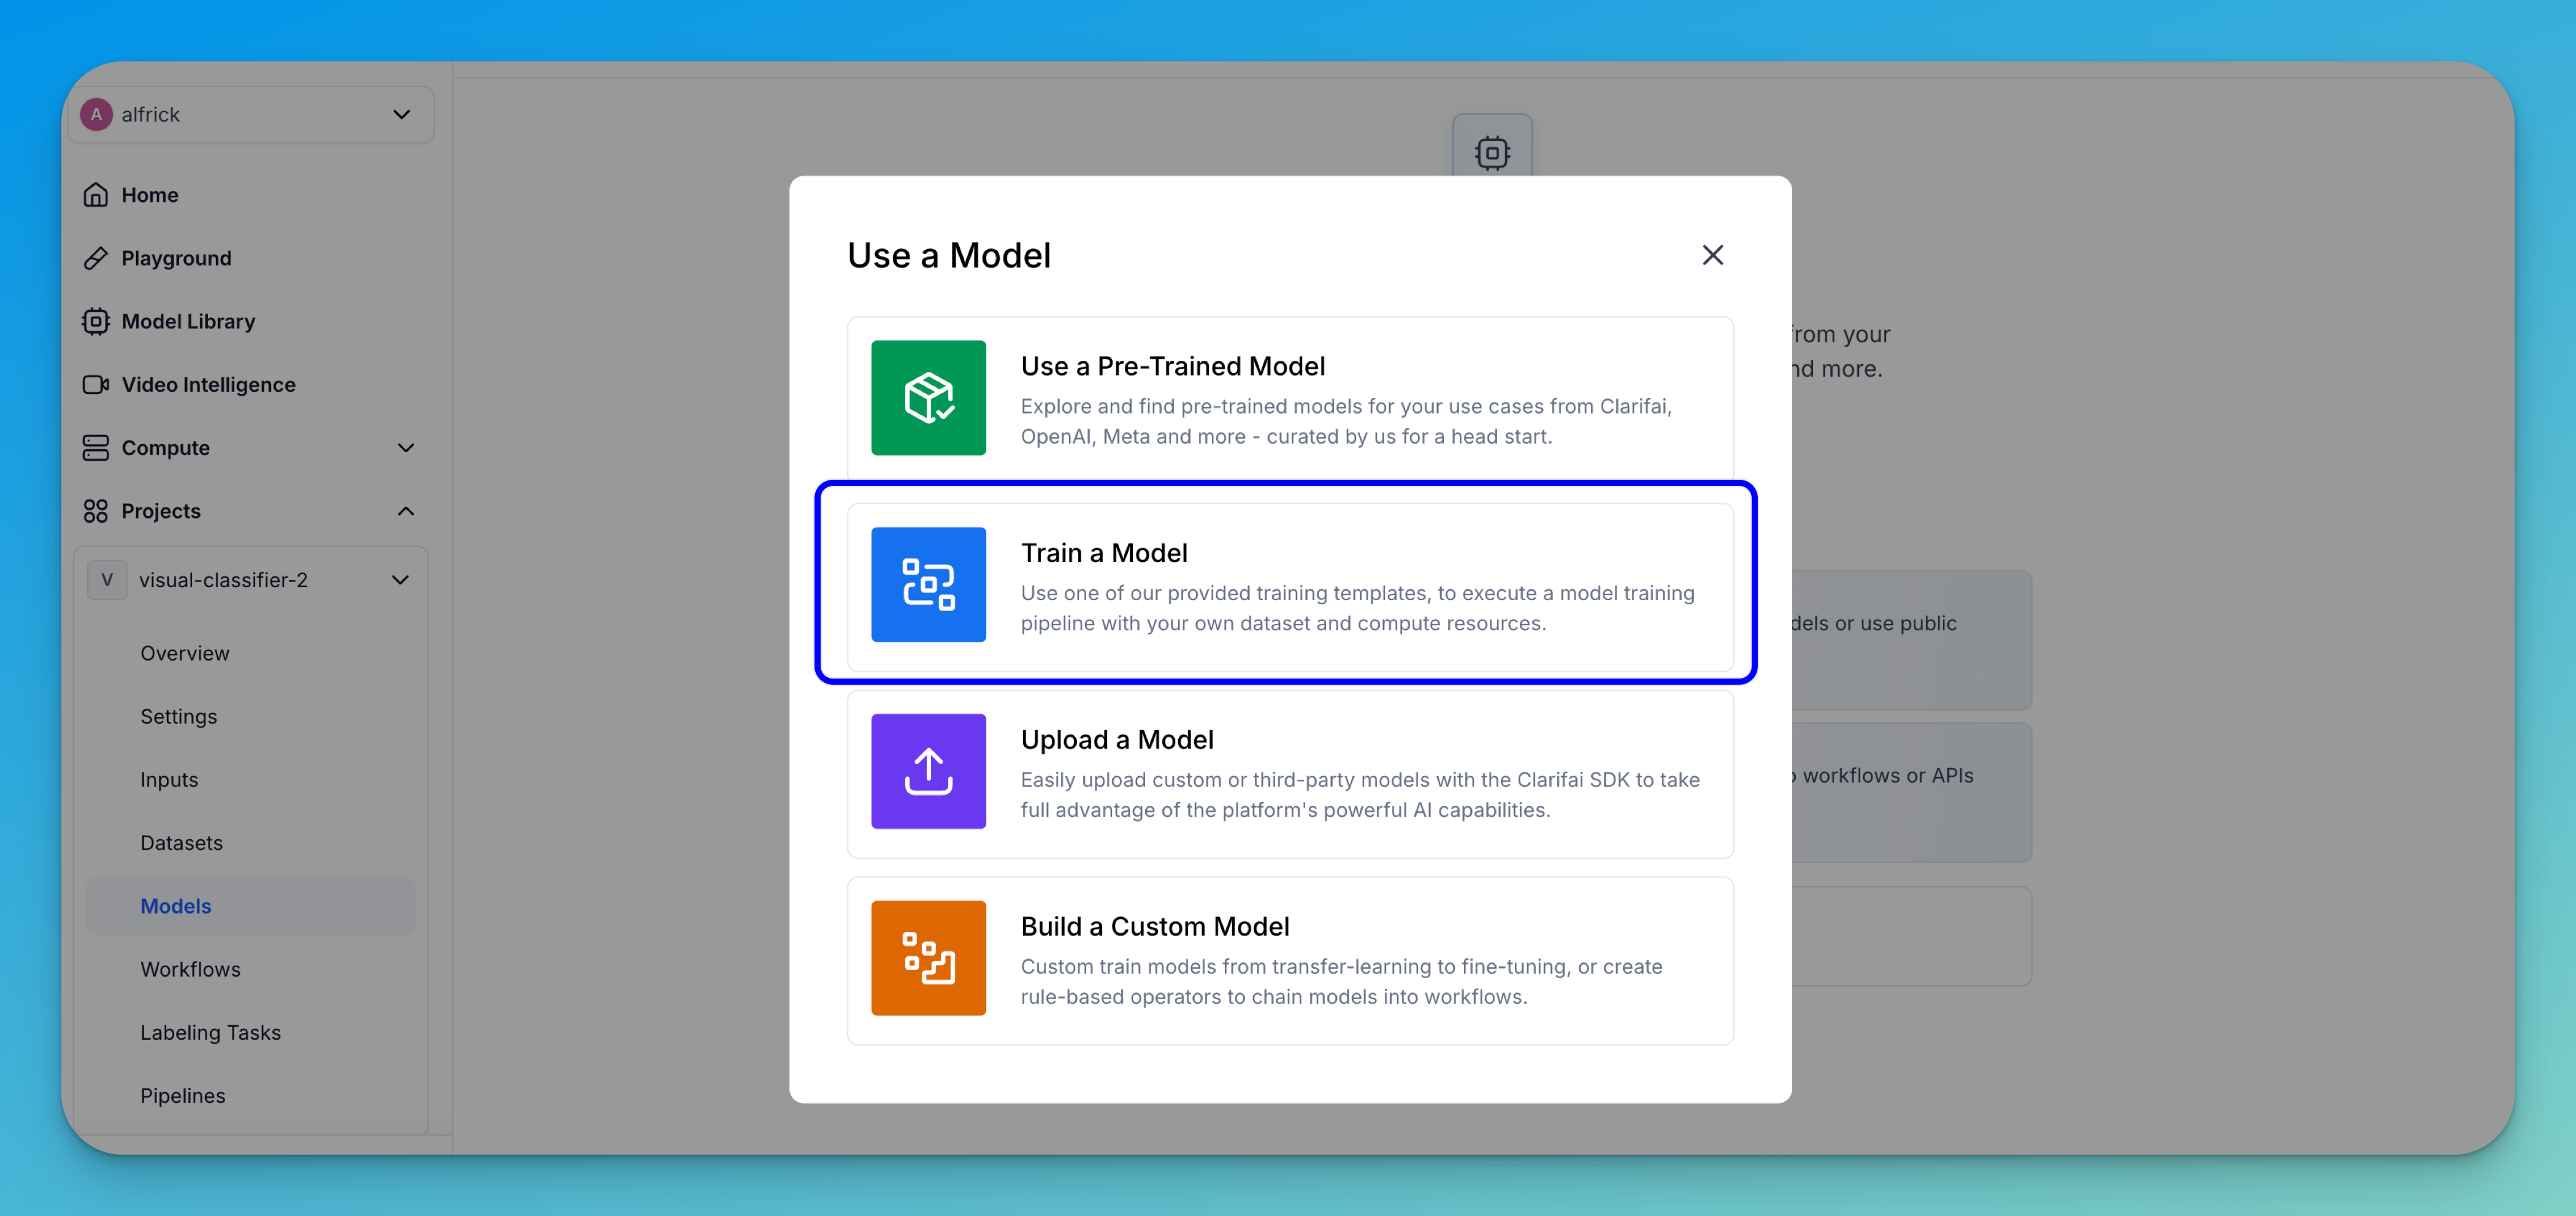
You’ll be redirected to a page listing available pipeline training templates. These templates provide pre-configured workflows to help you quickly get started with different types of models.
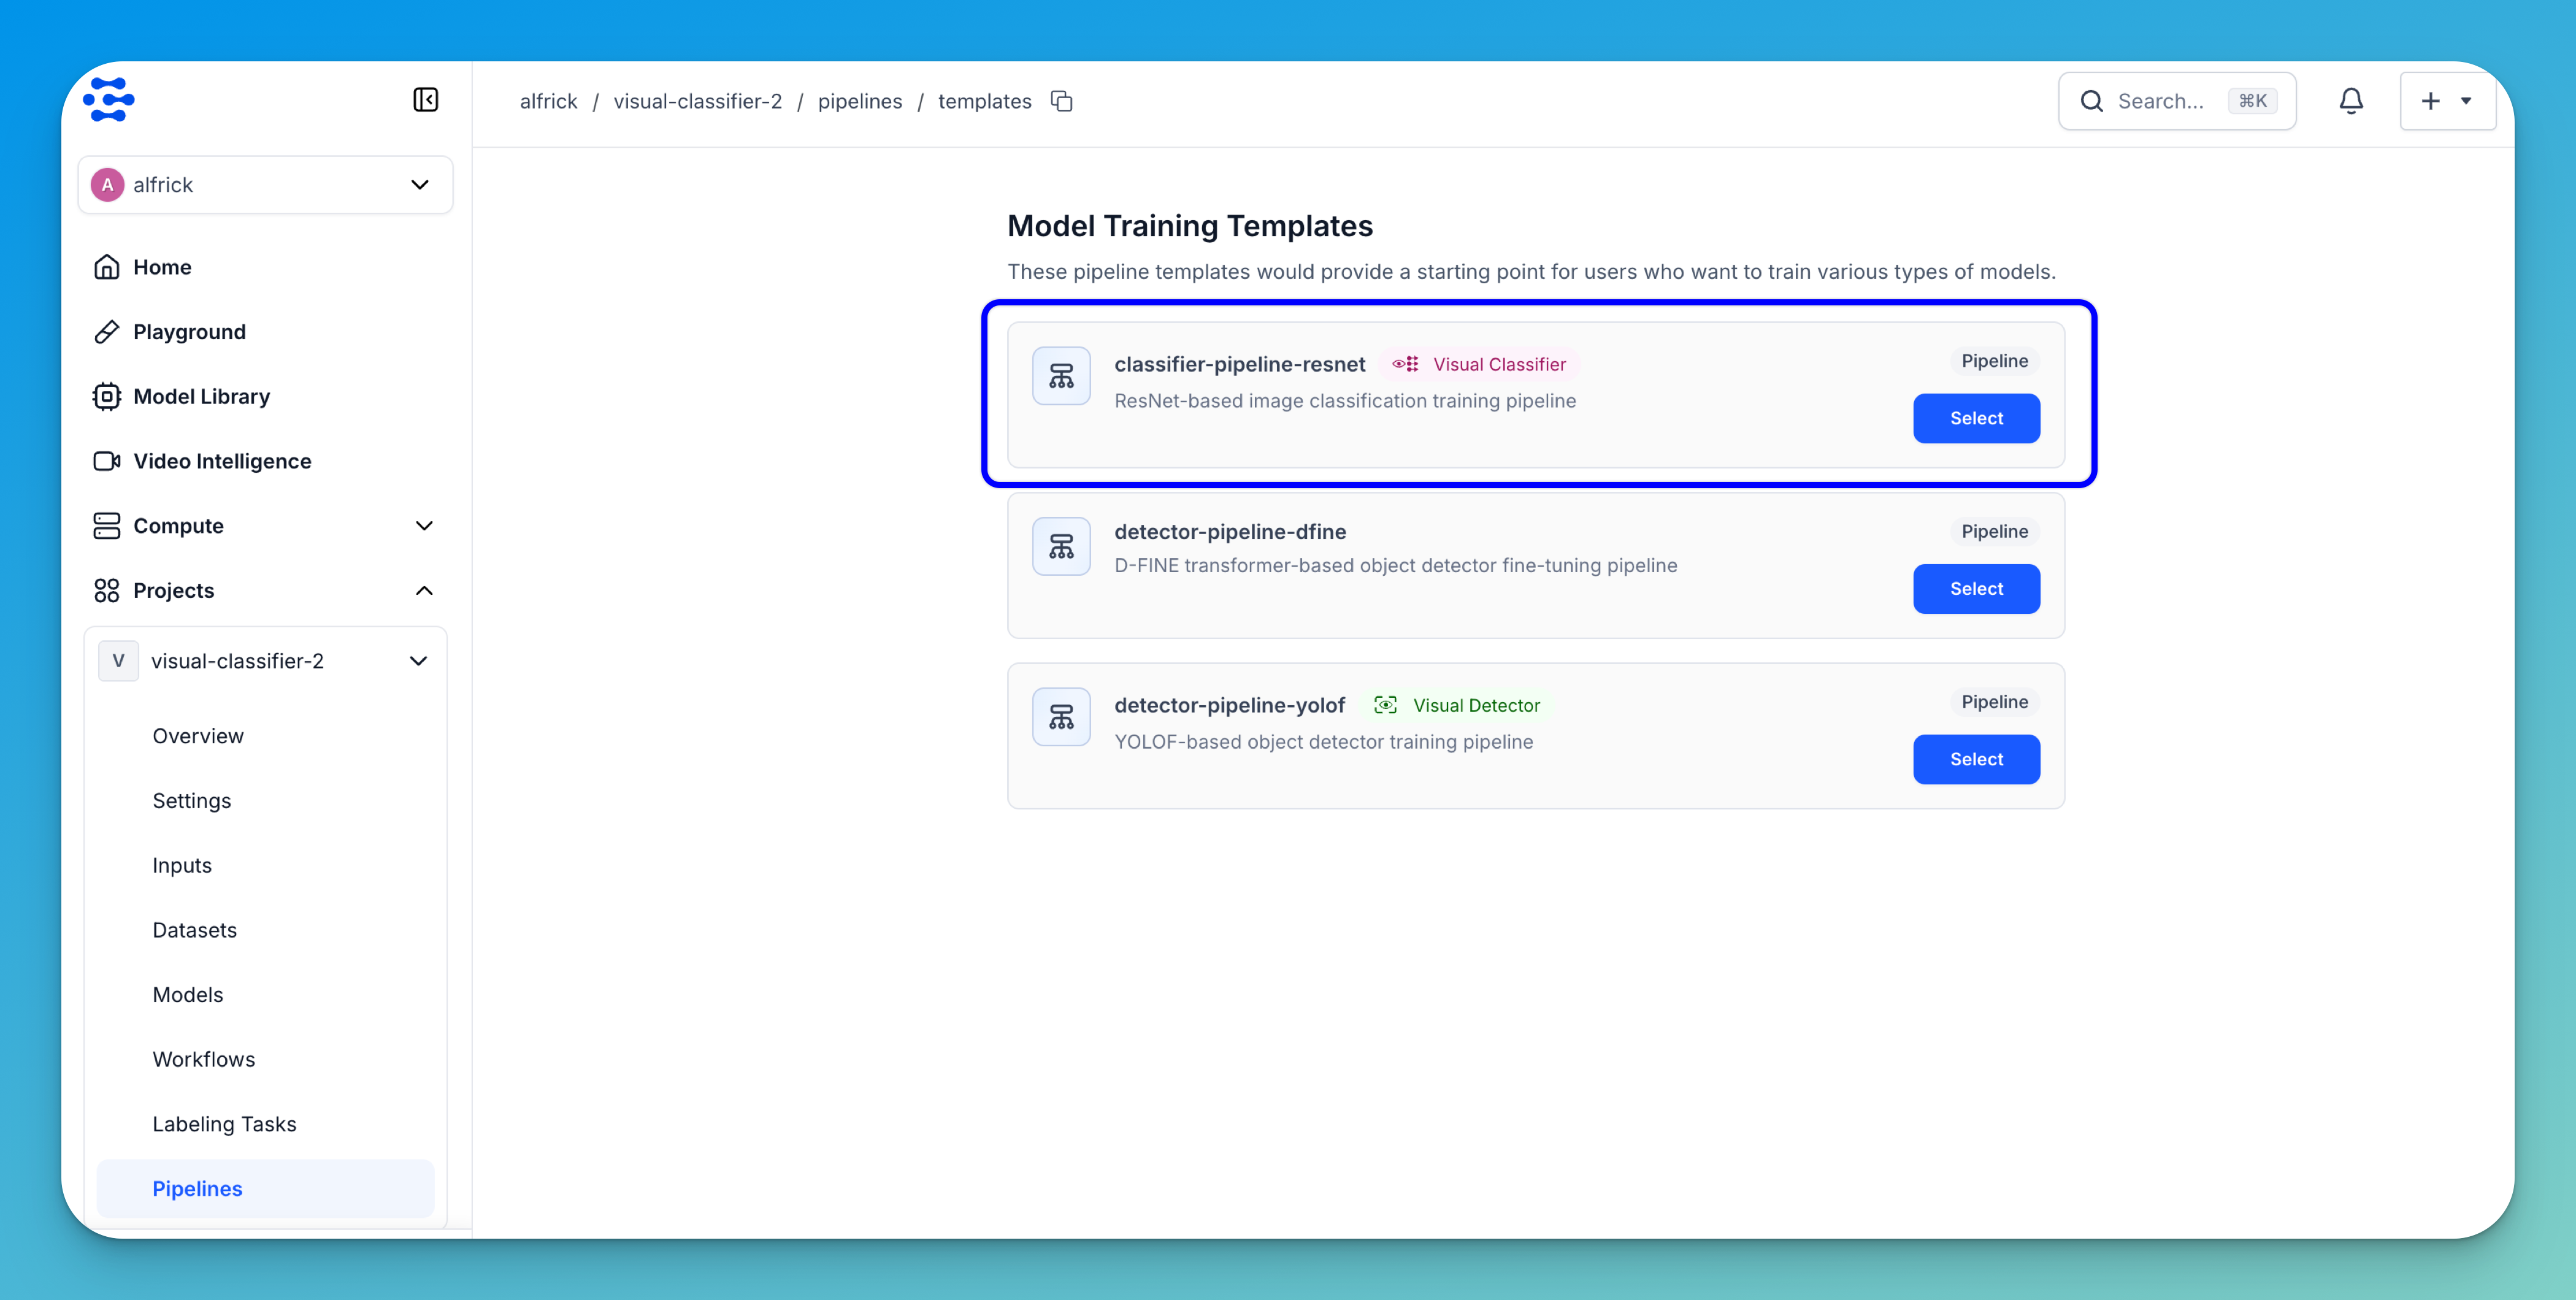
Select the classifier-pipeline-resnet template. This is a ResNet-based image classification pipeline designed for training models on labeled image datasets.
Step 6: Configure Training Settings
The ensuing page allows you to review the model training configuration and begin the training process.
Select Training Template
The training template you selected previously will be displayed for you. Otherwise, you can click the Change button to change to another training pipeline.
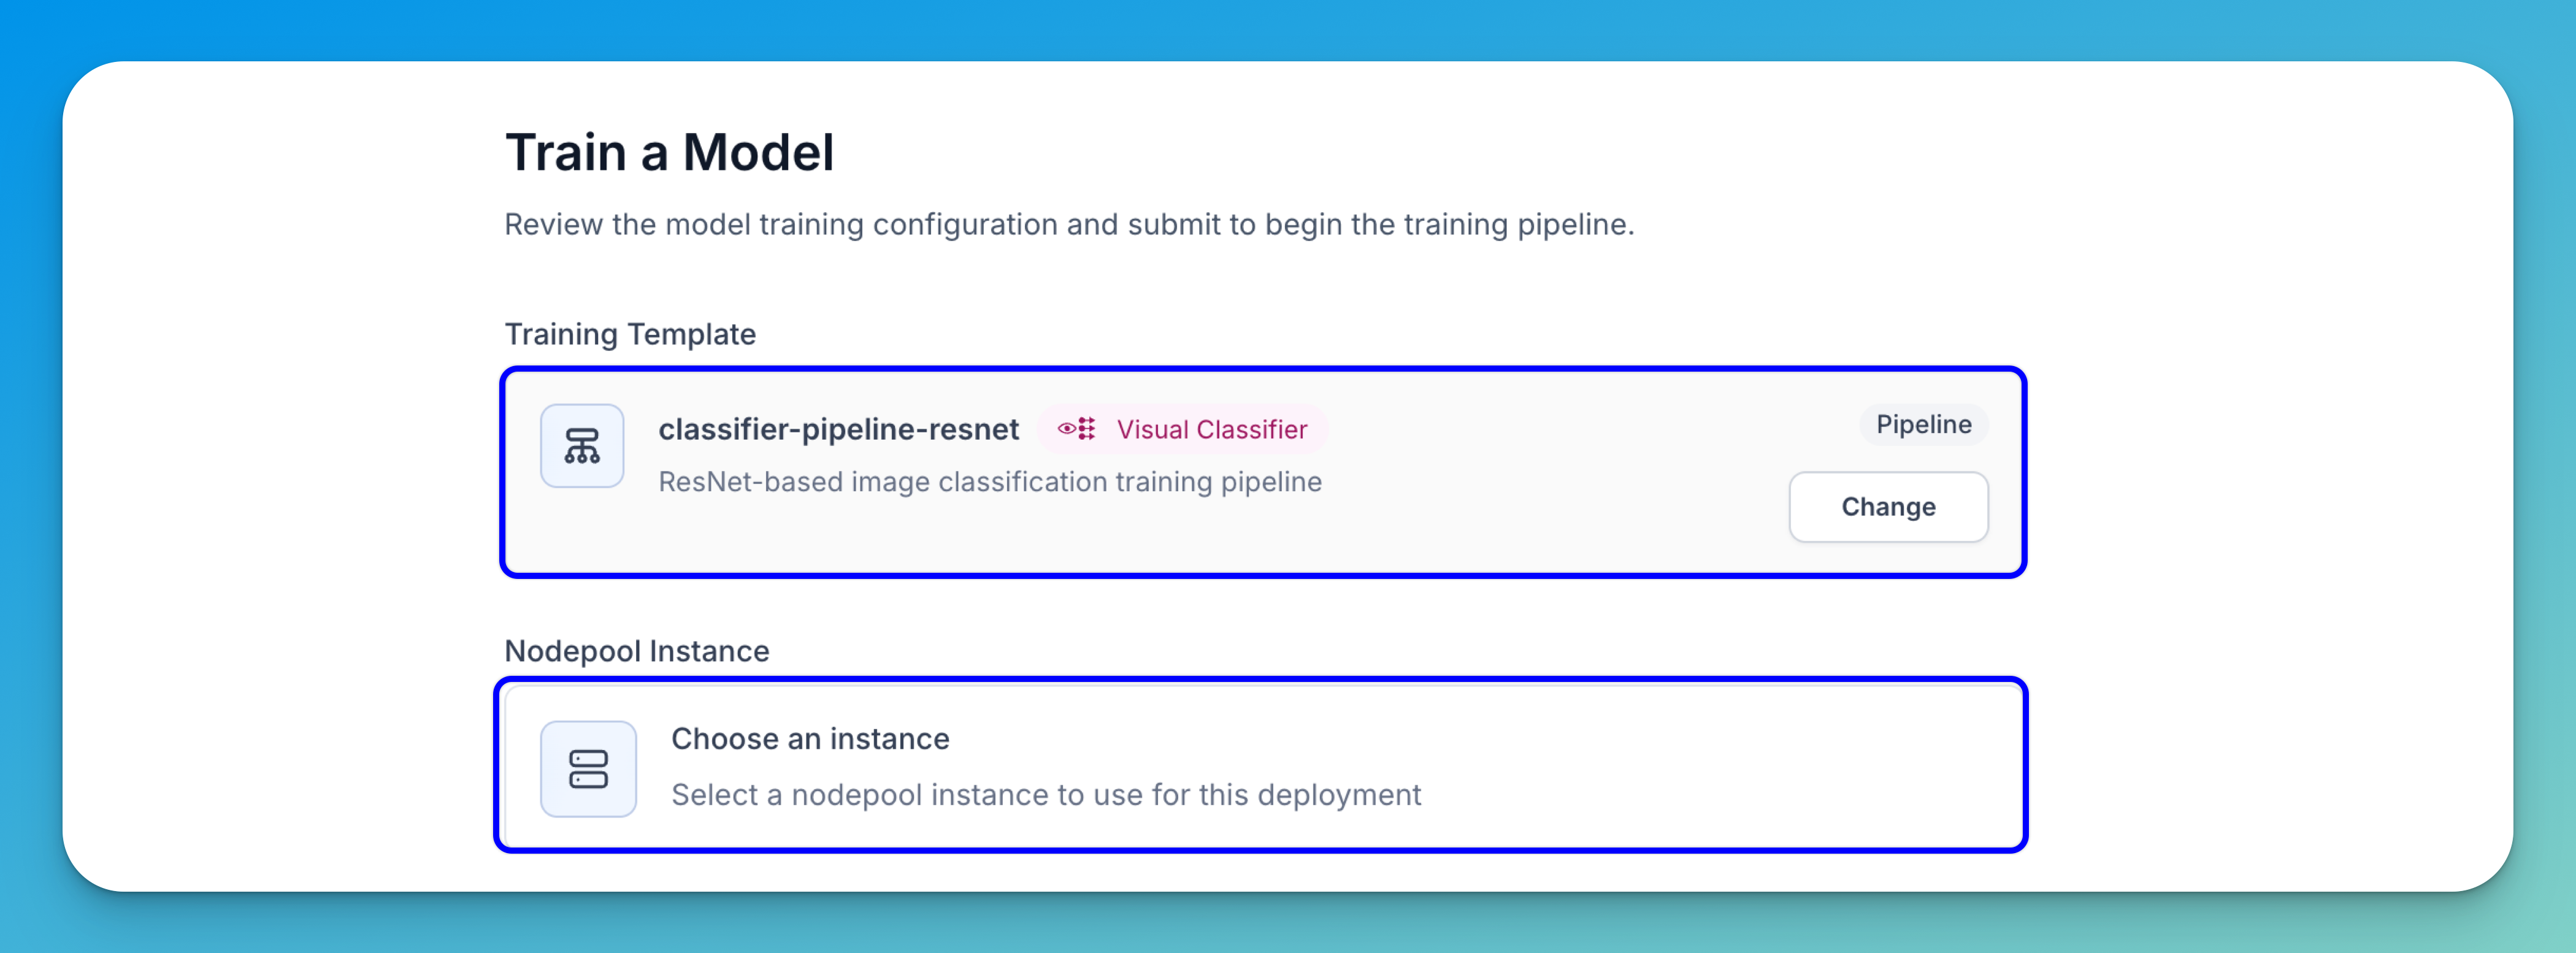
Select Nodepool Instance
Choose the nodepool that will be used to train your model.
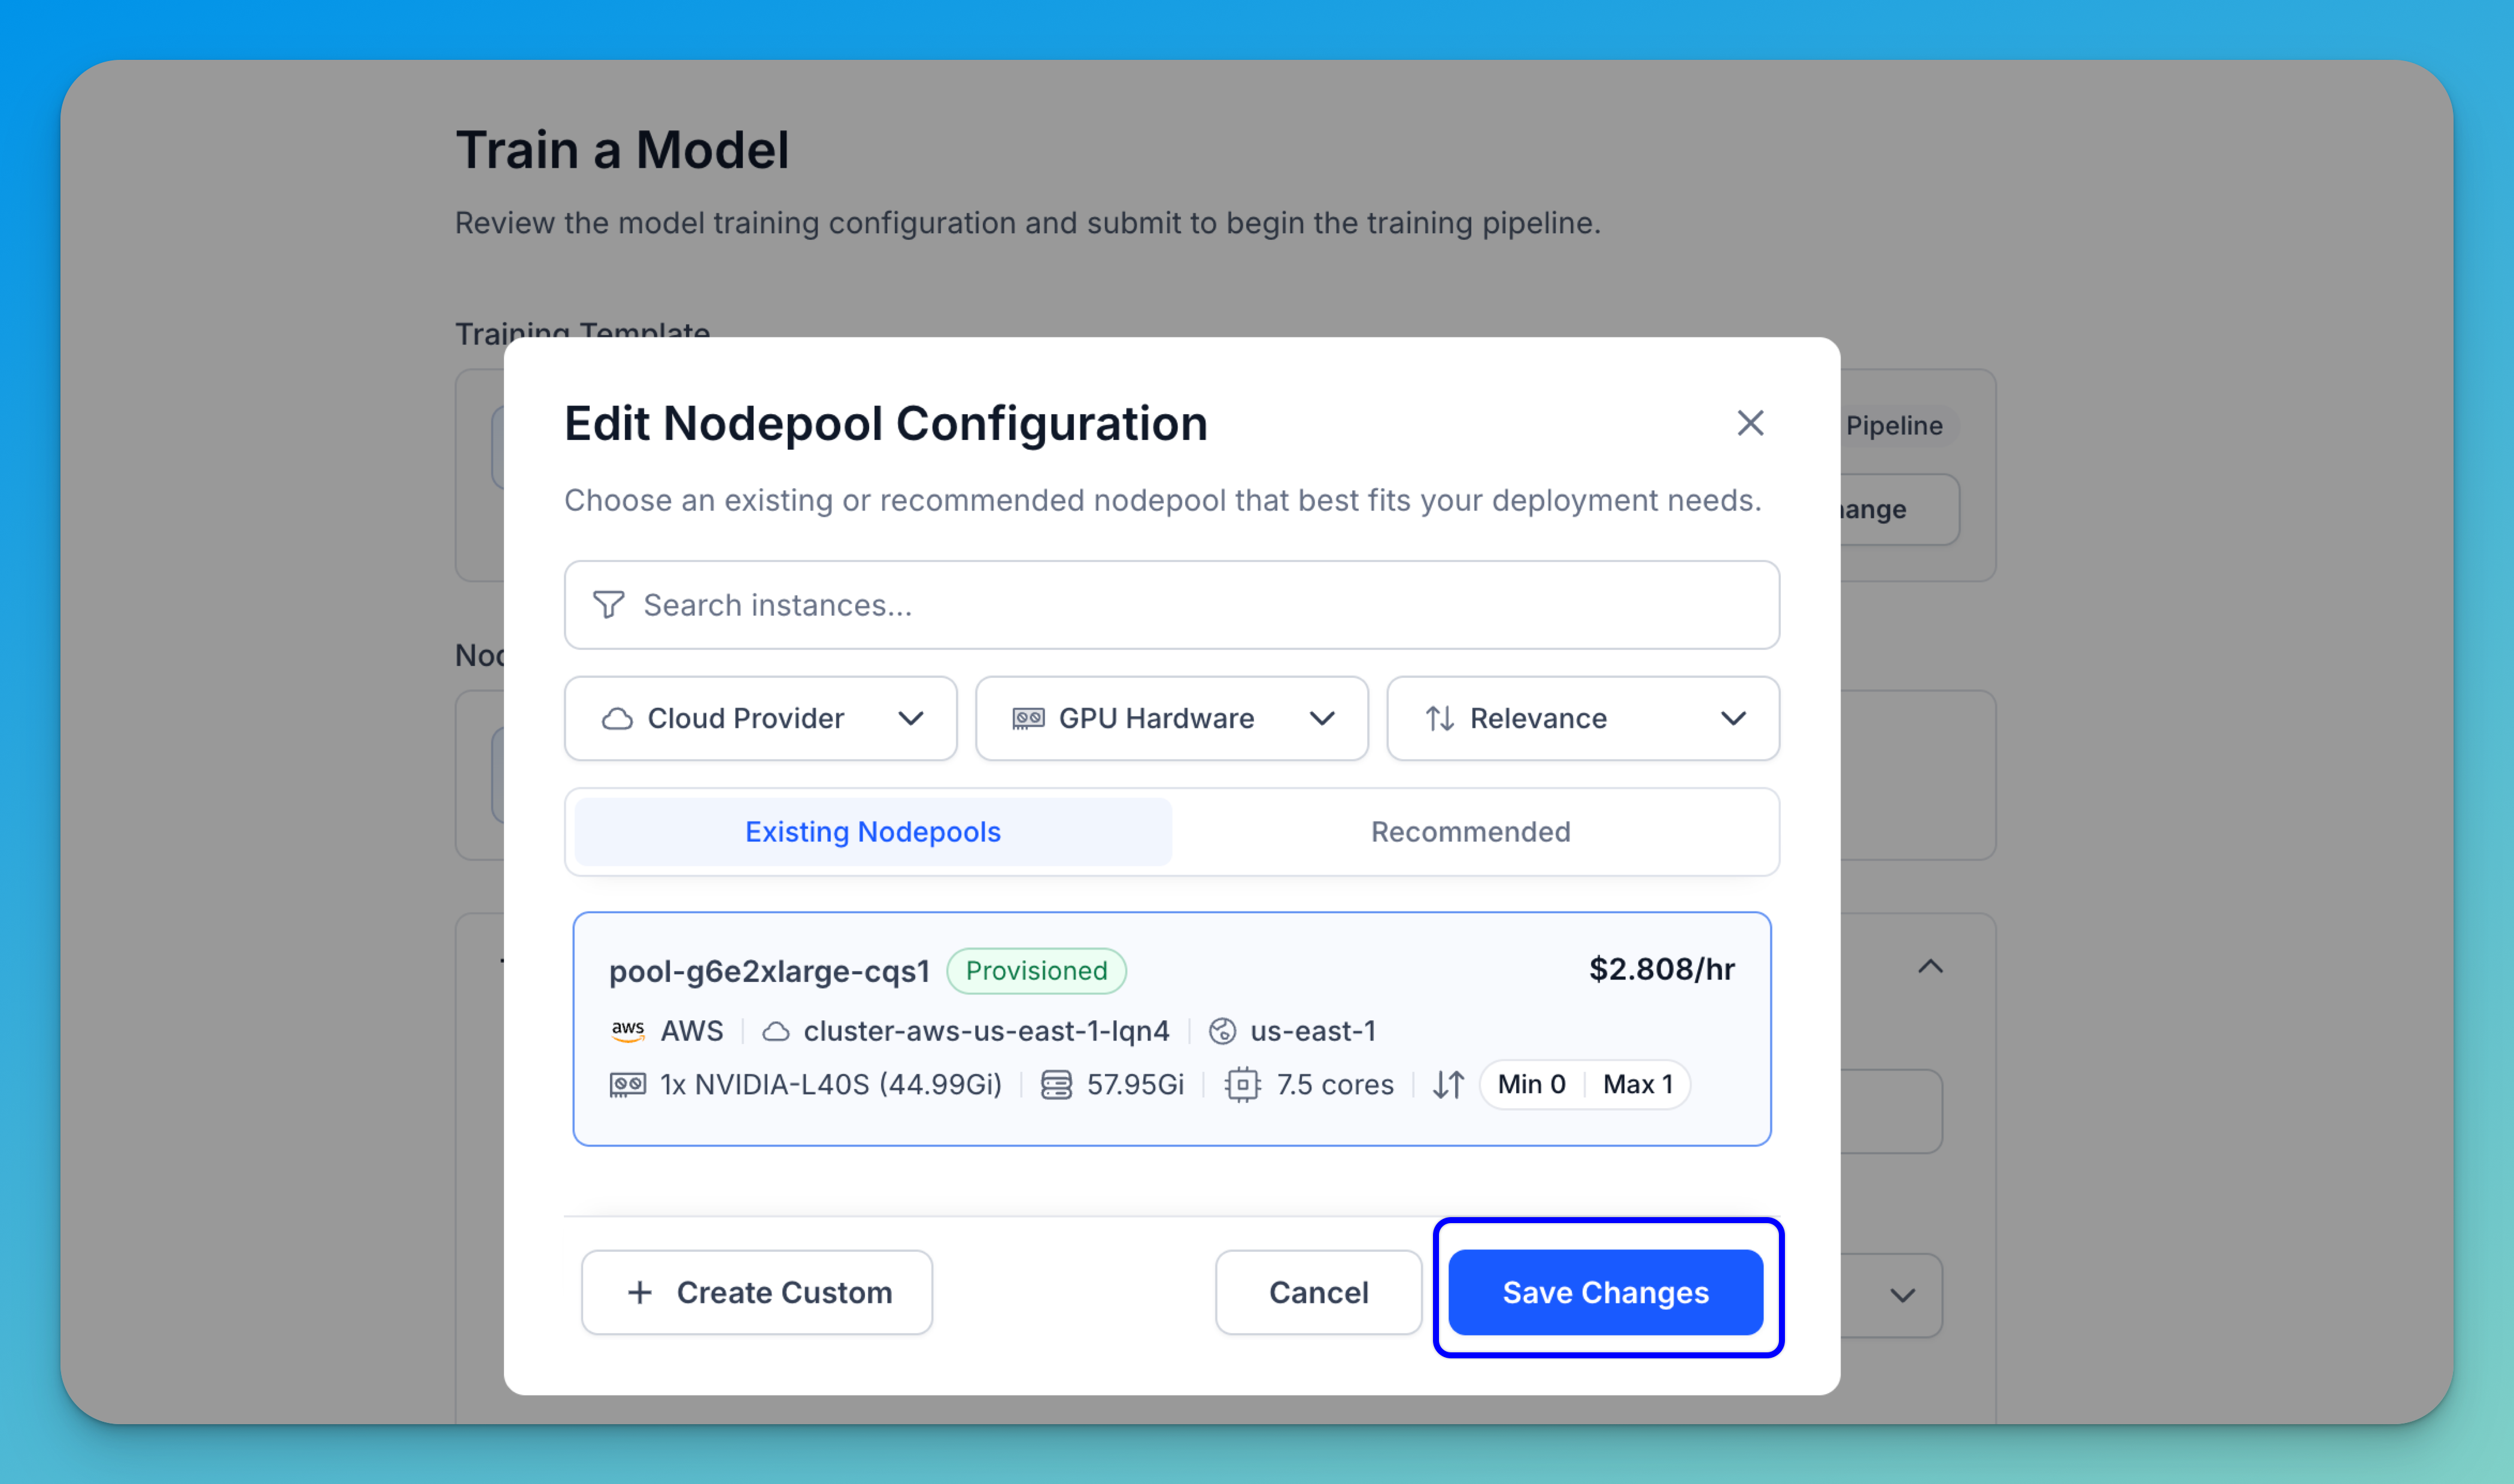
Select the Choose an instance option to open a selection window, where you can pick from existing or recommended nodepools based on your training requirements.
Choose your preferred nodepool, then click Save Changes to apply your selection.
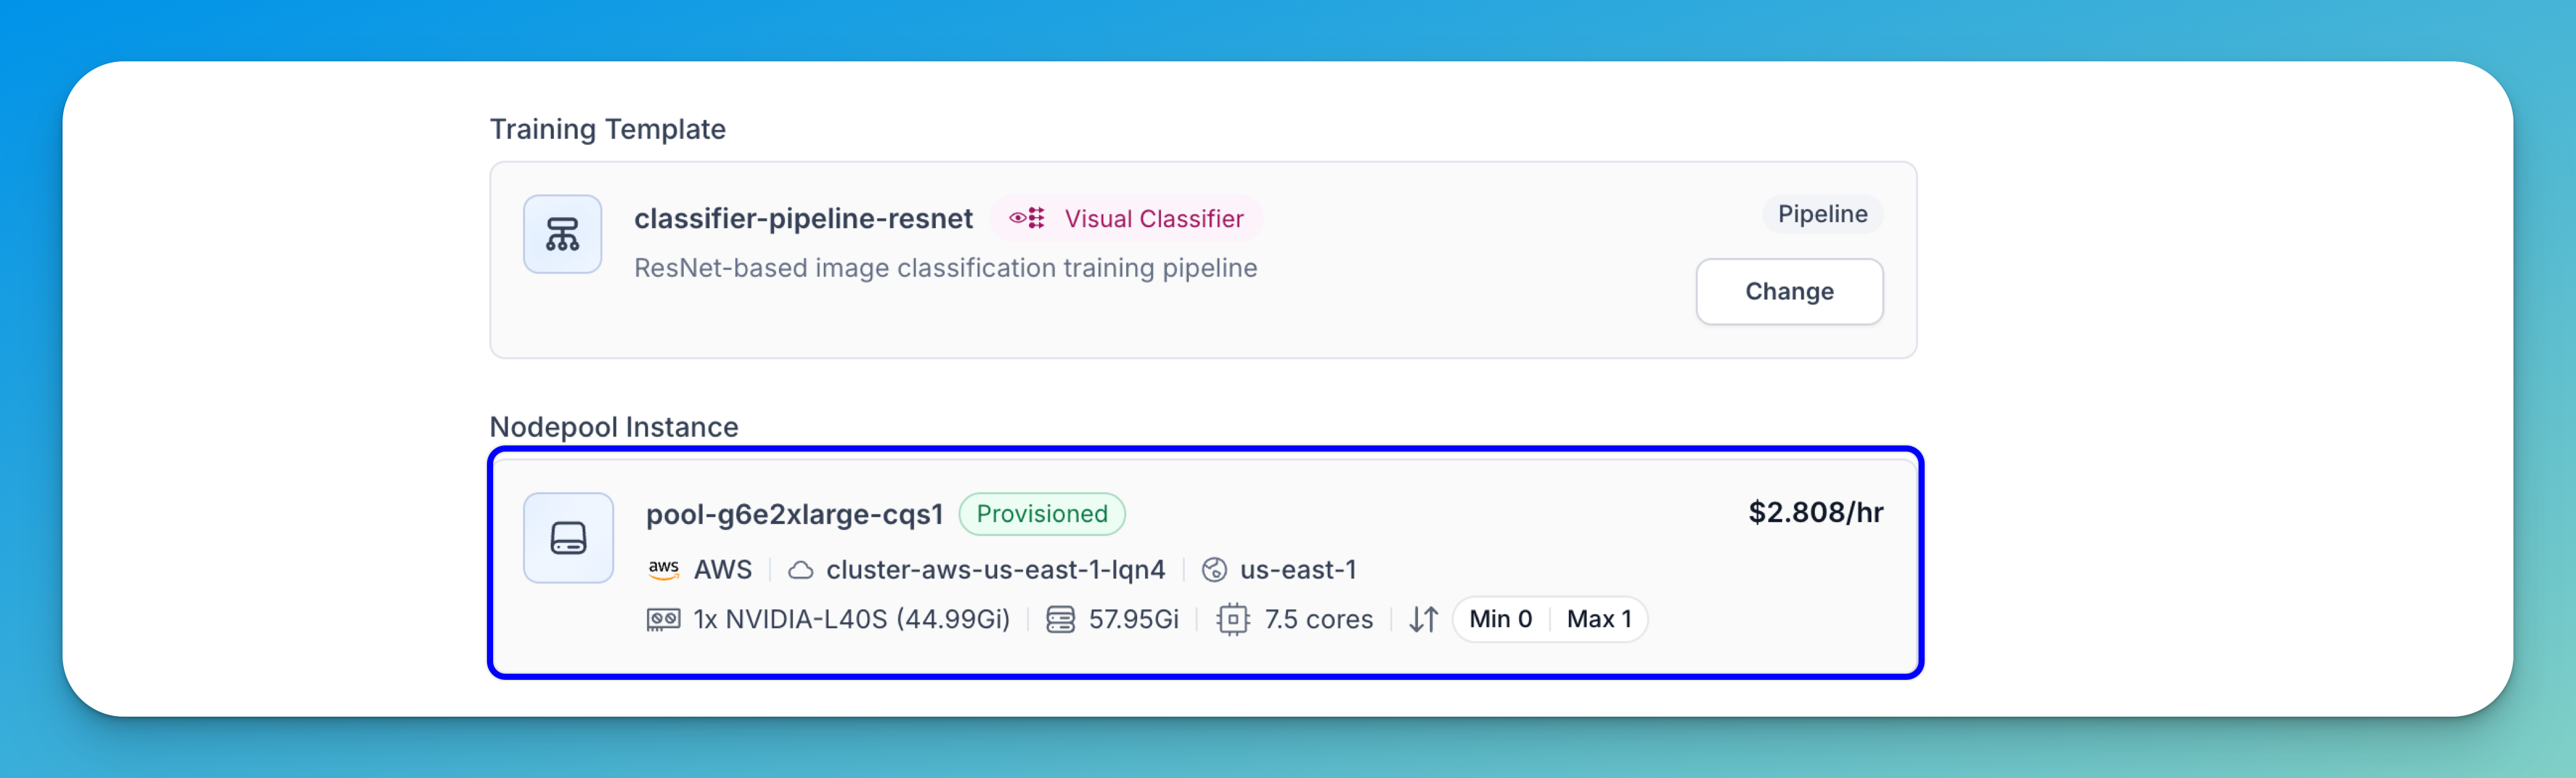
The selected nodepool will be displayed for you.
Learn more about selecting a nodepool instance here.
Set Training Settings
Configure the training settings for your model:
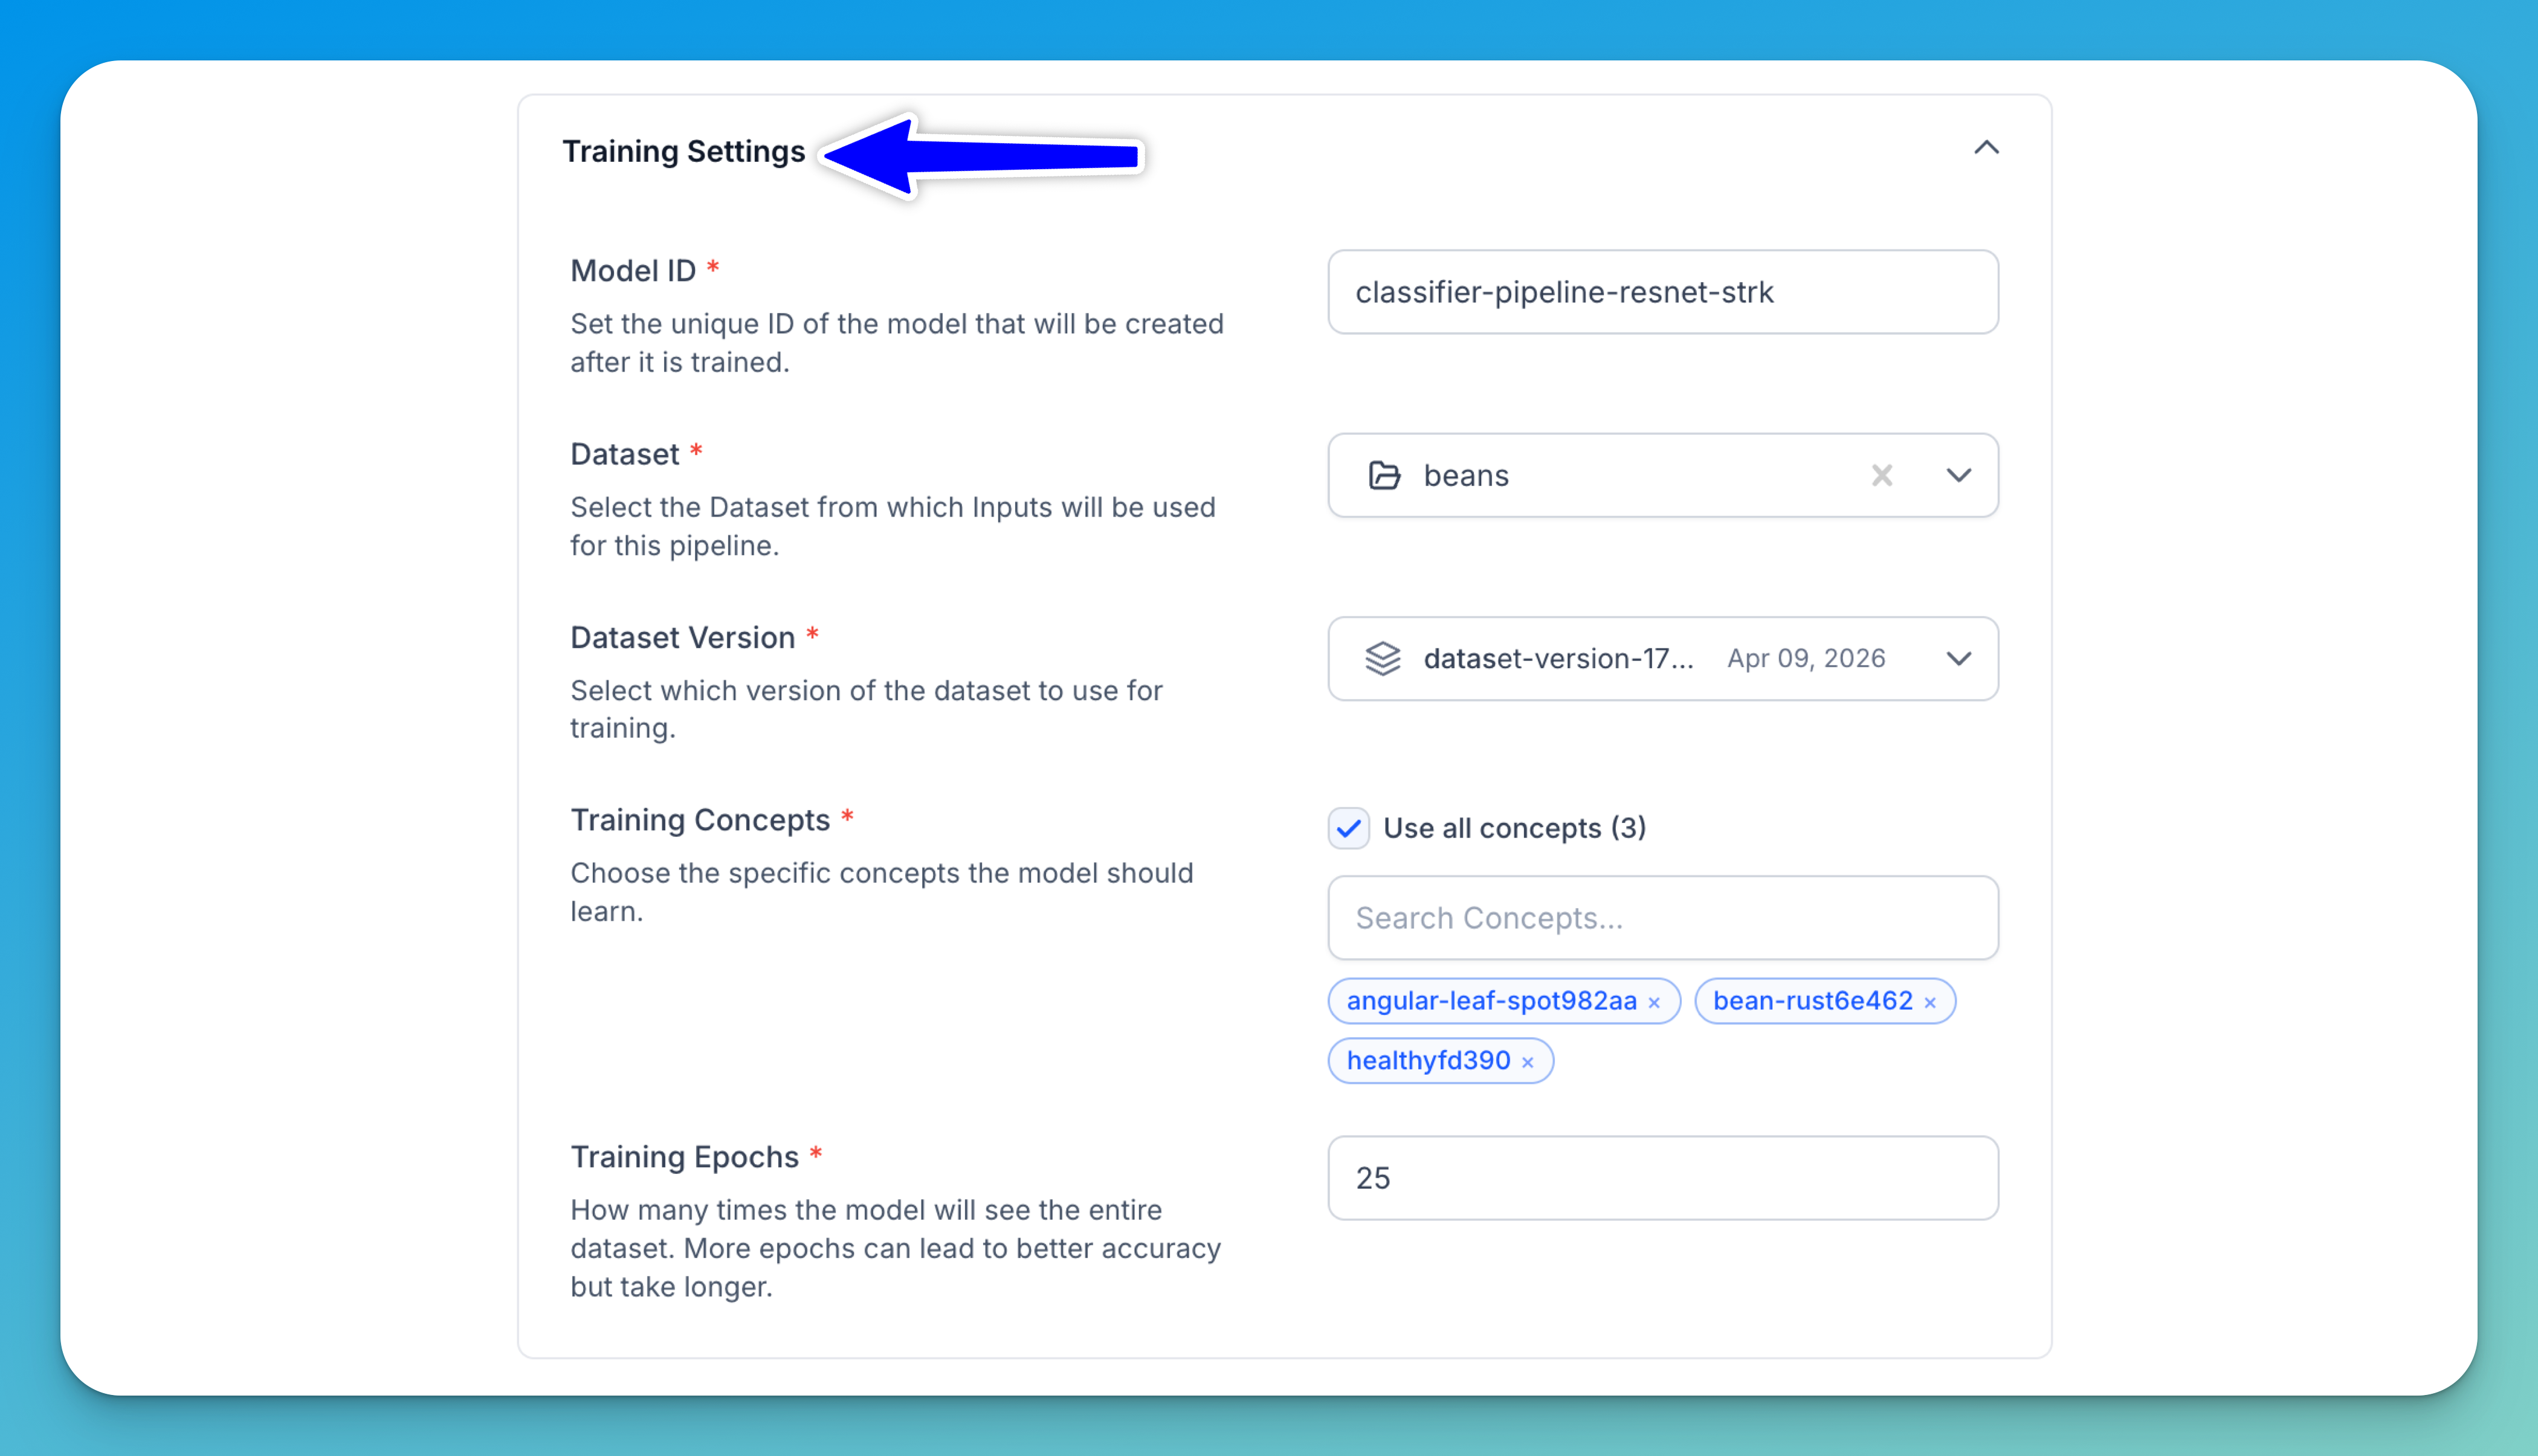
- Model ID — Set a unique ID for the model that will be created after it is trained.
- Dataset — Select the dataset from which inputs will be used for this pipeline. For this tutorial, let's select the dataset we previously created containing the bean leaf images.
- Dataset Version — Select which version of the dataset to use for training. You must select a dataset first before this option becomes available.
- Training Concepts — Select the list of concepts you want the model to predict from the existing concepts labeled with your inputs. For this tutorial, let's pick these concepts:
Angular Leaf Spot,Bean Rust, andHealthy. - Training Epochs — Set how many times the model will see the entire dataset. More epochs can lead to better accuracy but take longer. The default value is
25.
Configure Template
Each training template includes a set of configurable hyperparameters that control how the model is trained.
You can adjust these settings based on your dataset and performance goals. However, for this tutorial, we’ll use the default values provided by the classifier-pipeline-resnet template.
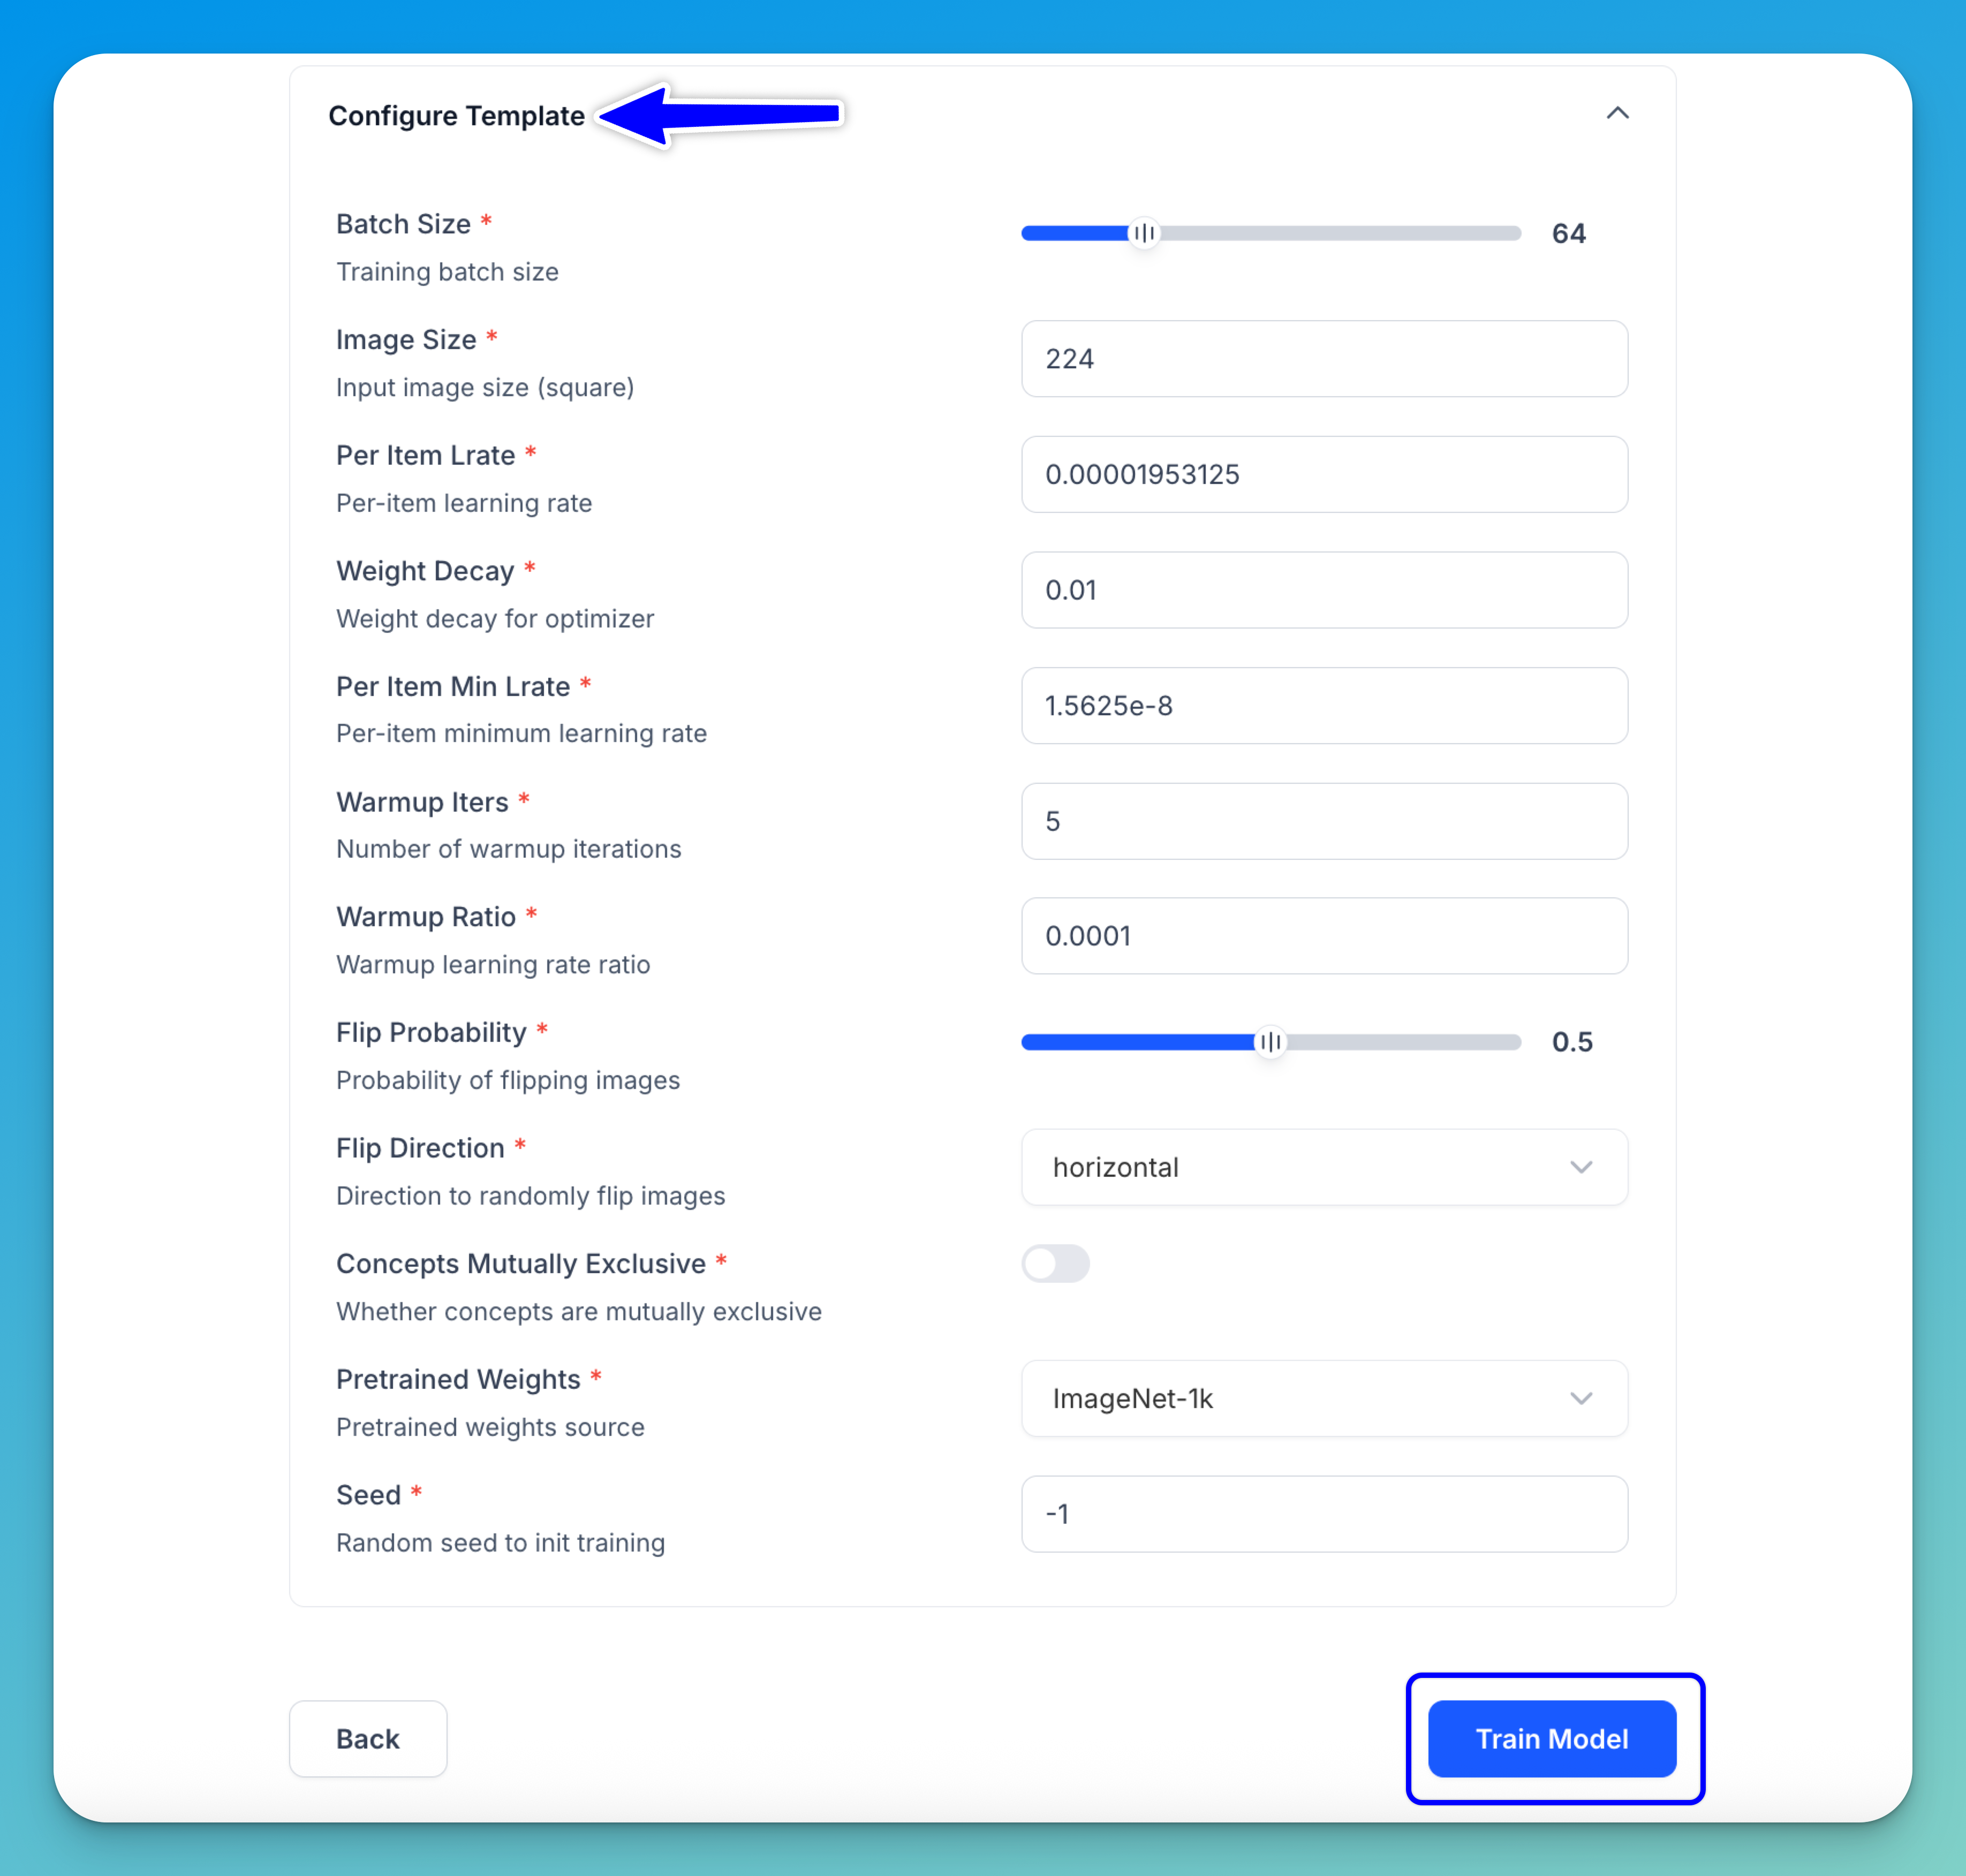
These are the settings you can configure:
- Batch Size — Number of samples processed per training step. Default:
64. - Image Size — Size (in pixels) to which input images are resized (square). Default:
224. - Per Item Lrate — Learning rate applied per training sample. Default:
0.00001953125. - Weight Decay — Regularization factor to prevent overfitting. Default:
0.01. - Per Item Min Lrate — Minimum learning rate per sample during training. Default:
1.5625e-8. - Warmup Iters — Number of initial iterations used to gradually increase the learning rate. Default:
5. - Warmup Ratio — Starting ratio of the learning rate during warmup. Default:
0.0001. - Flip Probability — Chance of randomly flipping images during training (data augmentation). Default:
0.5. - Flip Direction — Direction used when flipping images. Default:
horizontal. - Concepts Mutually Exclusive — Whether each input can belong to only one concept (mutually exclusive) or multiple concepts at the same time. Default:
disabled. - Pretrained Weights — Source of initial model weights for transfer learning. Default:
ImageNet-1k. - Seed — Random seed used to initialize training (set
-1for random behavior). Default:-1.
Step 7: Train the Model
After configuring the training settings, click the Train Model button to start training your model using the selected pipeline.
You’ll be redirected to the Pipeline Version Runs page, where you can monitor the training job in real time and track how the pipeline executes.
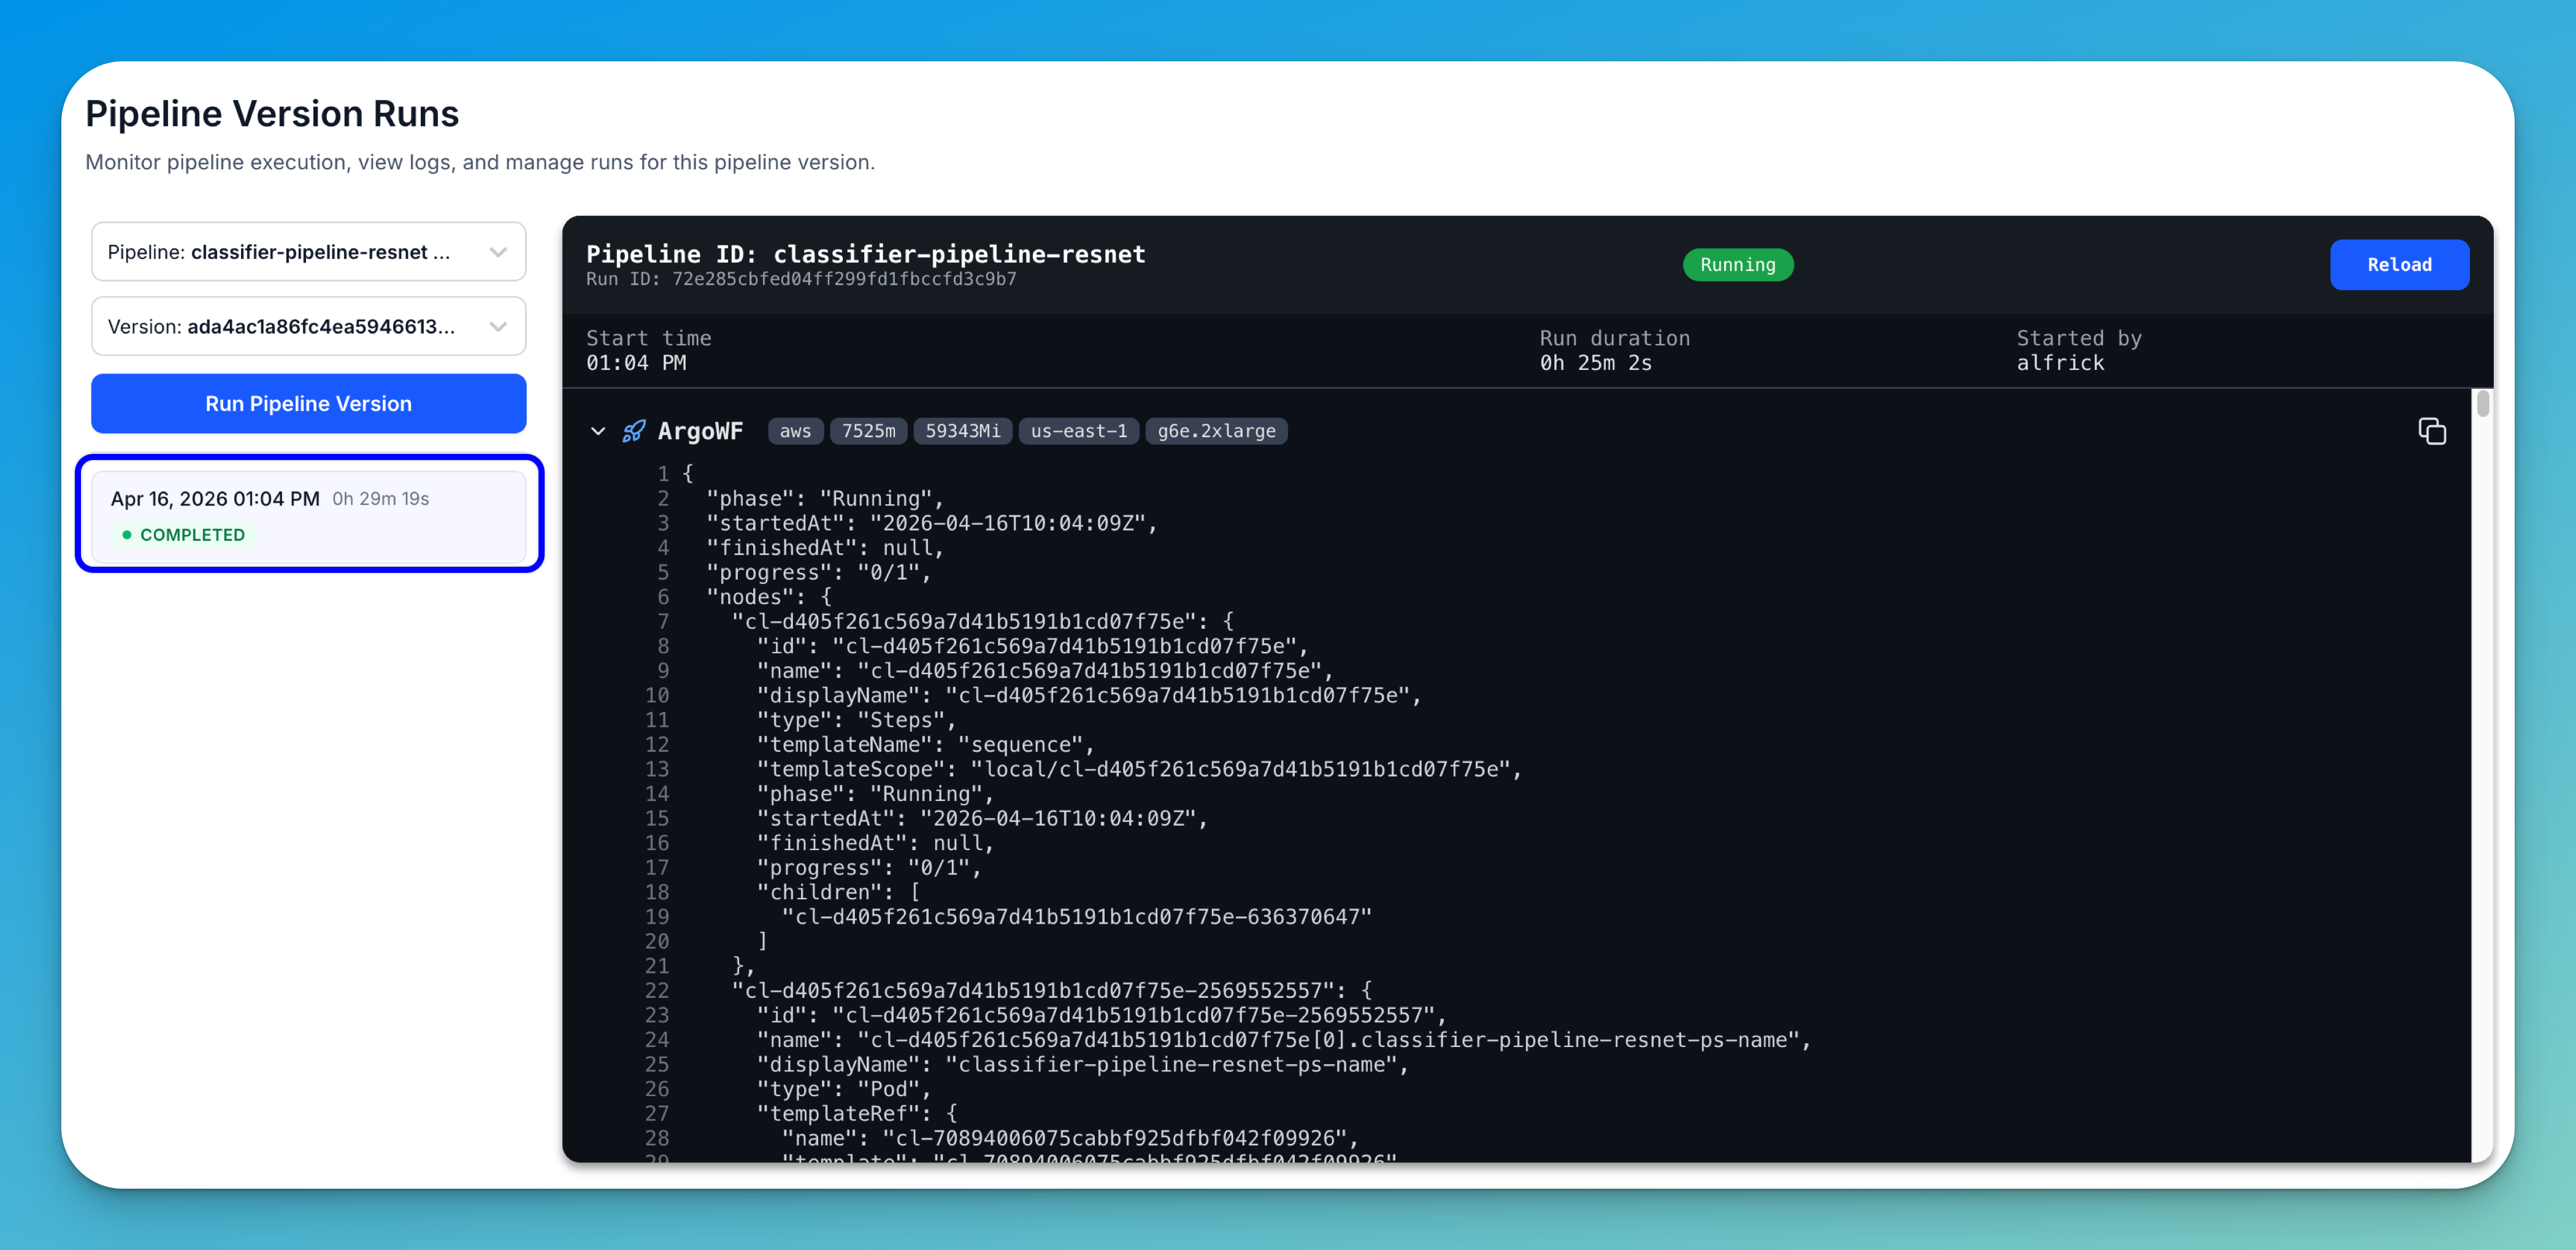
On this page, you can:
- Monitor run status — Track the current state of the pipeline:
RUNNING: The training job is in progress. While the job is running, you can pause or stop it.COMPLETED: The training finished successfullyFAILED: The training did not complete successfully (check logs for details)
- View run details — See key information such as the start time and total run duration.
- Inspect infrastructure — View where the job is running, including the cloud provider, region, compute instance type, and allocated resources.
- Follow pipeline execution — The training runs as an Argo Workflow, which breaks the process into steps. You can track the step-by-step execution of the pipeline in real time.
- Explore logs and nodes — The logs panel displays detailed, JSON-like output, including a list of nodes (pipeline steps such as data loading, training, and evaluation). Each node includes metadata like its ID, type (e.g.,
Steps,Pod), and current status. - Reload logs — Click the Reload button to refresh and view the latest logs.
- Run a new job — Click Run Pipeline Version to launch another training run. You’ll be prompted to select a cluster and nodepool before starting.
Step 8: Use the Model
Once your model has been trained successfully, you can start using it for predictions.
To access it, select the Models option from the collapsible left sidebar. This opens the models listing page.
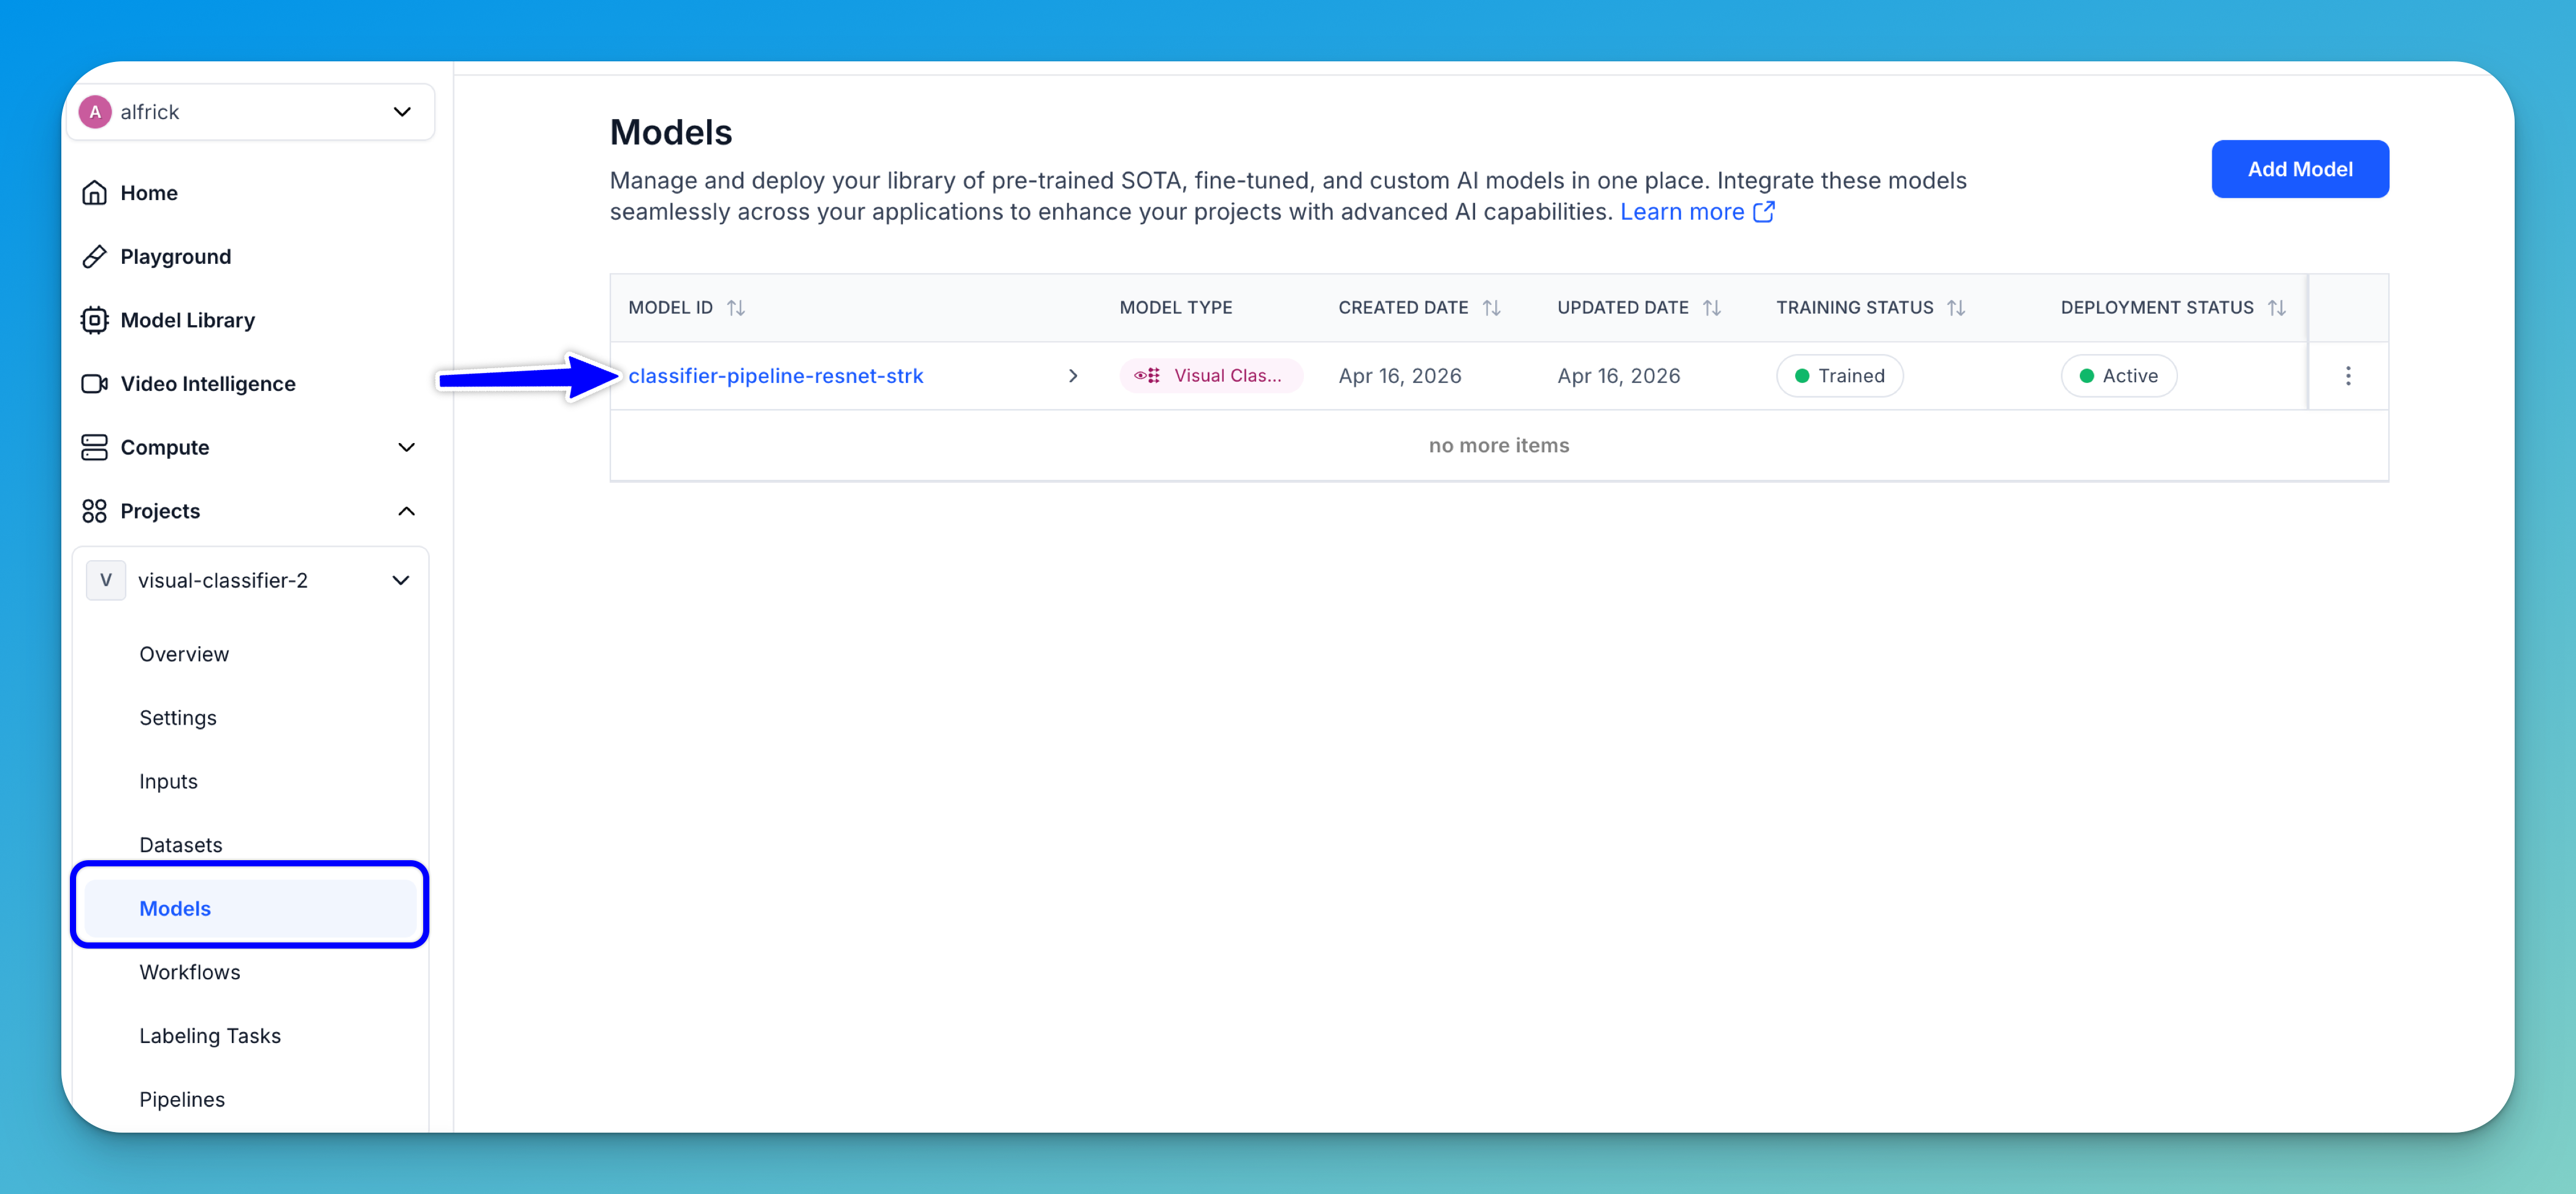
Click the listed model to open its individual page.
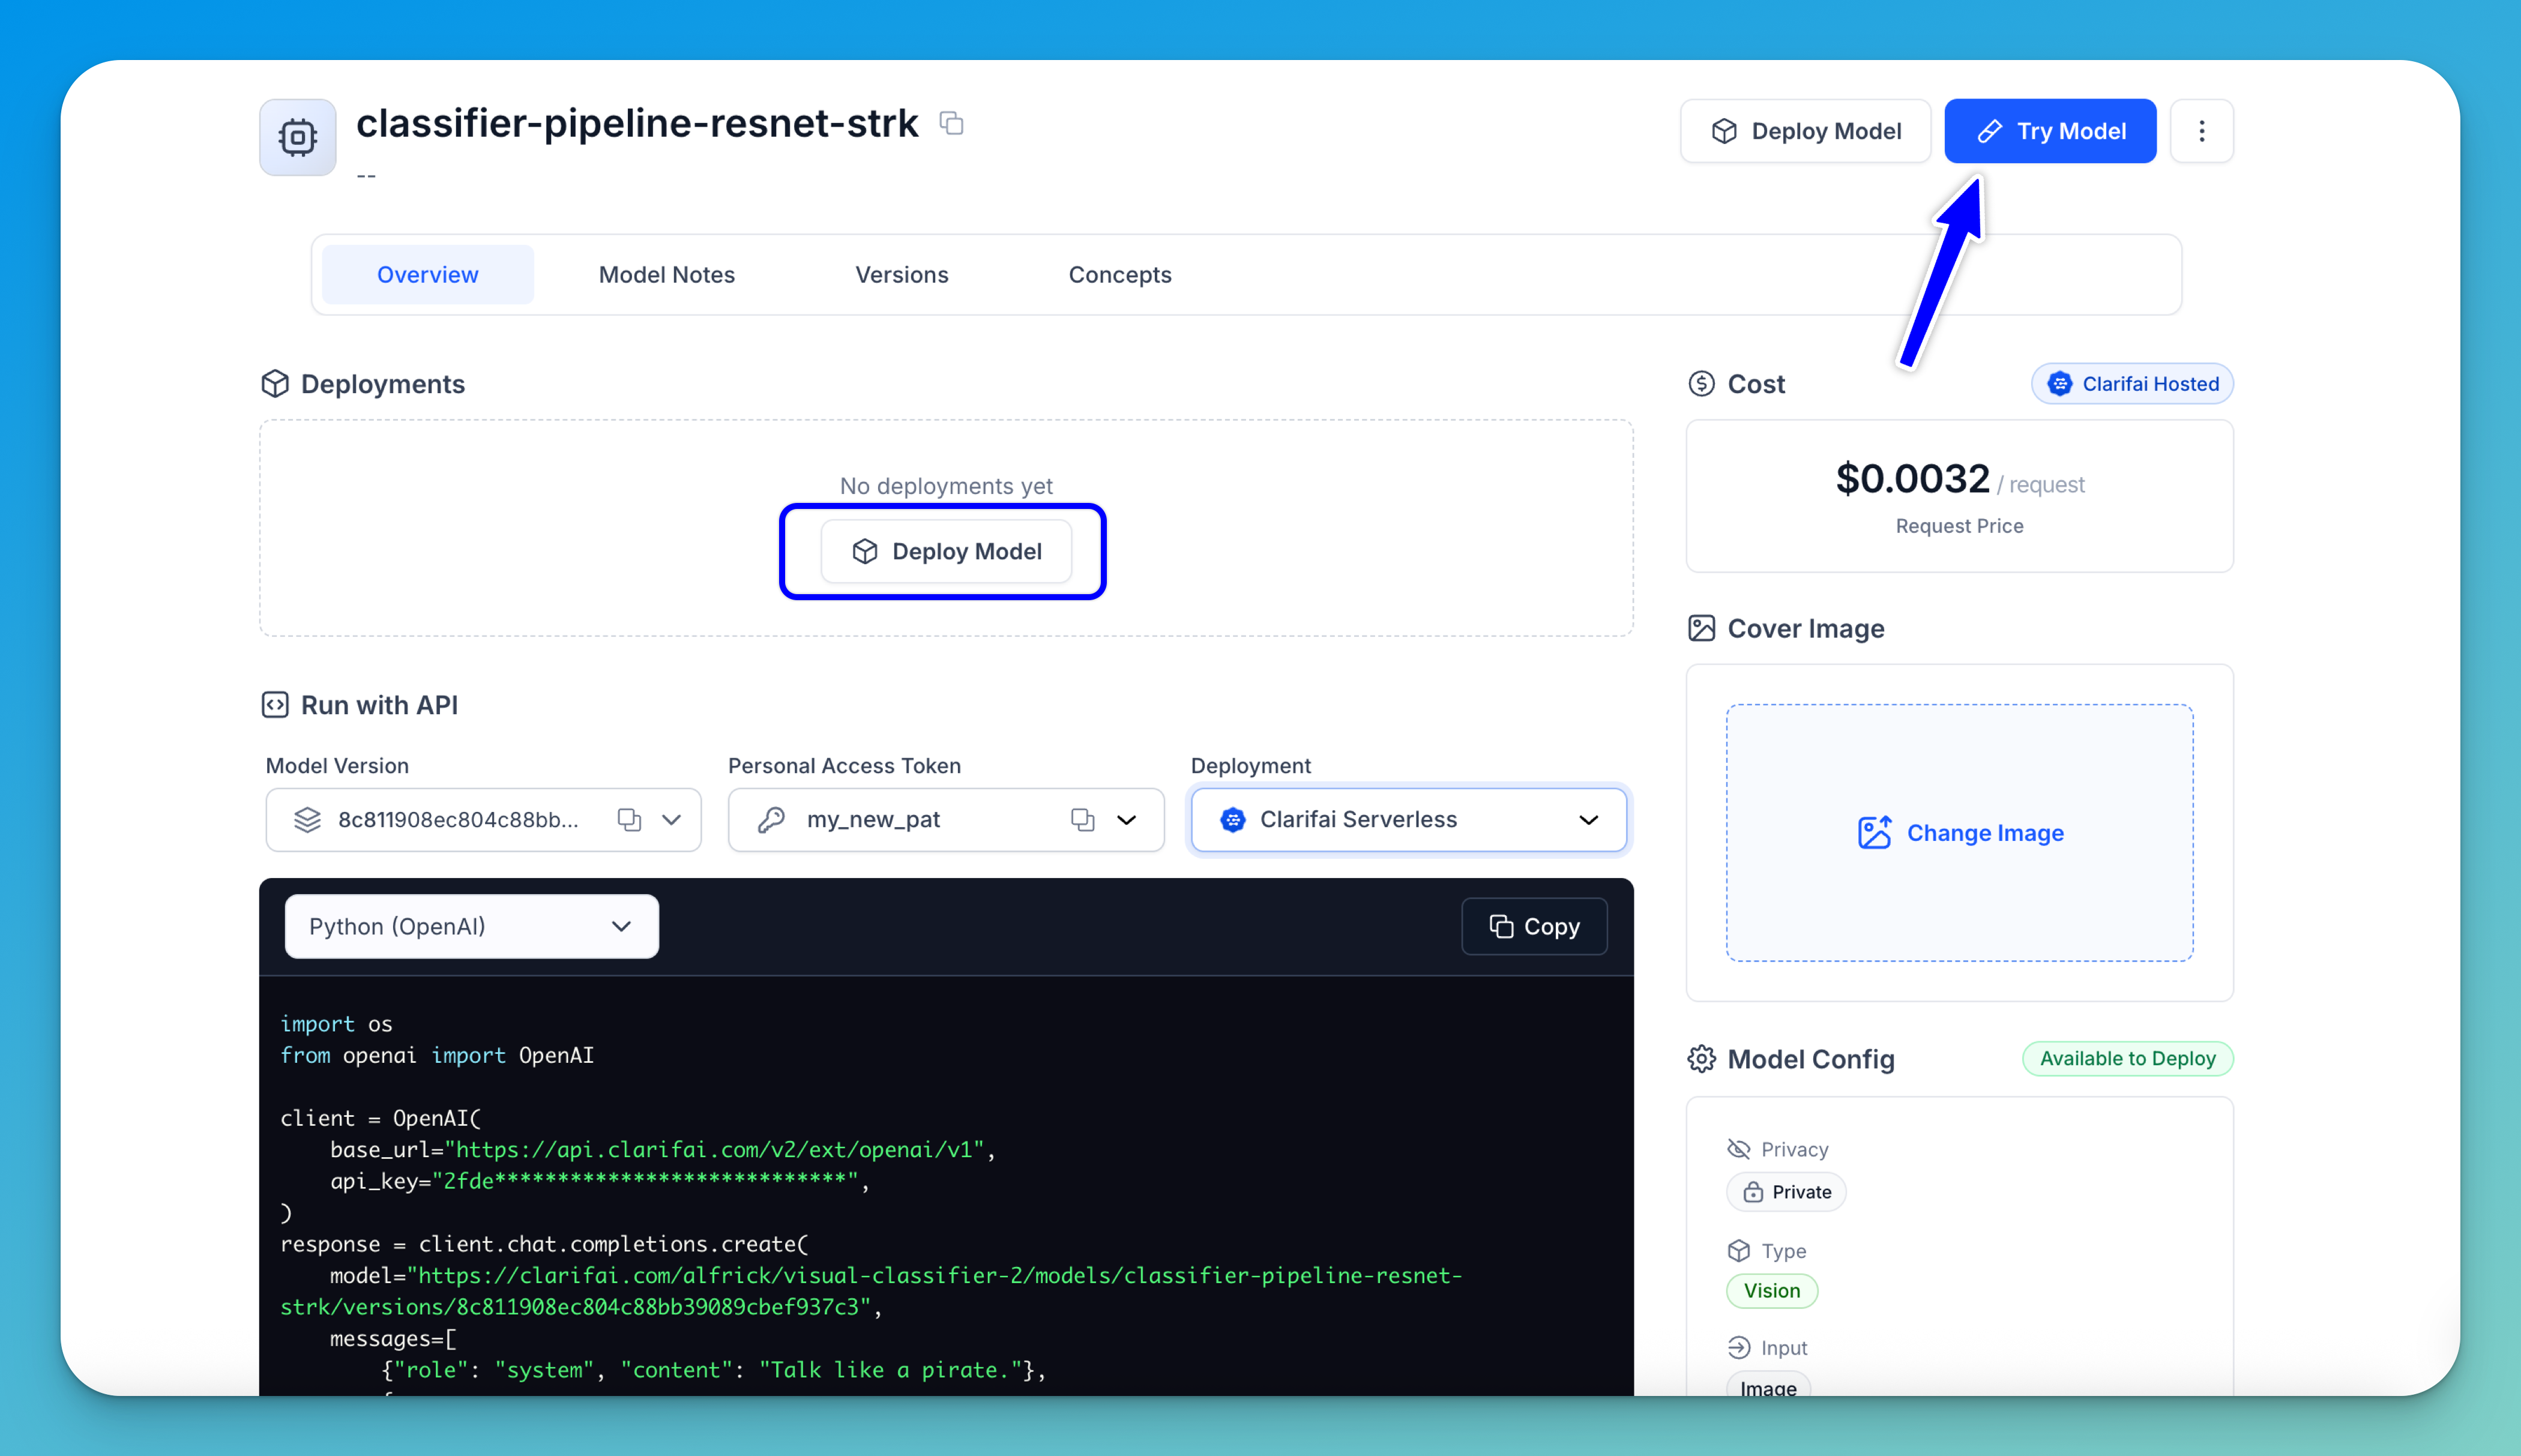
Next, click the Deploy Model button to create a deployment. This sets up the compute resources needed to run inference.
After deployment, click the Try Model button in the upper-right corner to open the Playground, where you can submit inputs and get predictions.
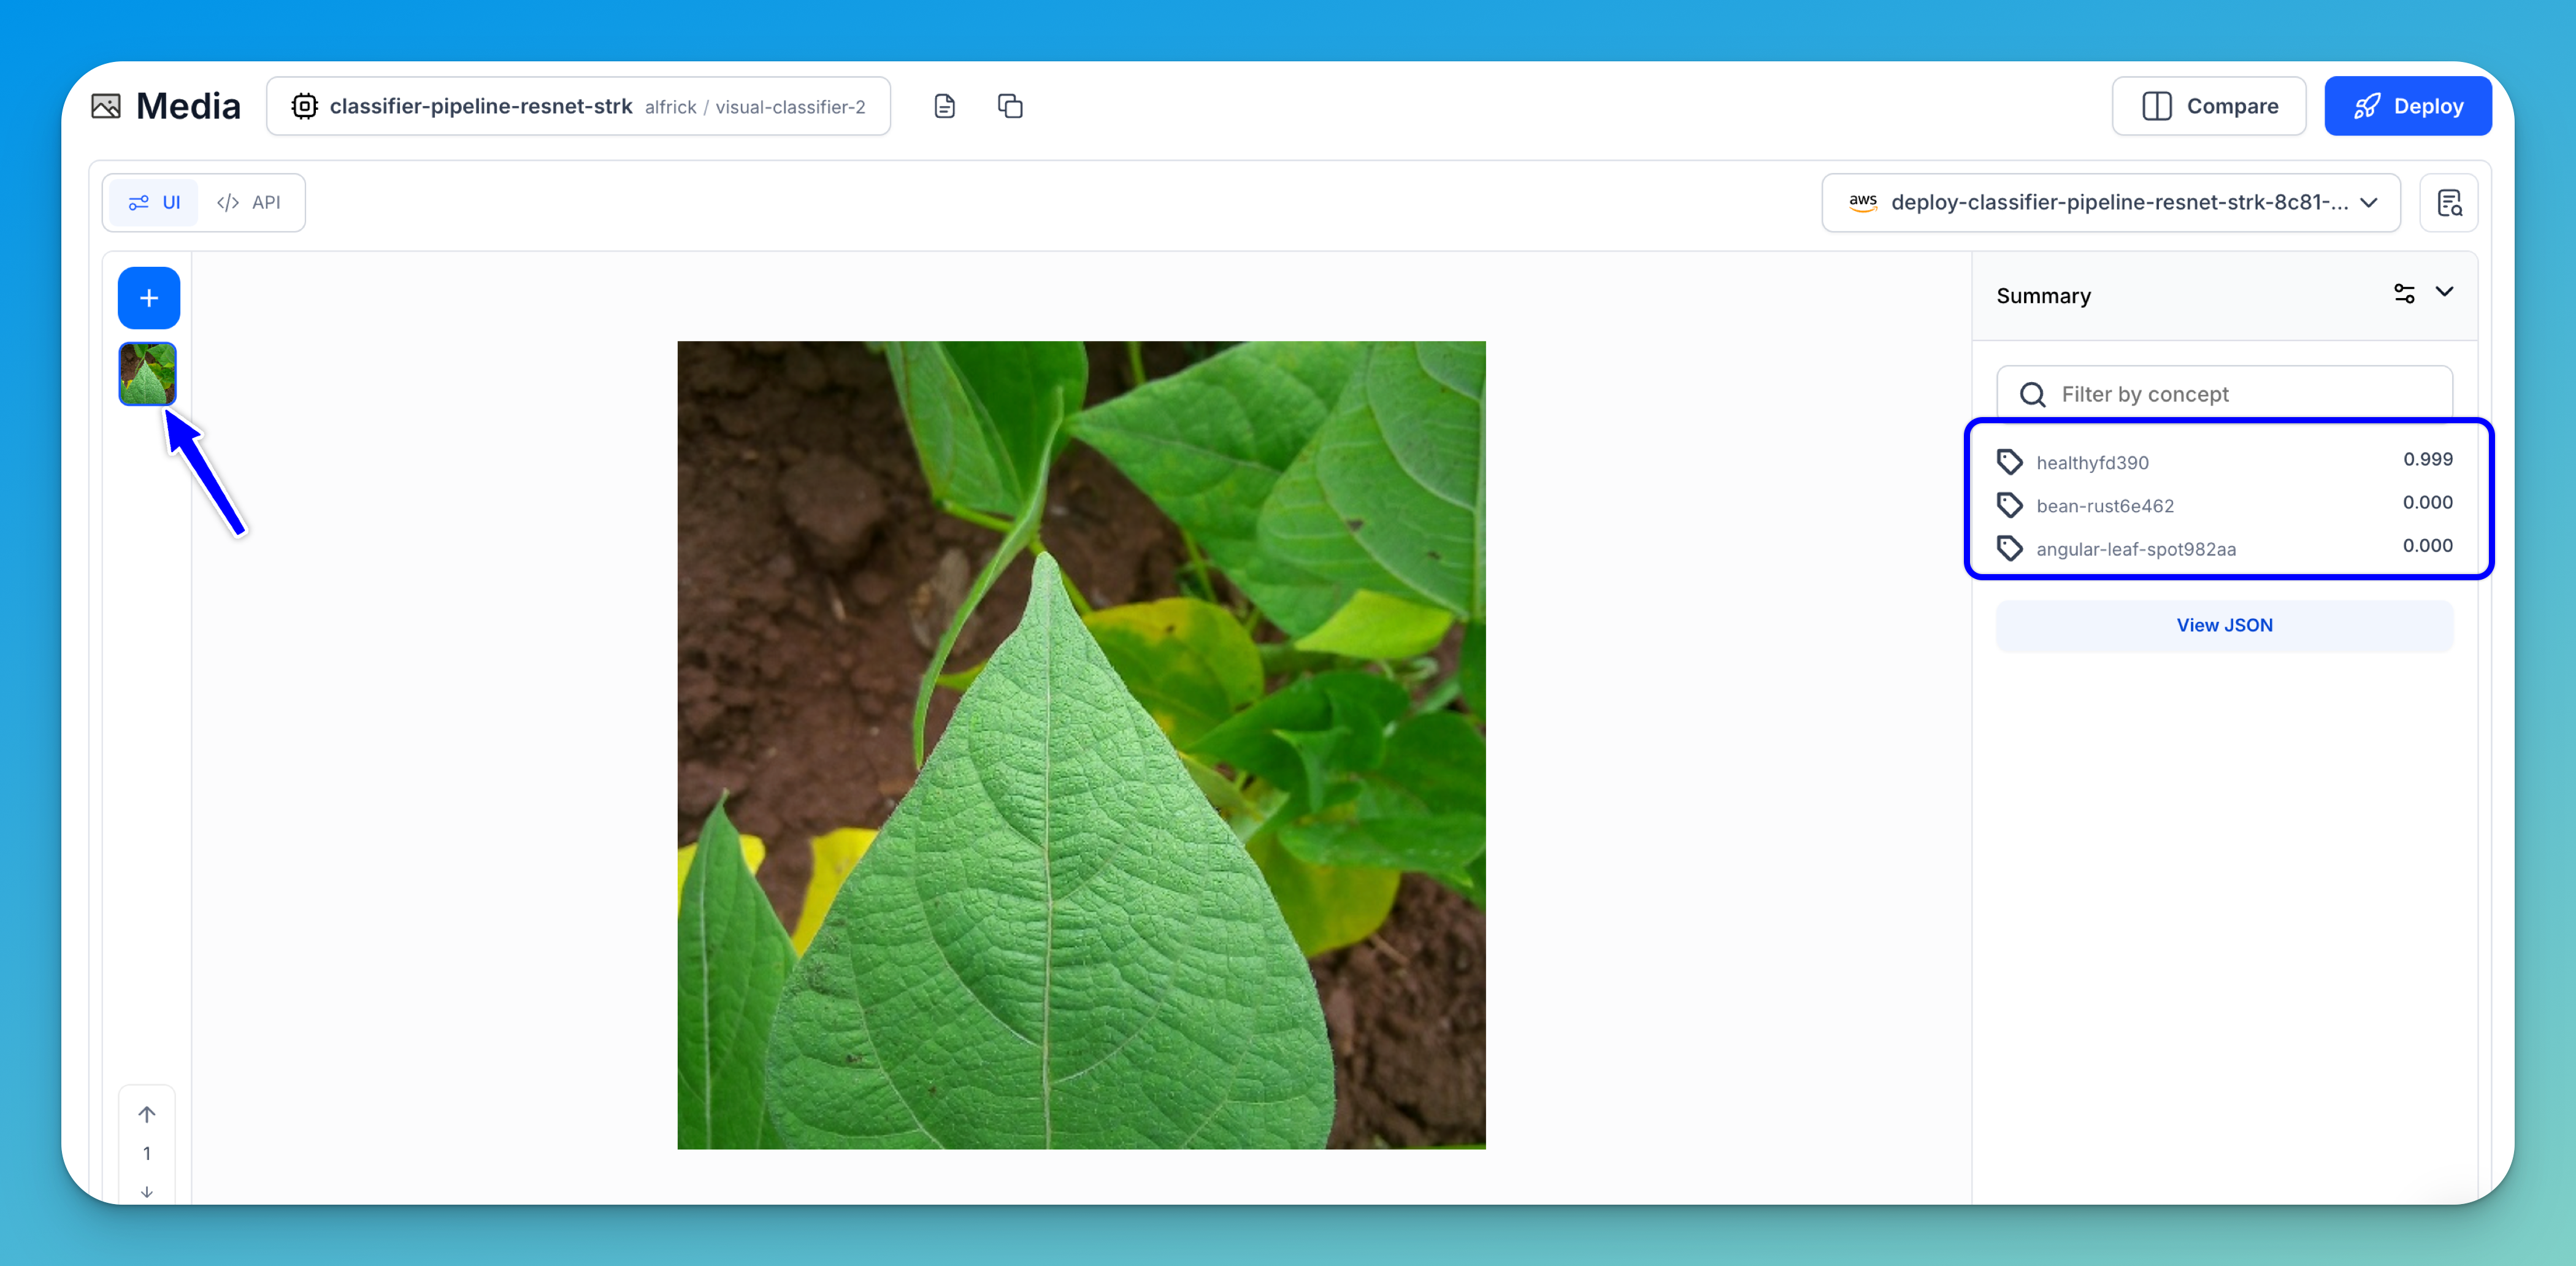
For this tutorial, uploading an image of a bean leaf will return classifications such as Angular Leaf Spot, Bean Rust, or Healthy, along with their prediction probabilities.
That’s it!